

Time to Complete Module: 1 hour
Last updated: March 11, 2025
IN THIS MODULE
8.1 Wix Studio’s Site Checker
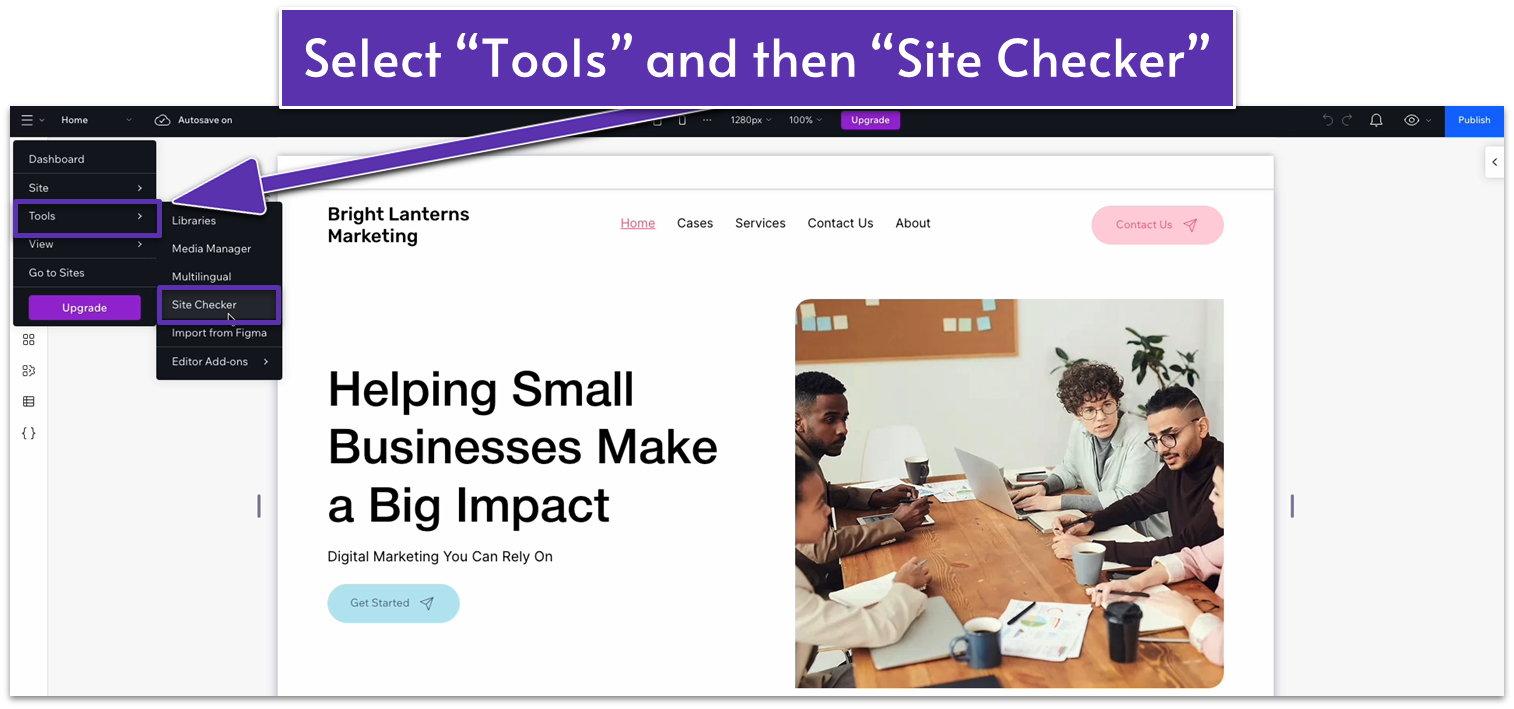
Let’s start by using Wix’s built-in site checker tool to scan our site for any possible performance, security, and SEO issues. Step 1: Open the site checker tool- Head over to the menu on the upper-left corner of your dashboard and go to “Tools.”
- Click on “Site Checker.”
 ! Site checker removal:
Update: Wix Studio no longer offers the “Site Checker” tool. The tool essentially performed an automatic scan for H1 tags, meta descriptions, and broken links throughout your site. You’ll have to check each page manually to perform the same function.
Step 2: Scan your site for issues
The site checker should automatically scan your website for potential issues, but you can always press the “Check Again” button to re-scan the page for the latest notifications.
 The checker isn’t showing any potential issues with this site, which means there isn’t much more to do on this step. However, if the checker for your site does show a list of potential issues, it’s just a matter of going through the list and solving them one by one.

8.2 Functional Testing
After we’re done with the Wix site checker, we should also perform some functional testing, i.e., ensuring that all forms, buttons, navigation, and other functions work as intended. Below, we’ll go over some of the steps you should follow for this, and we’ll do it directly from the editor. However, if you’ve already connected your site to a custom URL, I recommend opening it from an incognito tab and testing all the functionalities there. That way, you can thoroughly test the experience from a visitor’s point of view.Form Testing
Let’s start by making sure that all the forms on our site work as intended and deliver the information to the adequate channels. To do this, we should start by configuring the form submission settings. Step 1: Go to your dashboard On the upper-left corner menu, select “Dashboard.” Step 2: From your dashboard, open the “Forms and submissions” menu Type in “forms” on the search bar in the upper-right corner. Then, select “forms and submissions” Step 3: Open “Form settings” from the contact page form
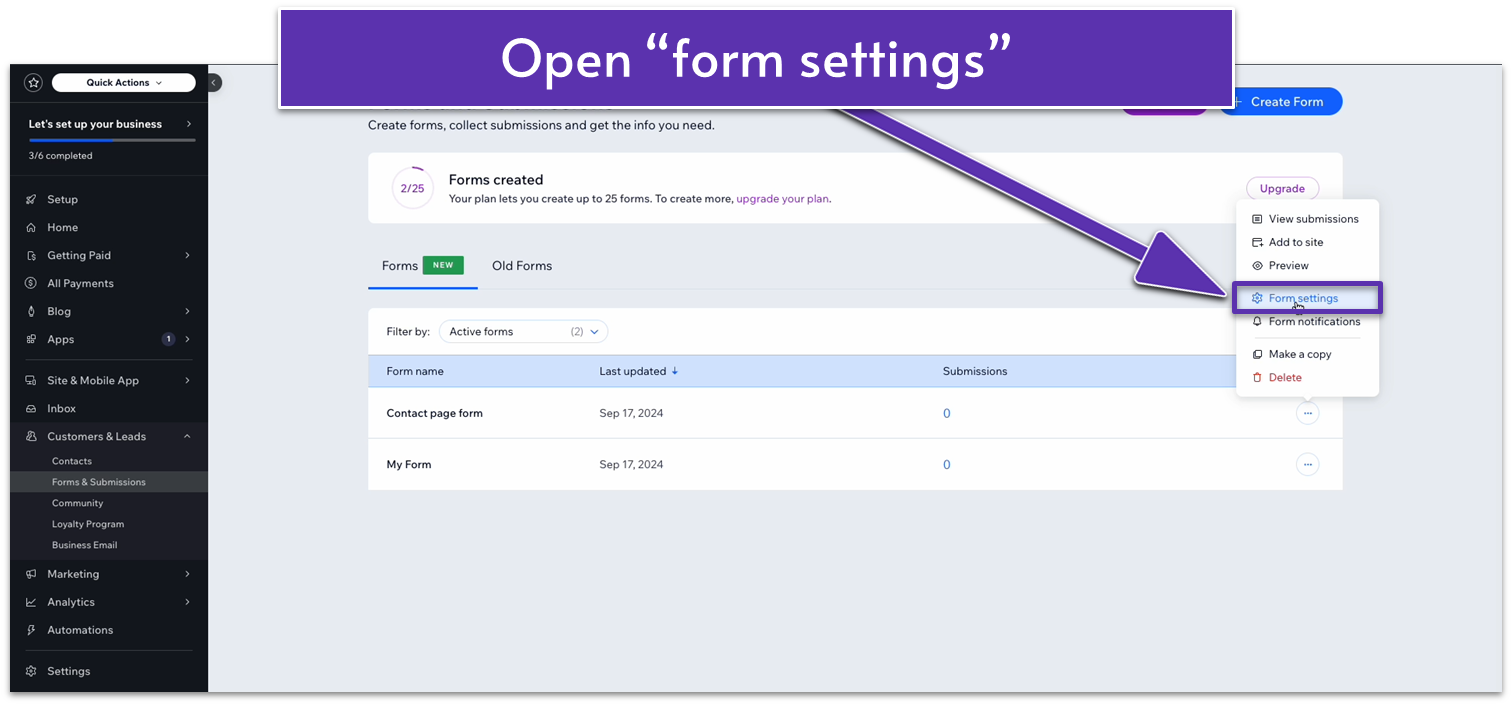
- On the form dashboard, head over to the “Settings” menu.
- Scroll down to “notifications and automations” and click the “Edit” button.
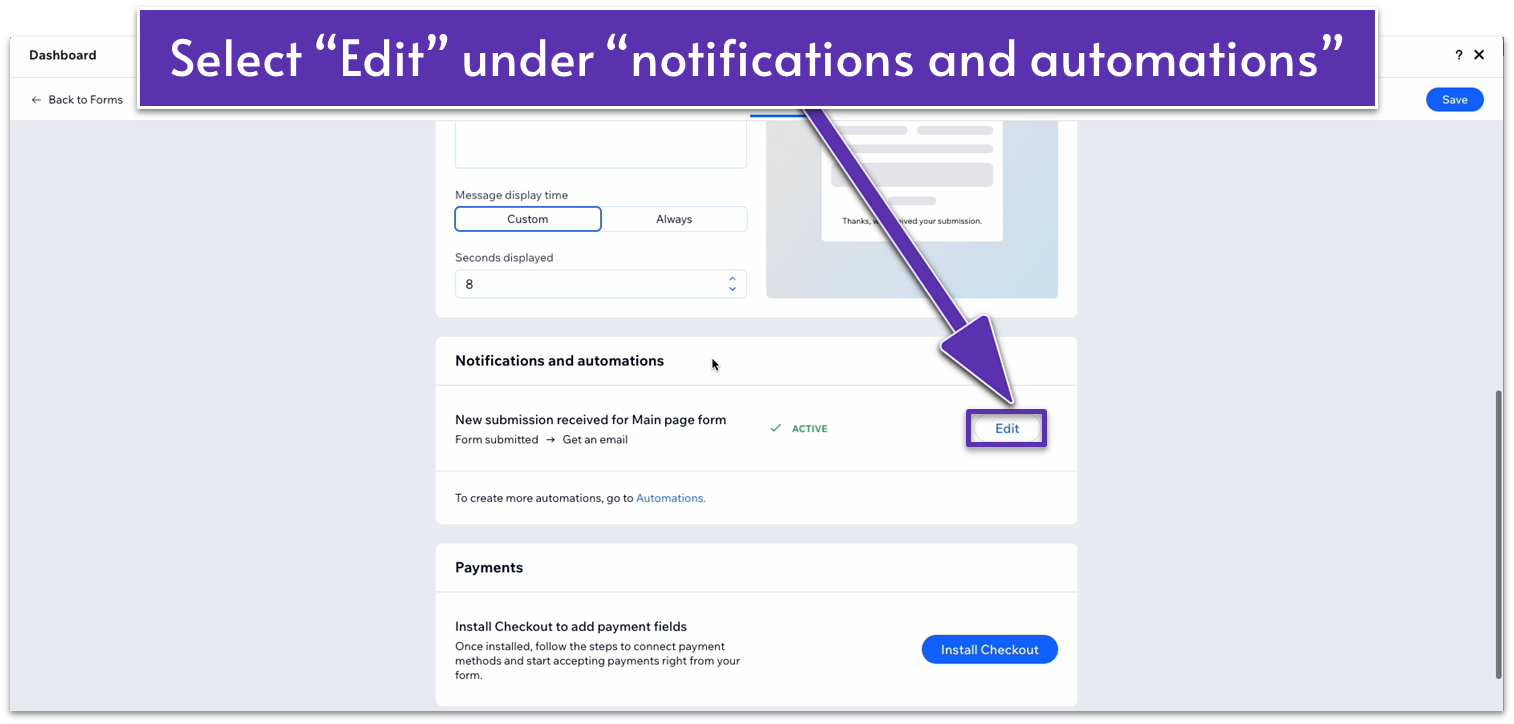 You can edit a series of automations on how your forms behave on submission. Feel free to tinker around here if you want to add more in-depth customization for your forms. At the moment, we’ll just change the basic behavior of the form so the information goes to a specified email address.
Step 4: Edit the behavior of submitted forms
You can edit a series of automations on how your forms behave on submission. Feel free to tinker around here if you want to add more in-depth customization for your forms. At the moment, we’ll just change the basic behavior of the form so the information goes to a specified email address.
Step 4: Edit the behavior of submitted forms- On the automations dashboard, click on the first step to edit its behavior.
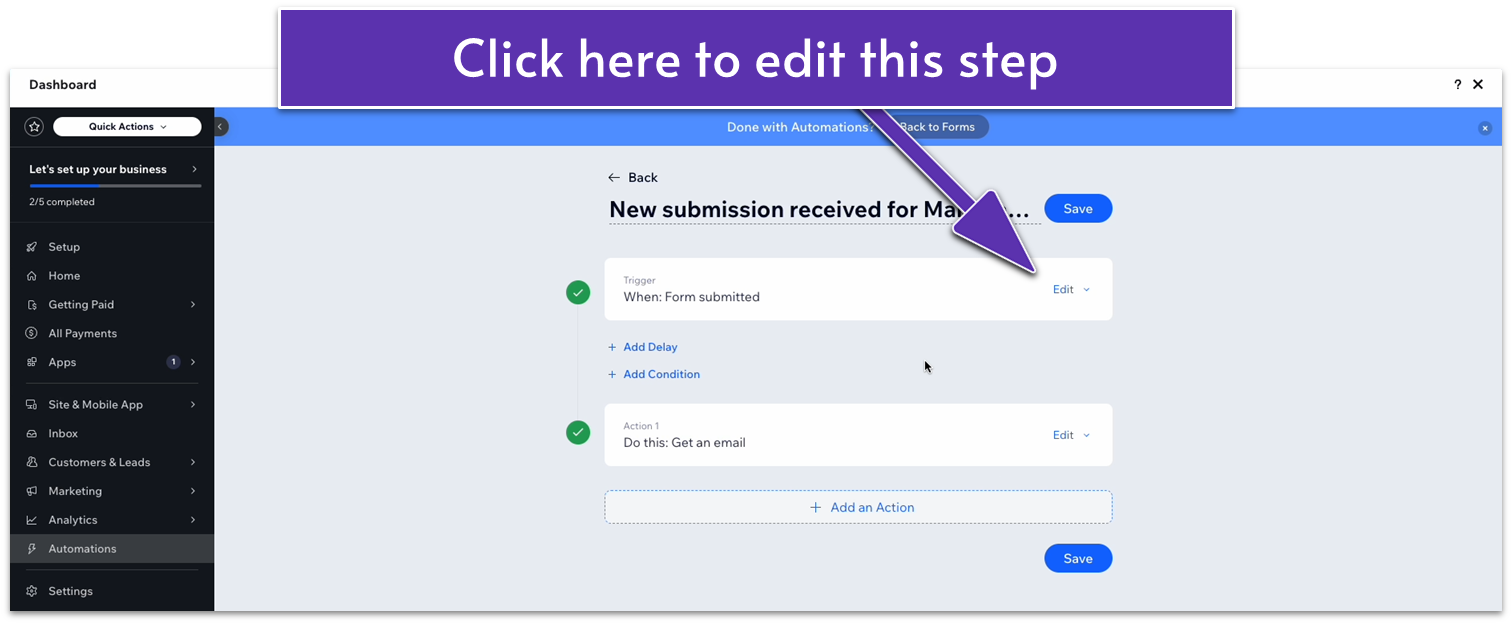 ! Form automations update:
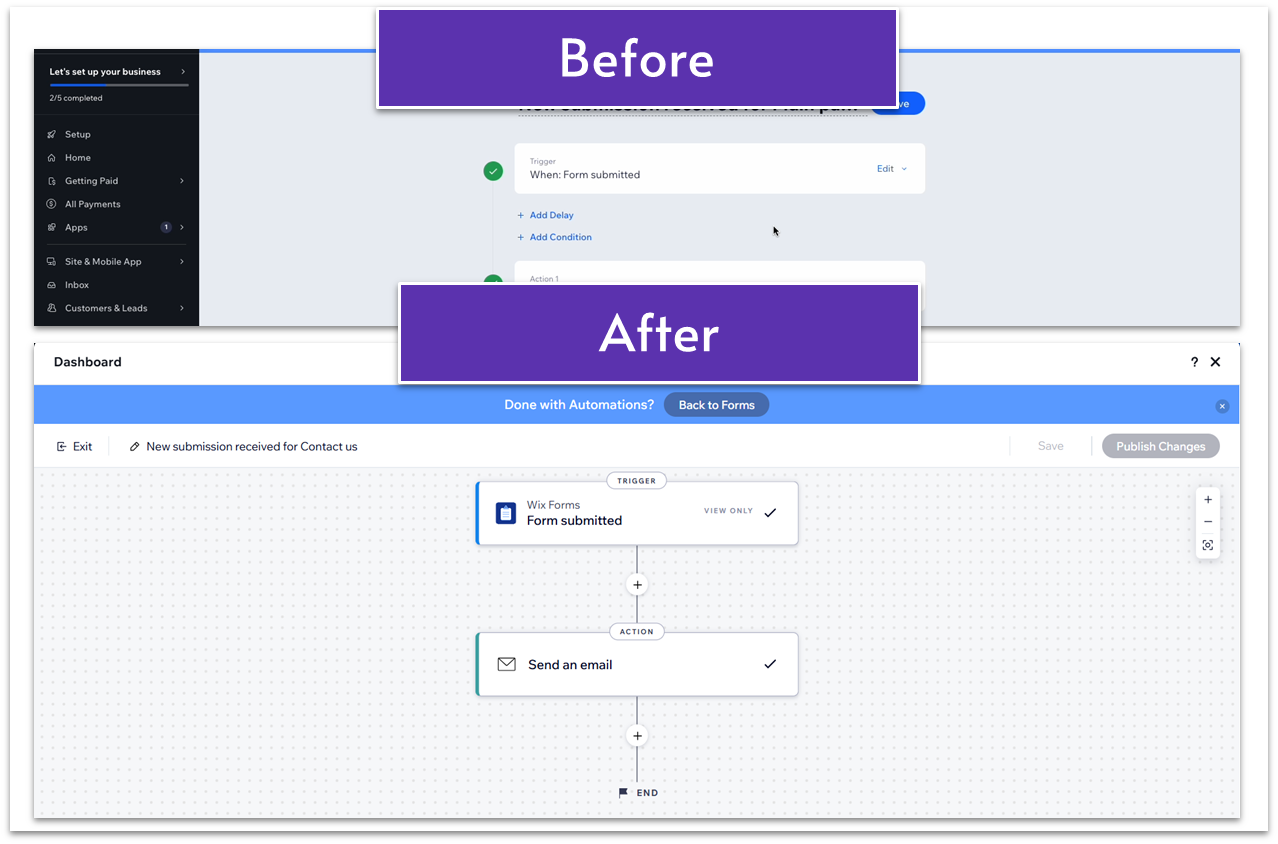
Update: Wix Studio has updated the form automations menu. You can still get the same results, but each step now appears in an automation diagram. To add new steps, simply click on the plus icon to add a new element to the flowchart. The automations will trigger sequentially from top to bottom.
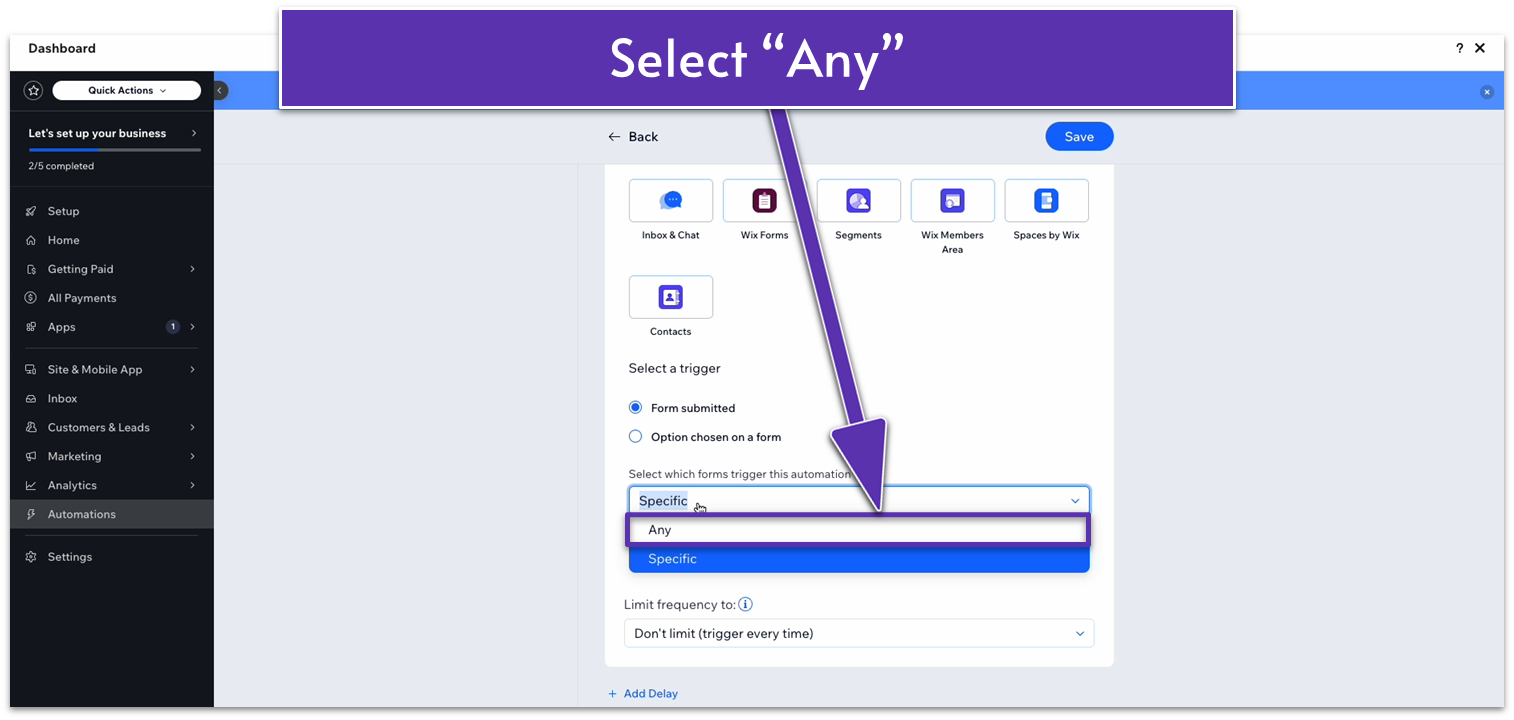
- Scroll down to the “Select which forms trigger this automation” drop-down menu and select “Any.”
- Now, click on the last step to edit the action behavior.
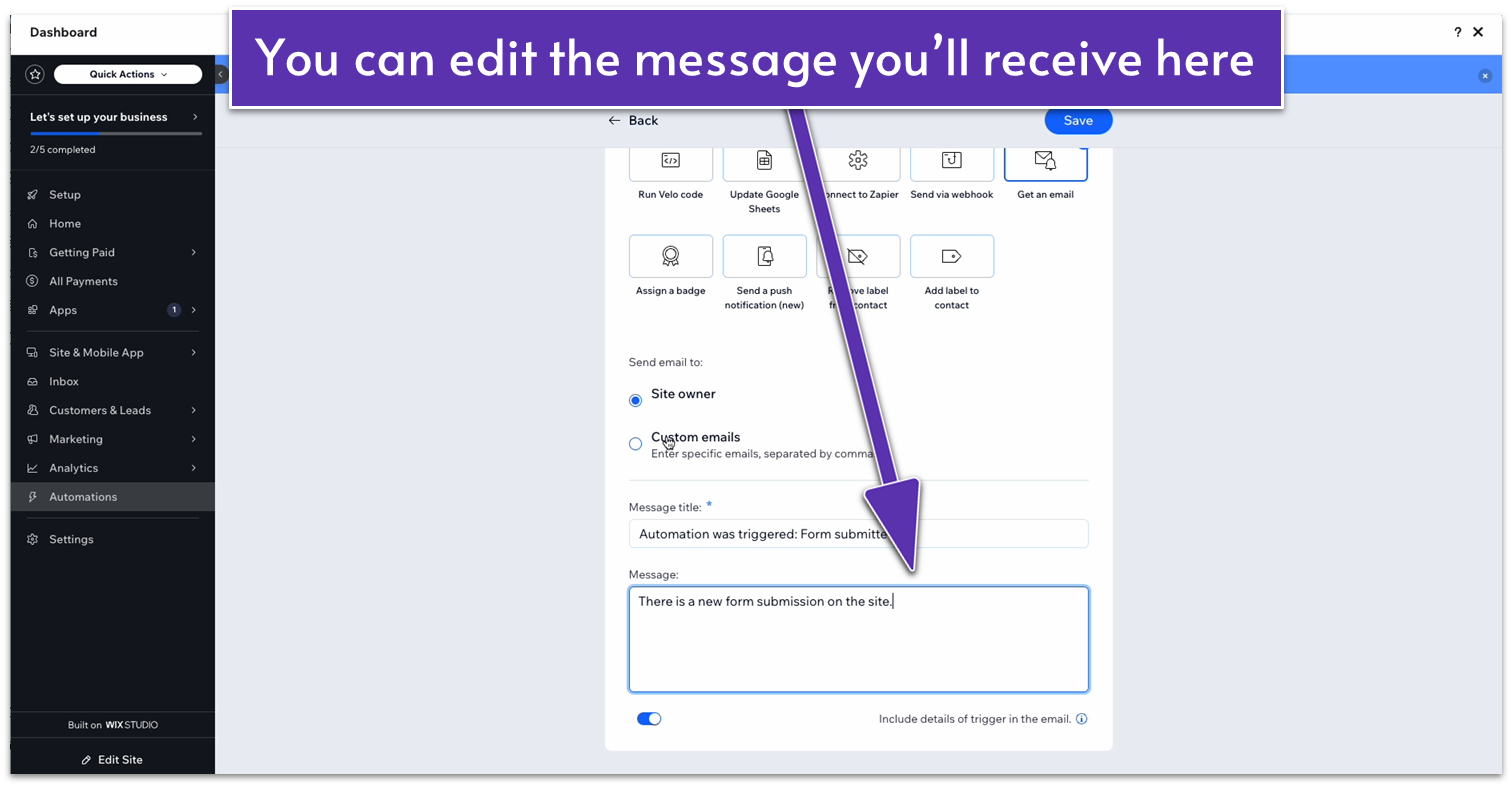
- Select “Get an email” for how you want to respond to the trigger (remember that you can later change this if it isn’t the most convenient option for you).
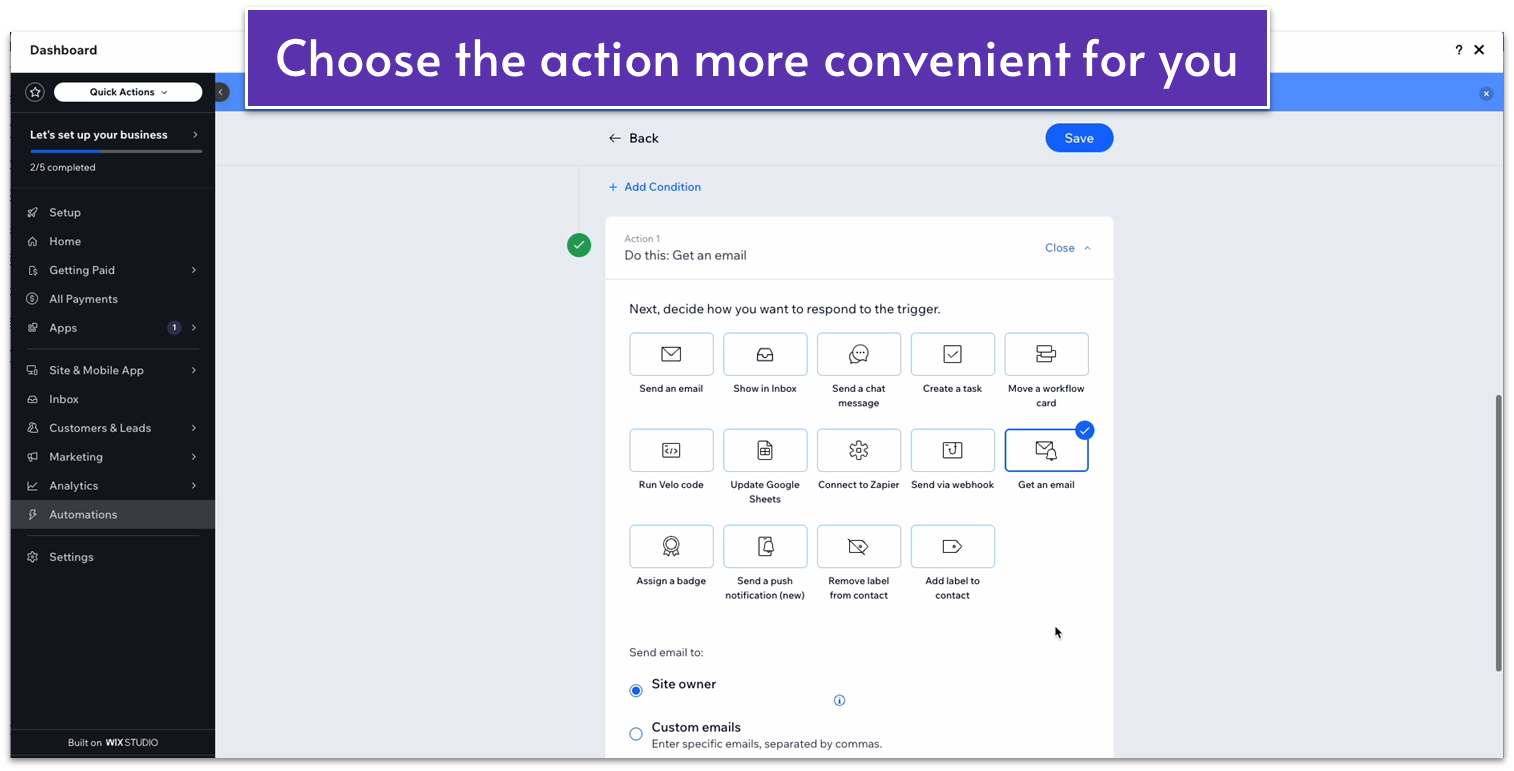
- Edit the message title and message of the email.
- If you want to receive the answers to a different email address than the one associated with your Wix account, select “Custom emails” under “Send and email to:” and add your email address or addresses (if many, separate them using commas).
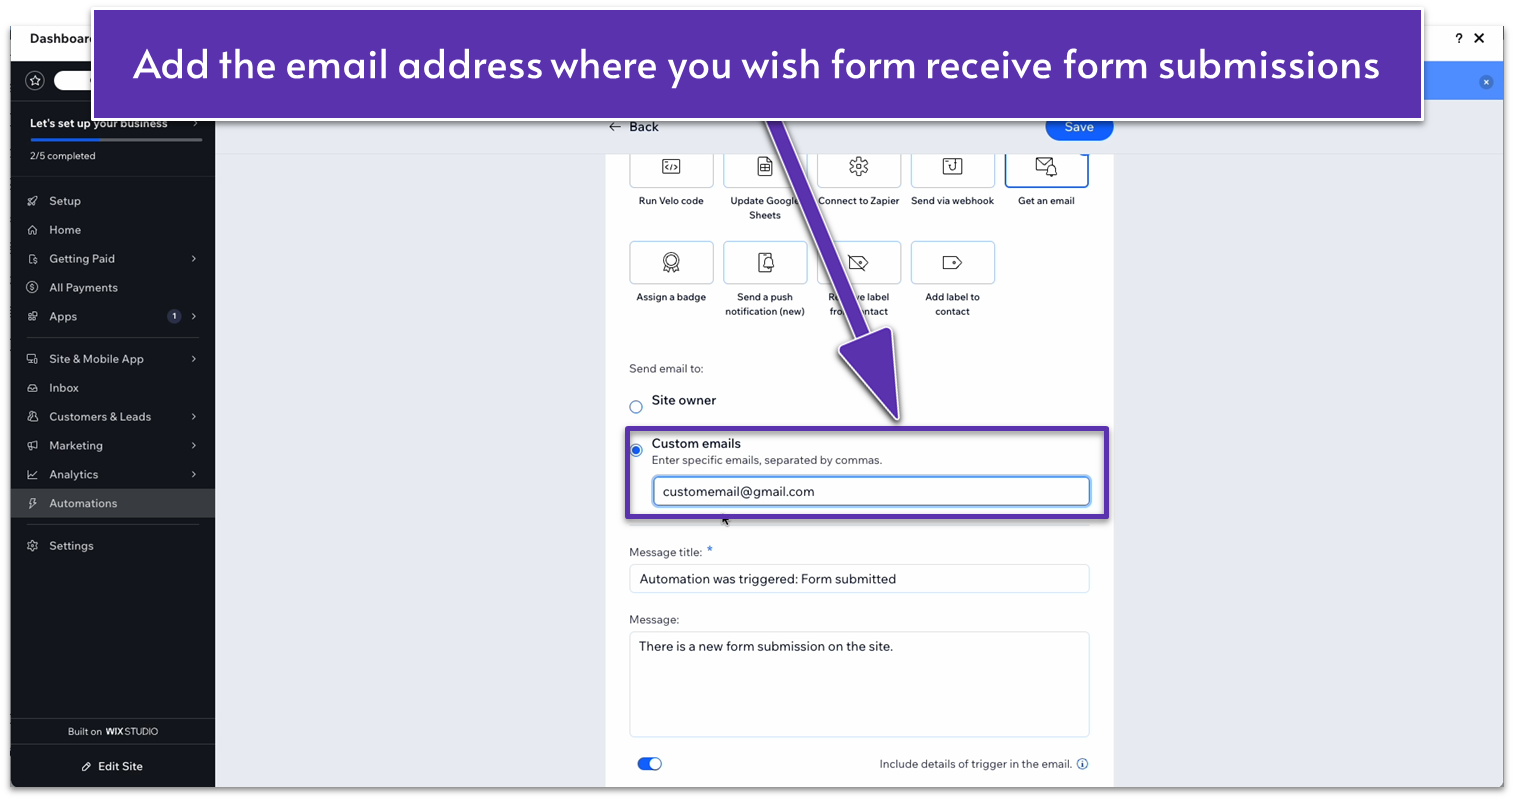
- Remember to save your changes to exit and re-publish the site if needed.
Navigation Testing
We want to make sure that your site’s navigation is excellent. Start by making a list of all the different links, buttons, and any other form of navigation throughout your site, as well as where they should lead to. Once your list is ready, open your incognito tab and test each one to ensure they work as intended. If you notice that all the links work but there’s something you could do to improve navigation on this step, write it down and implement it after you’re done checking everything else.Button and CTA Verification
Now, let’s test all buttons and call-to-actions. Again, start by making a list of all buttons and other interactable elements on your site, then, using the incognito window, make sure they all work as they should.Media Functionality
Finally, take a closer look at your site’s images, video, and other visual elements. Ensure they are all working as intended. The images should look clear, sharp, and properly fit in with the rest of your site.8.3 Cross-Browser Testing
A lot of websites behave differently across various browsers and devices. To ensure your website runs smoothly as often as possible, you should test it using several browsers. It is essential to mention that the most popular web browsers are Chromium-based (which means they are built on the same foundations as Google Chrome), so they’ll behave similarly. To be as exhaustive as possible, we should incorporate the most popular non-Chromium browsers out there. So, make sure to test your website at least on the following browsers:- Google Chrome. The most popular browser out there, most of your desktop users will be using this one.
- Safari. The default browser for Apple devices (not Chromium-based).
- Firefox. The most popular non-Chromium browser out there.
- Opera
- Vivaldi
- Microsoft Edge
8.4 SEO Testing
Since we performed our SEO testing in the last module (the Wix SEO checklist), we’ll only take this step to double-check that we implemented the best SEO practices on our site. More specifically:- Meta Tags & Descriptions: Check that all your pages have the proper title tags, meta descriptions, and alt text for images.
- Keyword Usage: Ensure your target keywords are strategically placed in headers, content, meta descriptions, and URLs.
- Structured Data: Search for Google Rich Results Test and input your URL. You’re checking that your site’s structure is properly implemented so search engines can understand its content.
- SEO-Friendly URLs: Confirm that your URLs are short, readable, and contain relevant keywords.
8.5 Set up Marketing Analytics
Once your site is live and functioning, you want to be able to monitor its performance and the behavior of your users. Wix offers the option to connect with several marketing analytics tools that help you do that. Since we’re nearly ready to publish our site, we want to set up marketing analytics beforehand so we can get accurate information from the second we get started. Step 1: Head over to your Wix Studio Dashboard- If you’re in the editor, click on the upper-left corner menu and select “Dashboard.”
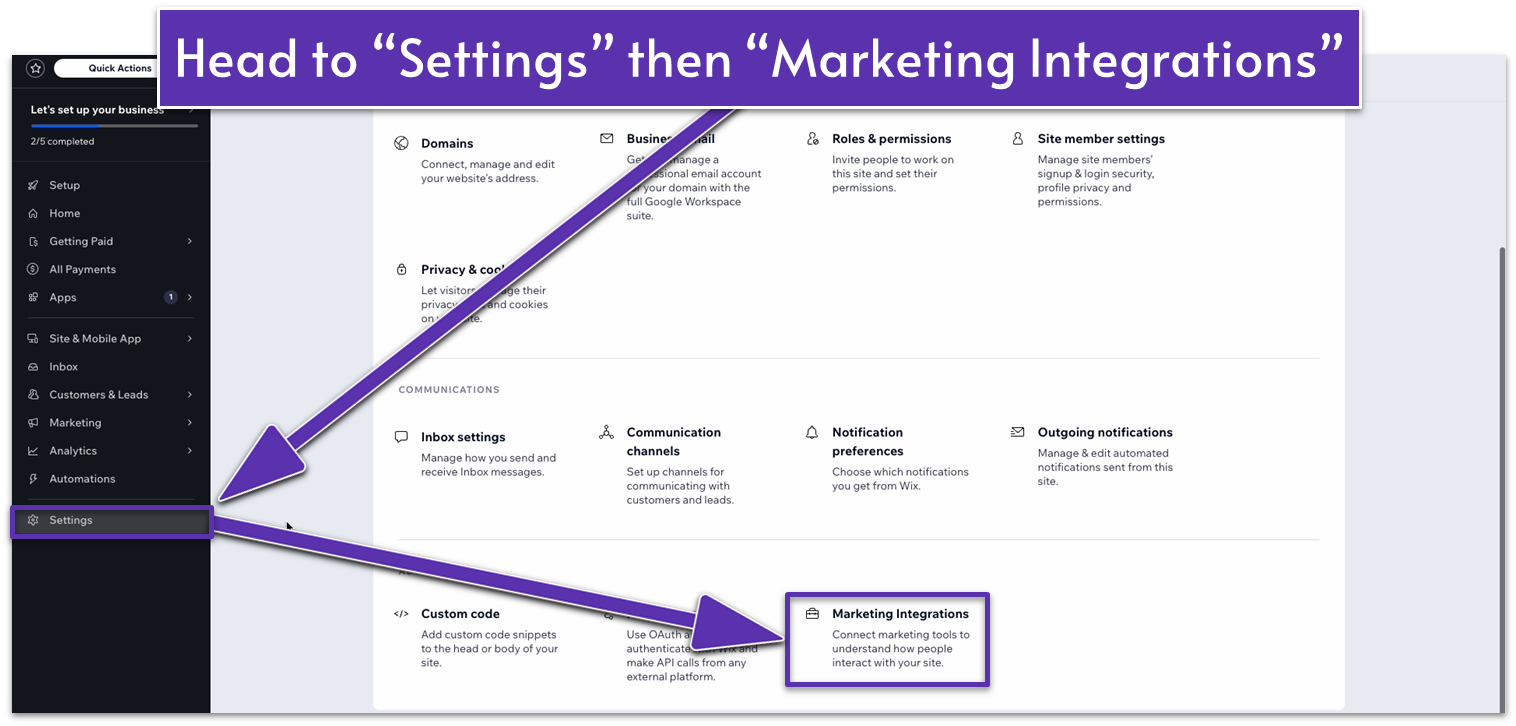
- From your dashboard, head over to the “Settings” menu.
 ! Settings menu update:
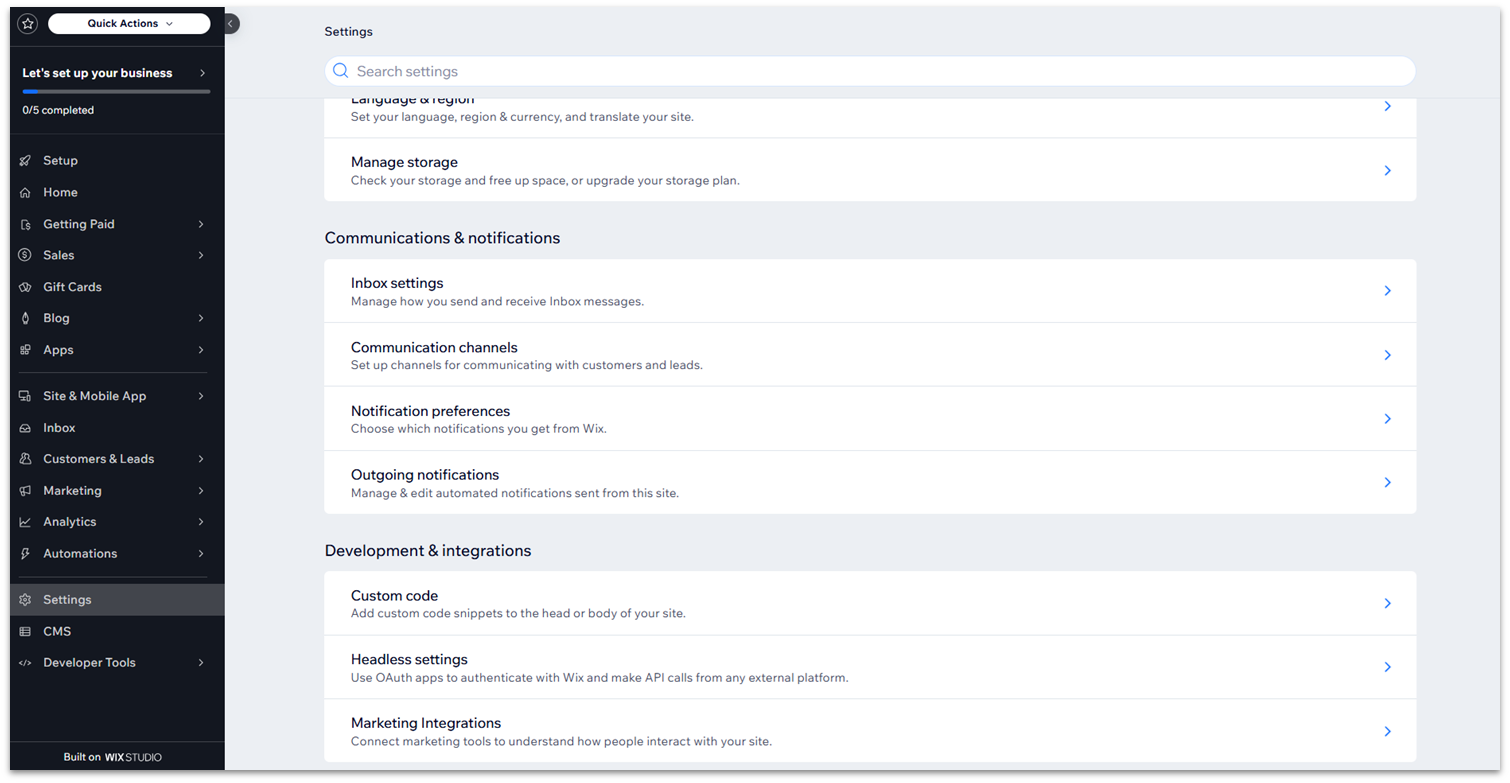
Update: Options in the settings menu no longer appear as a grid with icons, but as an ordered list. To find the Marketing integrations menu, for example, simply open the “settings” menu and scroll down to the bottom of the list.
- Scroll down and click on “Marketing Integrations.”
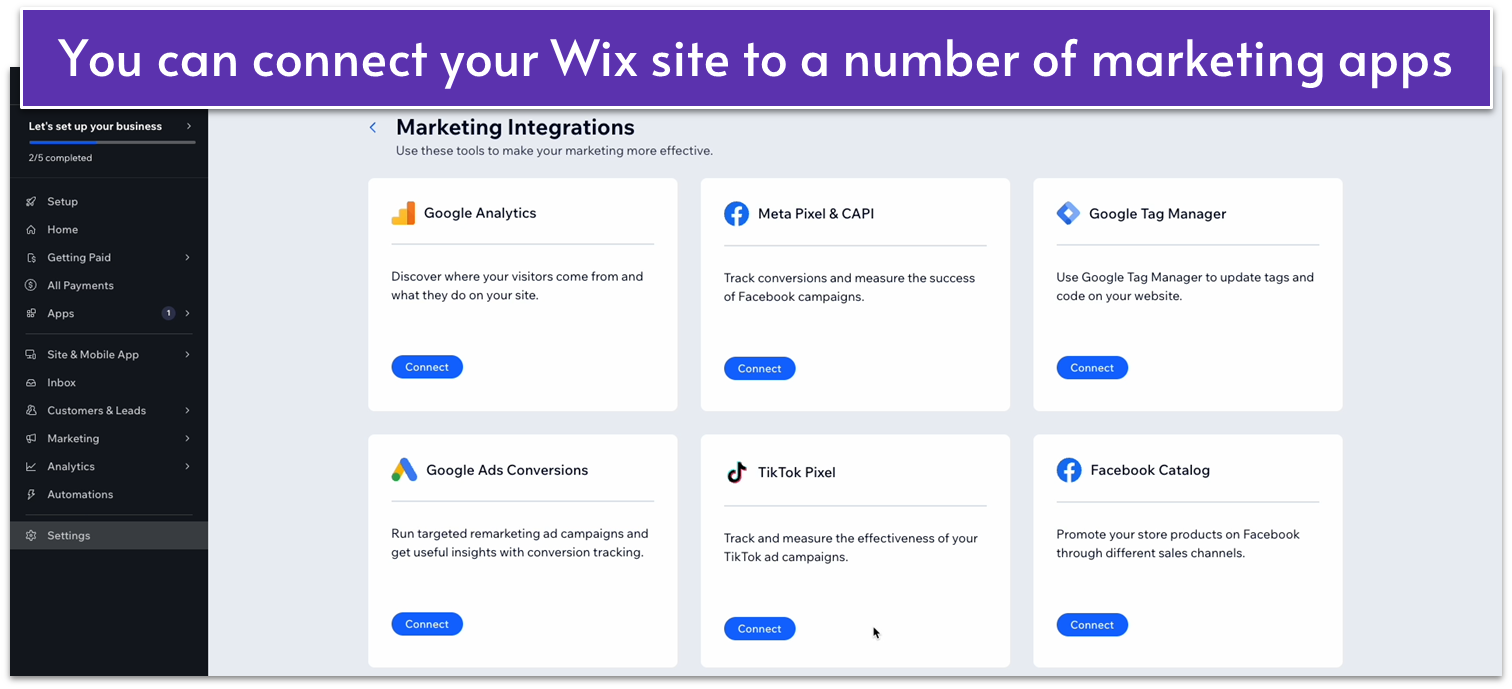 Step 3: Connect to your marketing integrations
You’ll have the option to connect to Google Analytics, Meta Pixel & CAPI, and more. You’ll have to be a user of these services in order to integrate them into your site.
Step 3: Connect to your marketing integrations
You’ll have the option to connect to Google Analytics, Meta Pixel & CAPI, and more. You’ll have to be a user of these services in order to integrate them into your site.
8.6 Refining Content and Design
We’re almost done now. Our site is built, structured, and optimized. Before we go live, however, I recommend taking one last look at your work and making sure that you like what you see, maybe even showing it to friends and asking for their opinions. We’ve been tinkering with the site a lot, so this isn’t the point of making huge changes to your site, but you can adjust some details to ensure you get everything just right. Regarding this step, the web designer in charge of our sample recommends:- Adjusting spacing & alignment: Ensure proper spacing between text and elements. Align images, text boxes, and buttons to create a clean, professional appearance.
- Enhancing CTAs: Refine the placement, text, and design of call-to-action buttons for better visibility and higher conversion rates.
- Double-checking typography and colors: Check for consistency in font sizes and colors. Make sure the typography aligns with your brand identity and is easy to read across devices.
8.7 Post-Launch Testing
Testing and refining aren’t over just because we publish our site. We should monitor the following factors continuously through our website’s life cycle:- Monitor Performance: Keep a good eye on your site’s performance and test regularly. If there are dips in traffic or issues reported by users, you should investigate the cause of the problem and endeavor to fix it.
- Test for Scalability: As your site grows, you might notice dips in performance. This might indicate that you need to upgrade your plan to accommodate its growing demands. Wix offers plenty of scalability options for when you reach that point.
- Continuous Updates: Even if your site is mostly static, try to update it from time to time. This doesn’t mean making major overhauls every week, though. Just upload new content, swap out your images and videos, or occasionally change up the copy a little to ensure your site remains relevant in search engine results.
