

Time to Complete Module: 2 hours
Last updated: March 13, 2025
IN THIS MODULE
5.1 Add a New Page5.2 Introduce Your Business To Attract Visitors (First Section)5.3 Share More About Your Business (Second Section)5.4 Establish Yourself as the Master of Your Craft (Third Section)5.5 Create a FAQ Section (Fourth Section)5.6 Optimize Your Homepage for Mobile5.7 Save Your Homepage

Alternative Designs
Each module in this guide includes instructions for building a specific page based on a sample design created by our Squarespace expert (Digital Agency, Local Business, Portfolio Site). You can switch to an alternative version of this module by clicking a different design in the left sidebar under “Alternative Designs.“
5.1 Add a New Page
As always, you’ll start with a blank canvas, allowing you to design a Homepage that truly reflects your unique salon business. Step 1: Add a “Not Linked” blank page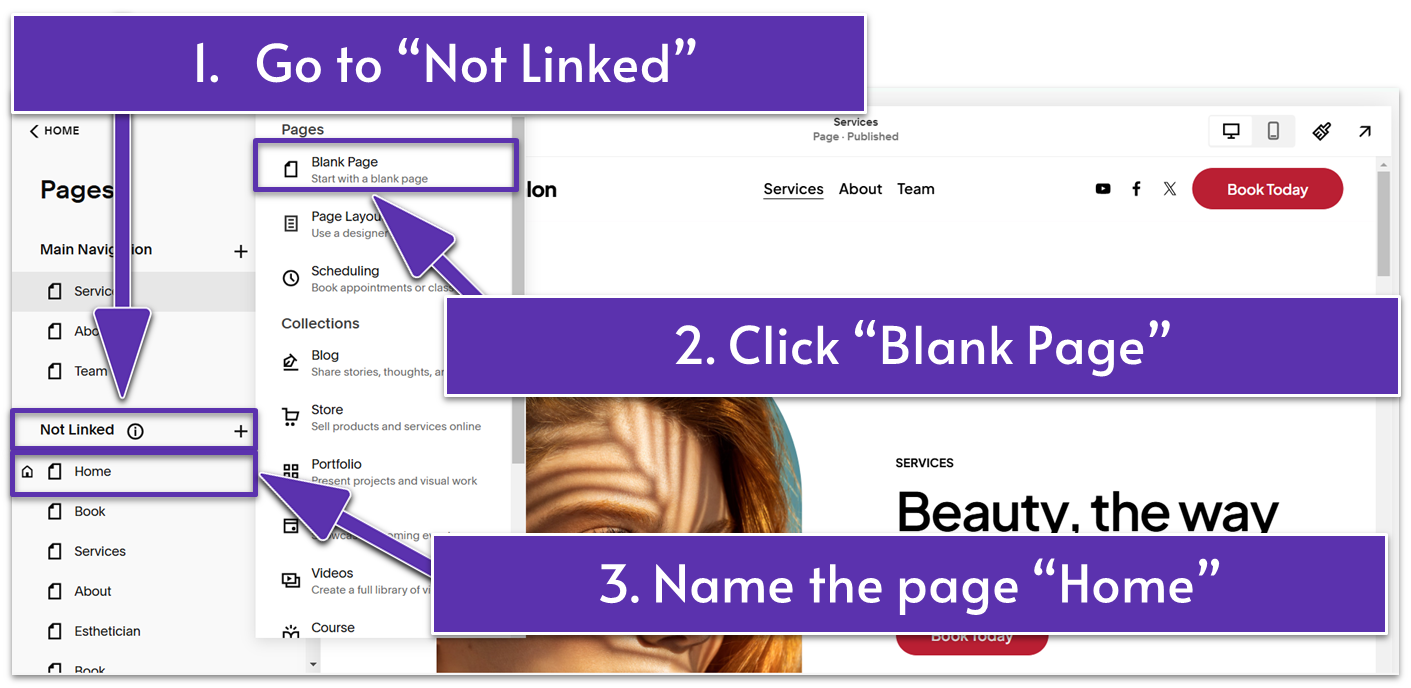
- In the “Pages” sidebar, click the plus icon (
) next to “Not Linked.” - Select “Blank Page.”
- Rename the new page to “Home.”

- Click the gear icon (
) next to “Home” to access the “Page Settings.”
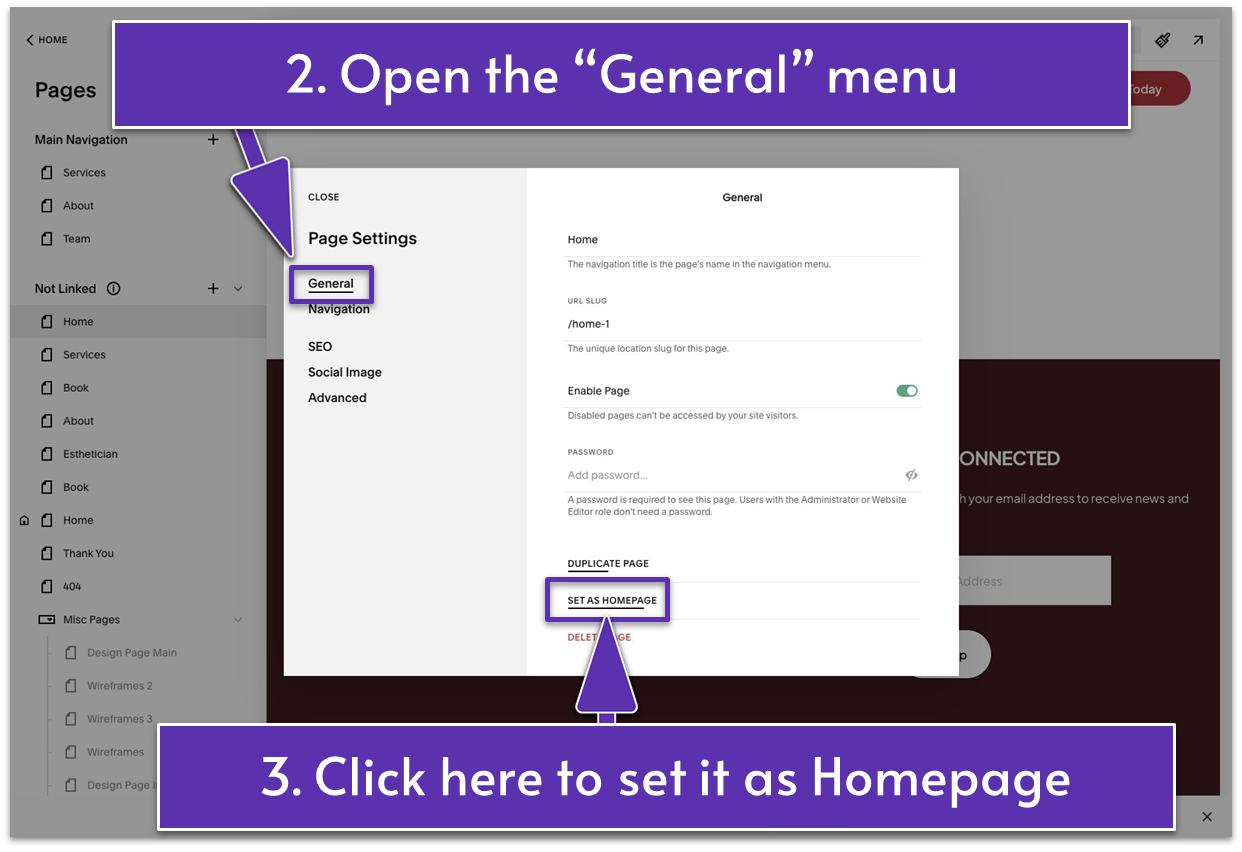
- In the “General” submenu, scroll to the bottom and click “Set as Homepage.”
- A message will pop up asking you to confirm your choice. Click “Confirm.”
5.2 Introduce Your Business To Attract Visitors (First Section)
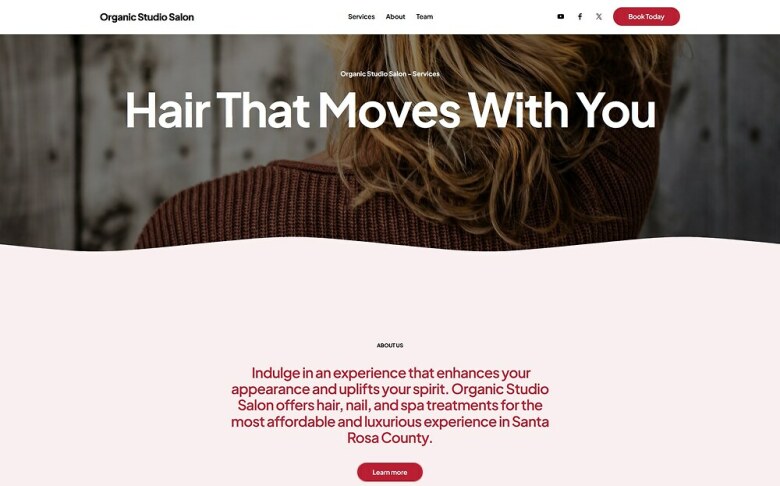
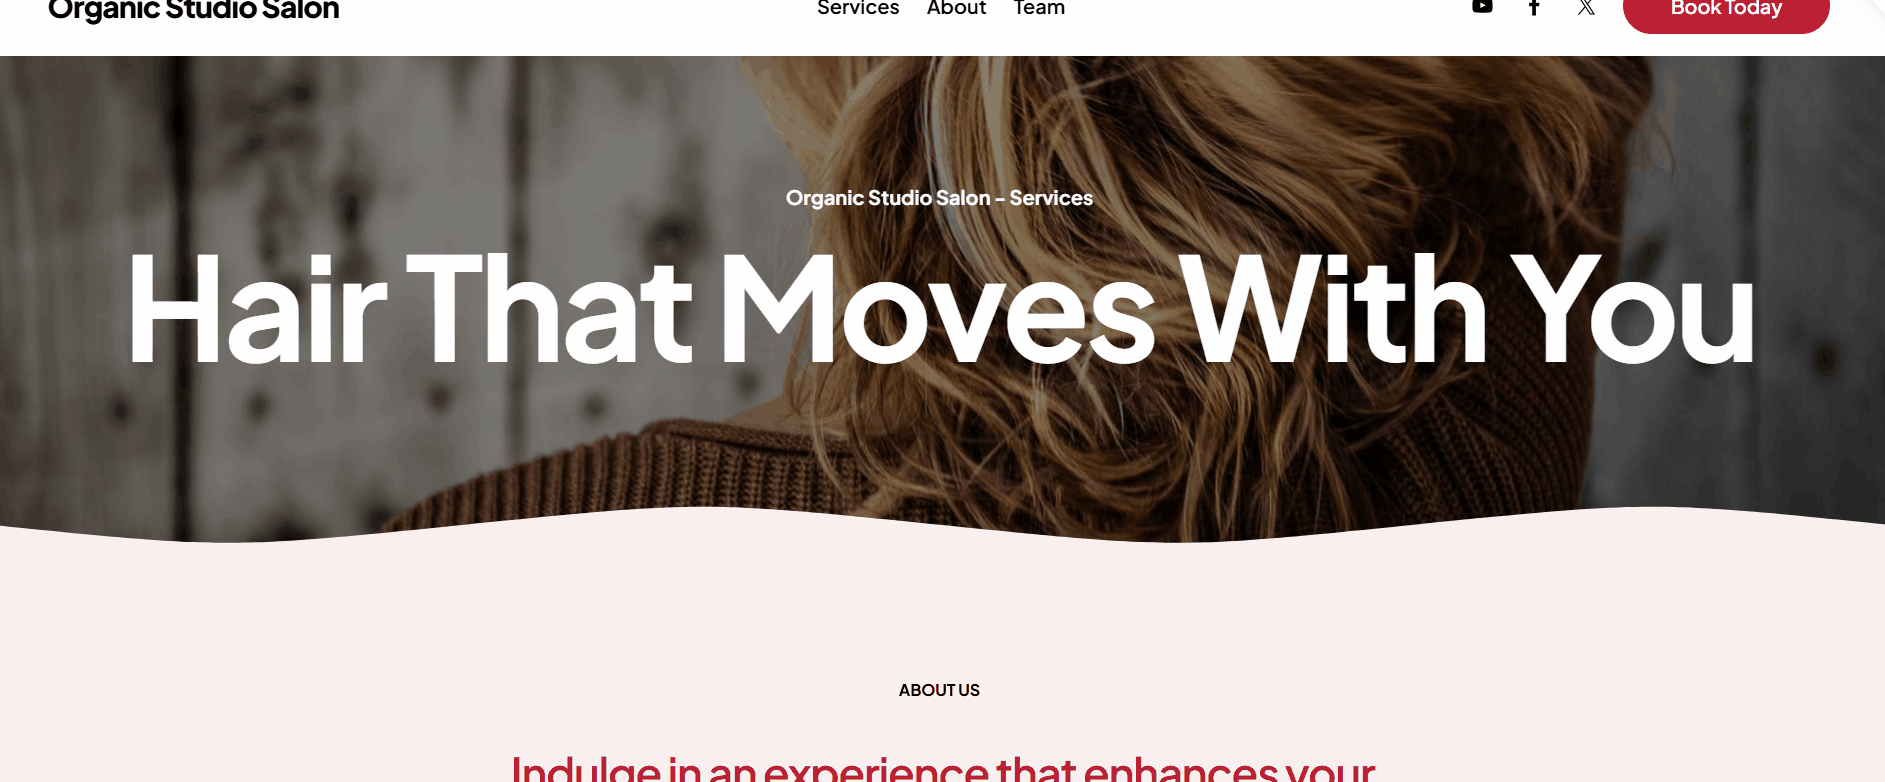
You only get one chance to make a great first impression. Think of your home page as your salon’s digital welcome mat. It should be presentable, inviting, and designed to make visitors feel they’re at the right place to get what they’re after. It should also encourage them to step inside and discover everything your salon offers. Use the opening section of your Homepage to showcase the value of your services. For instance, our headline “Hair That Moves With You” clearly communicates that our salon can help them get healthy, bouncy hair that turns heads. Pair a power headline with high-quality, on-brand visuals that reflect your expertise. Step 1: Add a new blank section Step 2: Change the section’s color
- Click “Edit Section” and open the “Colors” tab.
- Select a dark color theme. We chose “Darkest 1.”

- Open the “Background” tab.
- Click the “+” sign to add your image.
- Adjust “Overlay Opacity” to 45% or as you prefer.
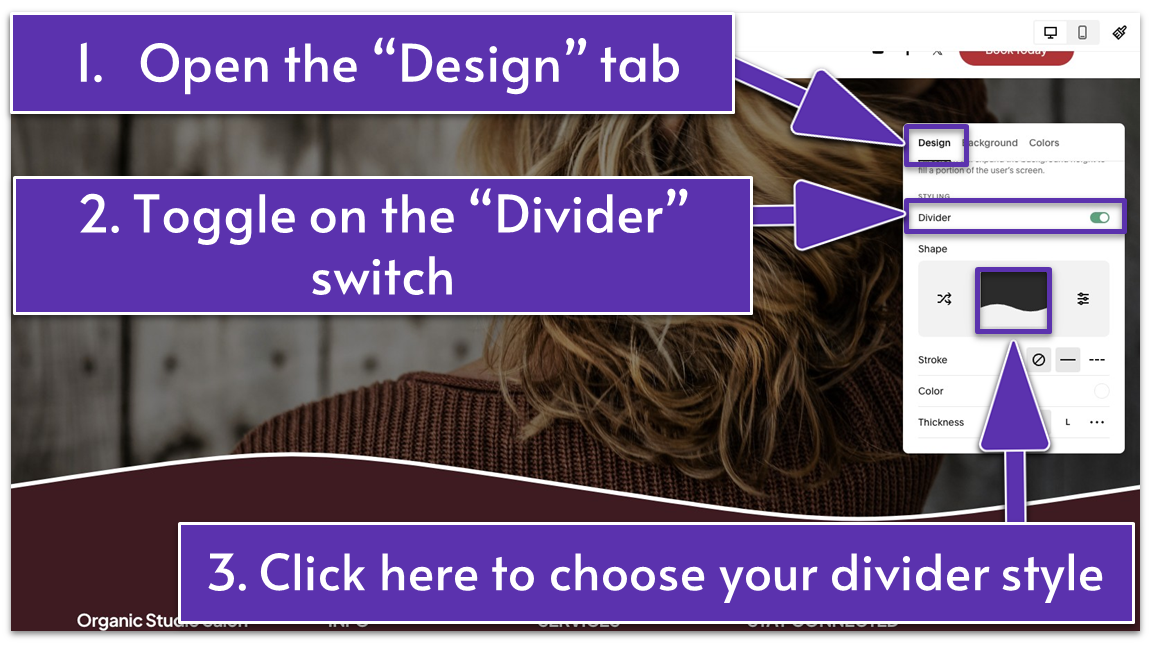
- Open the “Design” tab.
- Scroll down and turn on the “Divider” switch.
- Go to “Stroke” and click the “No Stroke” icon (
) if you want to remove the divider line.
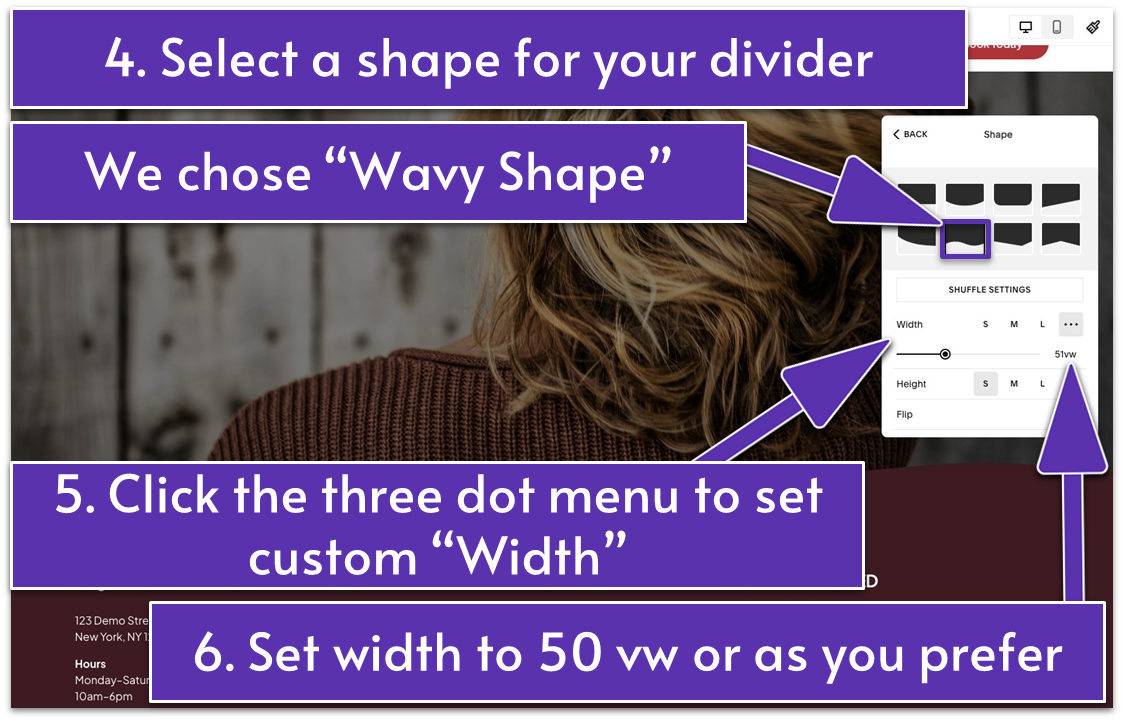
- Click the central icon under “Shape” to choose a divider style. We went with “Wavy Shape” to get that dynamic, playful effect. This separates the opening section from the second section.
- Click the three dots icon (
) to set a custom “Width.” Optionally, you can use some of the pre-arranged options. We adjusted the width to 50 vw.
- Add a text block.
- Stretch it horizontally across the whole section.
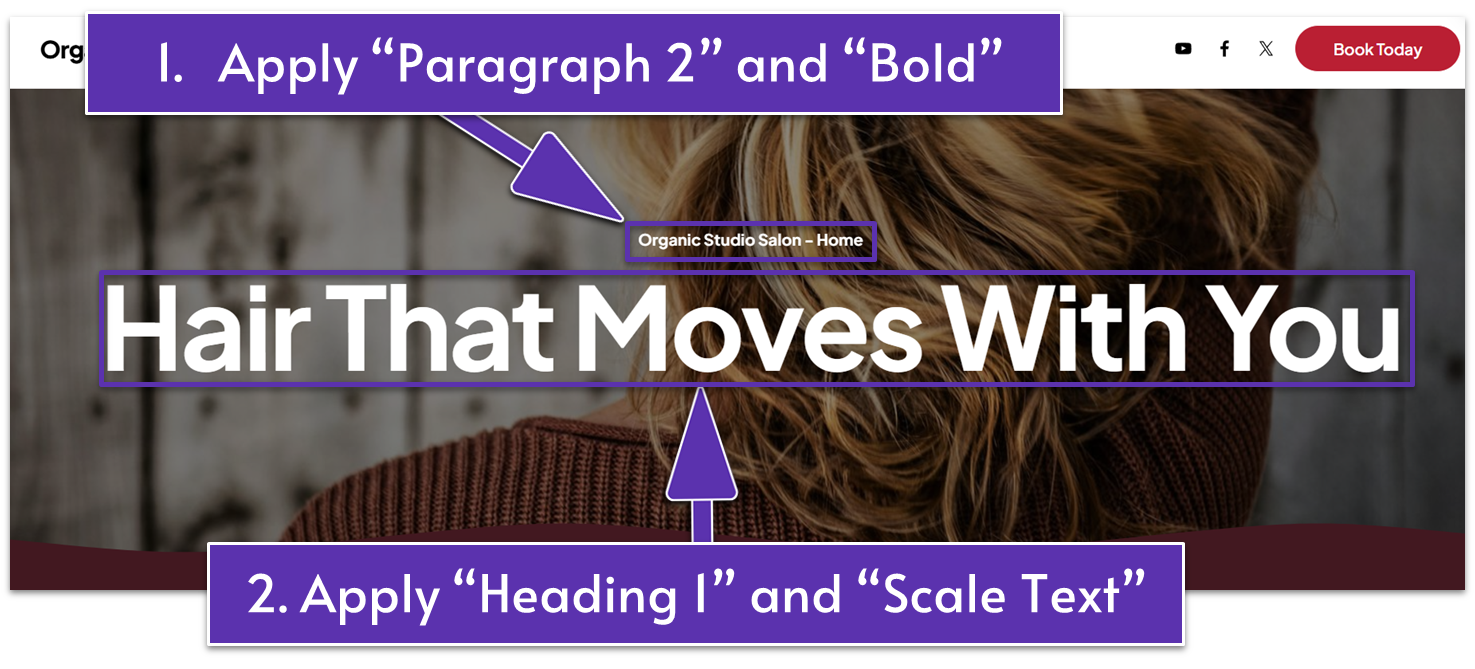
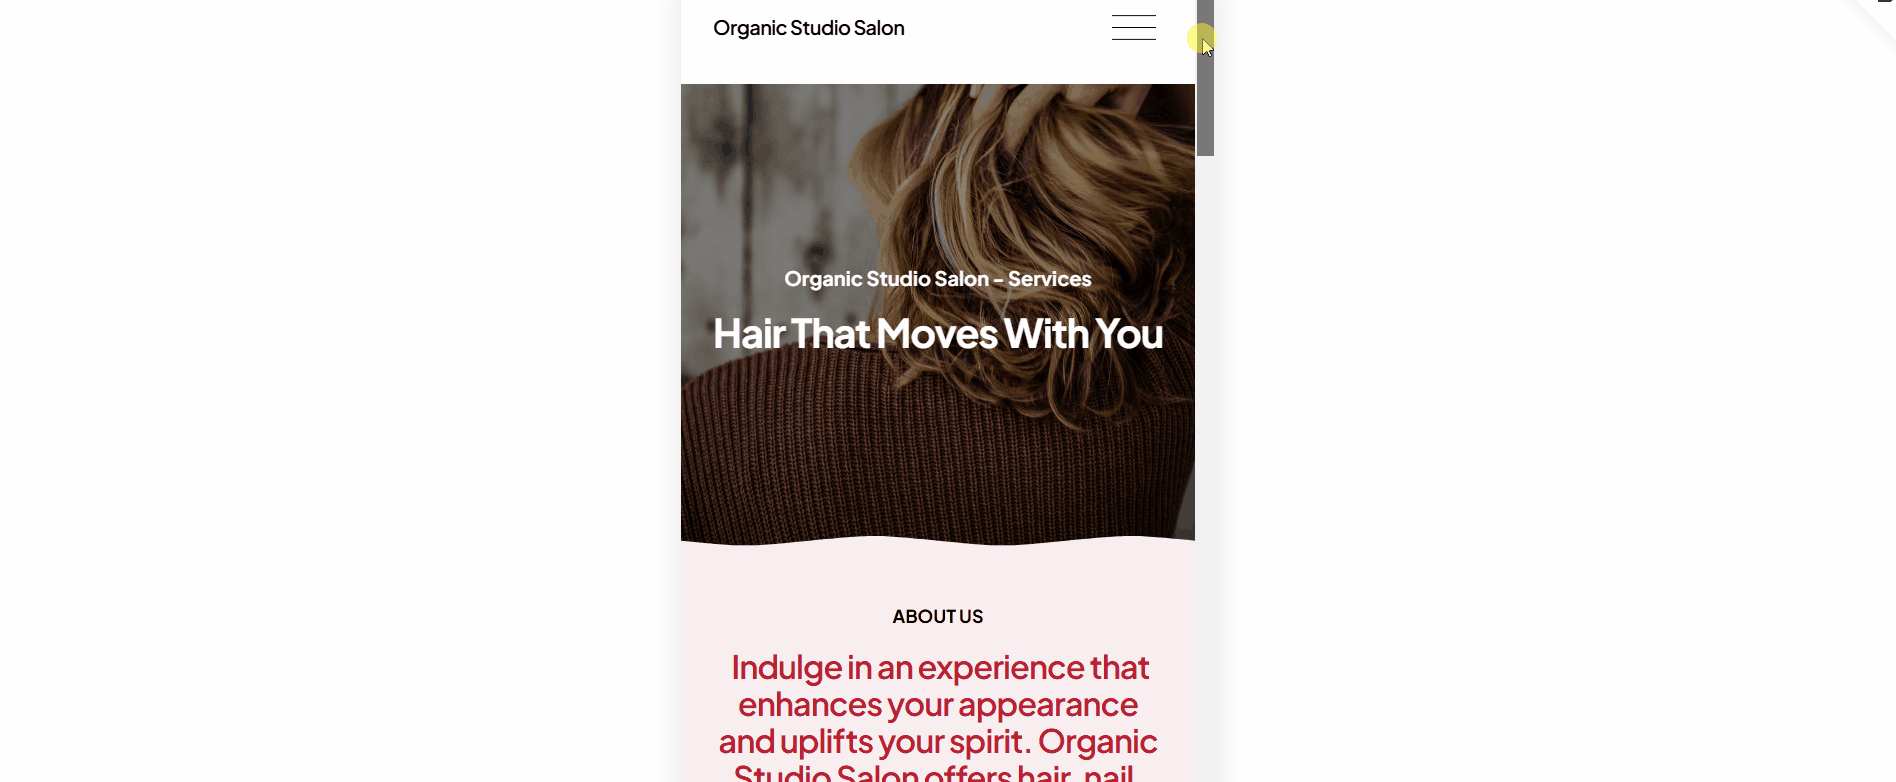
- Optionally, add a section title to provide a brief overview of what your website, page, or business is about. To stay consistent with what we did on our previous pages, we wrote “Organic Studio Salon – Home” and formatted it to “Paragraph 2” and “Bold.”
- Center the section title with
. - Add your headline and format it to “Heading 1” and “Bold.” In our case, that’s “Hair That Moves With You.”
- Click the “Scale Text” icon (
) to expand the headline to fill the entire text block. - Slide up the grid adjuster (
) to narrow the section spacing.
5.3 Share More About Your Business (Second Section)
Use this section to tell visitors exactly what makes your salon special. Use it to introduce your business, highlight your offerings, and share key details that set you apart. Finally, include a clear call-to-action (CTA) like “Learn More” to guide your visitors toward discovering additional services or booking their appointment. Step 1: Add a new blank section Step 2: Change the section’s color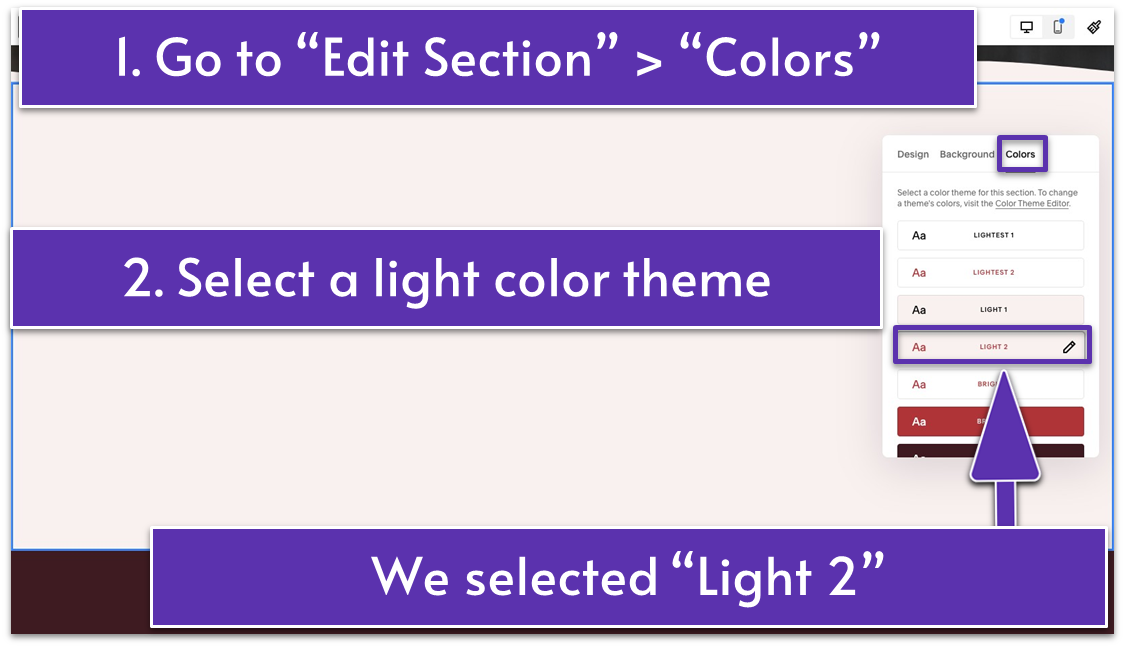
- Go to “Edit Section” and click “Colors.”
- Select a light color theme to contrast the previous section. We went with “Light 2.”

- Add a text block and insert your section title to clearly label the purpose of this section.
- We wrote “ABOUT US” in all capital letters in the first text block and formatted it to “Paragraph 3” and “Bold.”
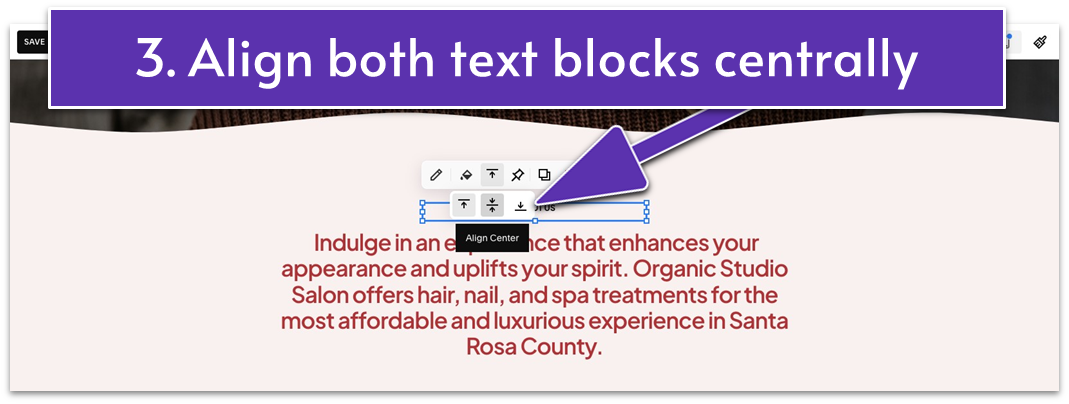
- Align center the text vertically using in the main block toolbar.
- Click the pencil icon (
) and select in the editing toolbar to center the text horizontally in the text block. - Place this text block in the upper middle part of the section.
- Add another text block. Use this space to introduce your services and give a glimpse into your salon experience.
- Format this text to “Heading 3.”
- Center the text horizontally with
and vertically with . - Stretch the block to make it wider.
- Place it below the first text block.
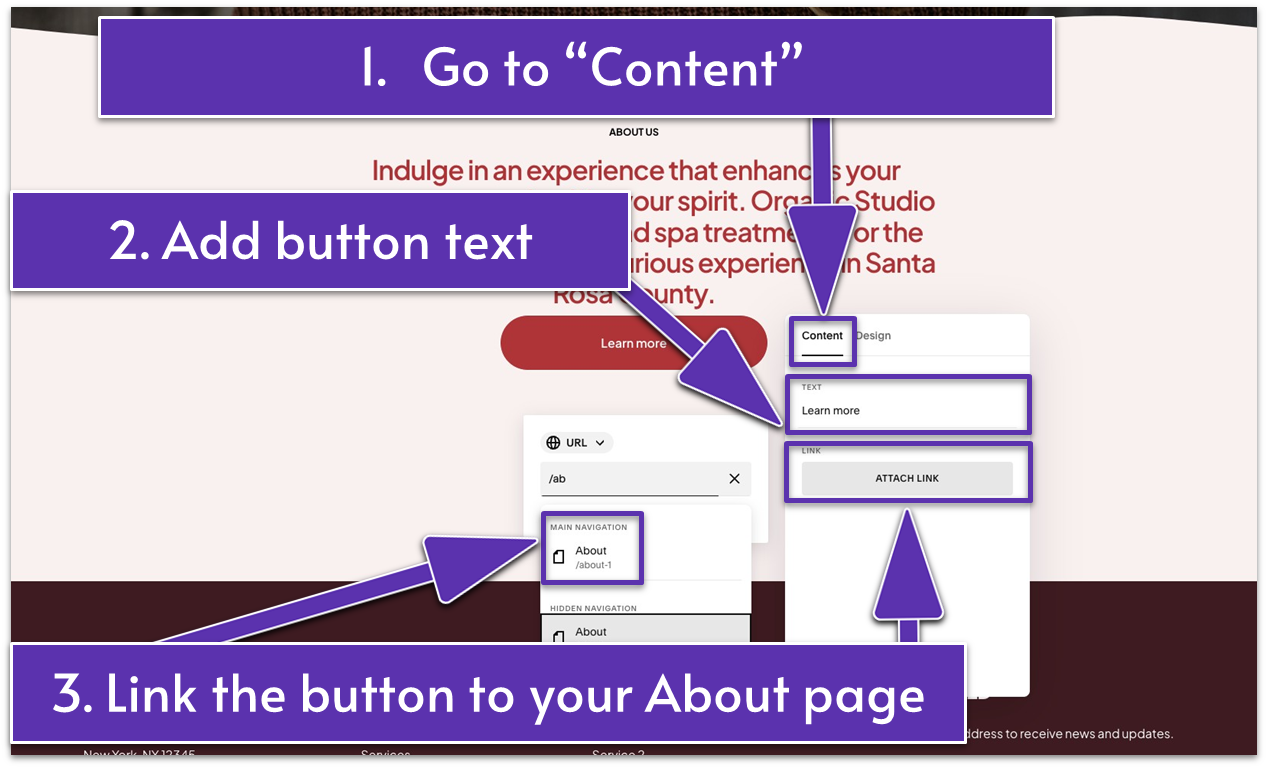
- Add a button block.
- Click the pencil icon (
) and open the “Content” panel. - Add a button text. In our case, we stuck to the default “Learn more.”
- Attach a button link to your About page.
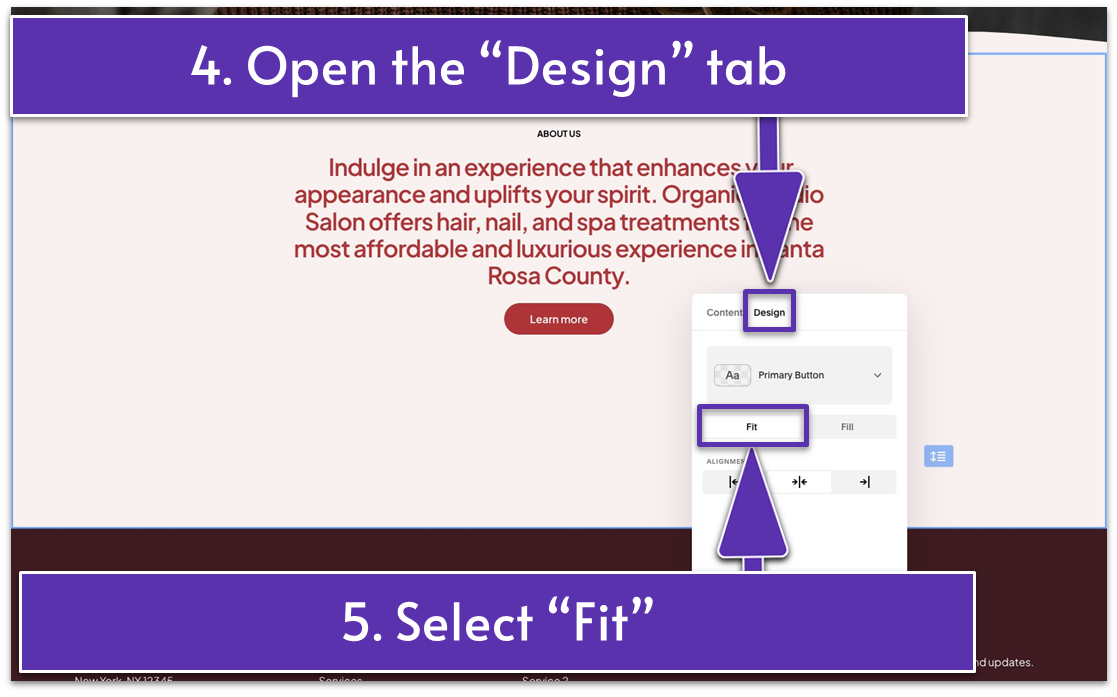
- Open the “Design” tab.
- Select “Fit” to keep the button’s predefined size and style.
- Place the button below the second text block in the middle.
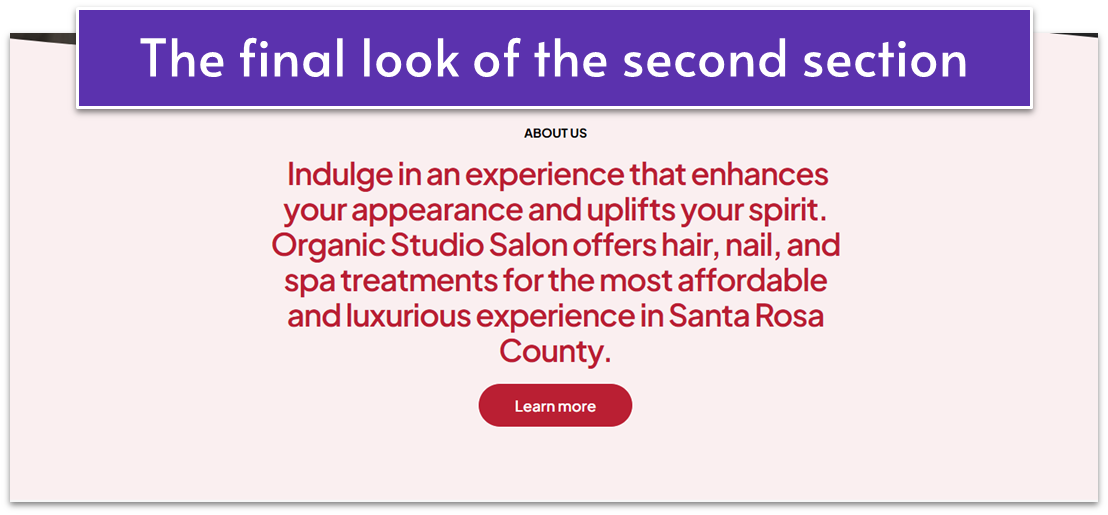 Ta-dum! The second section of your Homepage is done and ready to quench scrolling visitors’ thirst for information regarding your salon.
Now, let’s dress up your section number three!
Ta-dum! The second section of your Homepage is done and ready to quench scrolling visitors’ thirst for information regarding your salon.
Now, let’s dress up your section number three!
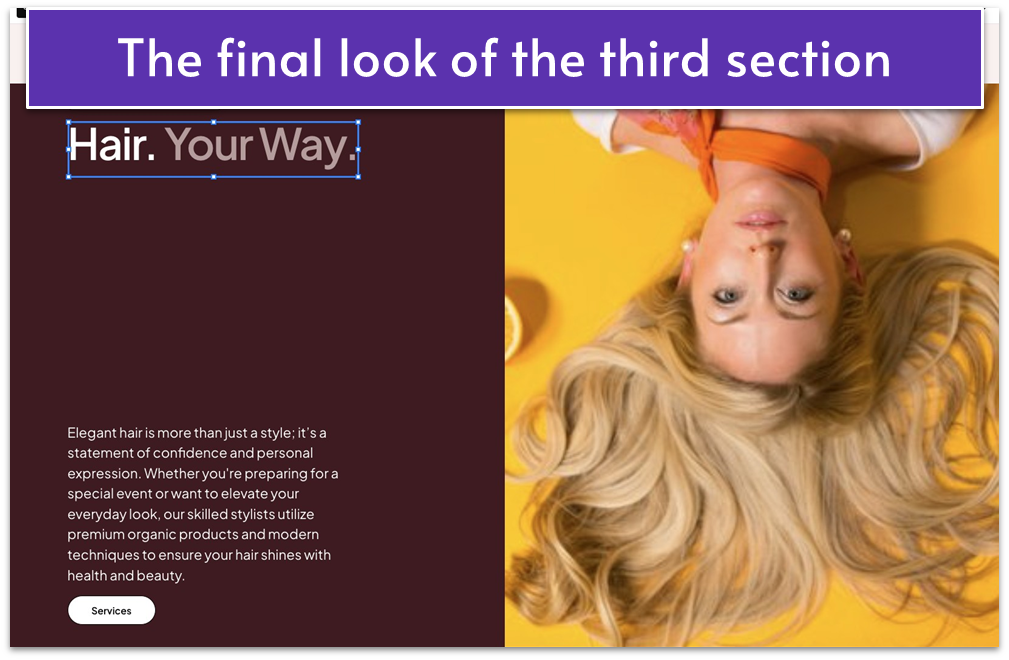
5.4 Establish Yourself as the Master of Your Craft (Third Section)
This section is your chance to position your salon as the ultimate destination for exceptional experience. Use it to highlight your expertise, explain what sets your offerings apart, and connect with clients looking for the best in hair, nails, spa treatments, or any other specialty you provide. Dive deeper into what makes your salon the perfect choice for their needs. Seal the deal with a strong CTA button, such as “Explore Our Services,” “See What We Offer,” or simply “Services,” and link it to your Services page. To make this section more convincing, include professional images of your work, your team in action, or your salon ambience. Personal content resonates more deeply with visitors, builds trust, and adds credibility to your message. Step 1: Add a new blank section Step 2: Change the section’s color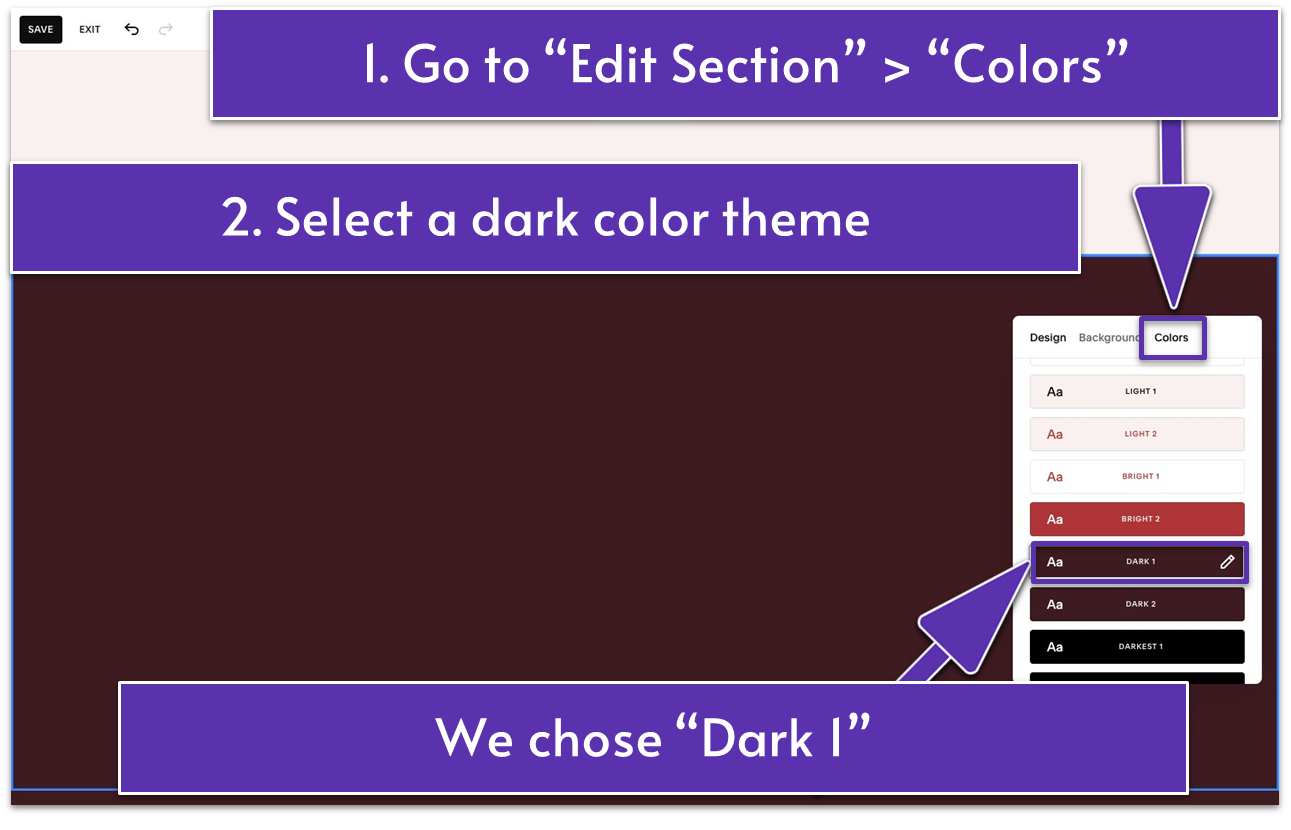
- Go to “Edit Section” and open the “Colors” tab.
- Select a dark color theme. We chose “Dark 1.”
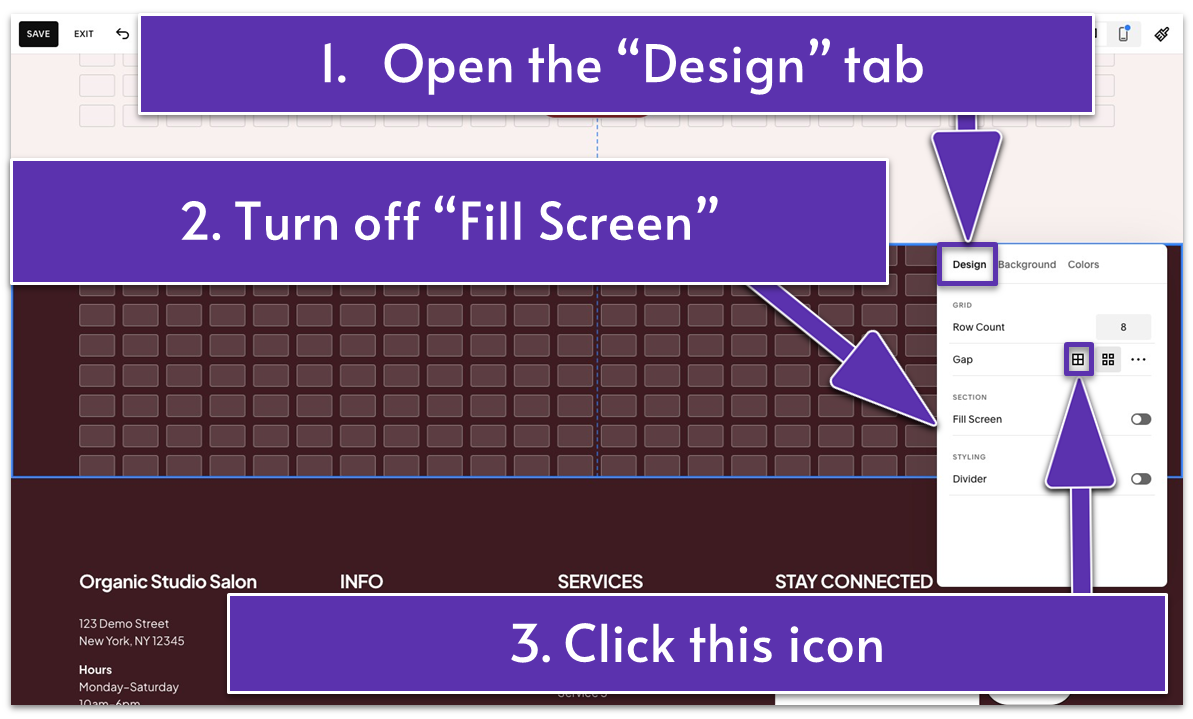
- Open the “Design” tab.
- Toggle off the “Fill Screen” switch.
- Go to “Gap” settings and click the “No Gap” icon (
) to remove the grid spacing.
Note: In this section, you’ll add an image to fill the entire right side. Grid gaps can cause slight misalignment, making the design look uneven. By removing gaps, you can align the image exactly with the center line and remove extra spacing between text blocks.
Step 4: Add text
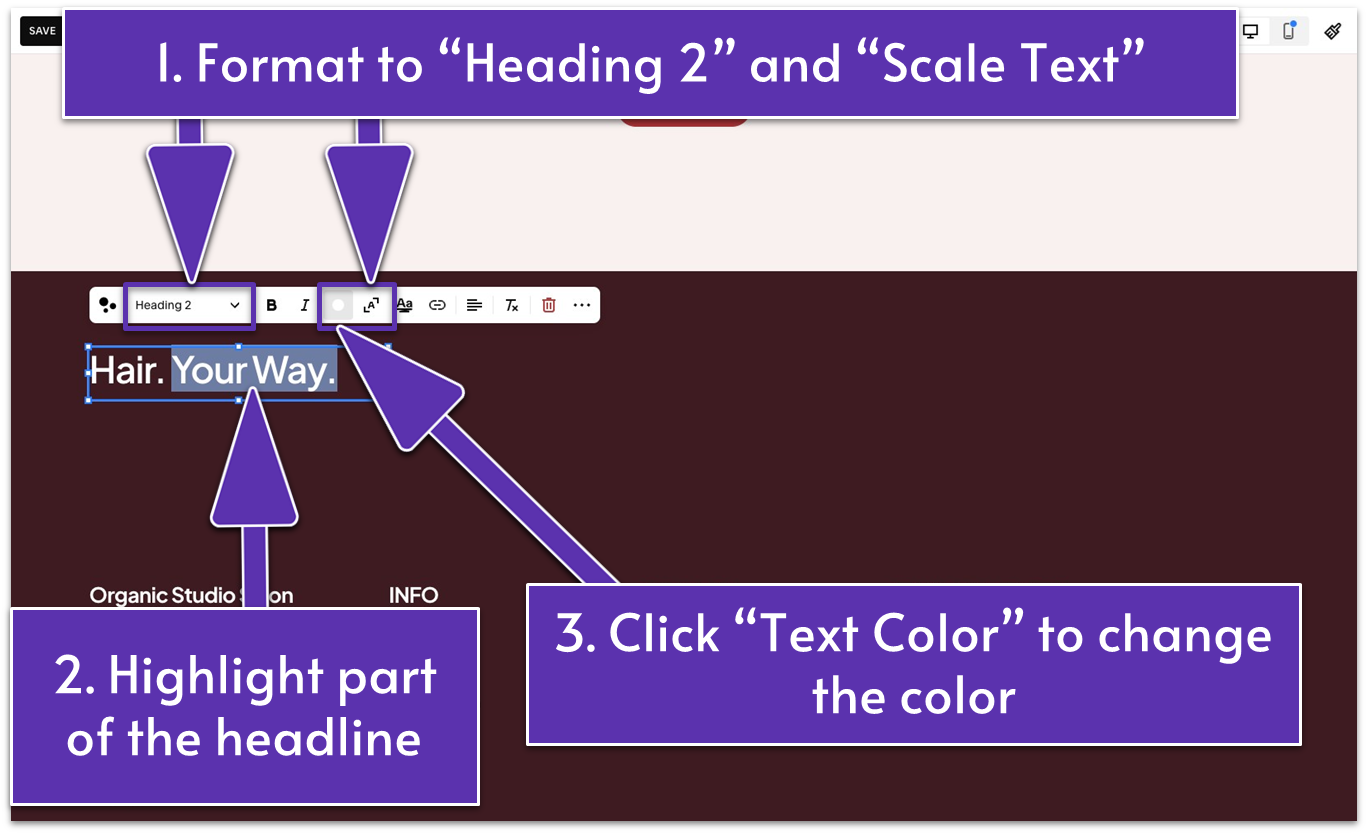
- Add a compelling headline for your third section. We wrote “Hair. Your Way.” on our website.
- Format it to “Heading 2” and apply “Scale text” (
). - Resize the text block if needed.
- Highlight the part of the text that you want to paint in a different color.
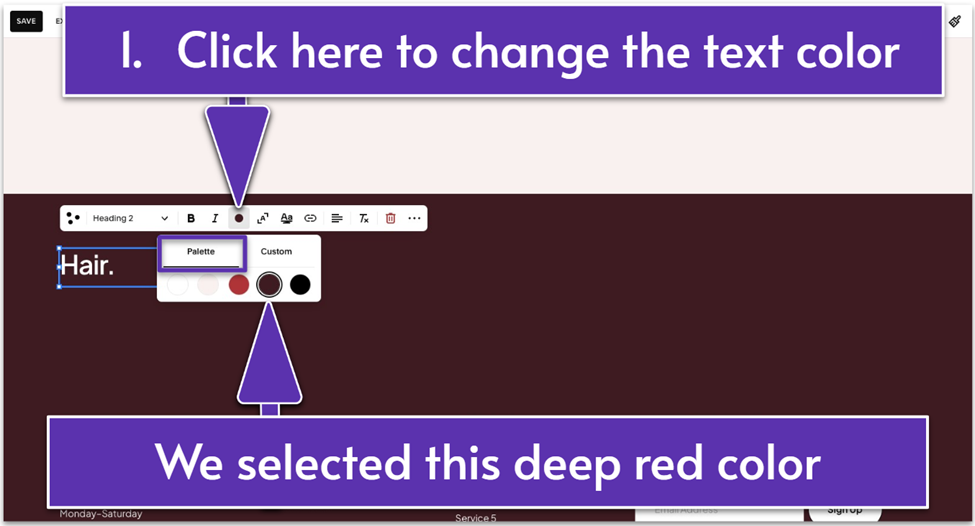
- Click the colored dot icon (
) and select a color of your choice. Under “Palette,” we selected the deep red color (HEX code: #421820). Then, we clicked “Custom” and dragged the color picker to a lighter tone (#B79A9A).
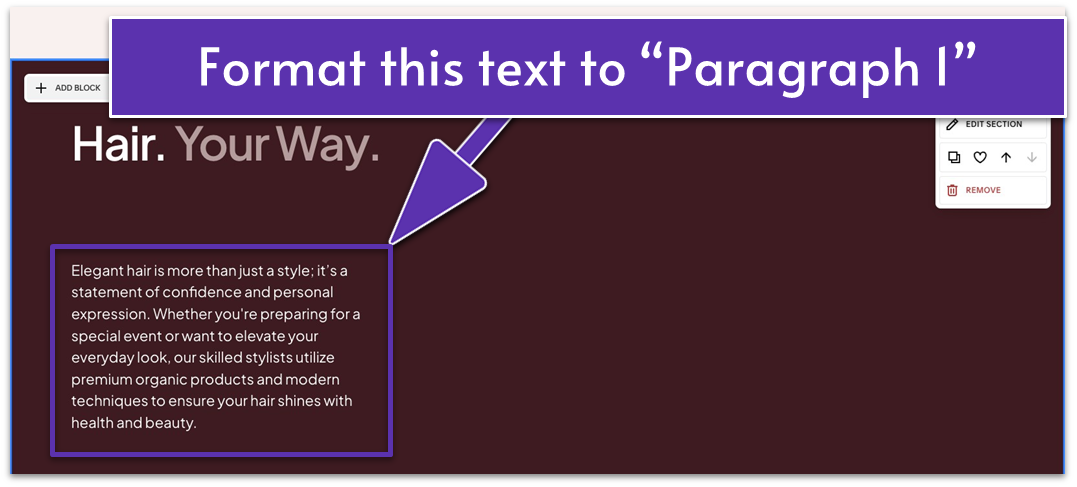
- Add a second text block. This is where you want to establish your salon as the expert in your area of specialization and emphasize the value of your services.
- Format this text to “Paragraph 1.”
- Resize the text block if needed to make the paragraph easier to read.
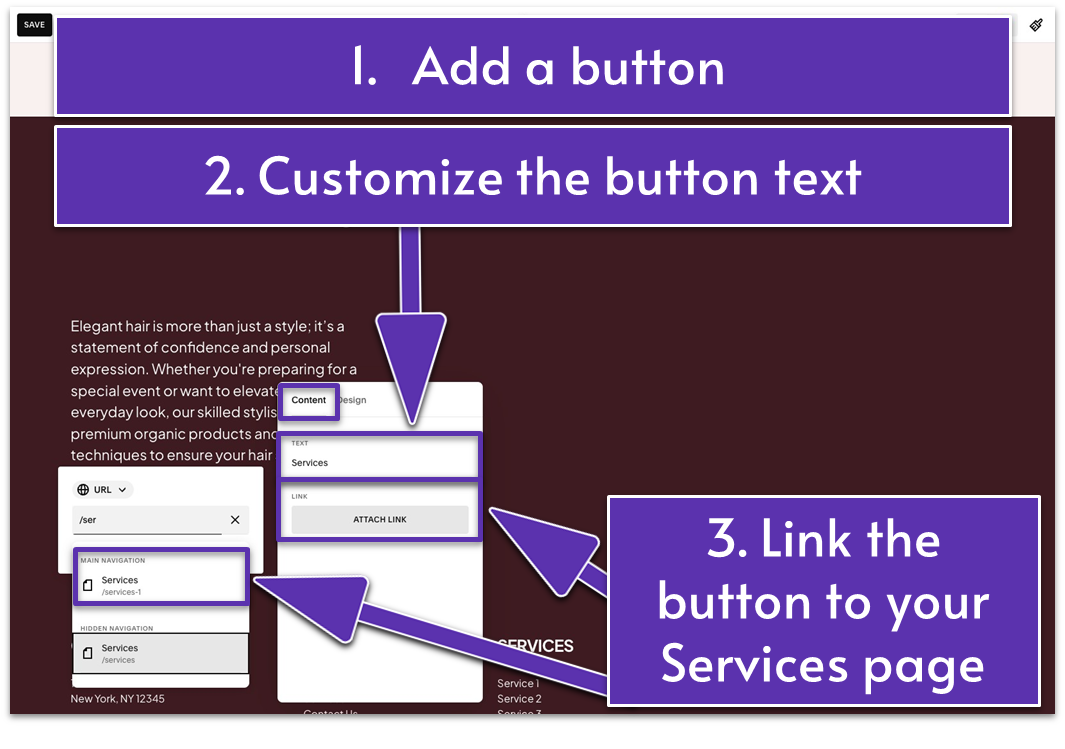

- Add a button block.
- Click the pencil icon (
) and open the “Content” tab. - Change the button text to “Services” or as you prefer. Link it to your Services page.
- Open the “Design” tab, select “Fit,” and align it to the left (
). - Place the button below the second text block.
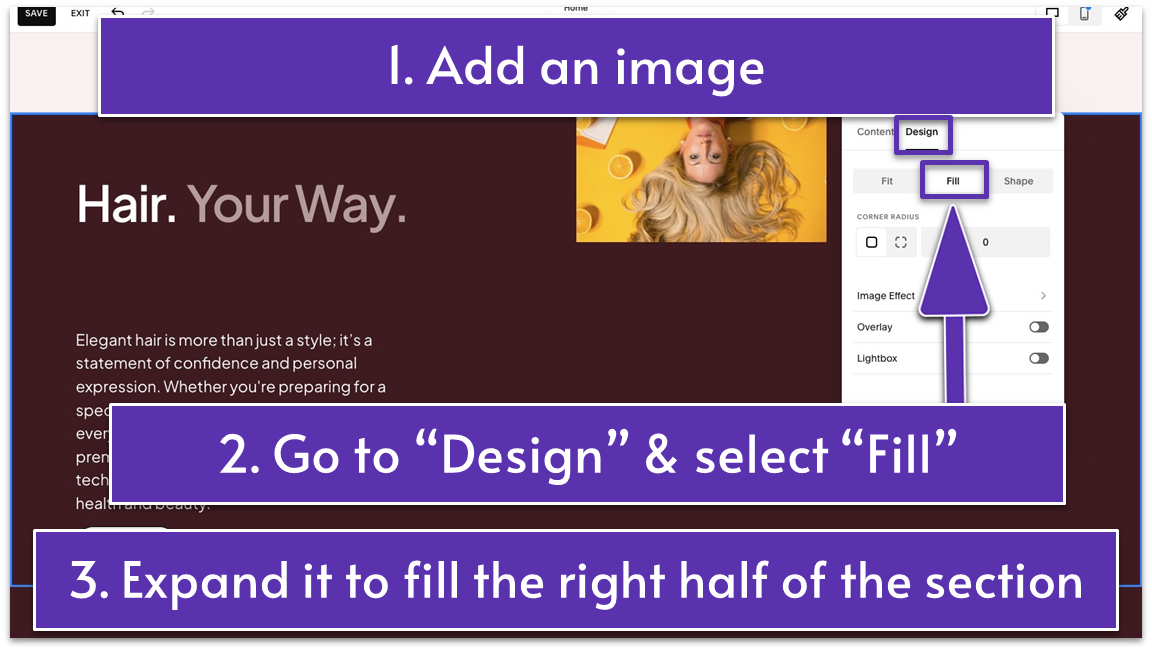
- Add an image block.
- Add your image.
- Click the pencil icon (
) and open the “Design” tab. - Select “Fill.”
- Stretch the image block to fill the right half of the section.
 Another section is all dolled up, and you’re one section away from finalizing your entire home page.
Look at you turning your vision into reality!
I have fantastic news for you: The last section of your Homepage is one of the easiest to create. Let’s get it done together!
Another section is all dolled up, and you’re one section away from finalizing your entire home page.
Look at you turning your vision into reality!
I have fantastic news for you: The last section of your Homepage is one of the easiest to create. Let’s get it done together!
5.5 Create a FAQ Section (Fourth Section)
Your Frequently Asked Questions (FAQ) section is the perfect place to address common questions and make visitors confident about choosing your salon. Use it to provide clarity and convenience, helping potential clients find quick answers about your services, pricing, booking policies, and more. By addressing these questions upfront, you’re saving time and building trust with your audience. For example, you could include questions like “How far in advance should I book an appointment?” and “What’s your cancellation policy?” with concise, reassuring answers that reflect your professionalism. With an informative FAQ section, you’ll leave visitors feeling supported and eager to book with your salon. Step 1: Add a new blank section Step 2: Add a section title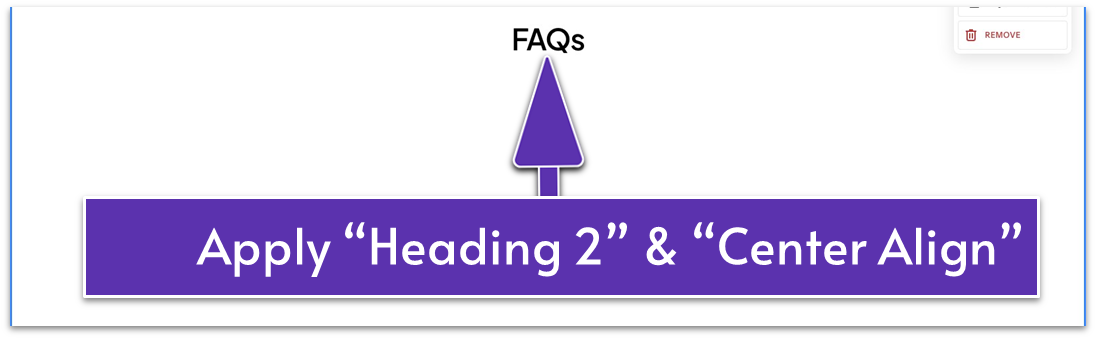
- Add a text block.
- Add your section title. We wrote “FAQs” here.
- Format this text to “Heading 2” and align it to the center (
). - Move the text block to the upper center of the section.
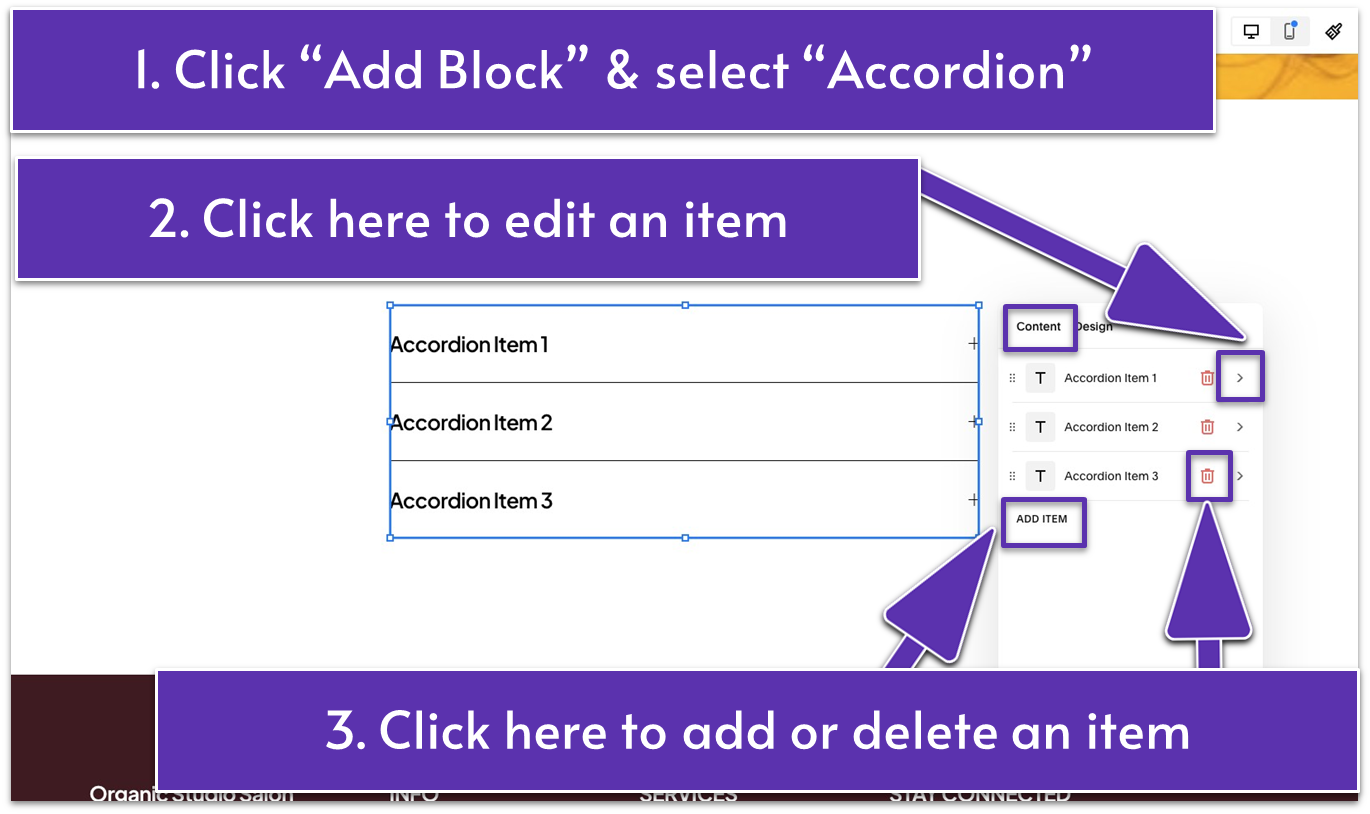
- Click “Add Block” and select “Accordion” from the list of options.
- A block with three accordion items will pop up. Move it to the center, under the title.
- Click the pencil icon (
) to customize it.
Under the “Content” tab, you can manage the number of accordion items, such as frequently asked questions in our case. You can add as many as you need.
- Click “Add Item” to add more FAQs, or use the red trash can icon (
) to delete items.
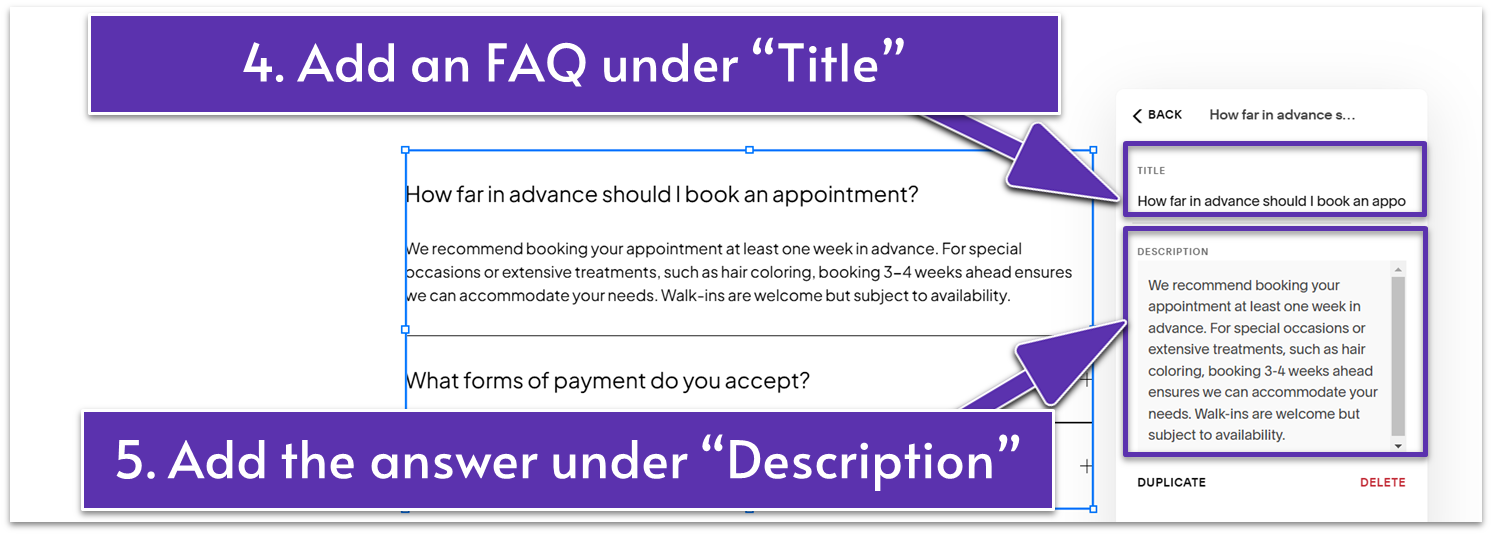
- Click on each accordion item to add your questions and answers. You should put the question under “Title” and the answer under “Description.”
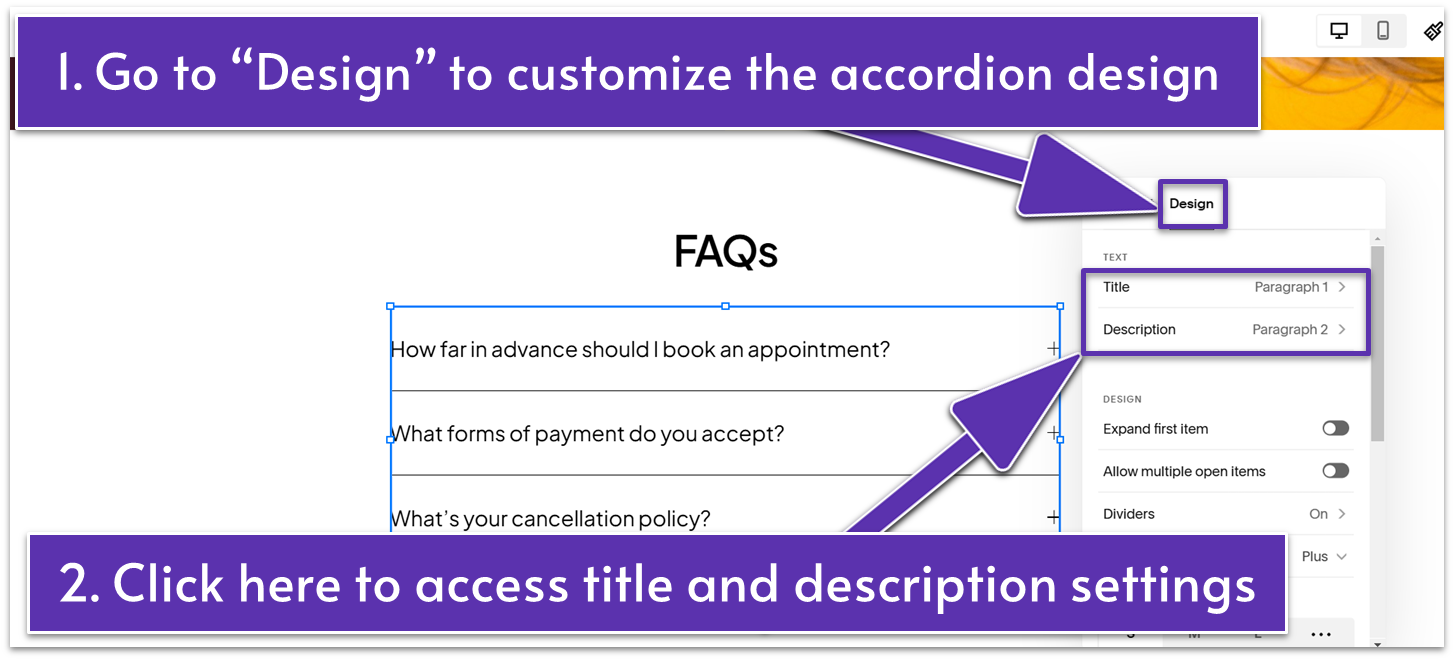
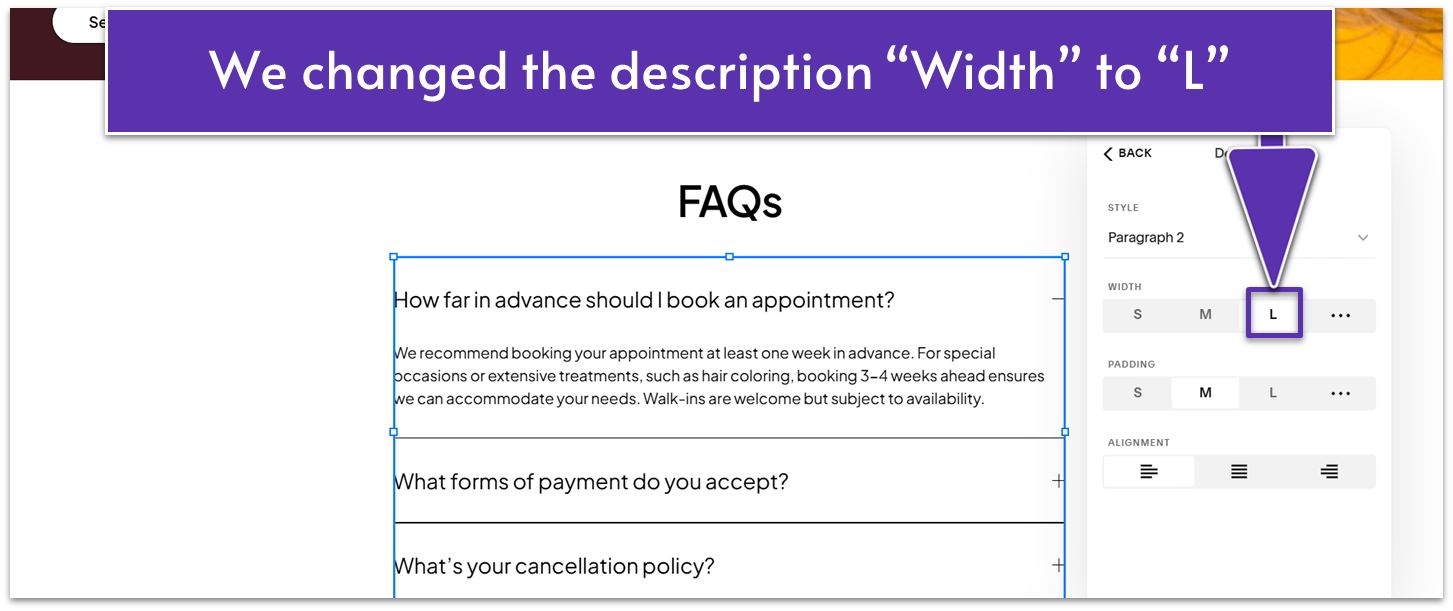
- Open the “Design” tab. From here, you can format the text and manage the design of the title and description. We didn’t do anything except change the title style to “Paragraph 1” and the description style to “Paragraph 2.” We also set the description’s “Width” to “L” (Large).
Now, the only thing left is to optimize it for mobile screens so everyone can have an amazing experience in your salon’s digital home.
5.6 Optimize Your Homepage for Mobile
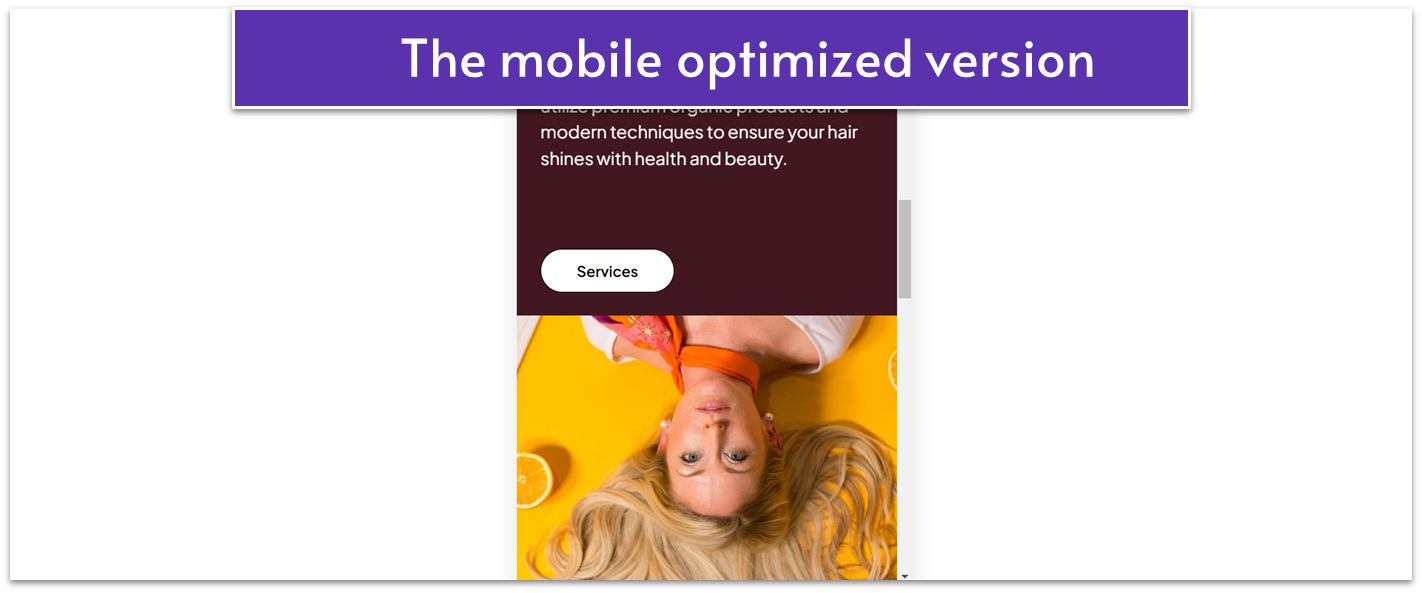
Make sure the layout adapts seamlessly to smaller screens, the text is readable, images adjust properly, and buttons are prominent and clickable. If you’ve changed the design outside the scope of this guide, your site’s mobile version might look different from ours. Evaluate and test the mobile version of your site and make any necessary adjustments until everything appears polished and works perfectly on mobile devices. Step 1: Go to “Mobile View” (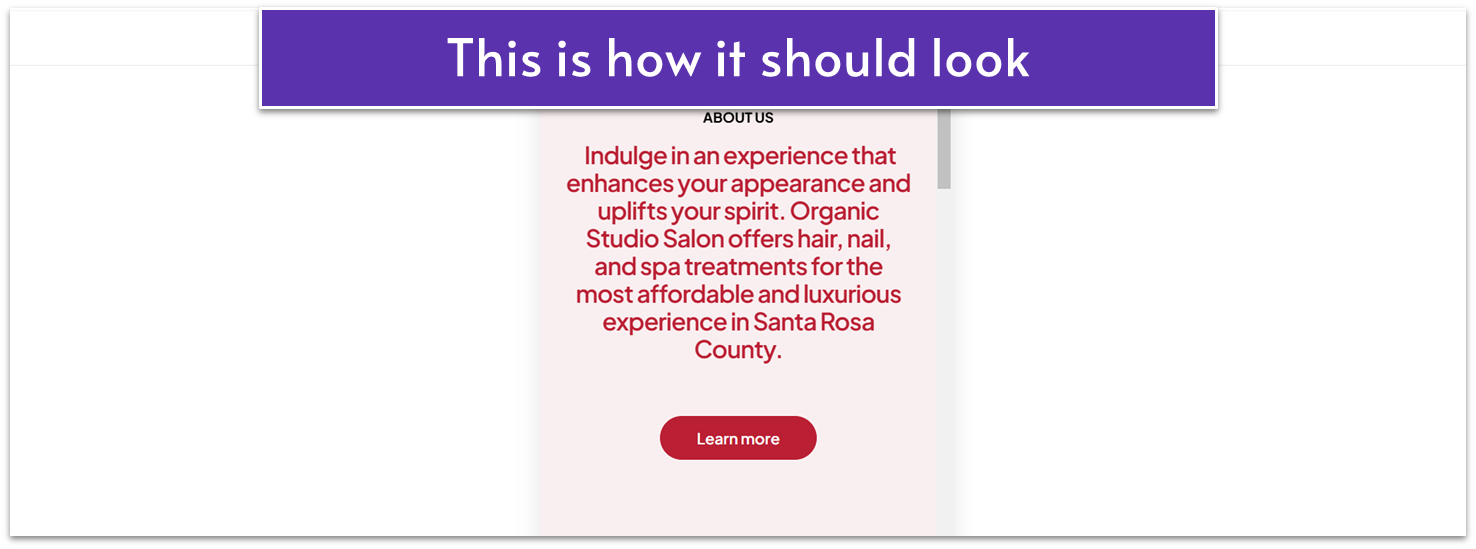 This section looked decent on mobile. Still, we made a few spacing tweaks. If you have the same issue, here’s how to solve it:
- Adjust the spacing between the elements and eliminate any unnecessary blank space.
- Move the button to the center below the second text block.
 If your third section is identical to ours, here’s what you need to do:
- Stretch the image to fill the entire section from side to side and adjust its height as needed.
- Adjust the spacing between the text blocks and the button.
- Use the grid adjuster (
) to remove unnecessary blank space.
 Fantastic work! Your Homepage has received a full glam treatment, and you’re closer than ever to going live.
But before you move on, save what you’ve built so far.
Fantastic work! Your Homepage has received a full glam treatment, and you’re closer than ever to going live.
But before you move on, save what you’ve built so far.
5.7 Save Your Homepage
With just one final step, you’ll have everything set and ready to go live:- Click the “Save” button in the upper left corner.
- Click “Exit” to leave the page.
 In the next module, you’ll build your main navigation and footer and optimize for search engine optimization (SEO). We’ll also walk you through the most common website mistakes so you can skip trial and error and take the success shortcut right from the start.
From vision to reality – you’re closer than ever to cutting your website’s ribbon and welcoming visitors.
Let’s complete your site!
In the next module, you’ll build your main navigation and footer and optimize for search engine optimization (SEO). We’ll also walk you through the most common website mistakes so you can skip trial and error and take the success shortcut right from the start.
From vision to reality – you’re closer than ever to cutting your website’s ribbon and welcoming visitors.
Let’s complete your site!
