

Time to Complete Module: 2 hours 30 minutes
Last updated: March 17, 2025
IN THIS MODULE
4.1 Set Up the Services Menu4.2 Introduce Your Service (First Section)4.3 List Your Service Features (Second Section)4.4 Introduce Your Service Team (Third Section)4.5 Outline Your Process Step by Step (Fourth Section)4.6 Share What Your Clients Say (Fifth Section)4.7 Build an FAQ to Answer Key Questions (Sixth Section)4.8 Add a Section for Your Contact Form (Seventh Section)4.9 Optimize for Mobile4.10 Duplicate the Services Page4.11 Bonus Page: Testimonials4.12. Add a Quick Introduction (First Section)4.13. Display Your Testimonials (Second Section)4.14. Add a Services Section (Third Section)4.15. Optimize the Testimonials Page for Mobile
Alternative Designs
Each module in this guide includes instructions for building a specific page based on a sample design created by our Squarespace expert (Digital Agency, Local Business, Portfolio Site). You can switch to an alternative version of this module by clicking a different design in the left sidebar under “Alternative Designs.“
4.1 Set Up the Services Menu
For this section, you’ll start by creating a dropdown menu containing separate pages for the different services you offer. Step 1: Add a new “Main Navigation” page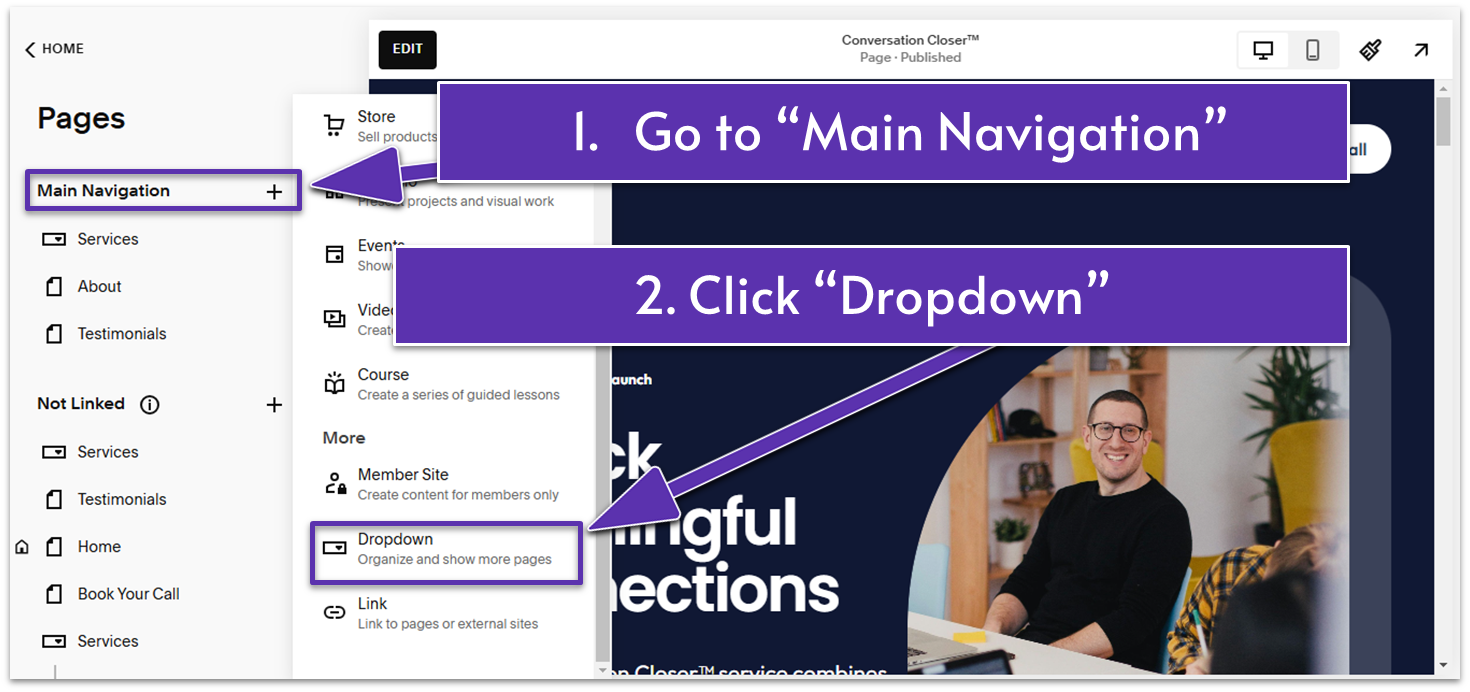
- Select “Dropdown” from the “Main Navigation” menu.
 Step 3: Under the “Services” menu, click on “Add Page”
Step 4: Click “Blank Page” from the “Pages” menu
Step 3: Under the “Services” menu, click on “Add Page”
Step 4: Click “Blank Page” from the “Pages” menu- The new blank page will introduce the first type of service you offer.
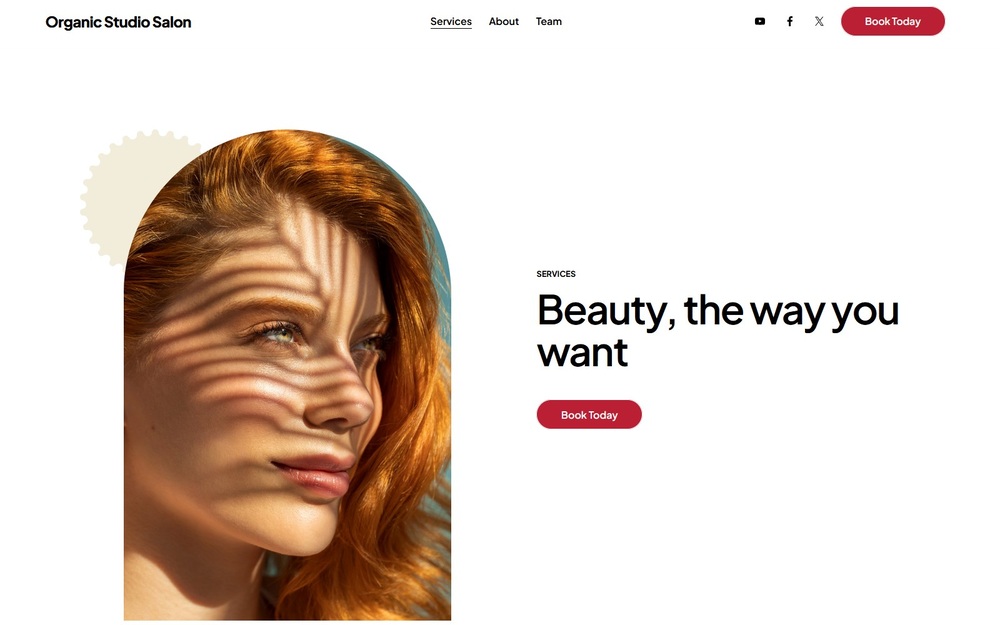
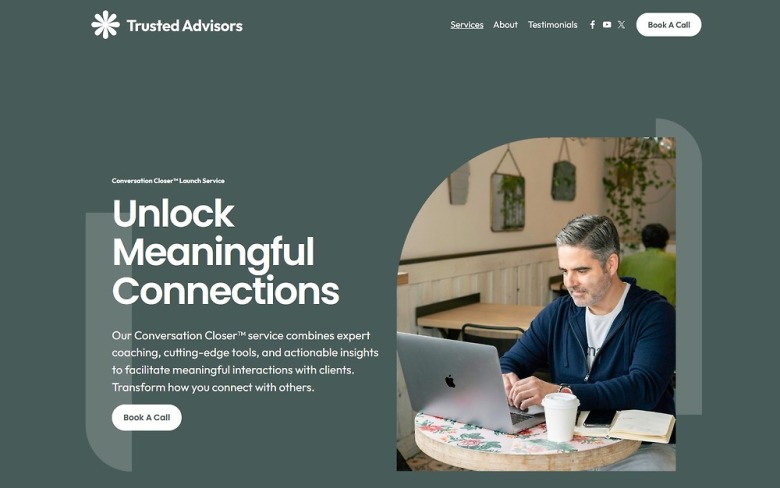
- For our website, we called this page “Conversation Closer™” to showcase a service designed to improve client interactions.
4.2 Introduce Your Service (First Section)
Instead of building the new page from scratch, you’ll reuse the first section of your About page. If you followed the previous module, you should now have four About page sections ready to use. Step 1: Open the page editor and click “Add Section”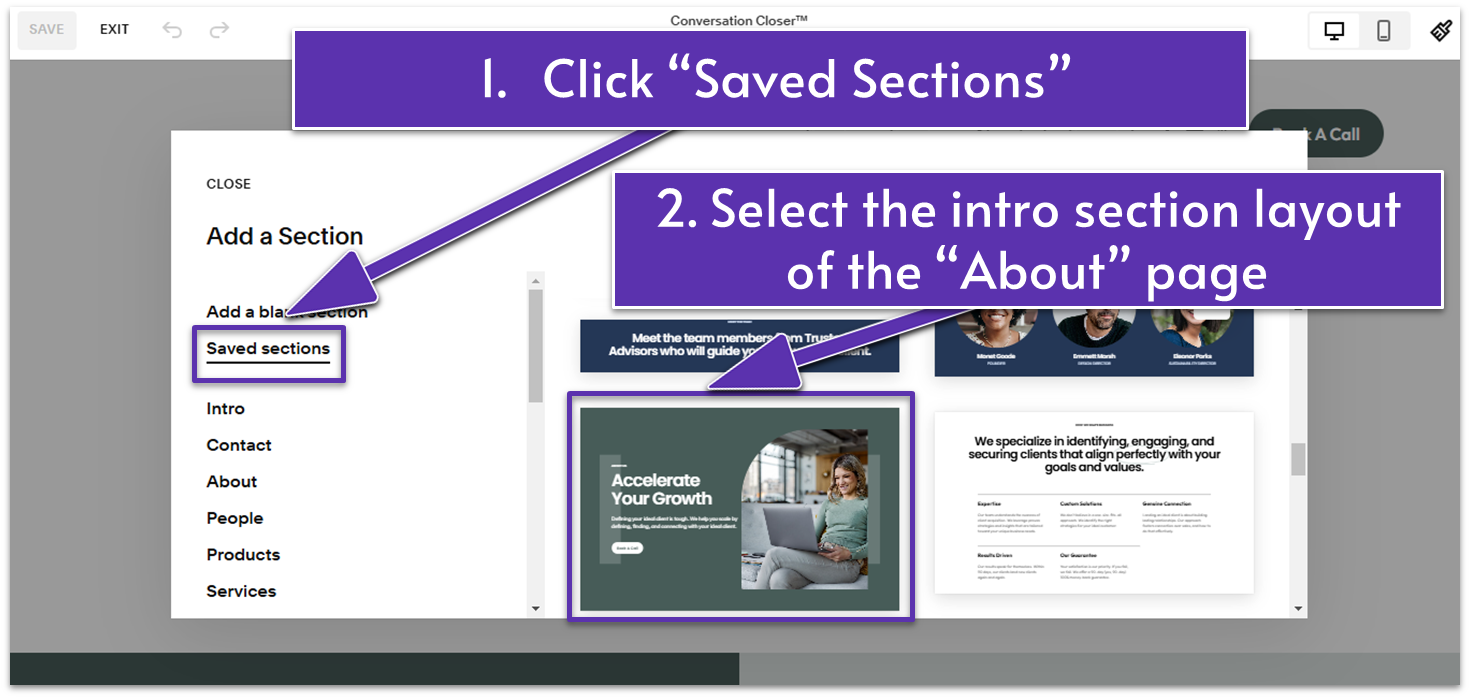 Step 2: Go to “Saved Sections” and select a saved layout
- Select the first section of the About page you made in the previous module.
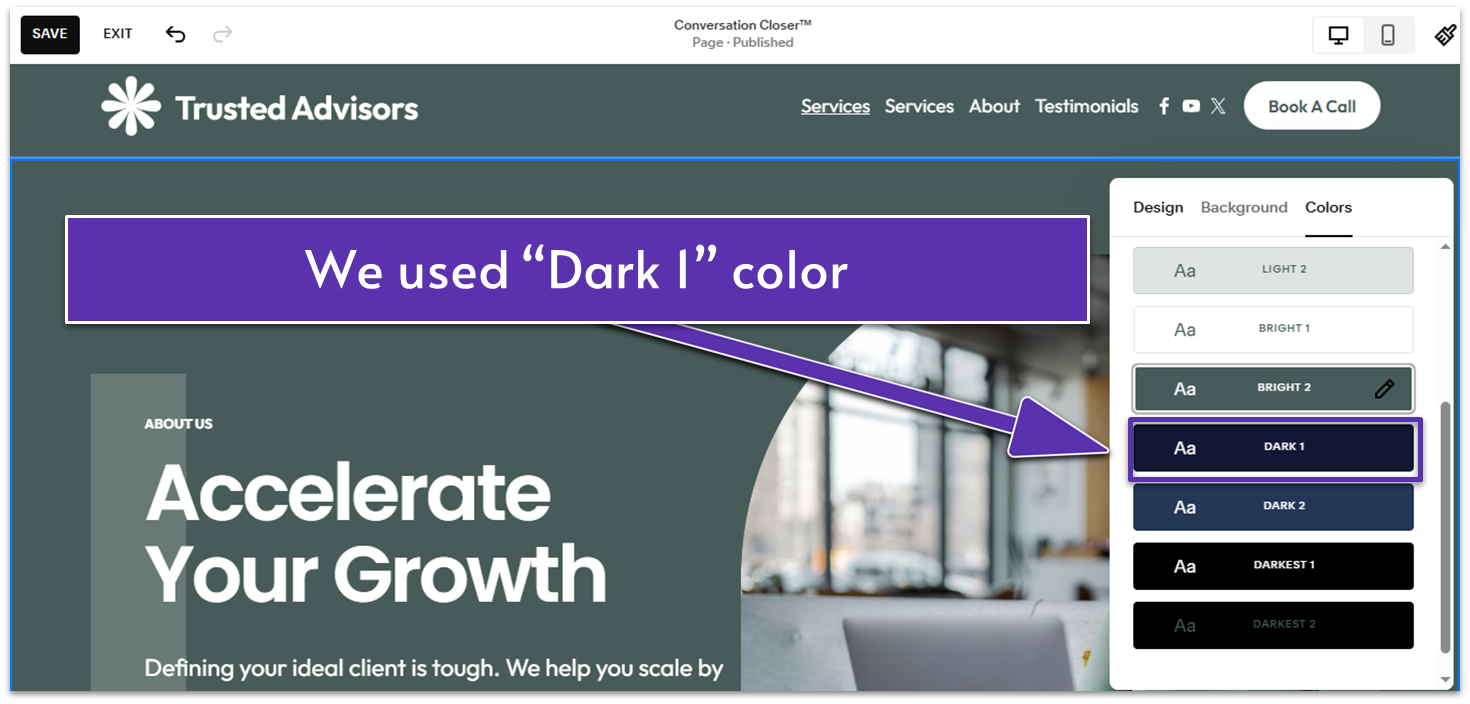
- Pick a different background color for the duplicated section. We went with a “Dark 1” color theme for our website.
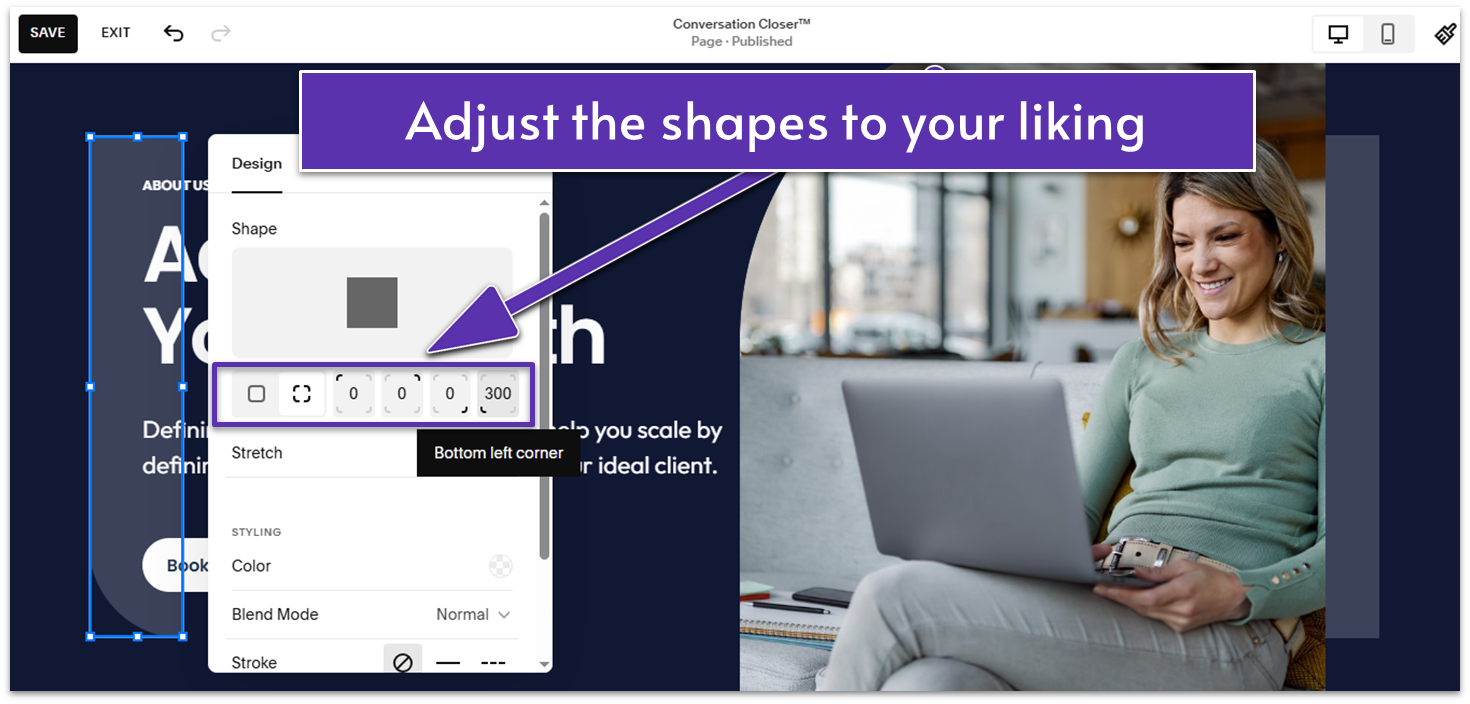
- Click on the shape.
- Click the pencil icon (
) to edit the shape. - Make adjustments as needed.
- We rounded the bottom-left corner by entering “300” into the field originally set to 0.
- We repeated the same process with the shape on the right. We rounded the top-right corner by entering “300” into the field.

- You can upload a new image file or select an image from your library or stock photos.
- Double-click the section title (the top-most text block) and replace it with your service’s name. We replaced the “About Us” section title in “Paragraph 3” with “Conversation Closer™ Launch Service.” Align the text to the left.
- Replace the headline in “Heading 1” with the core message of your service. We wrote, “Unlock Meaningful Connections.”
- For the lines in “Paragraph 1” below the headline, write a service description that adds context and supports the headline. We wrote, “Our Conversation Closer™ service combines expert coaching, cutting-edge tools, and actionable insights to facilitate meaningful interactions with clients. Transform how you connect with others.”
- Consider keeping the original formatting to maintain consistency with the rest of your site’s pages.
Feeling stuck? You can always rely on Squarespace AI to help with your website content. Just click the
Here’s the end result:
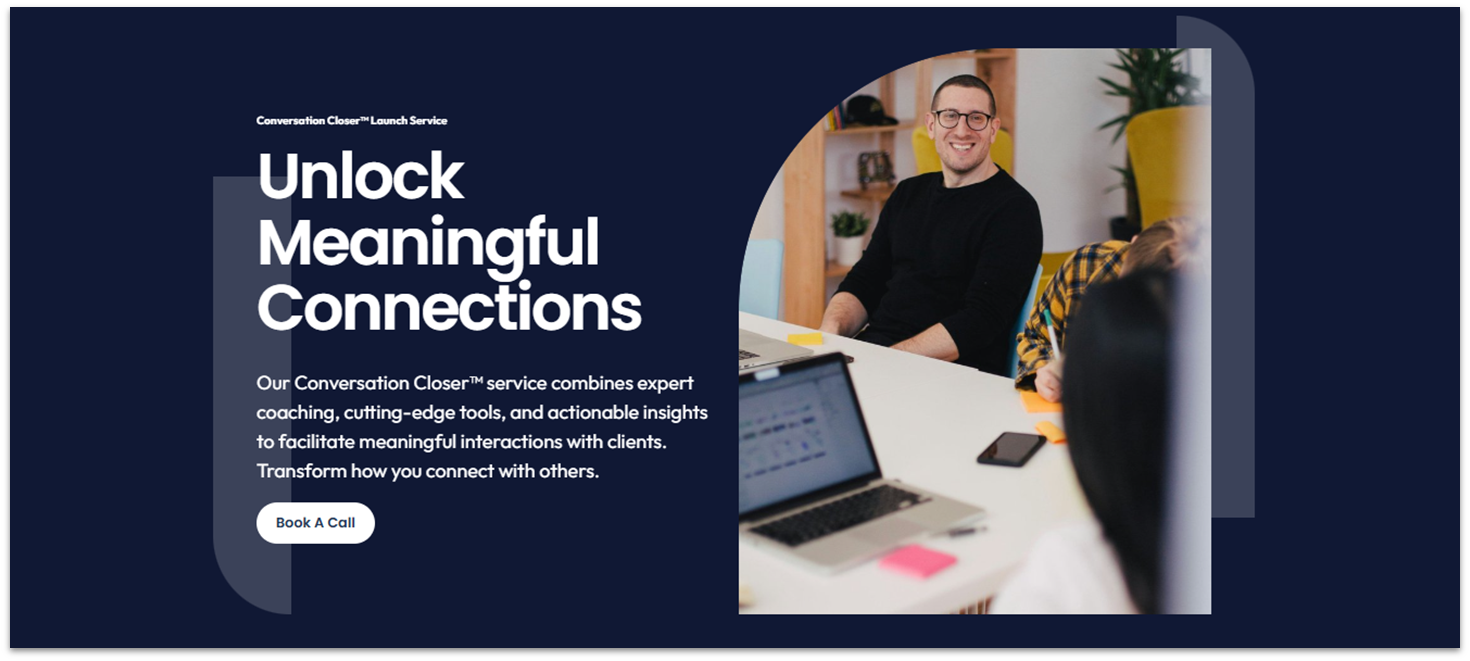 The “Book A Call” button stays the same.
Tip: You can align the elements to your liking and drag up the grid adjust button (
4.3 List Your Service Features (Second Section)
Step 1: Add a new blank section Step 2: Add a text block on the left half of the section- Stretch the text block so that it covers almost half of the section.
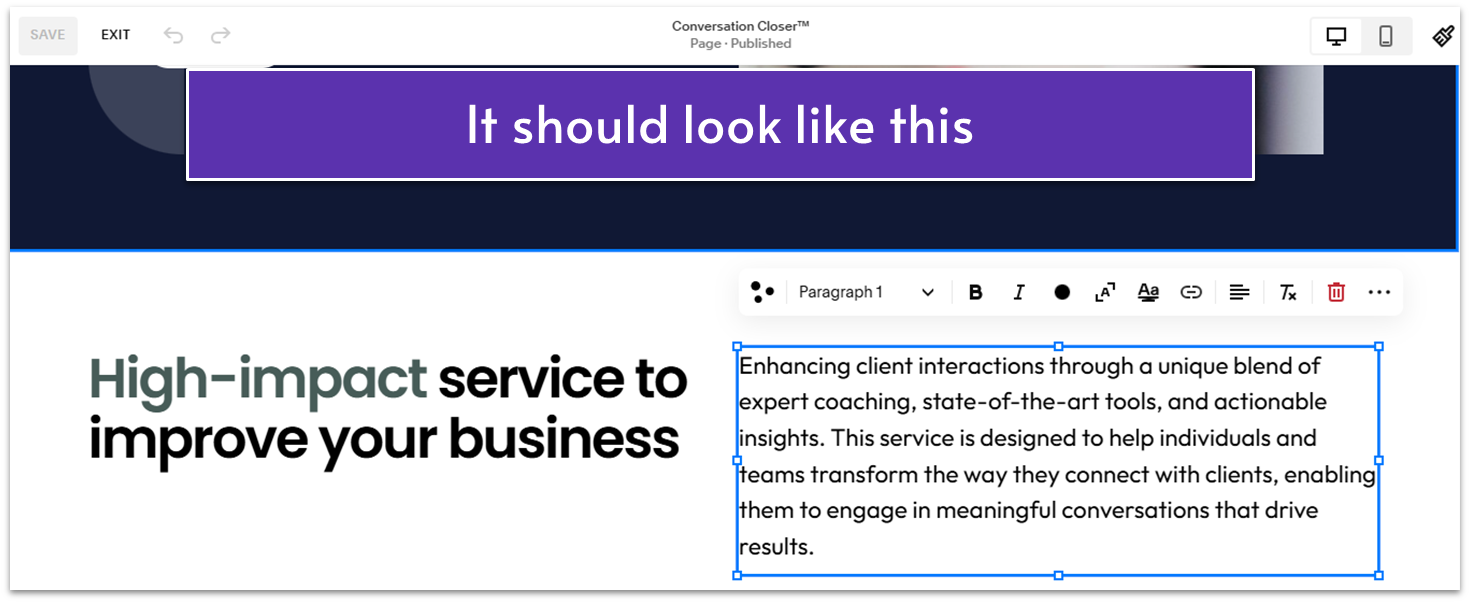
- Add a short statement that tells how your service benefits the customer. For this example, we wrote, “High-impact service to improve your business” in the text block. Format it in “Heading 1.”
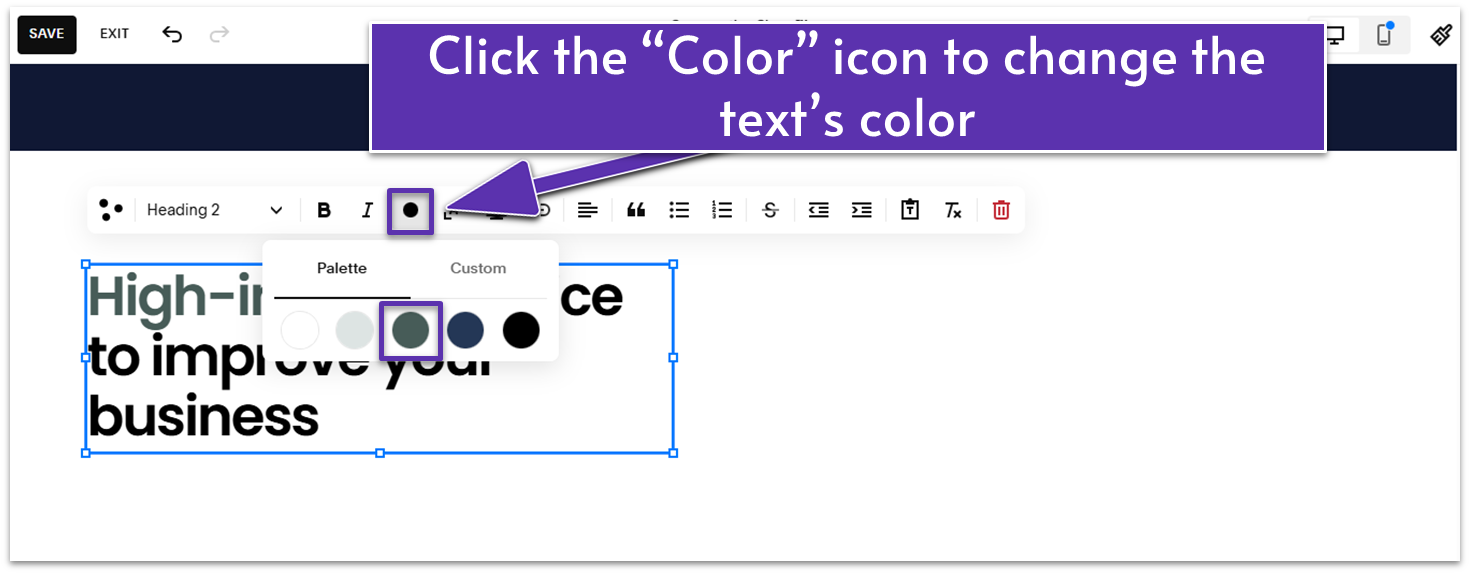
- Highlight the text you want to change and click the circle “Text Color” icon.
- Under the “Palette” tab, select the color you want.
- Place the text block next to the first text block. This will be a description block.
- Stretch the text block so that it covers almost half of the section.
- Write a description to tell more about your service’s benefits. We wrote, “Enhancing client interactions through a unique blend of expert coaching, state-of-the-art tools, and actionable insights. This service is designed to help individuals and teams transform the way they connect with clients, enabling them to engage in meaningful conversations that drive results.”
- Use “Paragraph 1” or any format you prefer for the description.
 Step 7: Copy the “Book a Call” button from the first section
- Paste the button below the text block describing your service and its benefits.
- In the line below the button, align the text block with the headline (the first text block) on the left.

- Click the block to open the main block toolbar.
- Click the paint bucket icon (
) to access “Style Background.” - Toggle the “Background” switch on.
- Click “Background Color” to choose a color. We used a light color.
- Select
under “Corner Radius” to set custom rounding for the corners. The higher the number you enter, the rounder the edges of the text block will be. We went with 20.
- Add a service feature name and format it in “Paragraph 1” and “Bold.” We put “AI-Software” as a feature example.
- Write a short description below the feature name to tell more about it. Format it in “Paragraph 2”. We wrote, “Our team understands the nuances of client acquisition. We leverage proven strategies and insights that are tailored to your unique business needs.”
- Duplicate and rewrite a text block as many times as you want depending on the number of service features you want to highlight. For this example, we duplicated the text block four times.
- Organize the text blocks evenly in a grid layout, placing them next to each other.
4.4 Introduce Your Service Team (Third Section)
In the previous module, we built the Team section. Now, we can reuse it and just change the color. Step 1: Add new section Step 2: Go to “Saved Sections” Step 3: Select the saved “Meet the Team” section layout with title and introductory text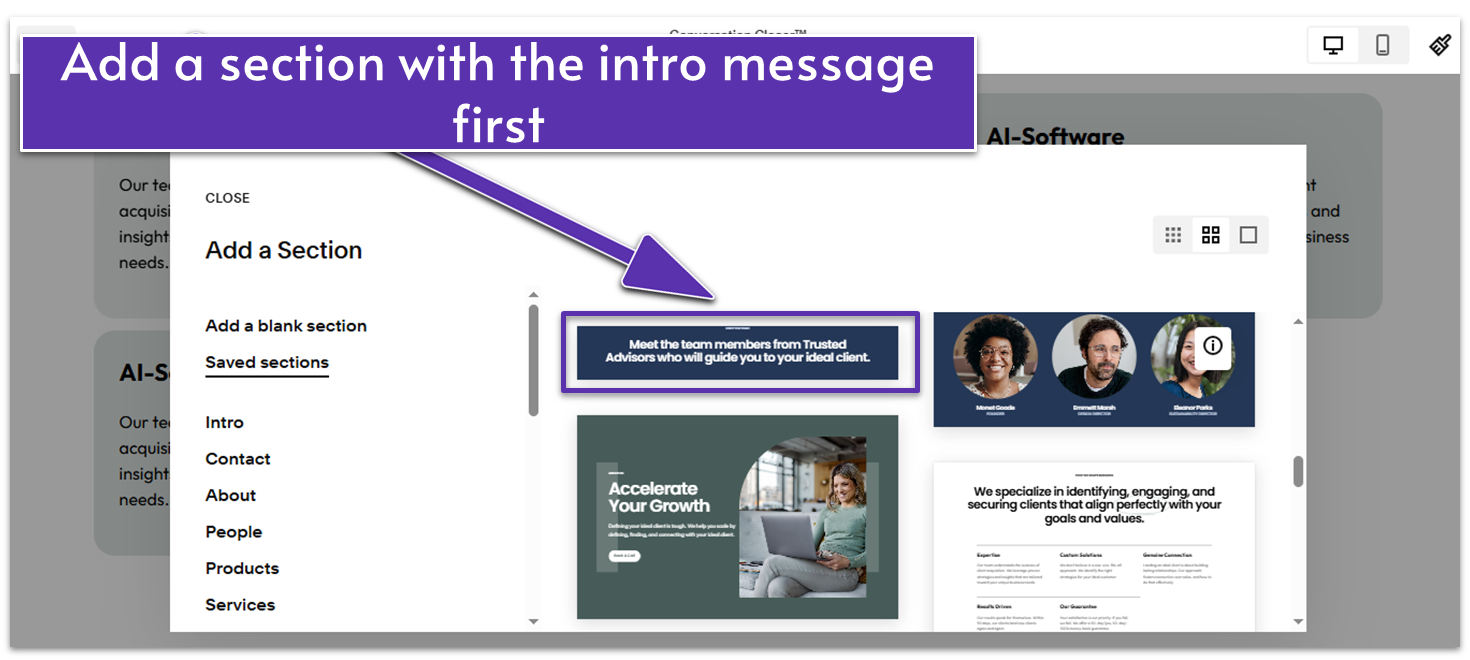
- Reuse the “Meet the Team” section in the About page you’ve built in the previous module. This section has two parts: one with the title and the introductory message and one with team members’ images, names, and positions.
- As you can only add one saved section layout per new section, first add the part of the section with the title and introductory message.
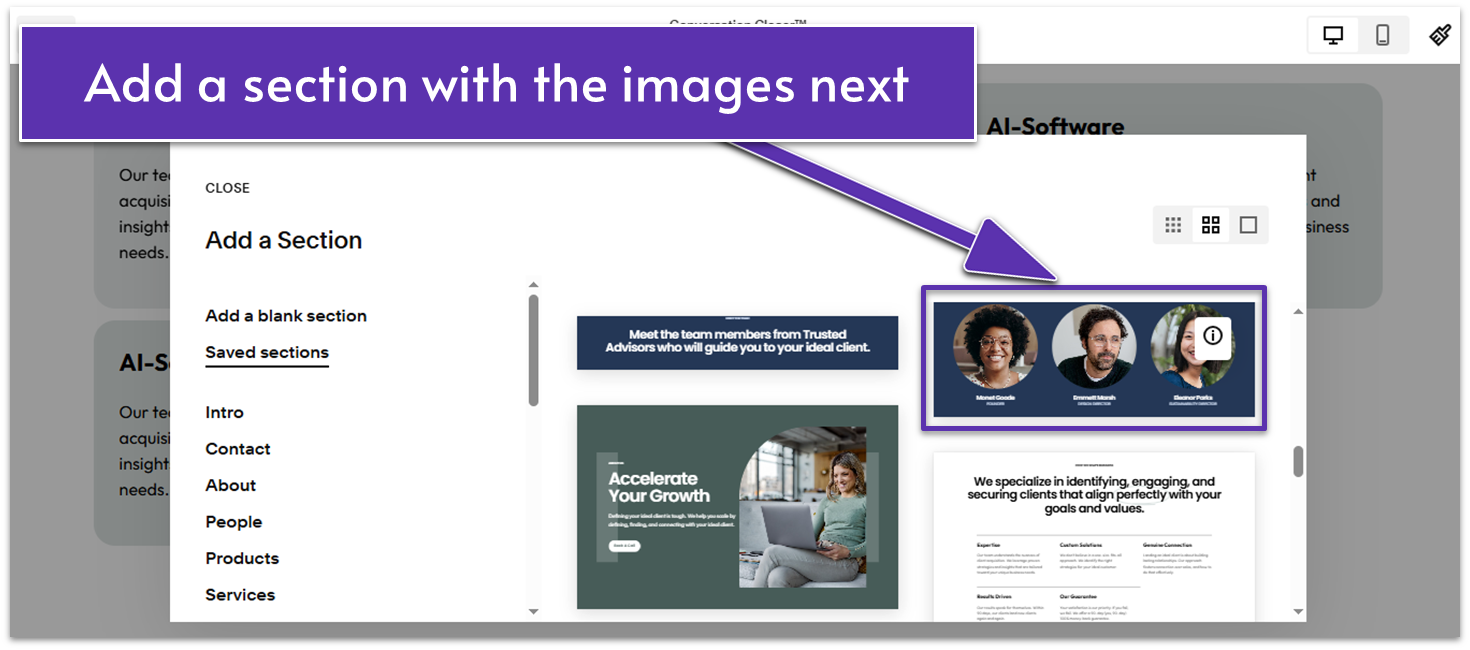
- In a new section, select the section layout with your team members’ images.
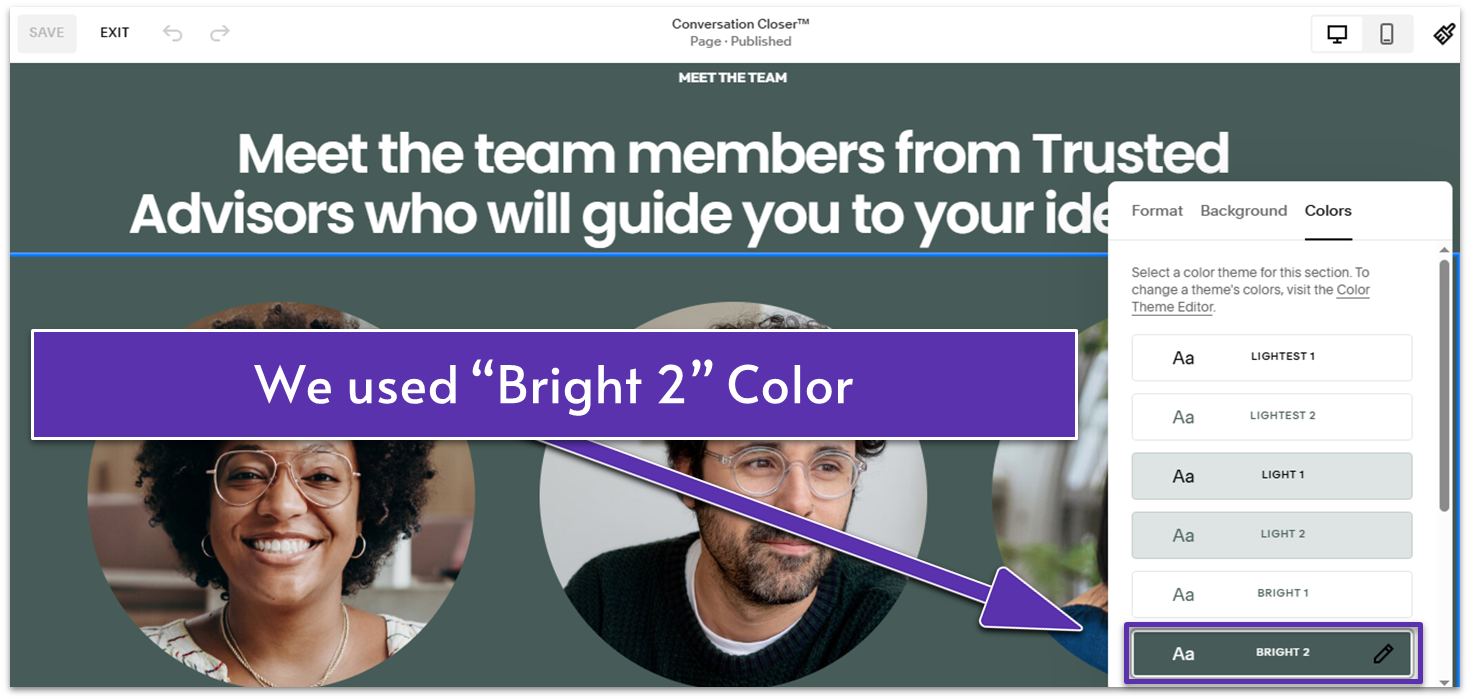
- We used the “Bright 2” color for the title and team member sections.
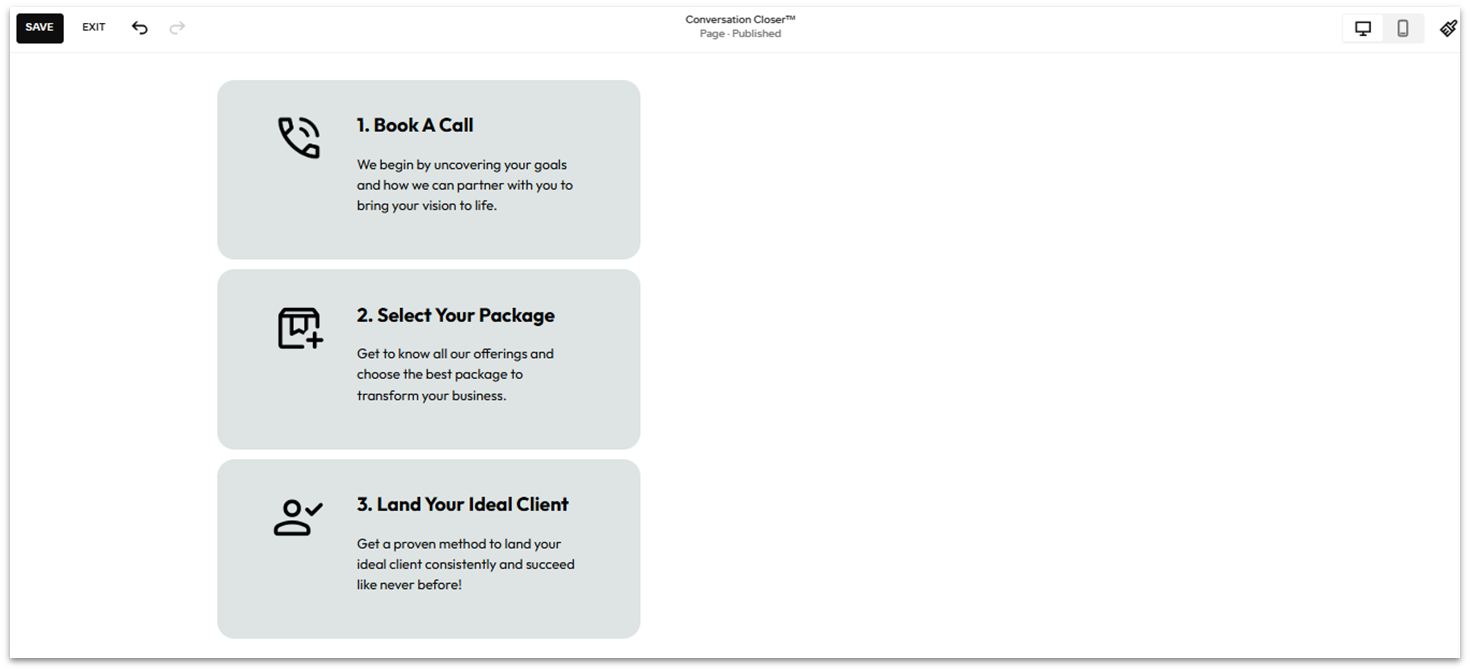
4.5 Outline Your Process Step by Step (Fourth Section)
Detailing how your services work provides transparency and can help build credibility with potential clients. You’ll be outlining the steps your prospective clients need to take to benefit from your services. This will help them understand what to expect and feel more confident in your company’s expertise and approach. Step 1: Add a blank section Step 2: Add a text block at the top center of the section Step 3: Write the section title in the text block- Write a title for this section to highlight your service process. We wrote, “Our Process” on our website. Apply “Heading 2” formatting.
- Resize the text block as long as the section title (“Our Process”).
- We wrote, “Our process is a proven approach designed to ensure consistent results for all our clients.” Apply “Paragraph 2” or your desired formatting.
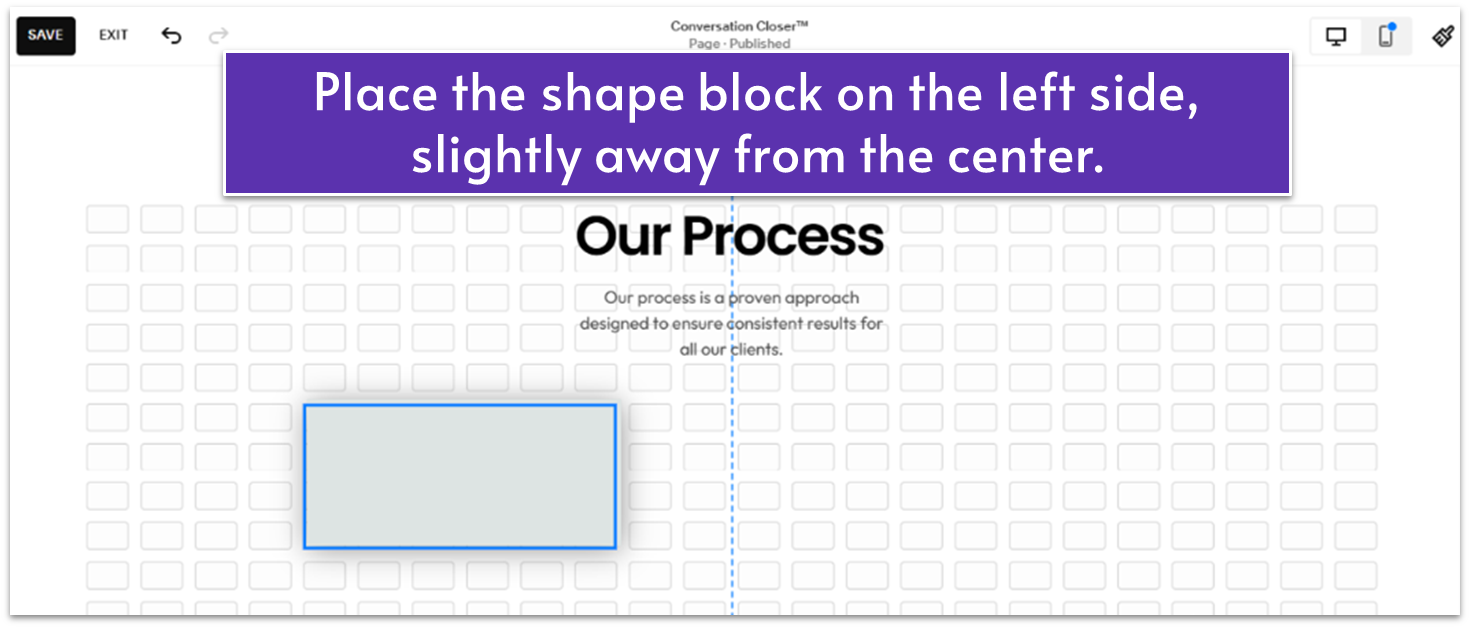
- Enlarge the shape and move it to the left side of the section, below the description. We placed it slightly away from the middle.
- To round the shape’s corners, double-click the shape block to open the “Design” panel. Select
and increase the corner roundness by typing a number in the box. For this example, we typed 20.
- Click on the block, then select the pencil icon (
) to open the editing panel.
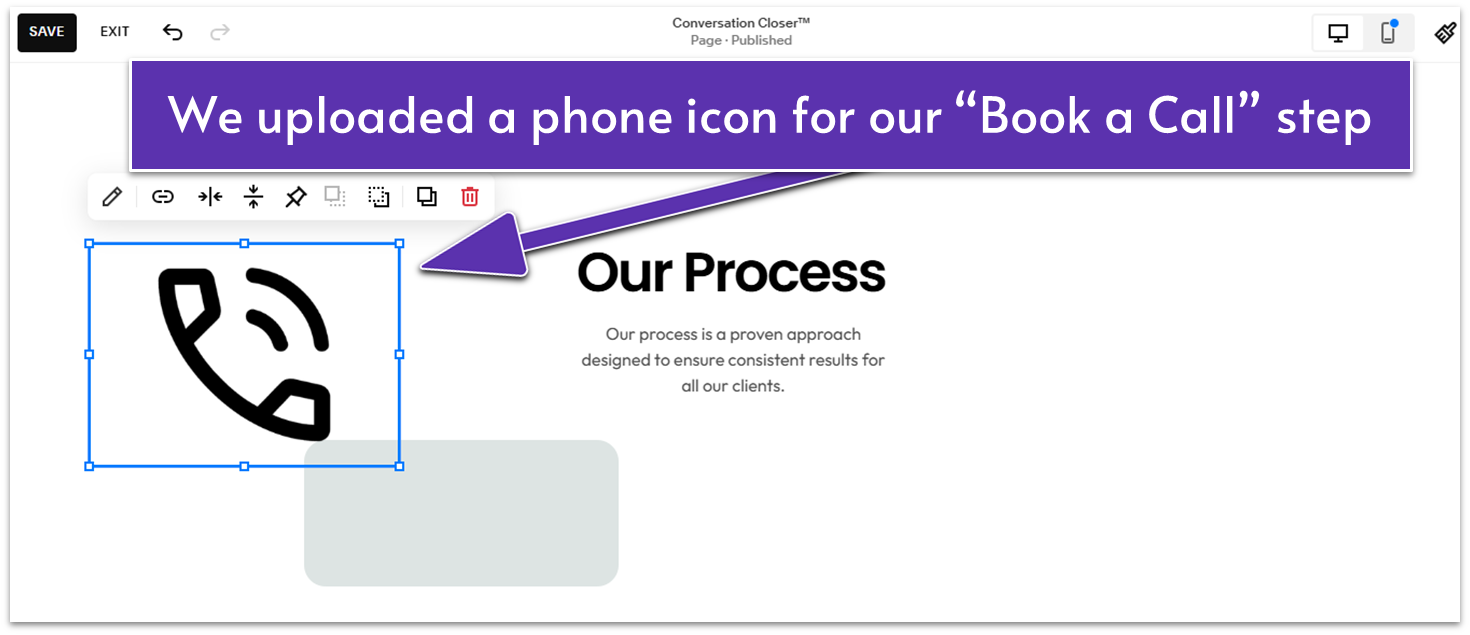
- In the “Content” tab, upload an icon that best reflects the first step of your service’s process. Since this is for the “Book a Call” step of our process, we used a clean, minimalist phone image.
Tip: To ensure your icons are suitable for uploading on Squarespace, use simple monochrome PNG or SVG images with transparent backgrounds.
Step 9: Place the icon inside the shape
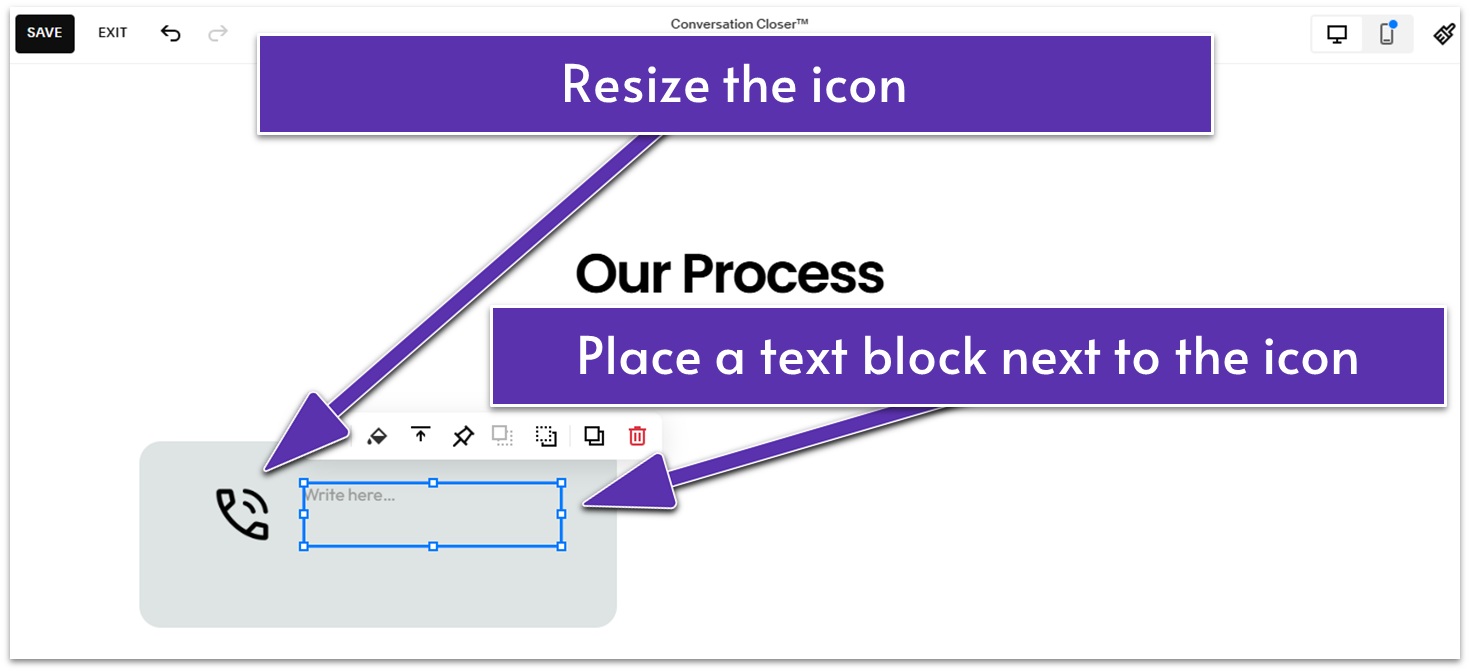
- Resize the icon so that it fits in the upper right corner.
- Write the first step of the process in the text block as a title. We wrote, “Book a Call” and formatted it in “Paragraph 1” and “Bold.”
- Add a short description below the title to add more details about the step. We wrote, “We begin by uncovering your goals and how we can partner with you to bring your vision to life.” and applied “Paragraph 2” formatting.
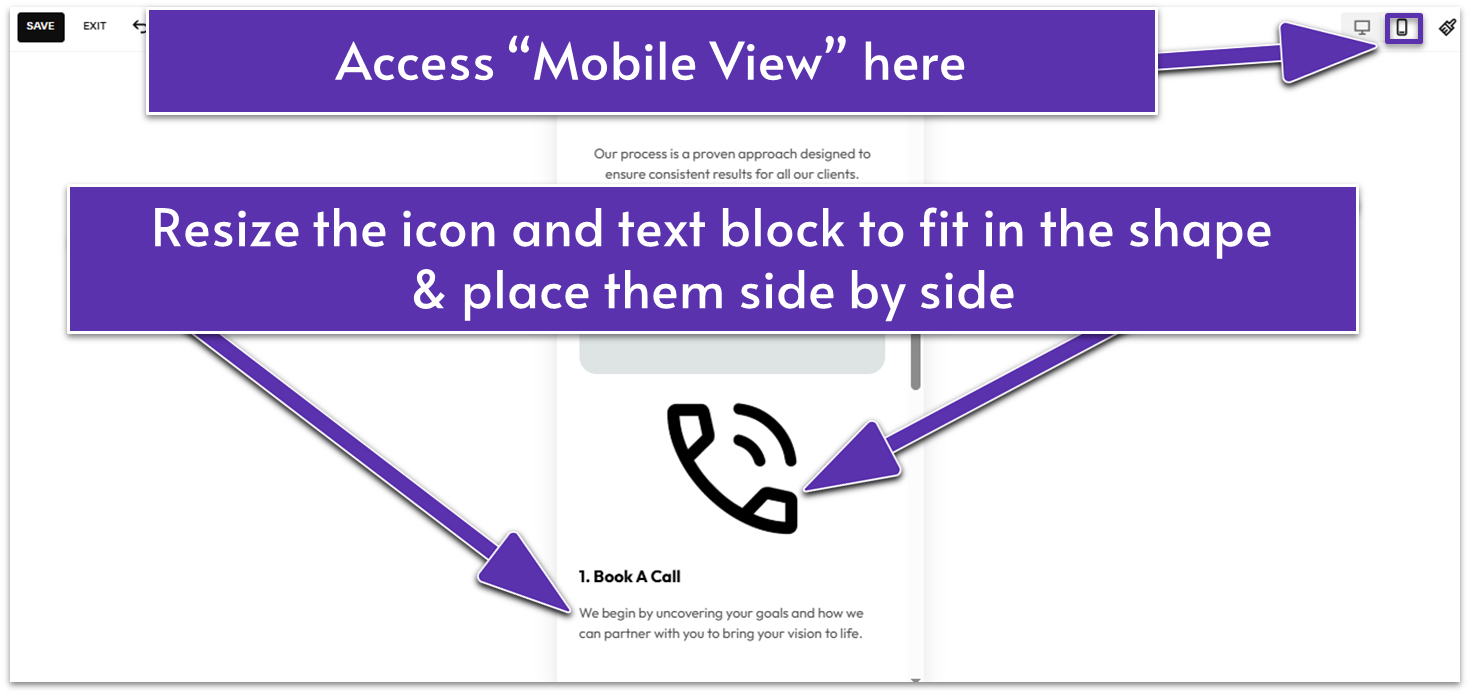
- Resize the icon and text block to fit in the shape. Place them side by side like you did in the desktop view.
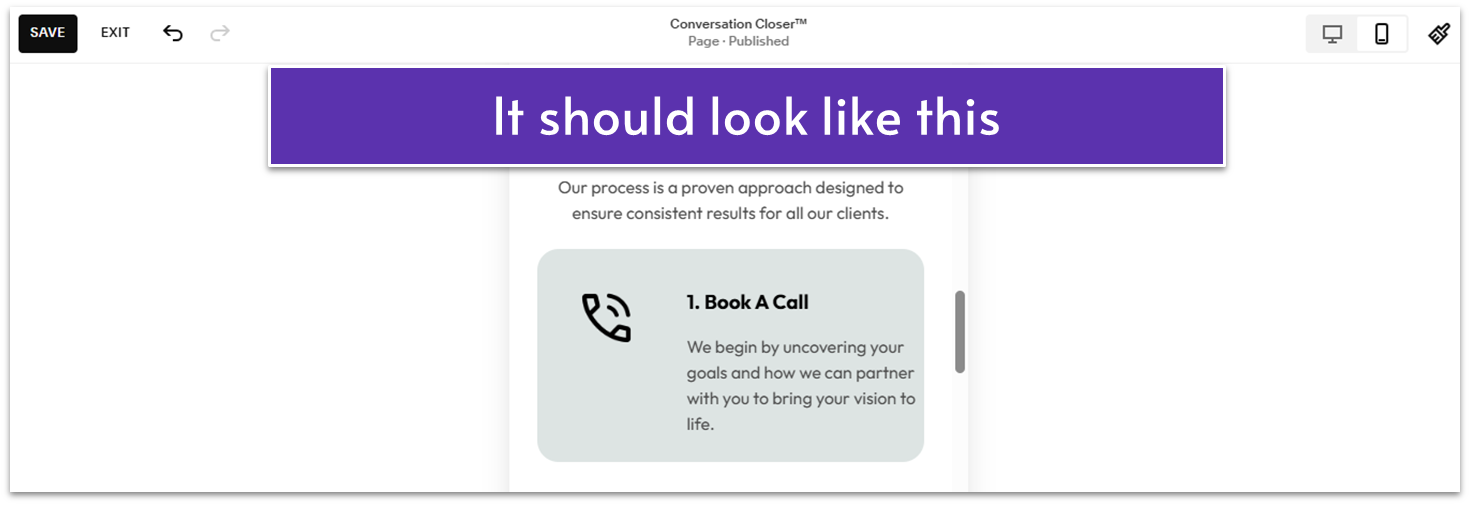
- You’ll notice that the text is a little too close to the edge of the text block. To fix this, you’ll need to adjust the text block’s background and spacing.
- Click the text block to open the main block toolbar.
- Click the “Style Background” paint bucket icon (
). - Toggle the “Background” switch on.

- Go to “Background Color” and drag the slider down to make the background transparent.
- Click the three dots button (
) under “Padding”
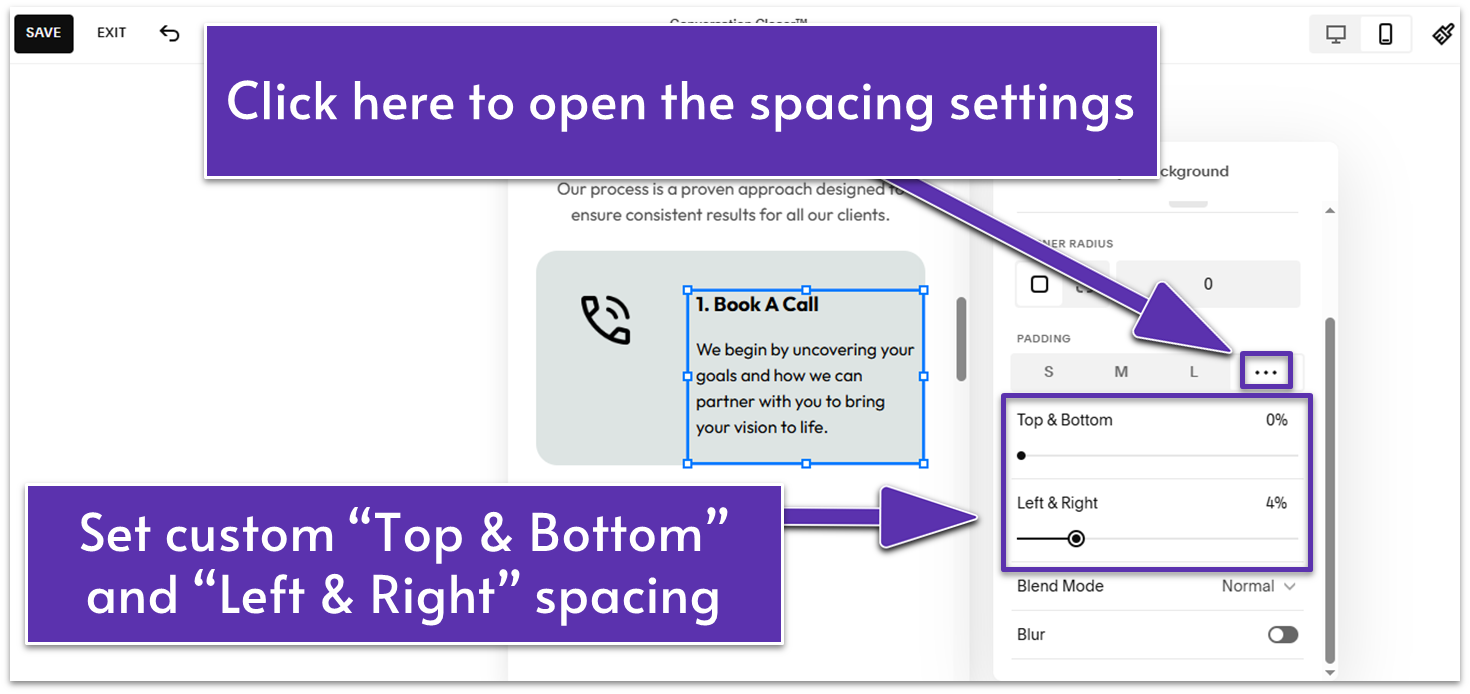
- Set custom “Top & Bottom” and “Left & Right” spacing. We set “Top & Bottom” spacing to 0% and “Left & Right” spacing to 4%.
 If the background changes in the mobile view affect the alignment of elements in the desktop view, apply the same adjustments there as well.
Now we’ll go back to the desktop view.
Step 14: Select the shape, image, and text blocks to duplicate all
If the background changes in the mobile view affect the alignment of elements in the desktop view, apply the same adjustments there as well.
Now we’ll go back to the desktop view.
Step 14: Select the shape, image, and text blocks to duplicate all
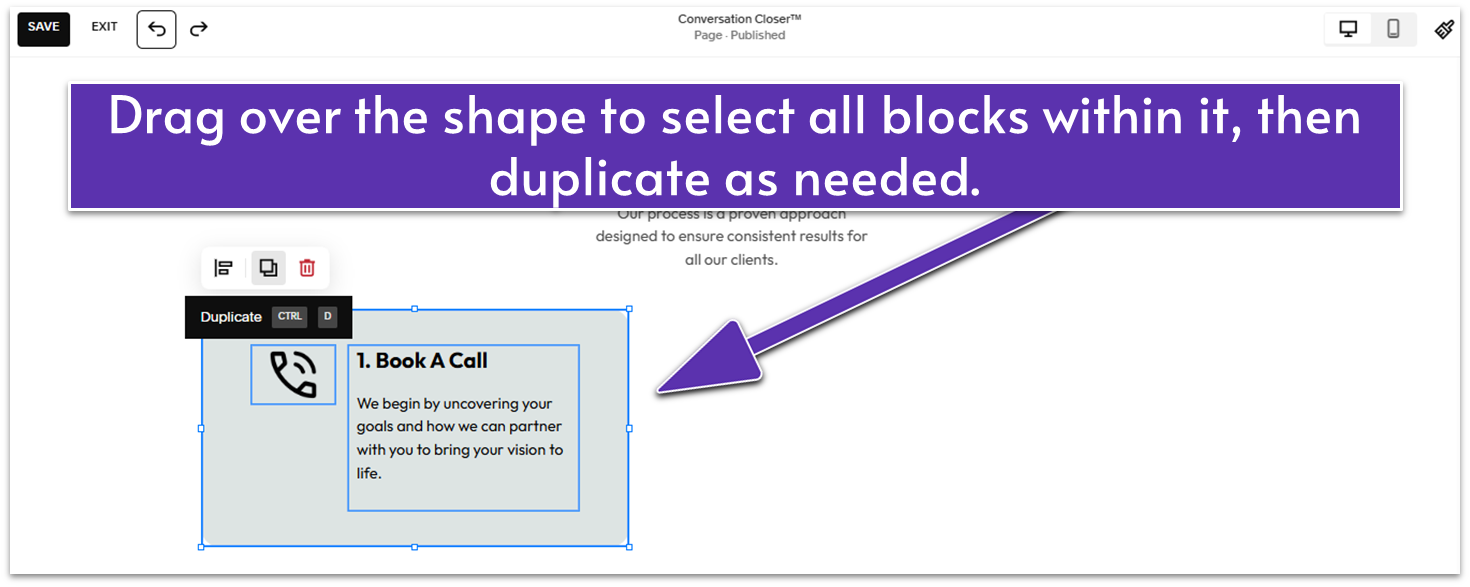
- Highlight the entire shape and the other blocks in it and click “Duplicate” (
). - Click “Duplicate” as many times as needed, depending on the number of steps in your process.
- Organize the duplicated blocks in a vertical column.
- Fill the duplicates with the next steps of your process, updating each with a new title, icon, and description.
 You can also change the background colors of each shape to make them stand out.
- Double-click the shape to open the “Design” panel.
- Go to “Color” and pick a color you want.
- Adjust the color opacity to your liking.
- Place a button below the last shape.
- Change the button text to “Book A Call” and link it to the “Book Your Call” Contact page you created in Module 2. You can also copy and paste the “Book A Call” button from the first and second sections.
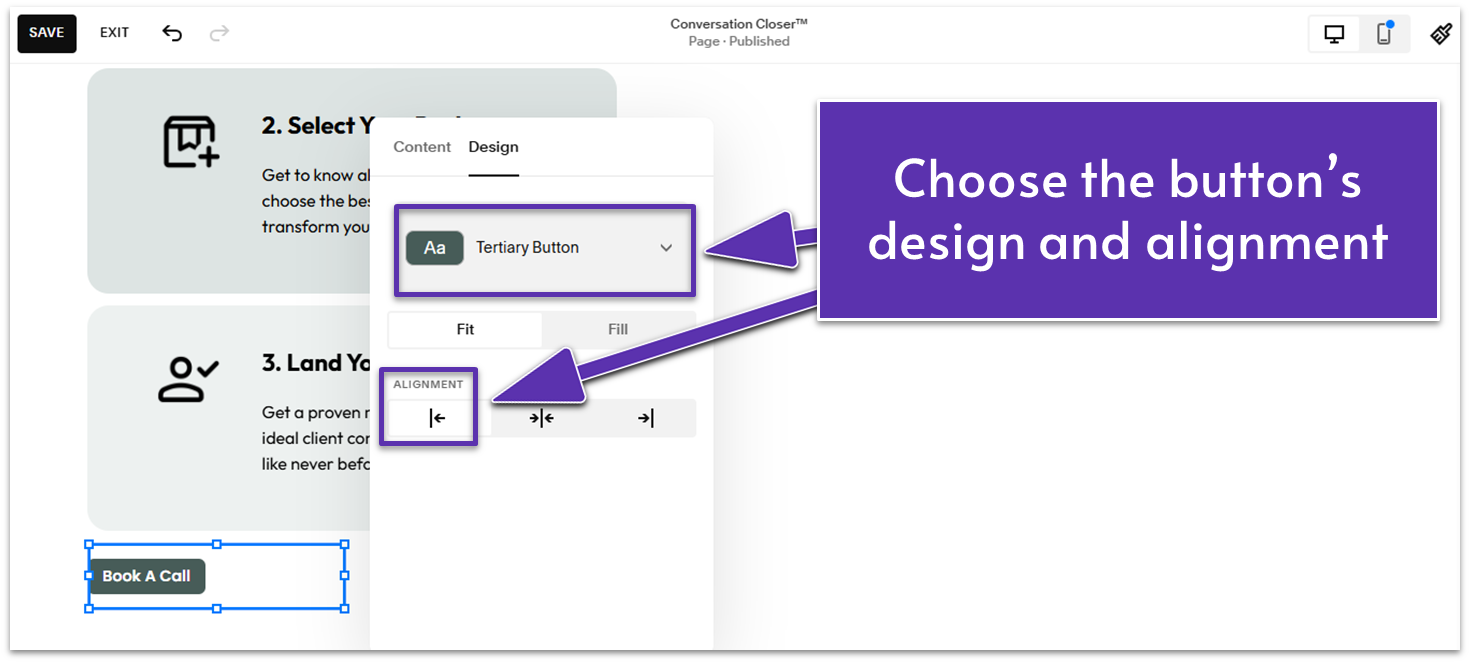
- You can customize the button’s design. We changed the button style to “Tertiary Button.”
Each button is “Primary” by default. You can keep it as is or change it to “Secondary” or “Tertiary” within the “Design” tab.
- Select “Fit” to keep the button’s size and align it to the left (
).
- Drag the image block to the right half of the section, slightly away from the shapes (list of steps).
- Add a new image and make it bigger to fill the right half of the section.
- Double-click the image and go to the “Design” tab.
- Click “Fill” to expand the image to fill the whole frame of the block.
- Click on
under “Corner Radius” and round all corners if needed. For this example, we set the corner roundness at 24.
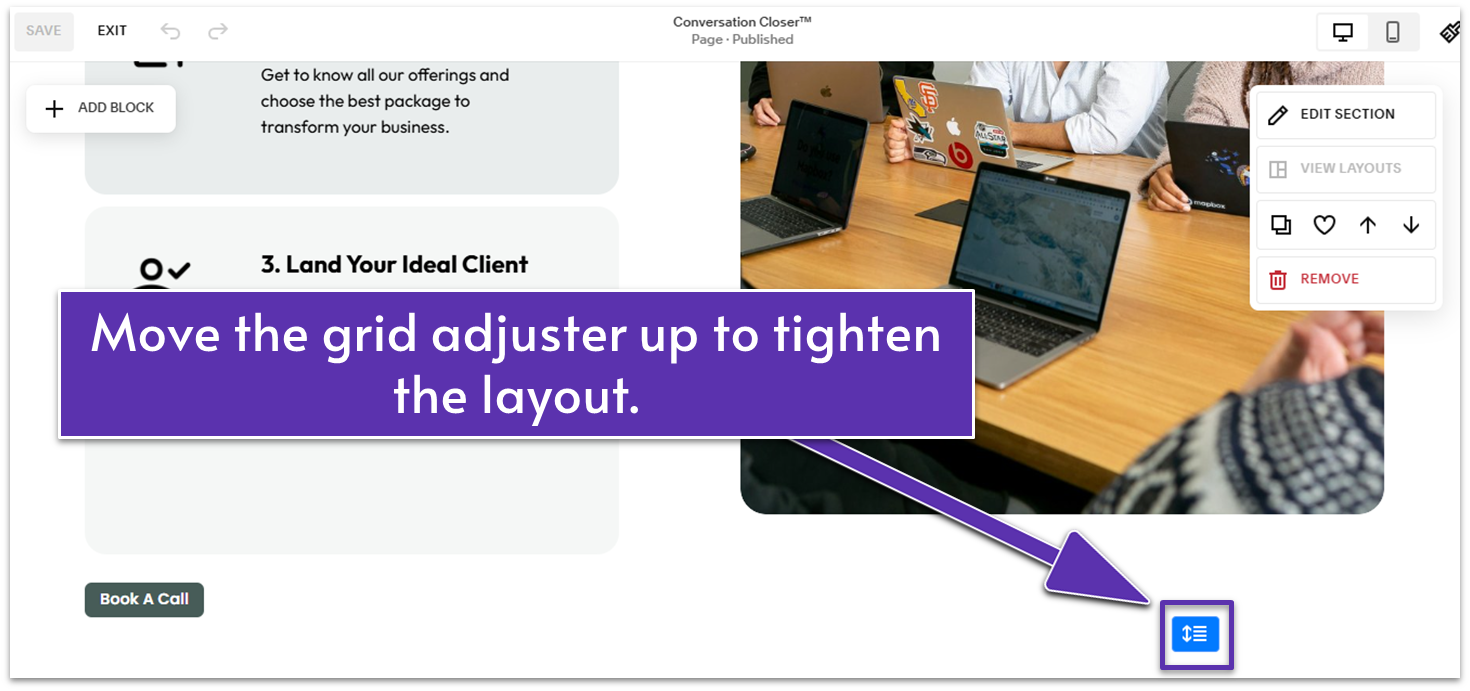
- Drag up
to remove the extra white space at the bottom of the section.
4.6 Share What Your Clients Say (Fifth Section)
Next up is the Testimonials section. Adding testimonials to your website helps build trust and credibility by showcasing your real-life experiences and results from previous clients. Choose testimonials that emphasize the key benefits of your service to show how it effectively meets customer needs and expectations. Step 1: Add a “Testimonials” section- Add a new section.
- Select “Testimonials” in the “Add a Section” menu.
- Choose a layout from the prebuilt options. We picked a simple layout with text, quote source, and slider arrows to show one testimonial at a time.
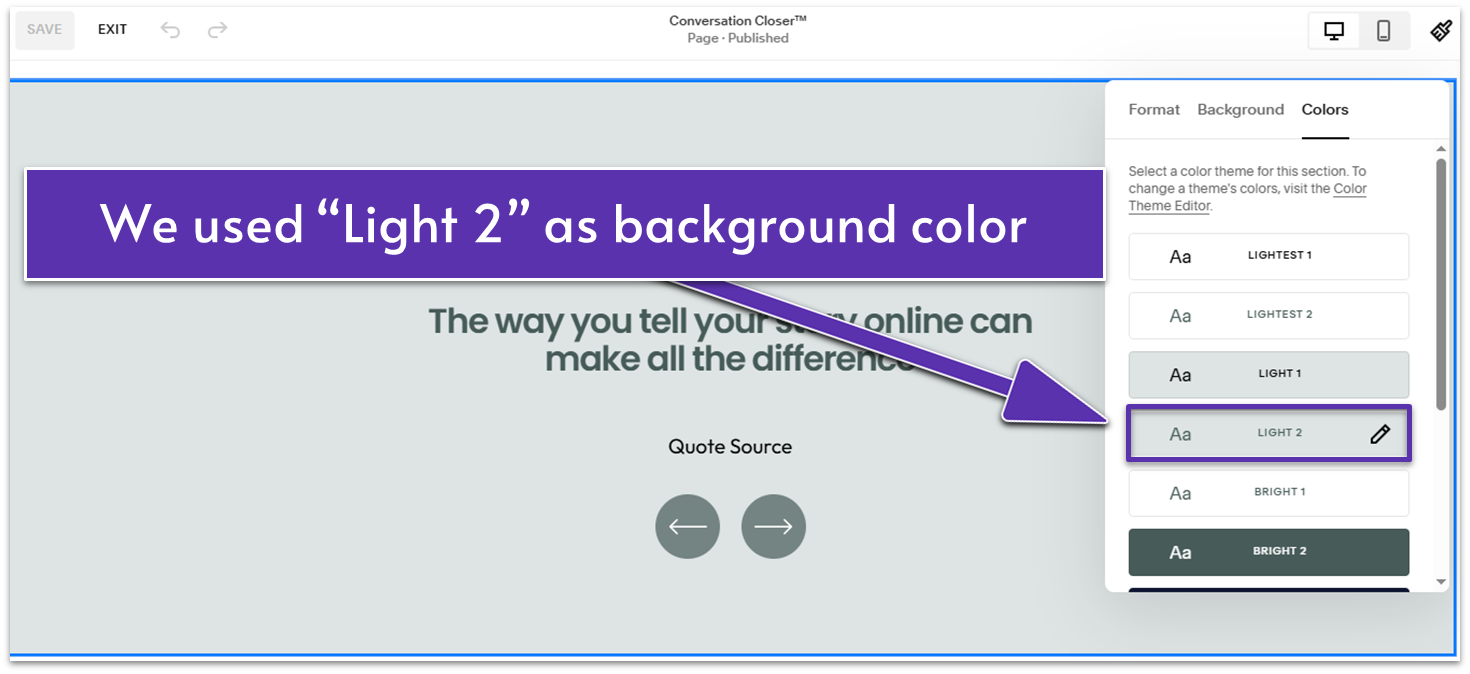
- We chose the “Light 2” color.
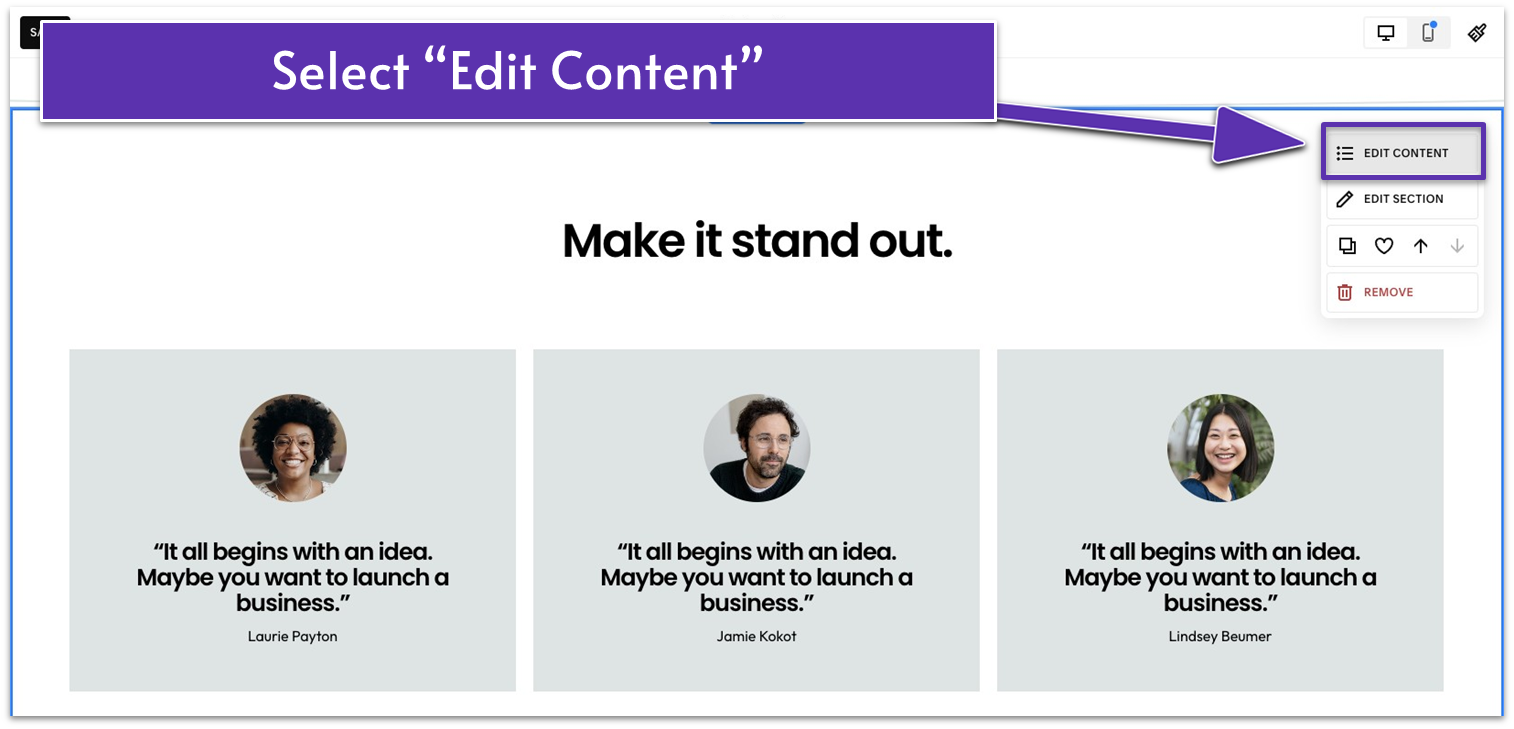
- Click “Edit Content.”
- Go to the “Elements” tab and toggle the “Title” switch.
- Go to the “Content” tab. Click the “Title” field under “Section” to open the panel where you can change the text. We wrote “Testimonials” in the title text box.
- Go to the “Design” tab and adjust the layout settings.
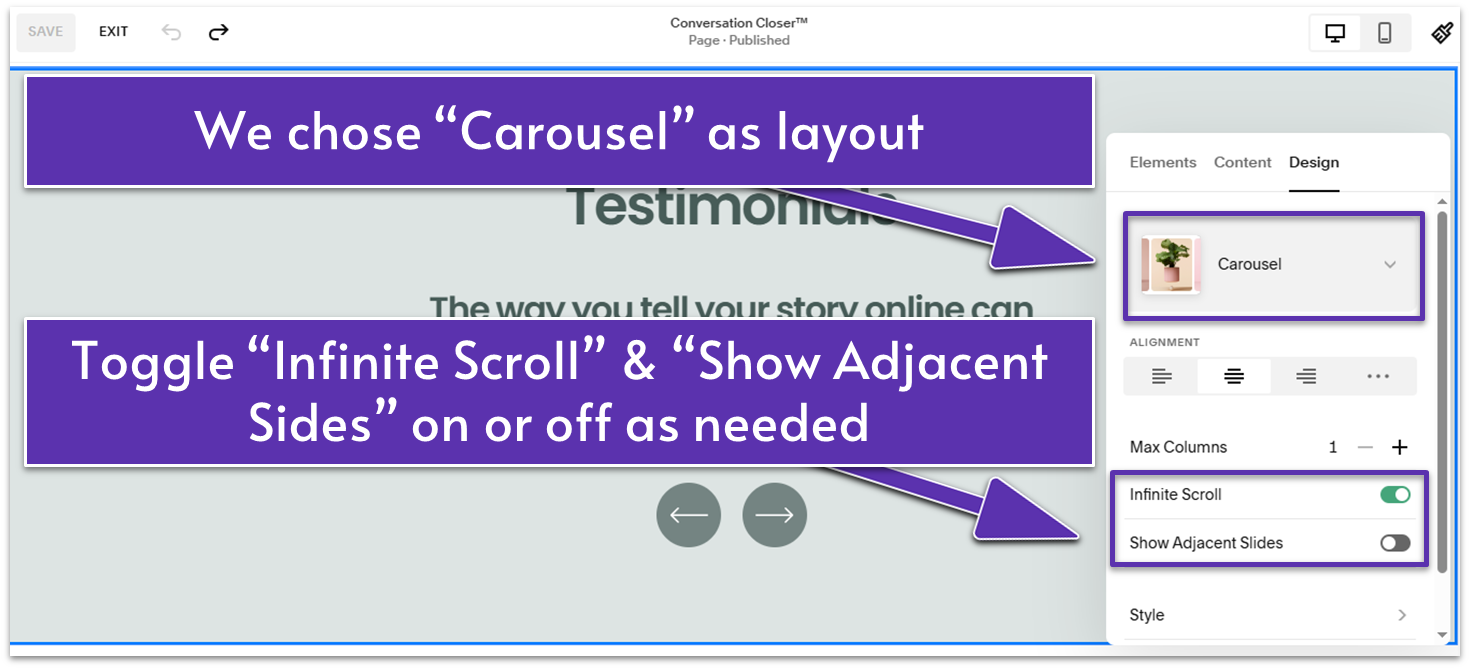
- Choose a layout design. We chose the “Carousel” layout to show testimonials in a rotating slider format. Also, in the “Max Columns” field, we put 1 to display only one testimonial per slide.
- Toggle “Infinite Scroll” on if you want site visitors to keep scrolling through testimonials in a continuous loop.
- Toggle “Show Adjacent Sides” off to hide the edges of other testimonials. This gives site visitors a visual cue that there are more testimonials to swipe through.
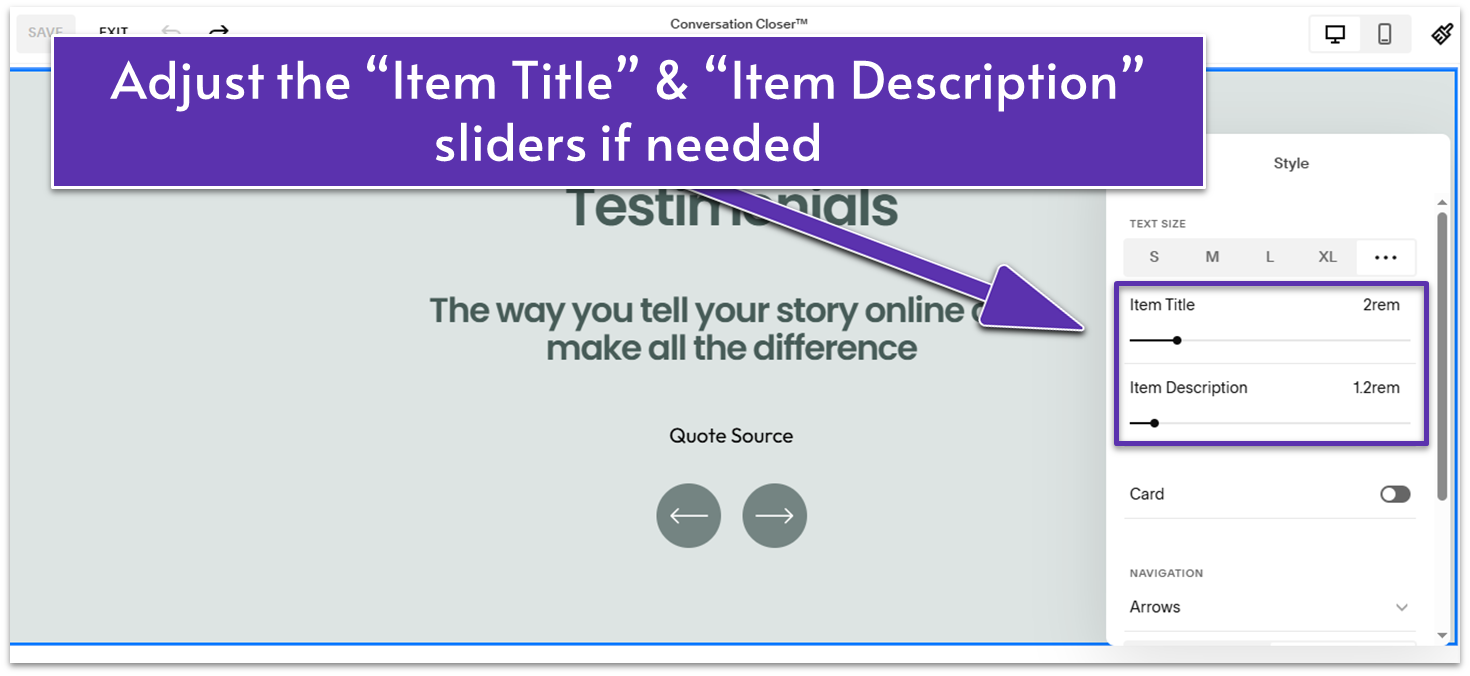
- Click on “Style” and click the three dots button (
) under “Text Size” to access the “Item Title” and “Item Description” sliders. - Adjust the “Item Title” and “Item Description” fields if needed. We went with 2 rem and 1.2 rem respectively.
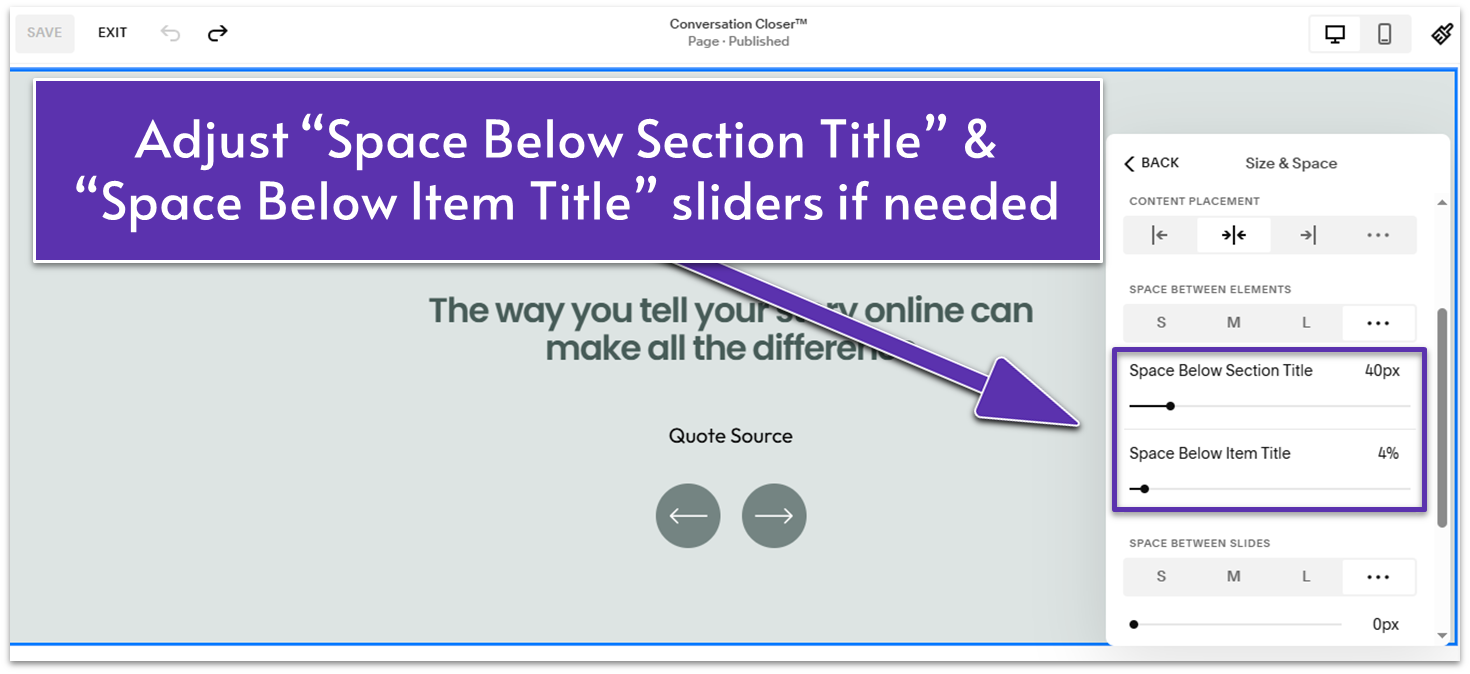
- Go back to the “Design” tab and click on “Size & Space”
- Under the “Size and Space” tab, set “Content Width” to “S” (small) and “Content Placement” to “Center” (
). - Adjust the spacing if needed. We set the “Space Below Section Title” to 60 px and “Space Below Item Title” to 4%.
- Set the “Vertical Padding” to “M” (medium) and set the “Position” to “Fill” (
).
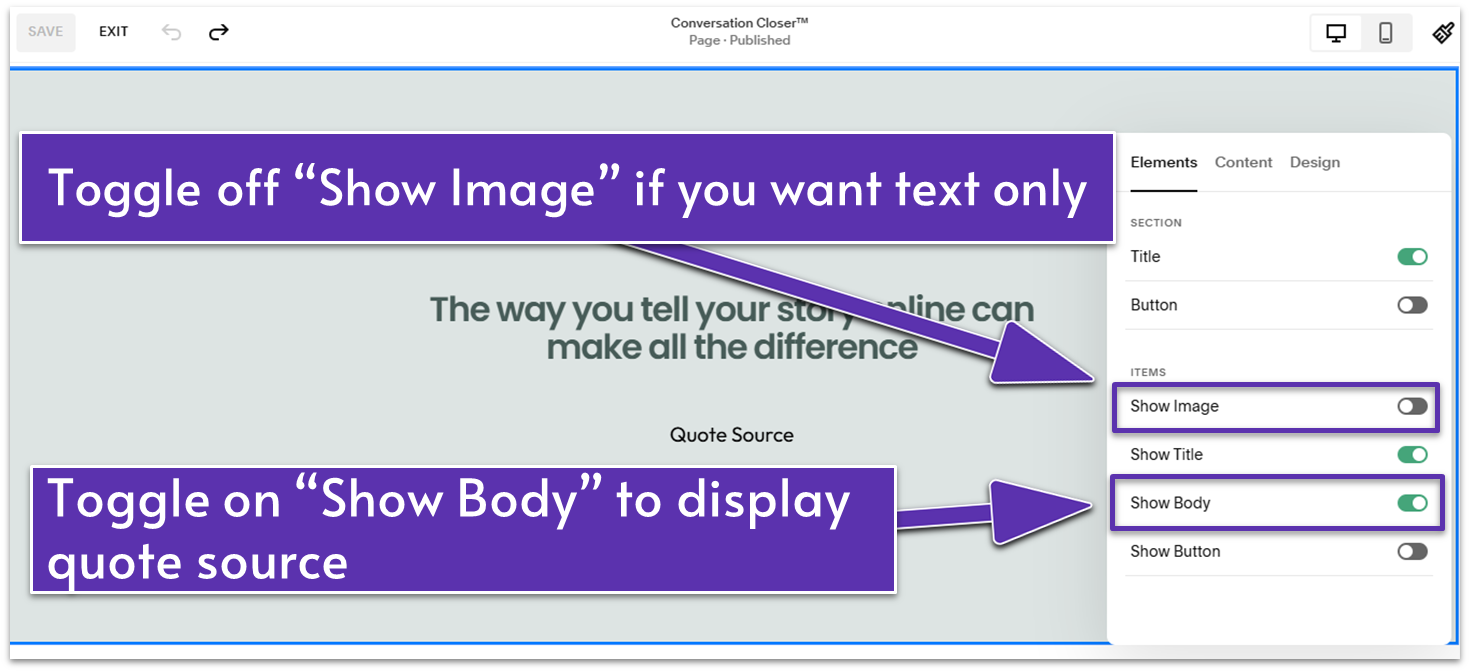
- In the “Elements” tab, turn off “Show Image” to display only the testimonial text. Then turn on “Show Body” to display the client’s name.
4.7 Build an FAQ to Answer Key Questions (Sixth Section)
You can get this “Frequently Asked Questions” (FAQs) section done really quickly. With an FAQ section, you can address common questions and concerns potential clients may have and make it easier for them to understand the services you offer. Step 1: Add a new blank section Step 2: Add a text block- Place the block on the upper-left side of the section grid.
- Write “FAQs” or your preferred title in the text block. We applied “Heading 2” formatting.
- Click “Add Block.”
- Choose “Accordion.”
- Move the accordion block to the right, close to the center of the section.
- Adjust the accordion’s size to your liking. We stretched it to the right to make it larger.
- Double-click the accordion block to open the “Edit” panel. You can also click the pencil icon (
) in the block’s main toolbar. - Go to the “Design” tab.
- Click on “Title” under “Text” to choose the text style of the question title. We picked “Paragraph 1.”
- Click on “Description” to choose the text style of the answer. We selected “Paragraph 2.” Feel free to adjust its width, padding, alignment, and placement.
- Back to the “Design” tab, go to “Row Padding” and click on the three dots button (
) to adjust the spacing in the accordion. We set the “Accordion Item Padding Top” to 20 px.
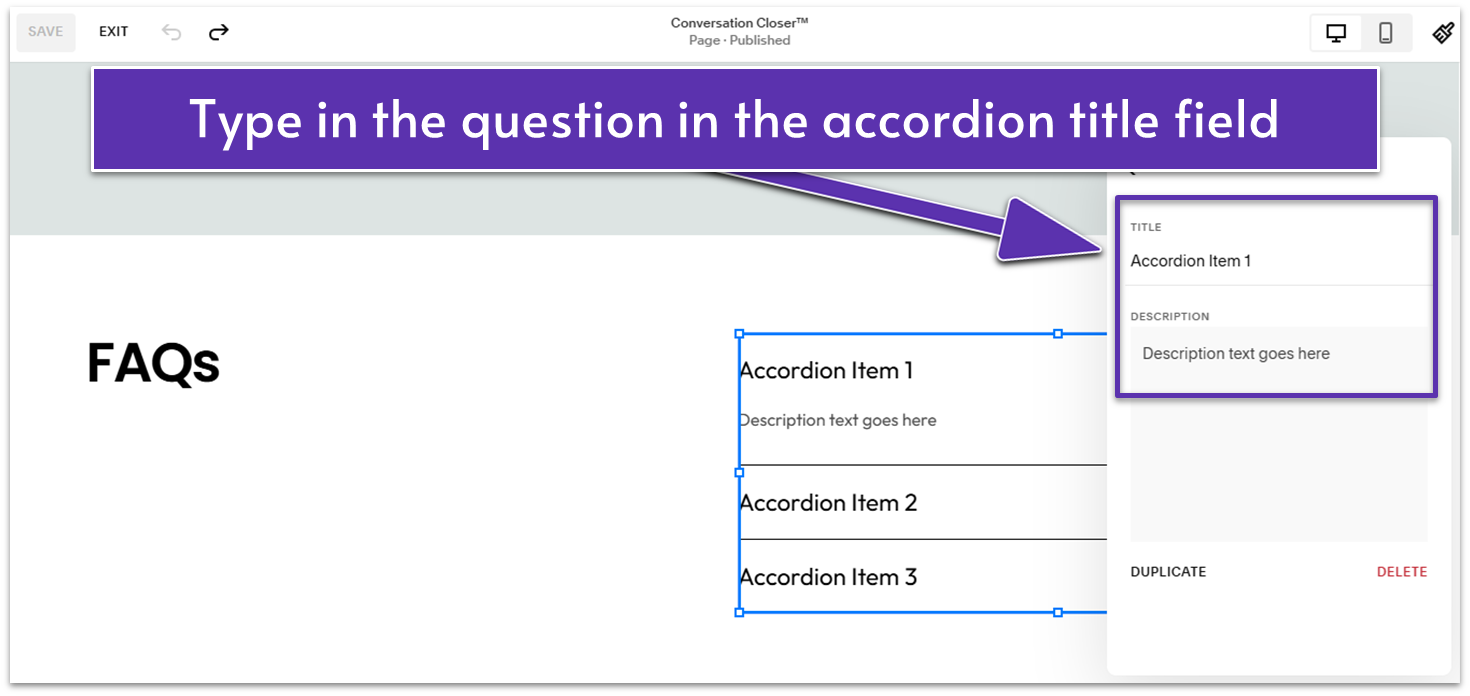
- From the “Content” tab, you can edit questions and add items if you need more FAQs.
4.8 Add a Section for Your Contact Form (Seventh Section)
Now you’ll just pull the “Book Your Call” section from the Contact page you previously built and tweak it a bit. Step 1: Add a new section and go to “Saved Sections”Step 2: Select the “Book Your Call” section
- The “Book Your Call” section is the first section you created on your Contact page (Module 1).
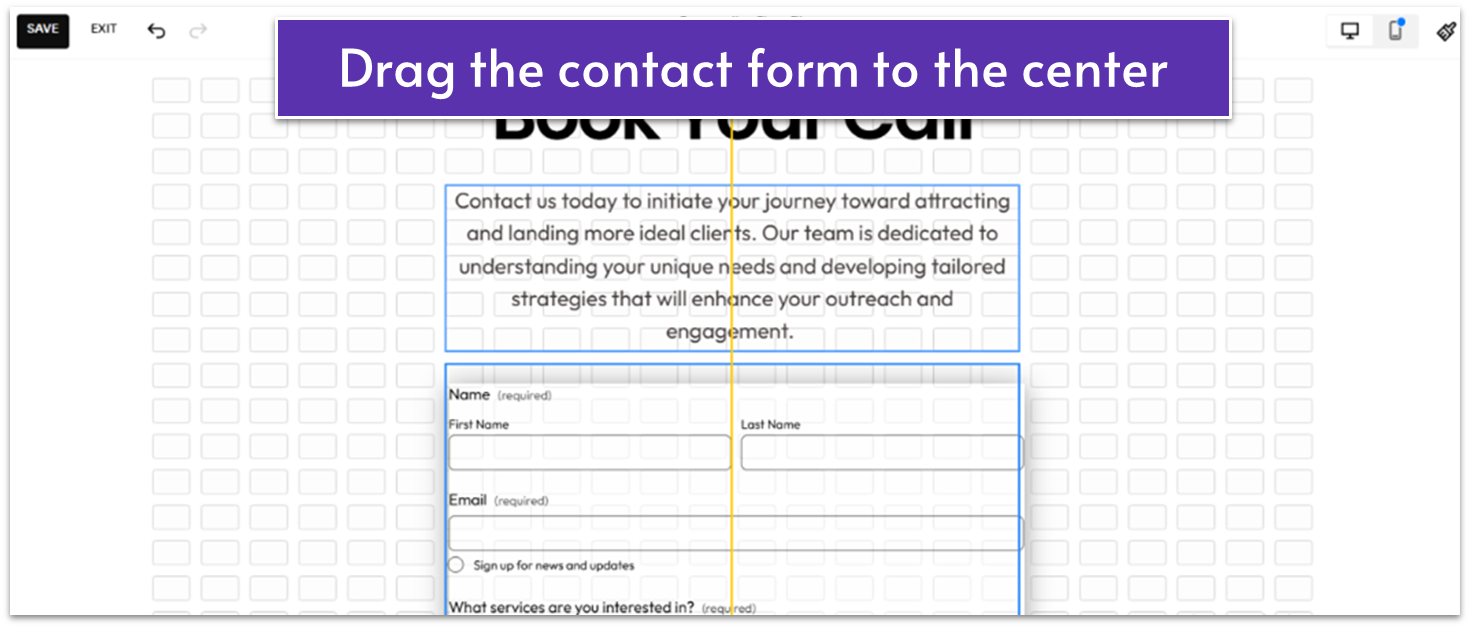
Step 4: Move the contact form to the middle
- It should look like this:
 Step 5: Change the section’s color
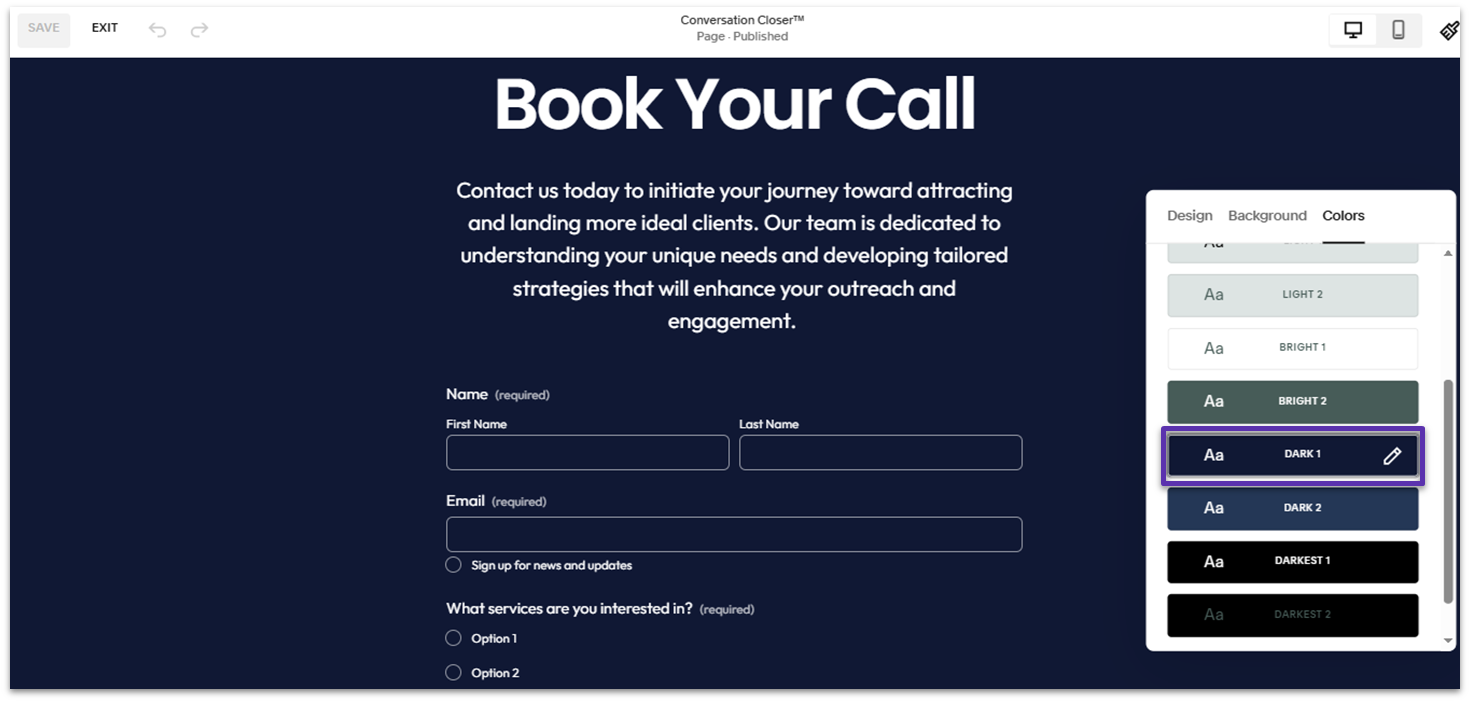
- We used the “Dark 1” color for this section.
4.9 Optimize for Mobile
Now it’s time to ensure your Services page looks great on smaller screens too. If you’ve noticed any elements that seem out of place, feel free to adjust them. Your mobile view can be just as clean and polished – it’s all up to you. After the finishing touches, here’s what our mobile page looks like: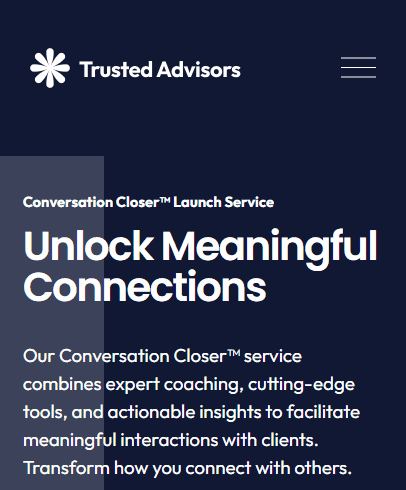 Here’s a look at what you can do and the changes we made to our Services page’s mobile view:
Step 1: Go to “Mobile View” (
Here’s a look at what you can do and the changes we made to our Services page’s mobile view:
Step 1: Go to “Mobile View” ( 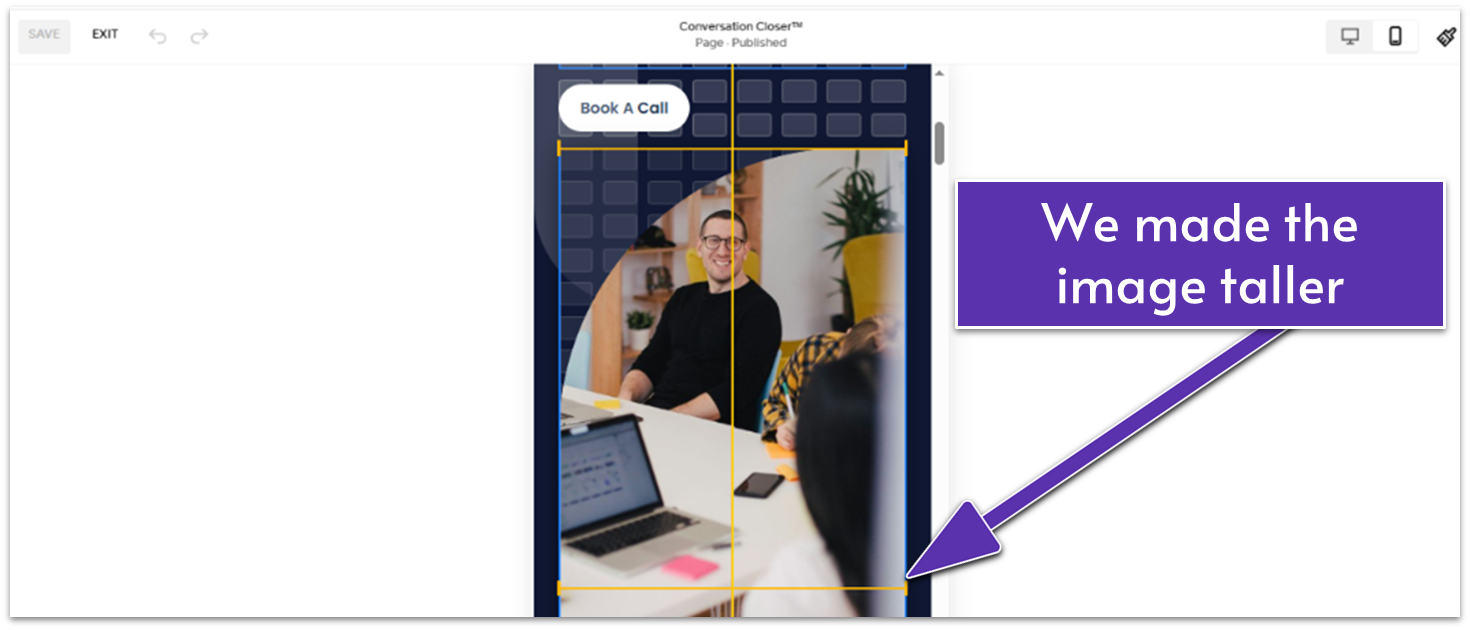
- Lower the shape at the bottom and make the image taller.
- Move the shape back up to slightly overlap the bottom of the image and send it backward using
. - Resize the image and shape further if necessary.
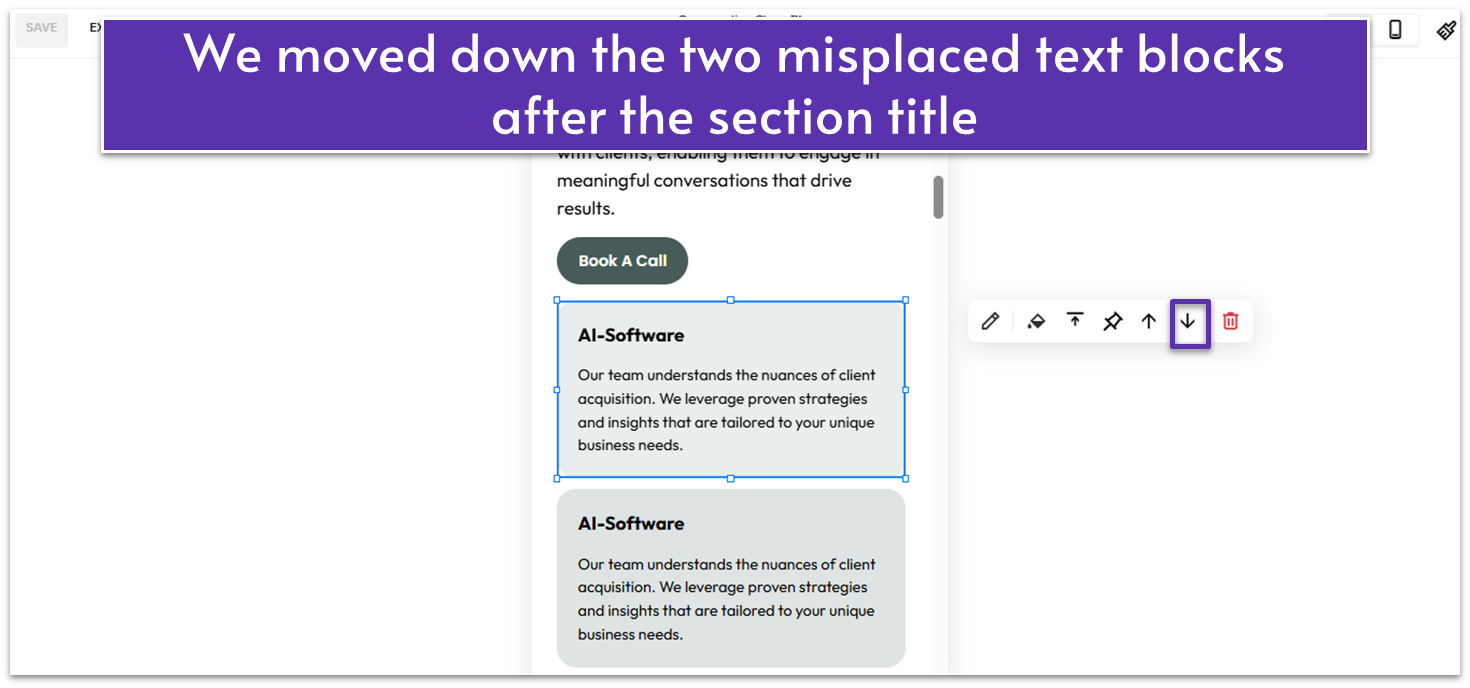
- Use the arrow buttons to move blocks up (
) and down when ( ) needed to ensure that your Services text blocks are in order. In the service features section, we moved down two misplaced text blocks, which were right after the section title. This placed the description and the “Book A Call” button correctly under the section title. - Adjust the alignment of blocks if needed. For example, we center-aligned the “Our Process” title.
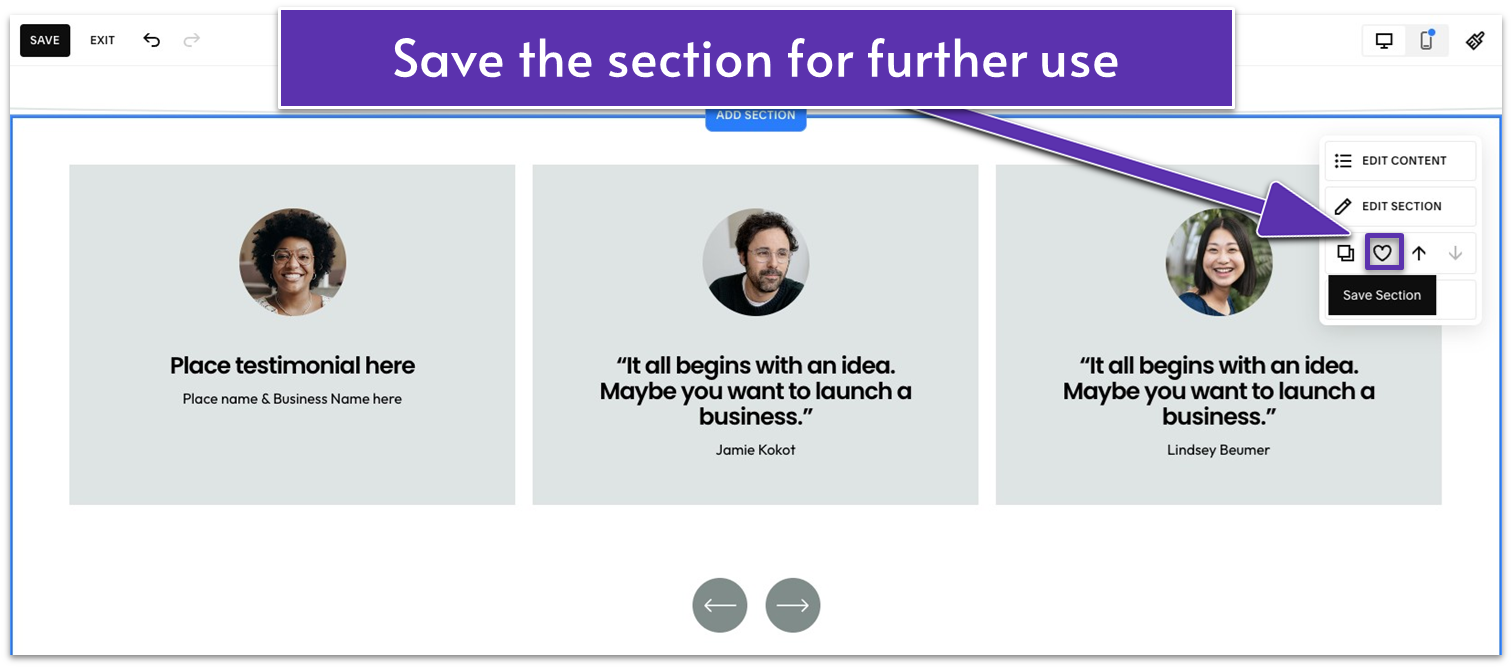
 Before moving to the next page, remember to save all the sections you made so you can reuse them in the future as needed. Click the heart icon (
 4.10 Duplicate the Services Page
Now that you’ve created one Services page, you can create as many as you want using the same structure – all you need to do is replace the images and text. Step 1: Click on the gear icon (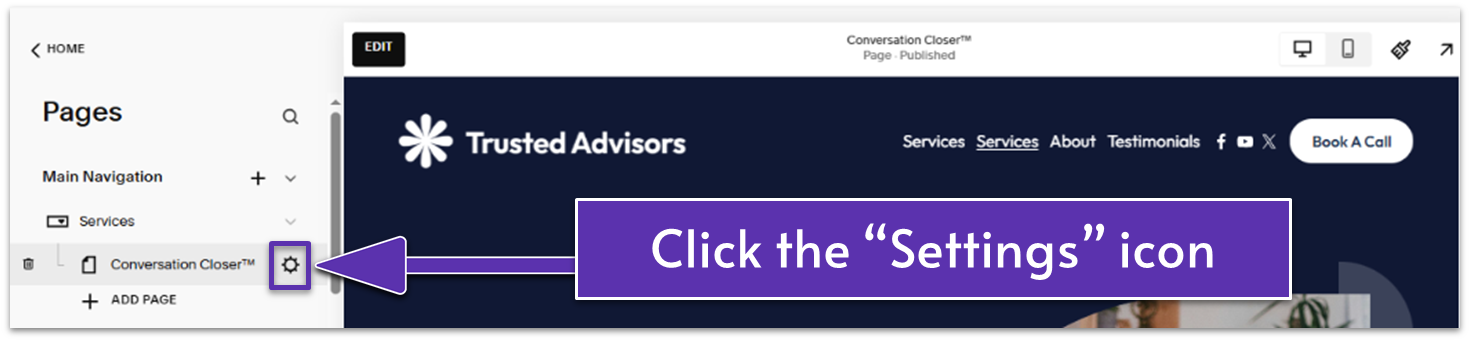 Step 2: Click “Duplicate Page”
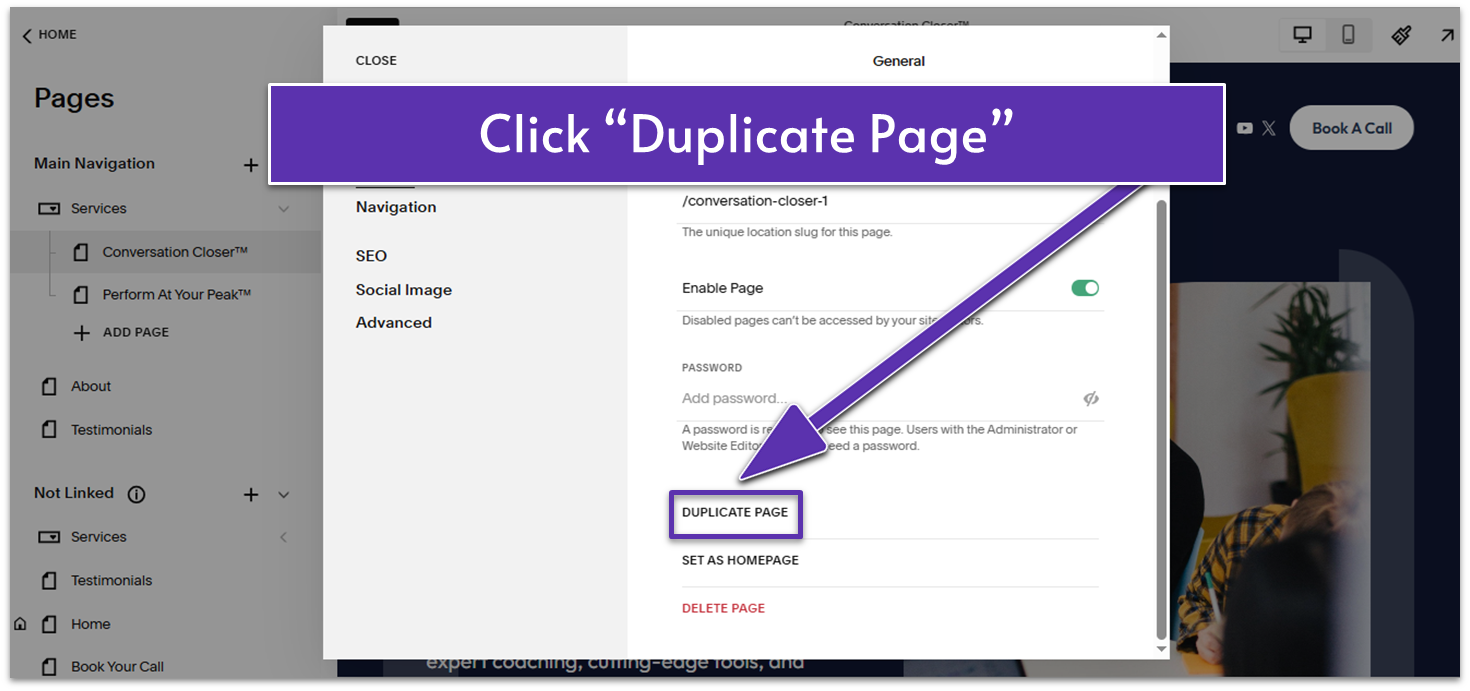
- Under “Page Settings”, go to “General”, then click on “Duplicate Page”. The duplicate page will be added to the list of “Not Linked” pages.
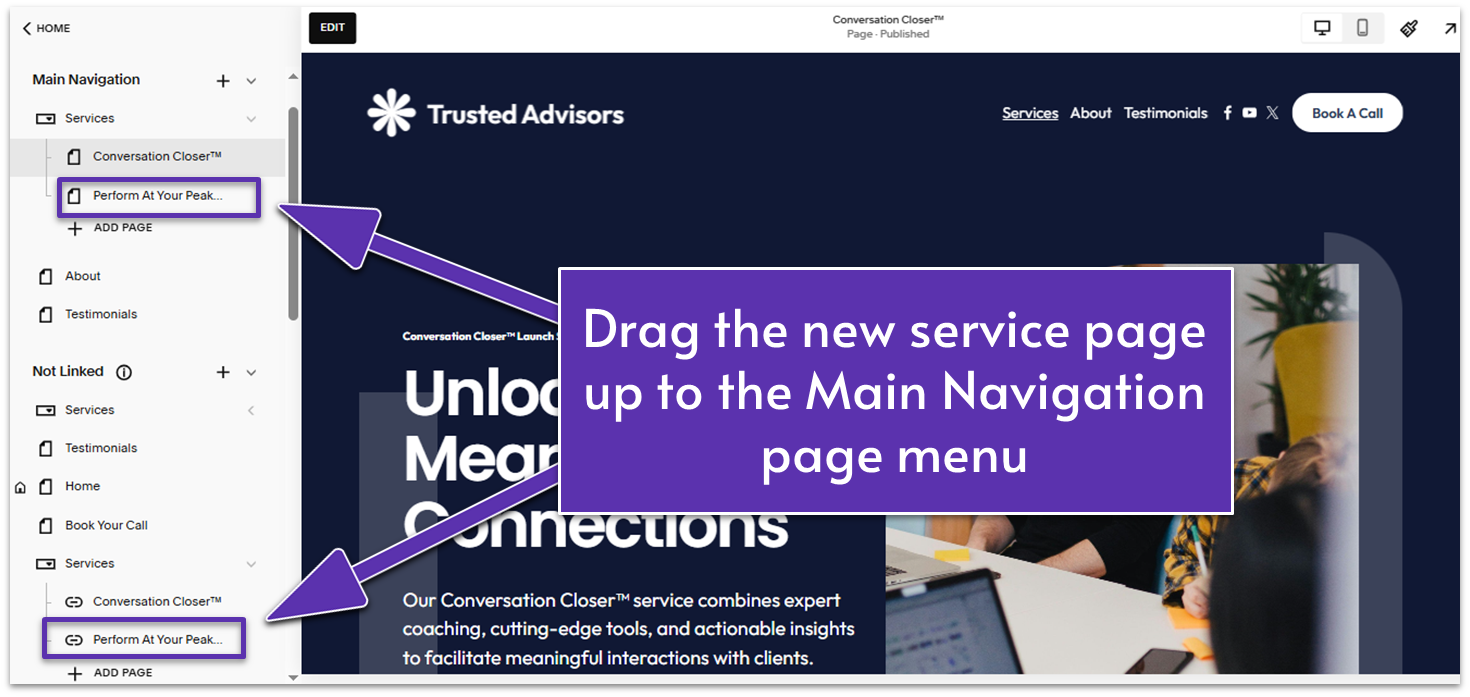
- We wrote, “Perform at Your Peak™” as our second service’s name.
- Click the gear icon (
) to open “Page Settings.” - Edit the URL slug to match your new service page’s name. We wrote “/conversation-closer” as this page’s slug.
A URL slug is the part of the web address after the main domain, describing page content. For example, the slug in “www.example.com/service” is “/service.” A clear slug makes your web address easier for users to understand and remember.
Step 5: Move the page from “Not Linked” pages to the “Main Navigation” page menu
 From there, you can open the page editor and modify the page you built by changing images, colors, and text as needed.
4.11 Bonus Page: Testimonials

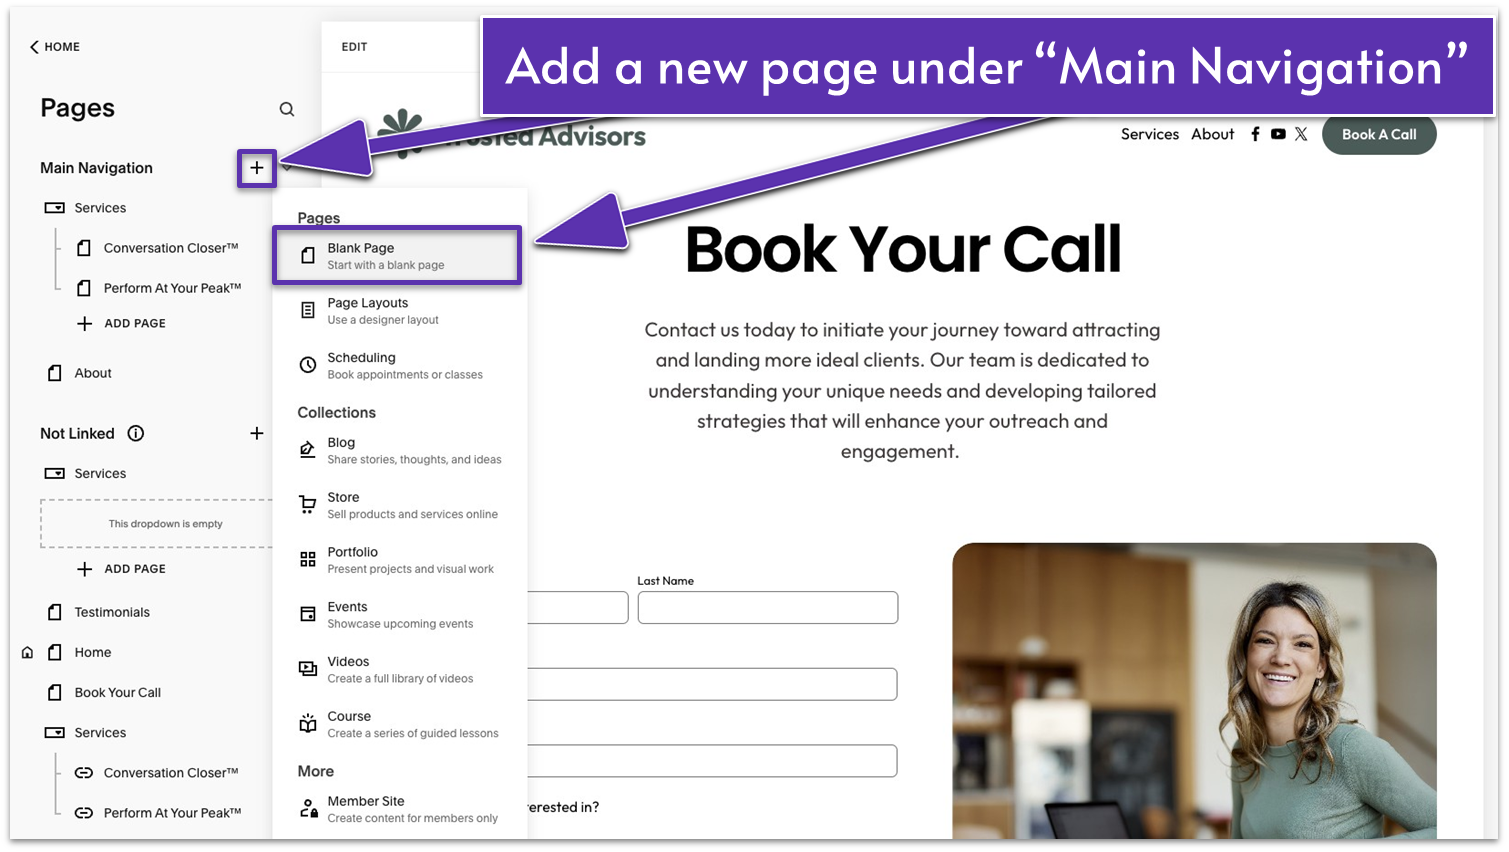
- In the “Pages” menu, click on the plus icon (
) next to “Main Navigation.” - Select “Blank Page.”
- Rename the blank page to “Testimonials.”
4.12. Add a Quick Introduction (First Section)
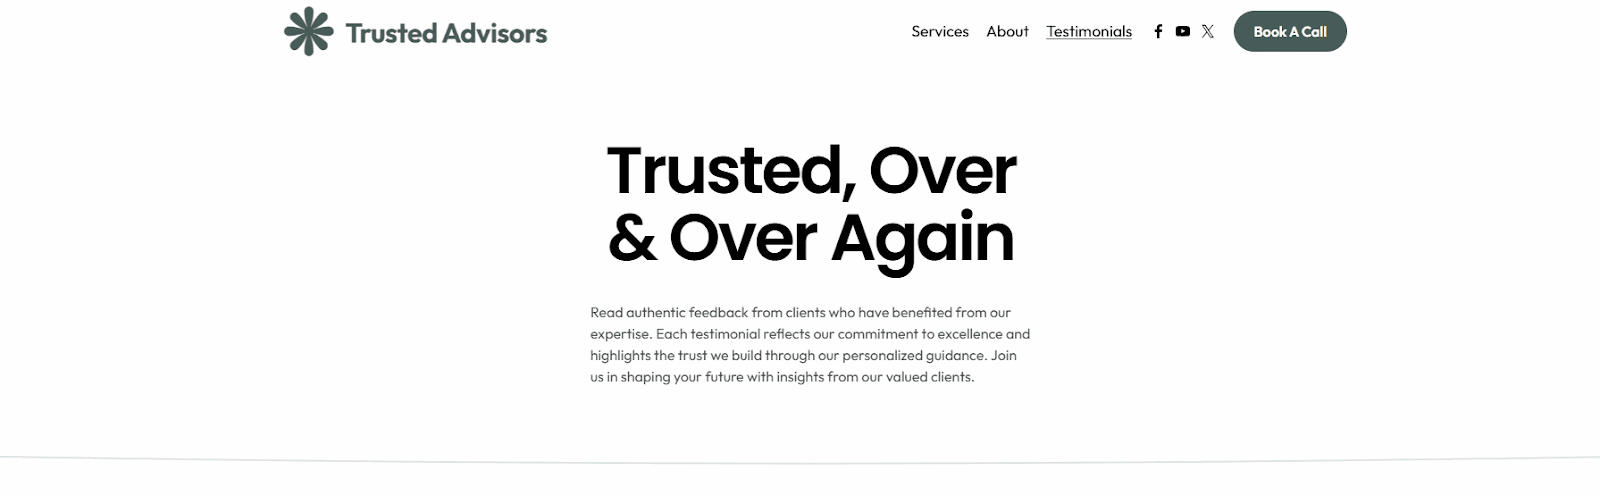
We’ll create the introductory section for this page from scratch. It will consist of a simple headline, an introduction, and a subtle curved line to bookend it. Step 1: Add a blank section- Click “Edit” to open the page editor.
- Click “Add Section.”
- Select “Add a blank section.”

- Click on “Add block.”
- Select “Text.”
- Center the text block.
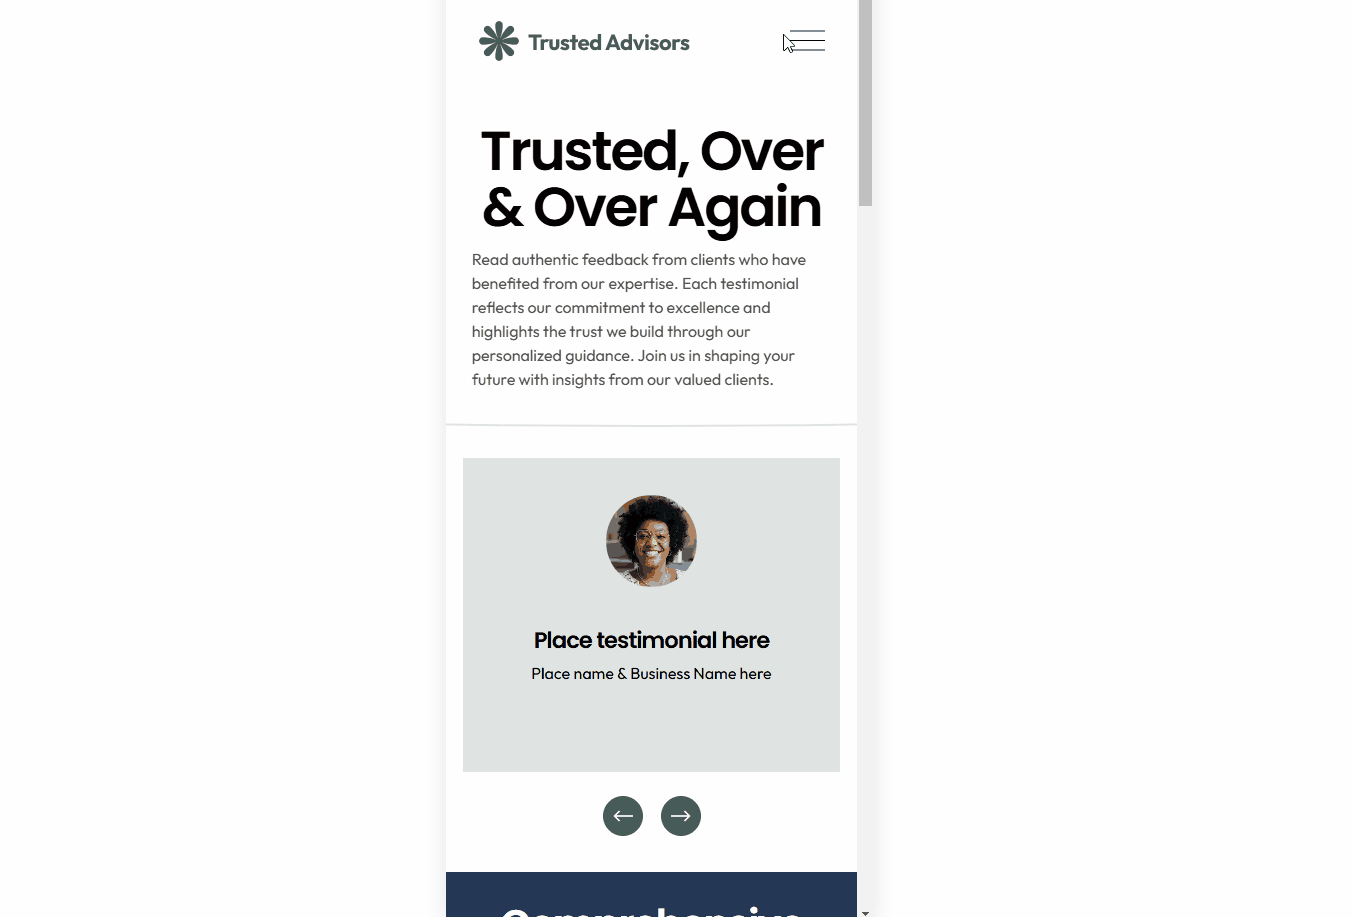
- Add your headline. For this example, we went with “Trusted, Over & Over Again.”
- Set the text to “Heading 1.”
- Center align the text (
). - Resize the text block if needed to make the text readable.
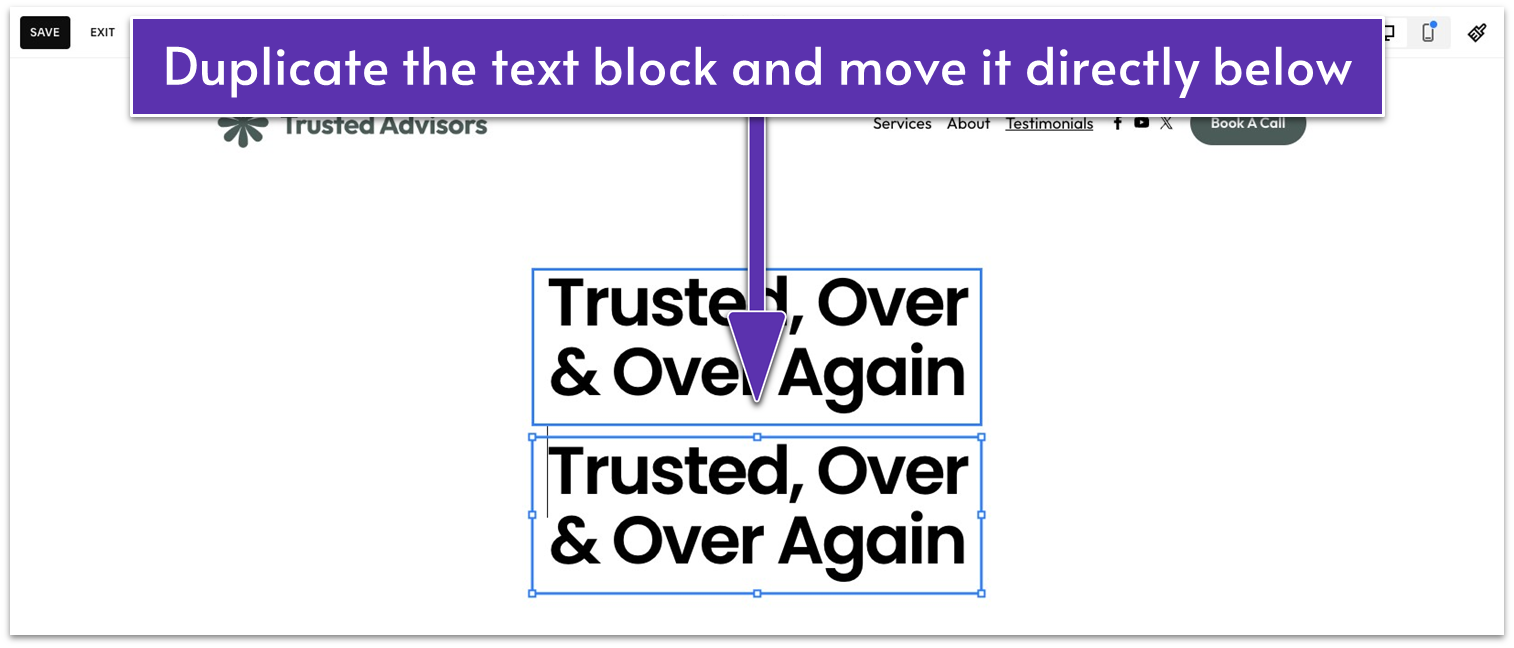
- Click
to duplicate the text block. - Move the duplicated block directly under the first block.
- Change the text style from “Heading 1” to “Paragraph 2.”
- Left-align the text (
).
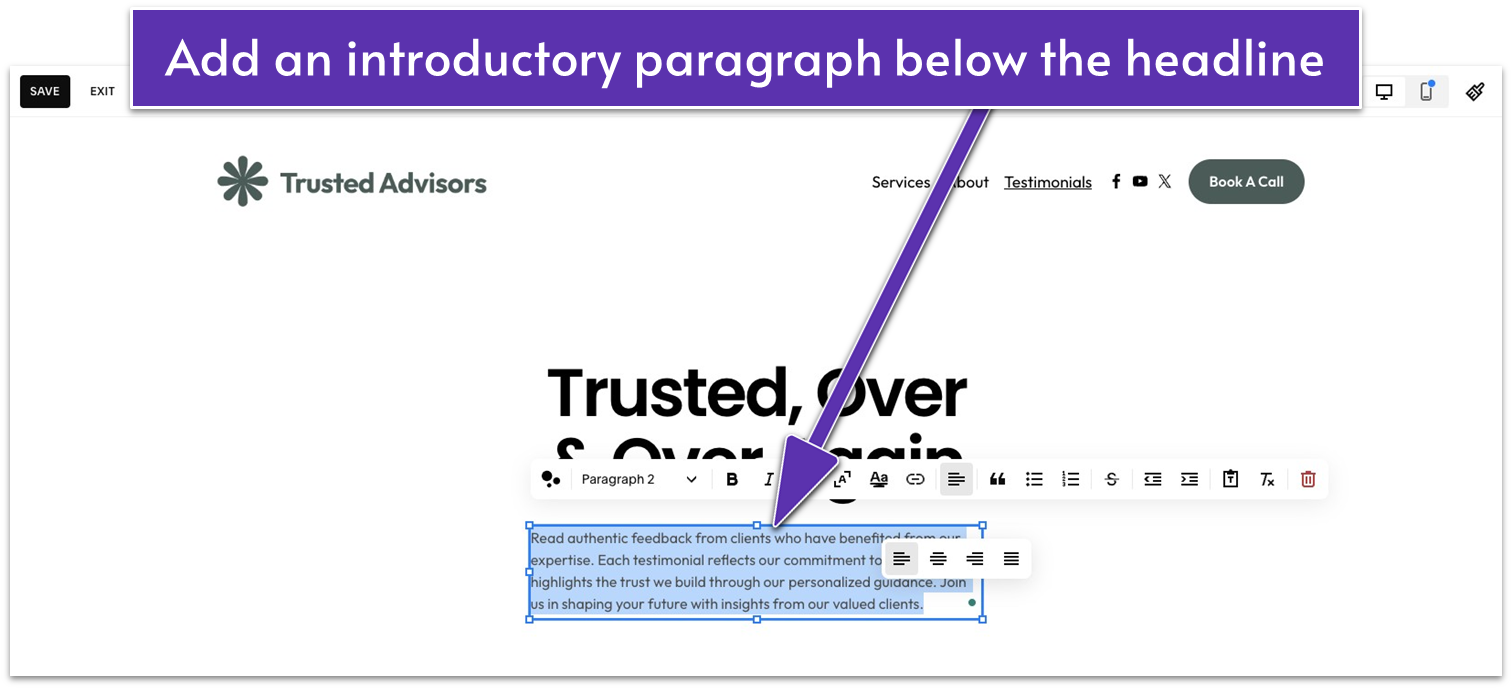
- Replace the previous text with a short paragraph introducing your visitors to the testimonials page.
- Click outside the text blocks in the section and select “Edit Section.”
- Set the section height to M (medium).
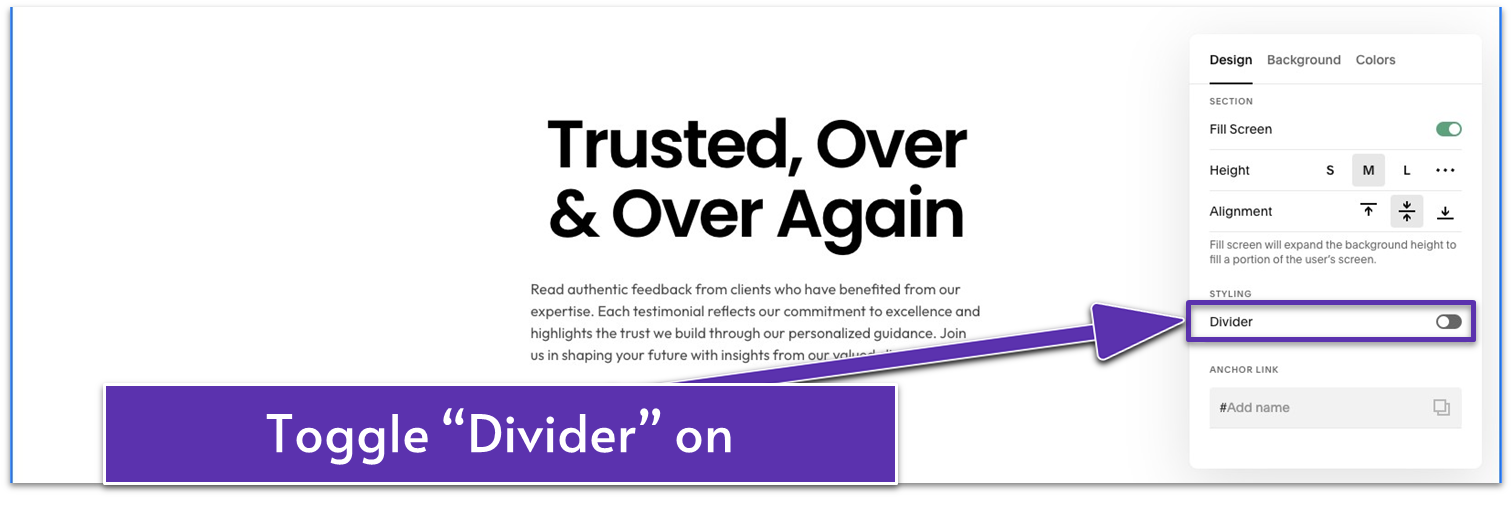
- Under “Styling,” toggle the “Divider” option on.
- Click the slider icon (
) next to “Shape” to change the divider’s shape. - Select a shape. We chose the “Rounded Shape” option (
) for our example. - Adjust the divider’s width. Click the three dots icon (
) next to “Width” to manually set it. We set it to 150 vw. - Adjust the divider’s height. We manually set it to 1 vw.
- Select “Back” to return to the “Design” menu.
- Adjust “Thickness.” We set the divider’s thickness to 1 px.
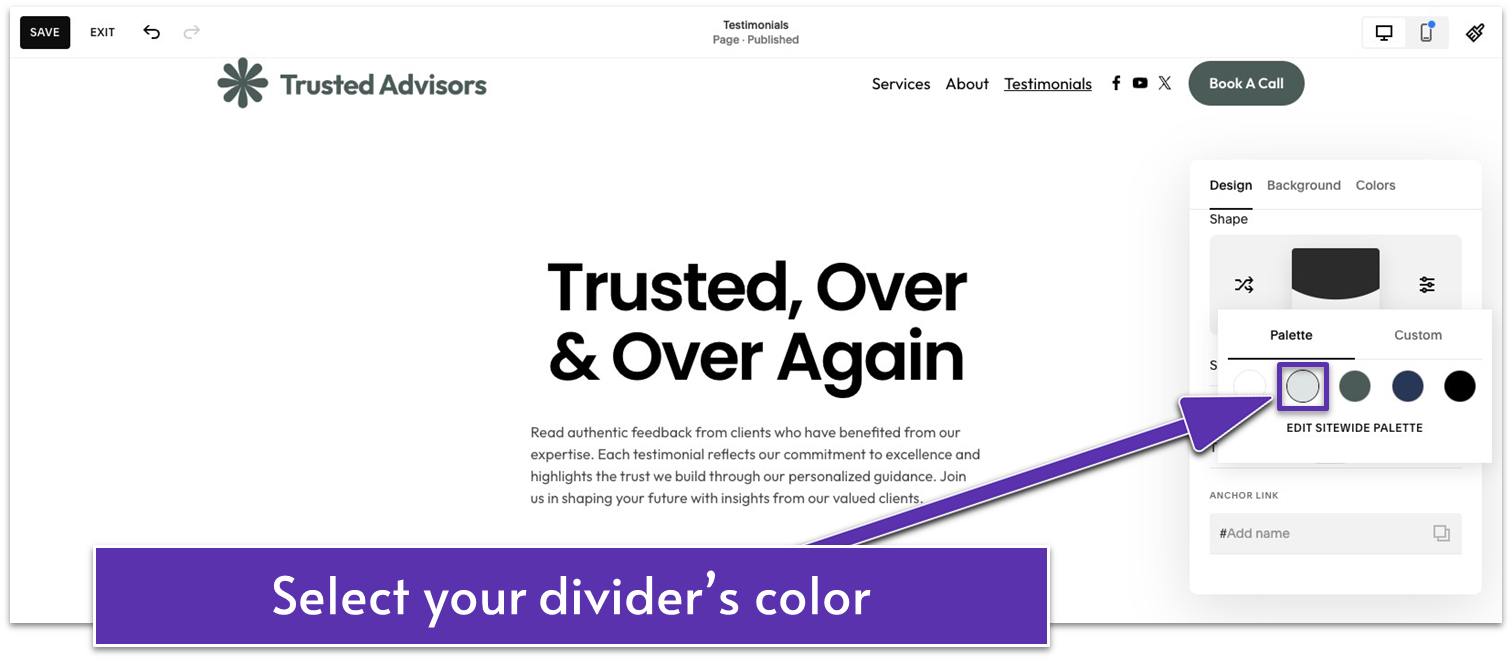
- Go to “Color” and choose your divider color from the “Palette” or “Custom” tabs. We selected the light gray (#DDE4E3) color from the palette.
- Click outside the panel to close the section options.
4.13. Display Your Testimonials (Second Section)
Now, for the centerpiece of this page, we’ll add a scrolling feature with testimonials from previous clients. This will showcase how your business has helped others and increase your visitors’ confidence. We’ll use one of the default “Testimonials” section layouts and make only minor adjustments to suit your site. Step 1: Add a new section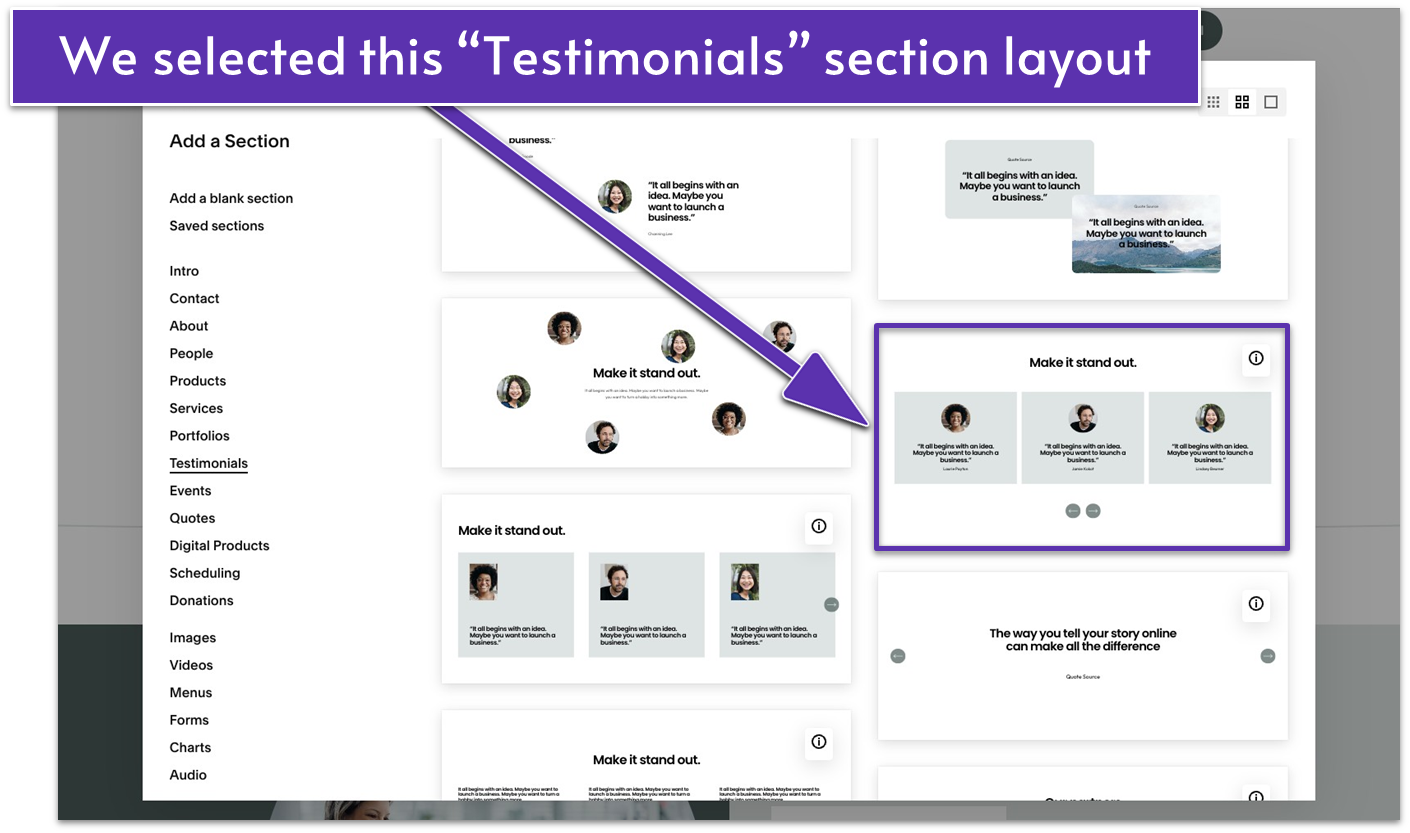
- Select the “Add Section” option beneath your introductory section.
- In the “Add a Section” menu, select “Testimonials.”
- Select a layout. We chose the layout displaying three testimonial cards at a time, with all elements center-aligned.
- Hover over the testimonials section and select “Edit Content.”
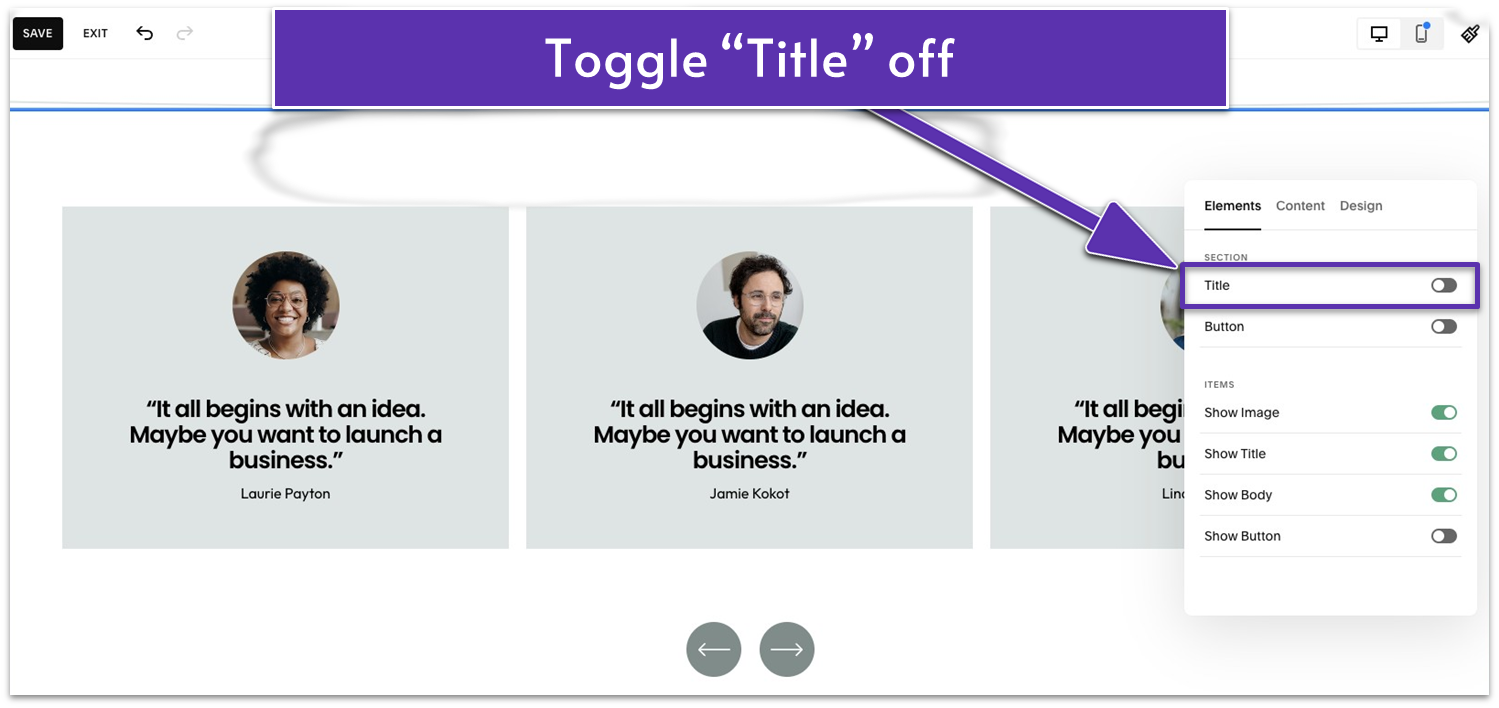
- In the “Elements” tab, enable the information you want your testimonials section to present. For this example, we toggled off the “Title” option to remove the preset section title. We also kept the “Show Image,” Show Title,” and “Show Body” options on, so each testimonial card displays the client’s name, photo, and quote.
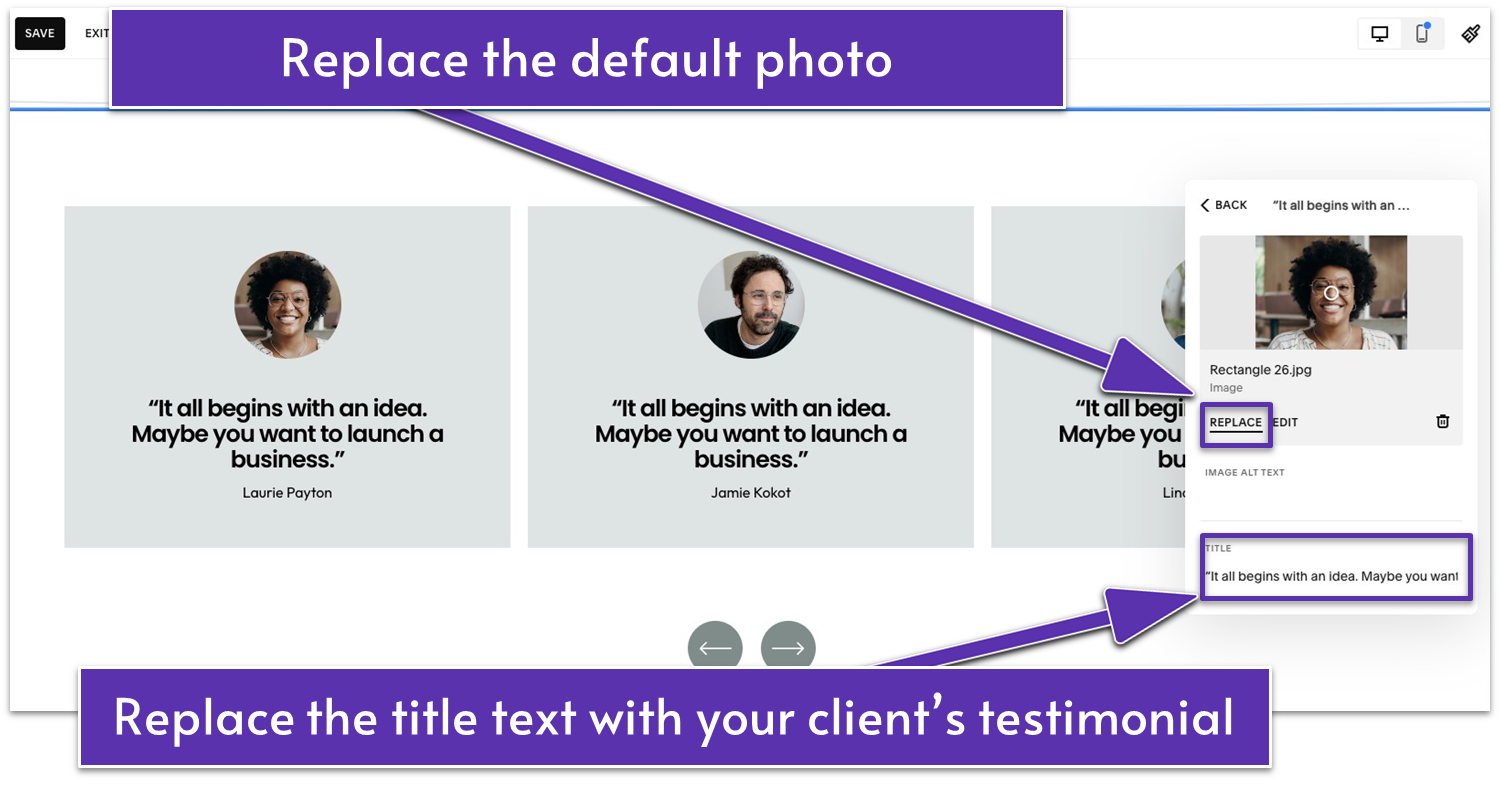
- Still in the “Edit Content” panel, go to the “Content” tab. You’ll see a list of preset testimonials with images and names under “Items.”
- Click an item to open the item editor.
- Replace the image with your client’s photo, the “Title” text with their testimonial quote, and the “Description” text with their name. Repeat this step for the remaining items.
- Click the trash can icon (
) to delete items, and click “Add” at the bottom of the list to add more testimonials.
- Go to the “Design” tab in the “Edit Content” panel.
- Select “Size & Space.”
- Adjust the vertical padding. We set it to “S” (small).
- Select your testimonial content’s position. We selected the “Stretch” icon (
) so the content covers the entire section’s height.
- Click outside the “Edit Content” panel.
- Hover over the section.
- Click the heart icon (
) to save your selected section so you can use it on other pages.
4.14. Add a Services Section (Third Section)
Now, it’s time to showcase what you offer. In this section, we’ll introduce your core services and briefly outline how each addresses your clients’ needs. We’ll keep the descriptions clear and benefit-focused so visitors can quickly grasp which service is right for them. Then, we’ll guide them to your detailed Services page by including a “Learn More” button. This helps convert curiosity into action, encouraging your visitors to take the next step toward working with you. Step 1: Add a blank section Step 2: Change the section’s color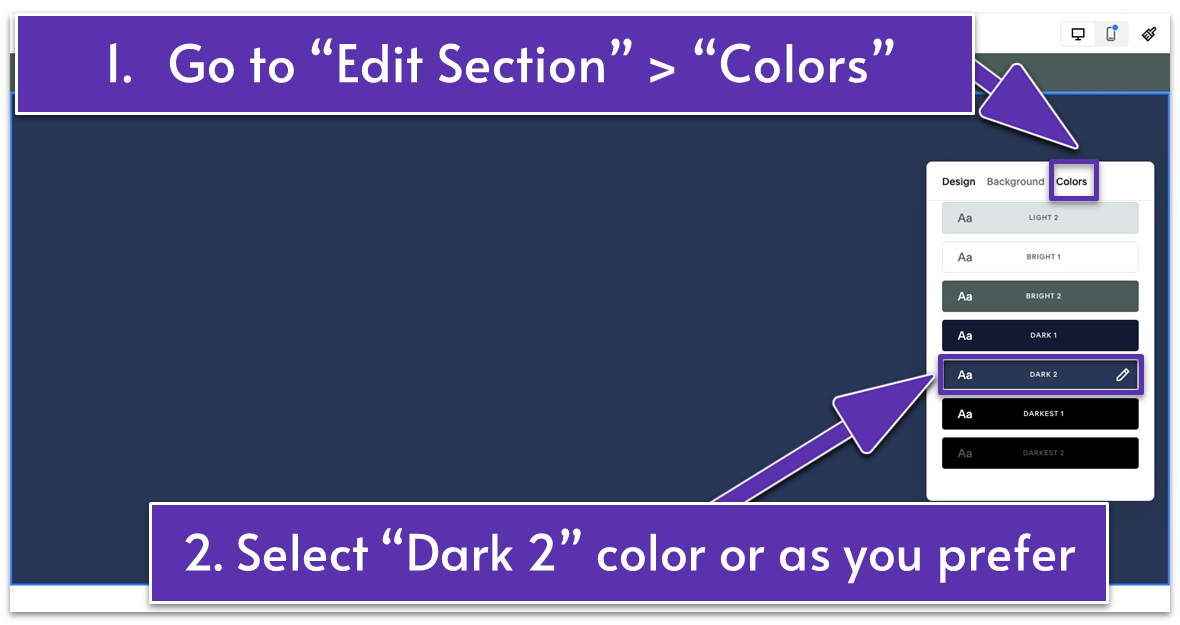
- Click “Edit Section.”
- In the “Colors” tab, select your preferred color for this section. We selected the “Dark 2” color theme for our website.
- Go to the “Design” tab.
- Select your preferred section height. We chose “S” (small).
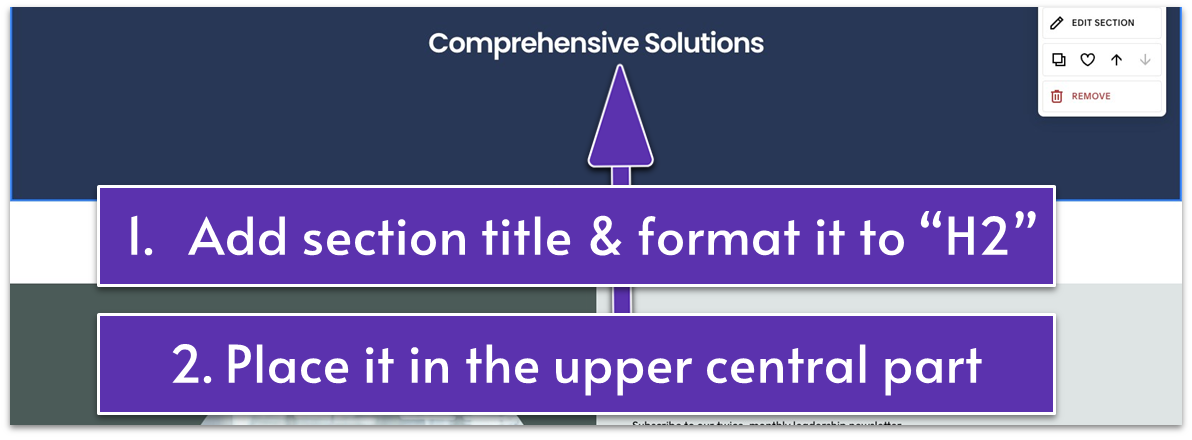
- Add a text block.
- Extend the text block to your desired direction if necessary.
- Place the text block in the upper central part of the section.
- Add your section’s title in the text block. Format it as “Heading 2” and set the alignment to center (
) and top ( ). We wrote “Comprehensive Solutions.”
- Add an image block. If you have more than one service to feature, move the first image to the left side of the section, right under the title. For a single service, place the image in the center or wherever it best fits within the section.
- Add your image. Choose whether to upload a new file, select an existing one from the library, or pick a stock image.
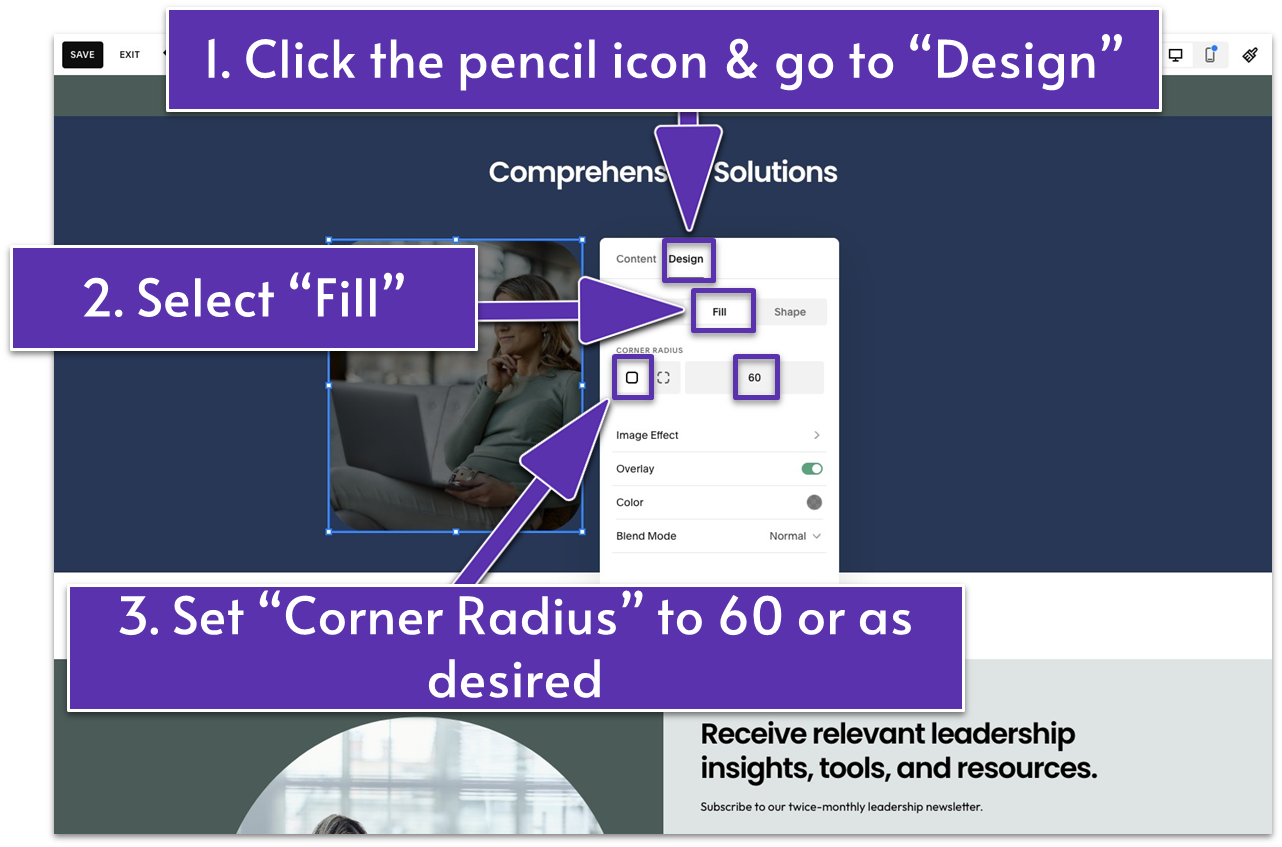
- Click the pencil icon (
) and go to the “Design” tab. - Select “Fill.”
- Apply a “Corner Radius” of 60 to all four corners (
) of your image or adjust as desired. - Apply other edits to the image if needed. The only thing we did here was go to the “Content” tab and center the image using the small circle.
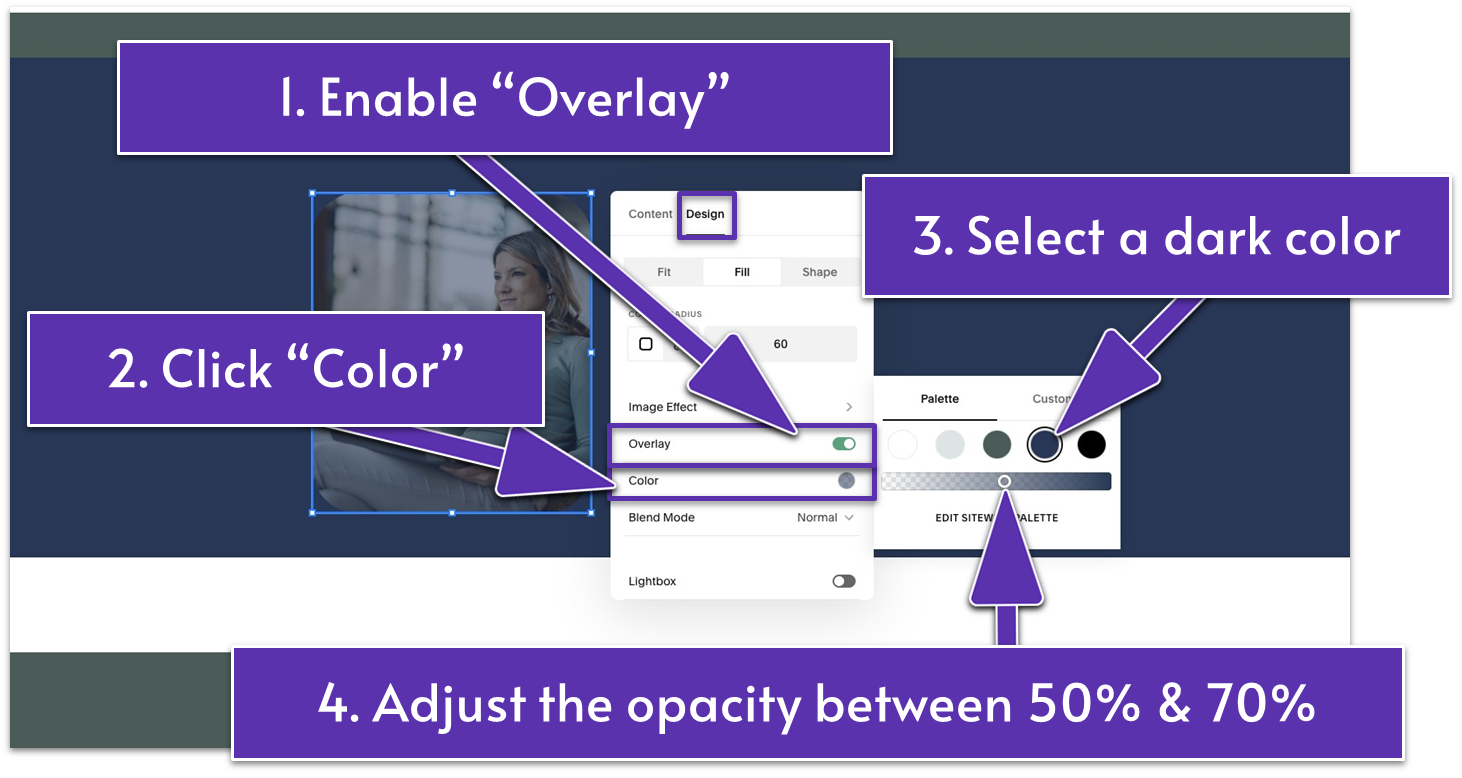
- In the “Design” tab, enable “Overlay” to add a semi-transparent layer over the image.
- Click “Color.”
- Select a darker color from your site palette, or go to “Custom” and pick a custom shade. We selected the blue color (HEX code: #243756) from our site palette and moved the slider to adjust the opacity to around 50% to achieve a muted look. Anything between 50% and 70% should work. Play around and see what looks best.
- Add a text block. Place it over the bottom of the image.
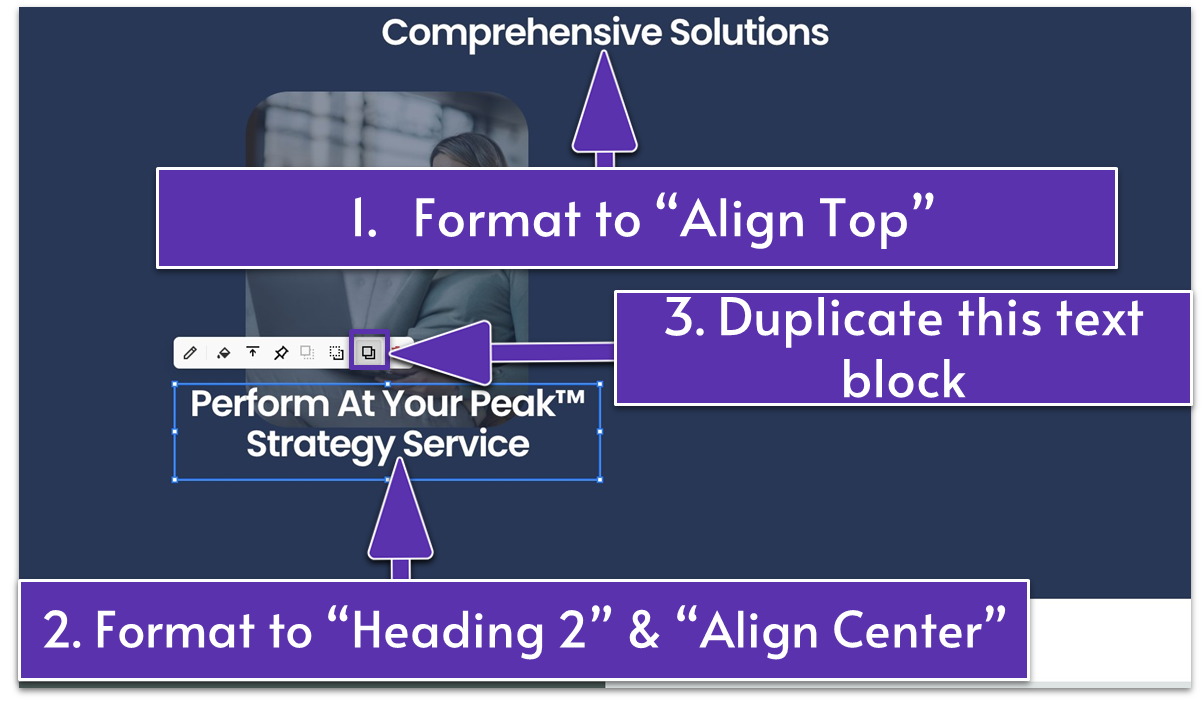
- Add the name of your service in this text block. In our case, that’s “Perform At Your Peak™ Strategy Service.”
- Format the name as “Heading 2” and center-align it (
). - Click
from the main block toolbar to align the text to the center of the block.
- Duplicate the text block containing the service name by clicking
or add a new text block. - Place the new text block under the service name.
- Write a short description of your service in the new text block. You can describe what you offer and encourage visitors to click the “Learn More” button. We wrote: “This program offers tailored strategies for goal-setting, productivity, and sustainability. Our expert advisors help identify strengths and challenges, implementing actionable growth plans. Start your journey to peak performance today.”
- Format the description text to “Paragraph 2” and “Align Top” (
).
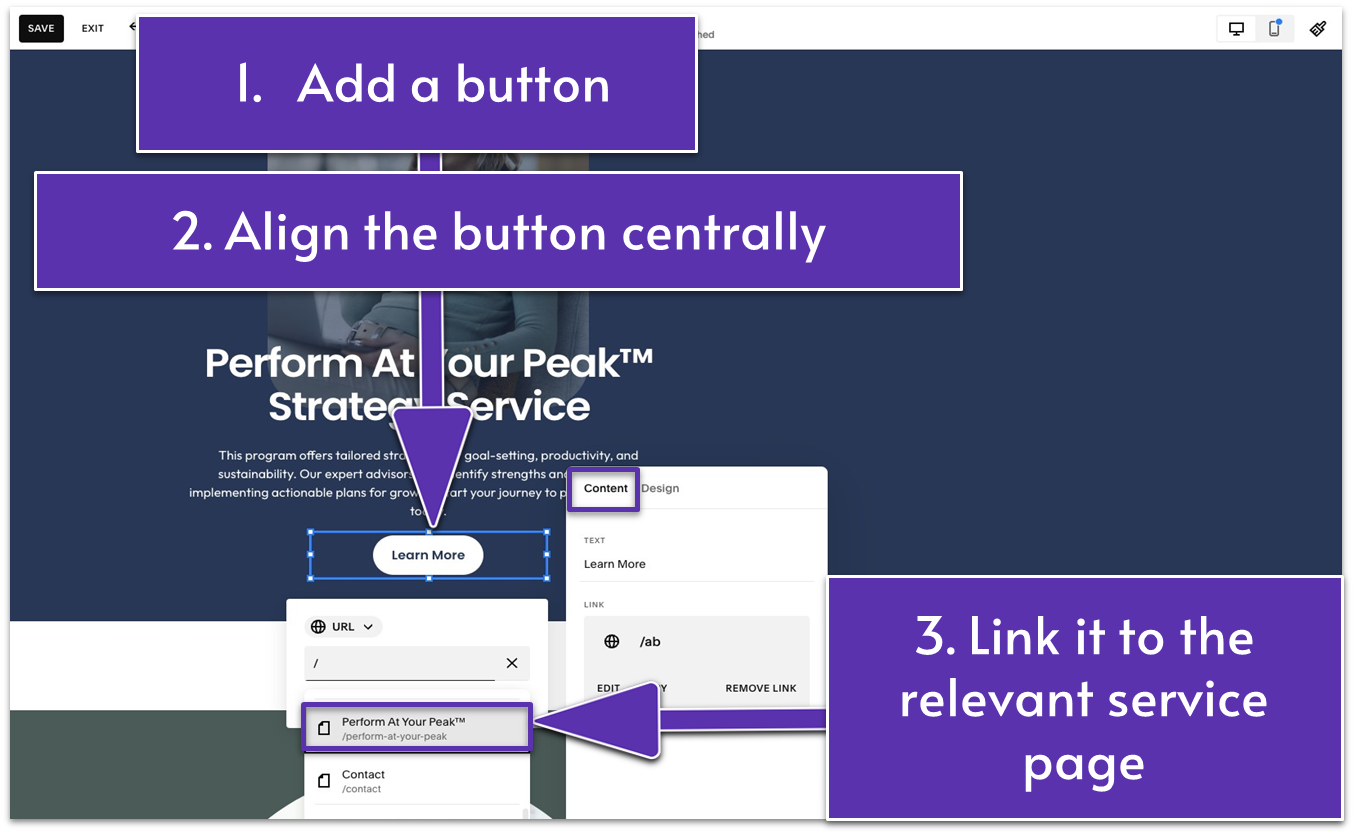
- Add a button block. Place it below the text block with the short description.
- Click the pencil icon (
). - In the “Content” tab, change the button text if necessary. We kept the “Learn more” as the call to action.
- Go to the “Design” tab, click “Fit,” and select
to center-align the button horizontally in the block. - Link the button to the relevant service page using
. Type the page name in the search bar and select it from the dropdown. In our case, we linked the button to our “Perform At Your Peak™” service page.
- Open “Mobile View” (
) and evaluate what needs to be optimized.
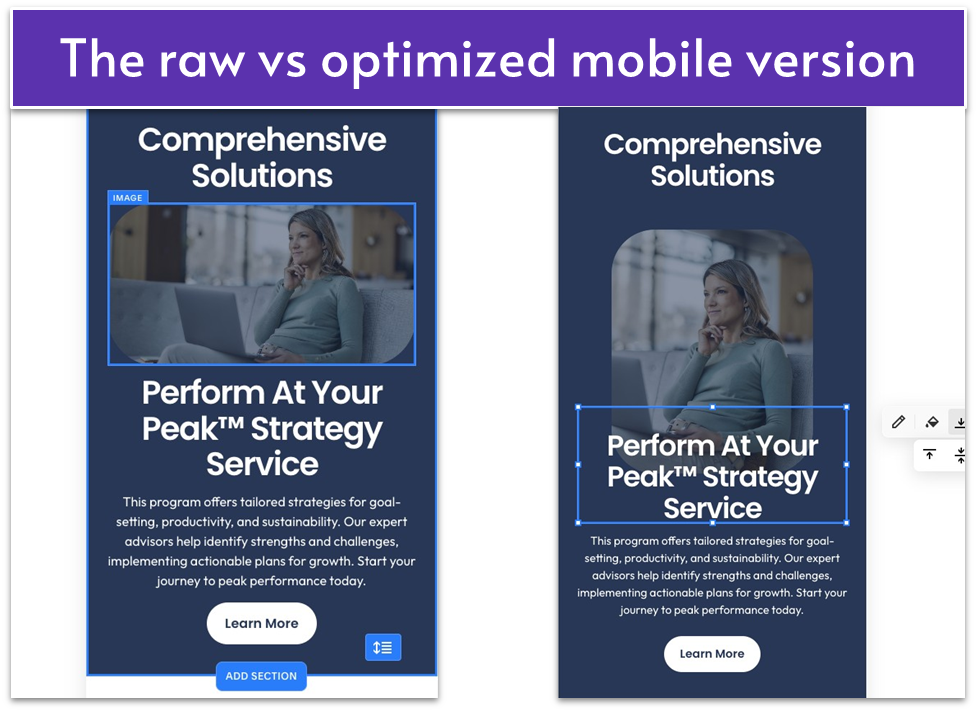 Most elements looked fine on our end. However, we slightly changed the arrangement of the image and text to achieve a smoother look.
To recreate our results, you can follow these exact steps:
Most elements looked fine on our end. However, we slightly changed the arrangement of the image and text to achieve a smoother look.
To recreate our results, you can follow these exact steps:- Stretch the image to make it a bit taller.
- Move the service name to sit near the image’s bottom. Click
to align it to the bottom of the block. - Adjust the blocks to make sure they’re center-aligned and there’s only a small gap between them.
- Go back to “Desktop View” (
)
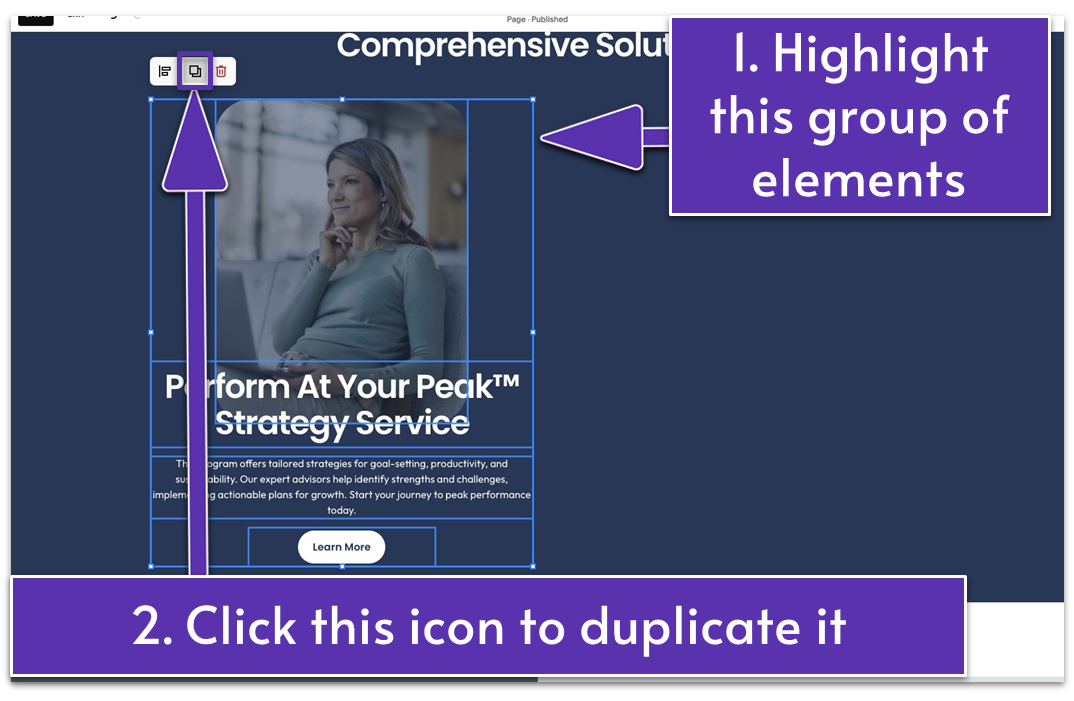
- Highlight the blocks with the image, service name, description, and button. A toolbar with a few icons will appear above.
- Duplicate everything by clicking
from the toolbar. - Drag the duplicated group of elements to the right side of the section.
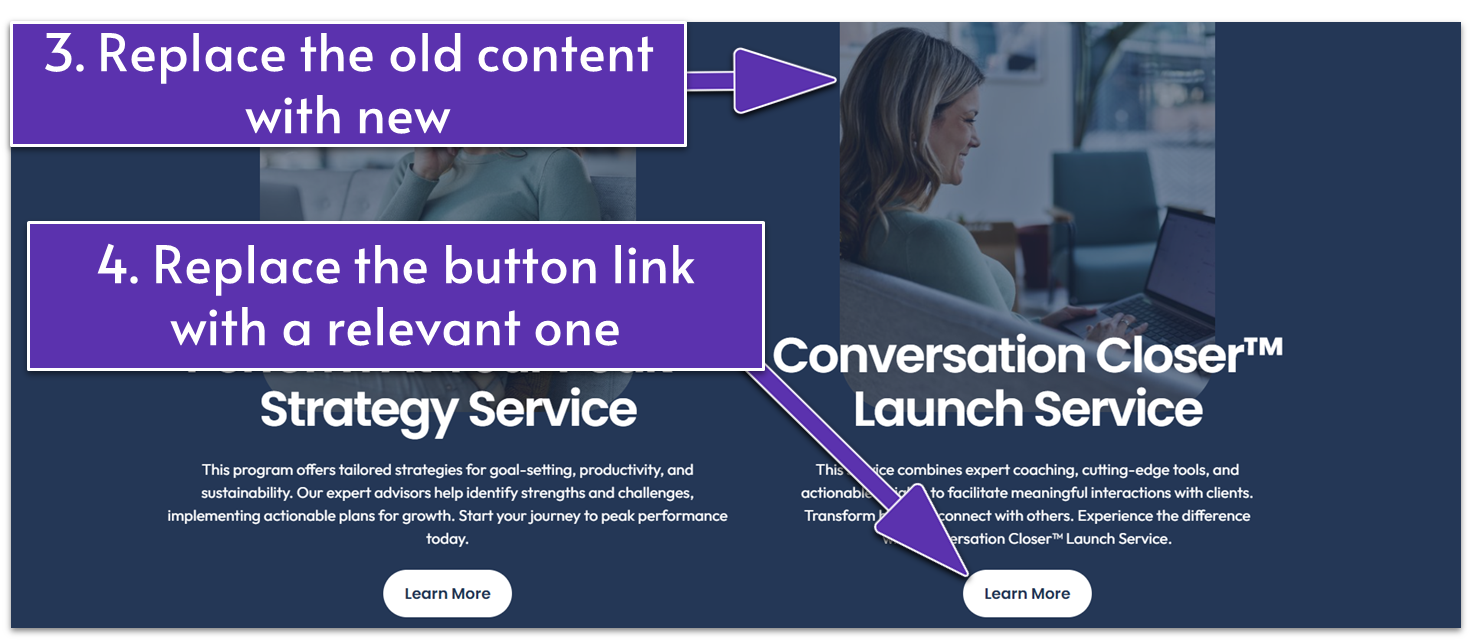
- Replace the duplicates with a new image, service name, and description. Repeat this as needed for each of your key services.
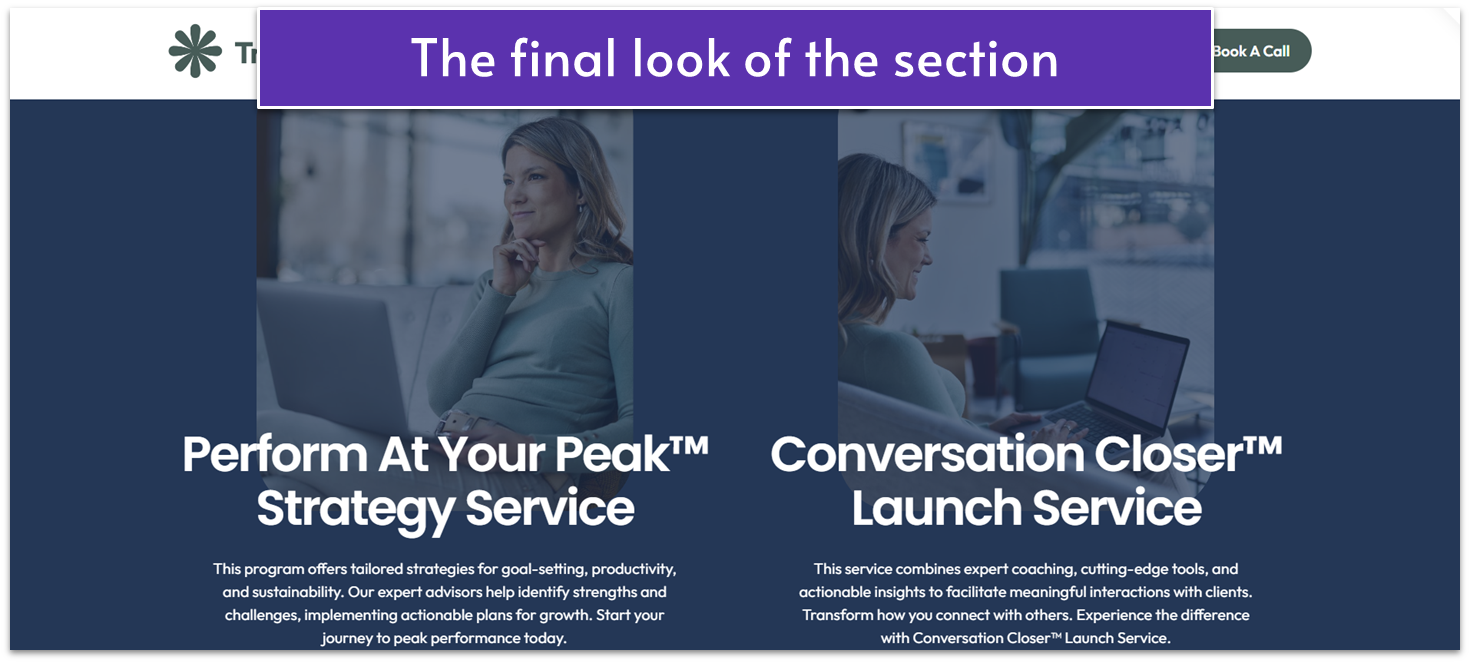 Repeat Step 10 to add another featured service, arranging the new elements below the existing ones. You can resize them as needed and organize them into two or more columns – it’s completely up to you.
Step 11: Save the section
Repeat Step 10 to add another featured service, arranging the new elements below the existing ones. You can resize them as needed and organize them into two or more columns – it’s completely up to you.
Step 11: Save the section- Click anywhere within the section to open the section menu.
- Select the heart (
) icon to save this section. Since we’ll use this exact section for the homepage, saving it will save us a lot of time when we need to add it again.
4.15. Optimize the Testimonials Page for Mobile
Step 1: Go to “Mobile View” (- Check for misalignments, overlapping elements, and narrow spacing and adjust them.
 For our example website, we decided to stick with the default mobile version for other sections since they already work well without us having to make any major changes. However, feel free to make any adjustments you think are necessary to better suit your design.
 Once you save this page, we’re ready to move on to the homepage!
