

Welcome to the centerpiece of your website: the Portfolio. This is your chance to put your talent on display and convert visitors into customers. To make the best impression, organize your work into clear categories, display high-quality images, and ensure your design looks seamless on any device.
This Portfolio guide stretches across two modules. In this first module, we’ll build the Portfolio subpages to showcase your work in dedicated categories.
Then, in the next module, we’ll focus on creating a hub for these subpages, as well as adding an impactful introduction and an engaging About section. This will then serve as your website’s homepage.
Let’s get started!
4.1 Add a New Page
You’ll begin with a “Portfolio” template to harness its unique features. This page structure allows you to separate projects into different categories (subpages), making it easy for visitors to navigate your Portfolio page and find what they want.
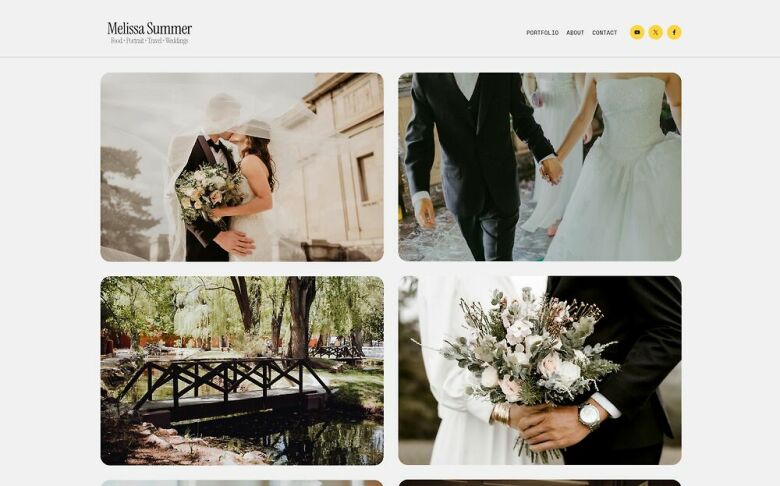
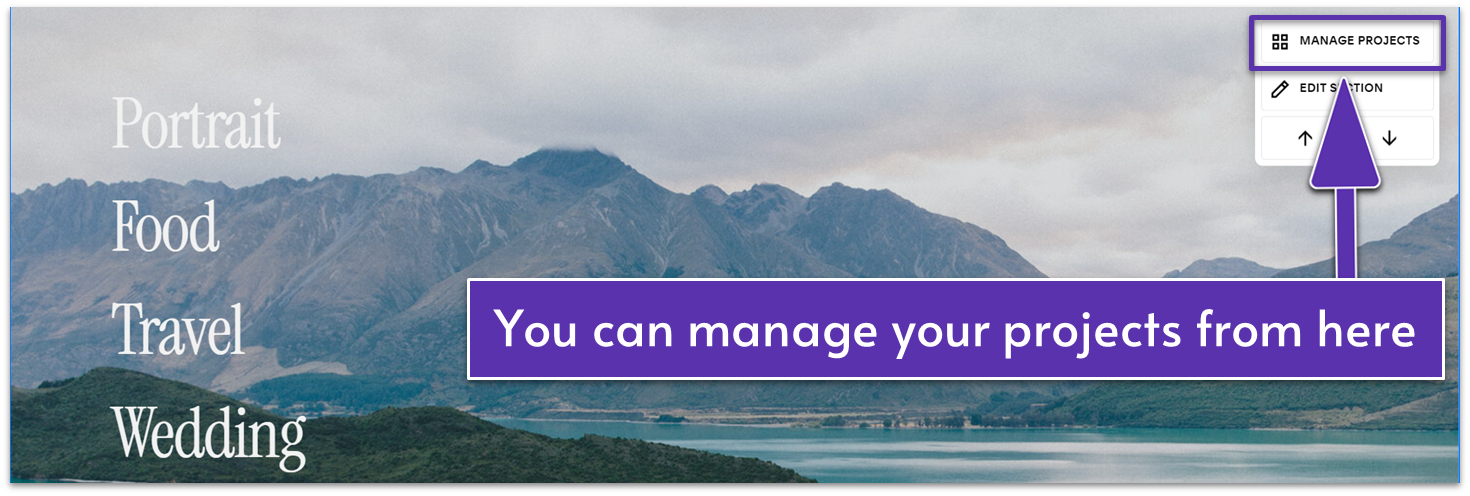
Another unique feature of the Portfolio page template is that you can set a different background image for each subpage. For example, when visitors hover over our “Travel” category, a shot from a seaside city fills the background. On the other hand, a photo of newlyweds appears when they hover over our “Wedding” subpage. This feature is only available on the Portfolio page template.
Step 1: Add a “Portfolio” page
You’ll build your separate portfolio categories on this page.
- Open the “Pages” panel.
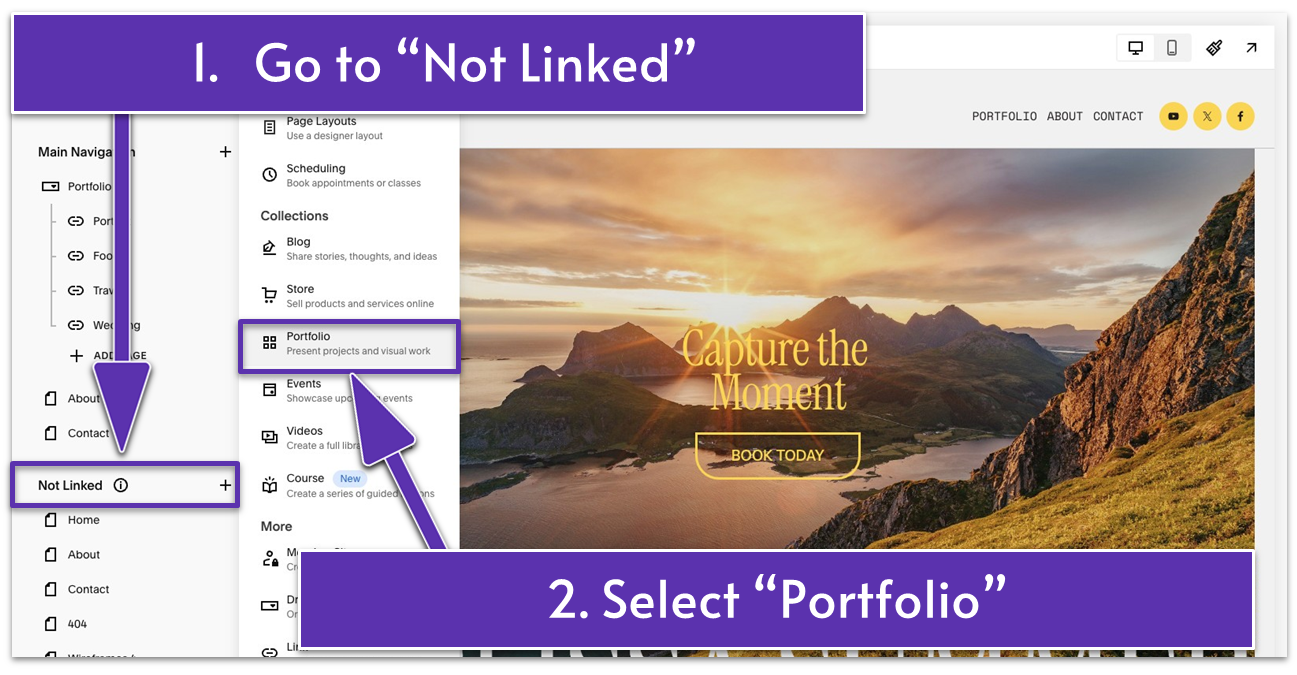
- Go to “Not Linked” and click the plus icon ( ).
- Select “Portfolio” from the list that will pop up. It’s under “Collections.”
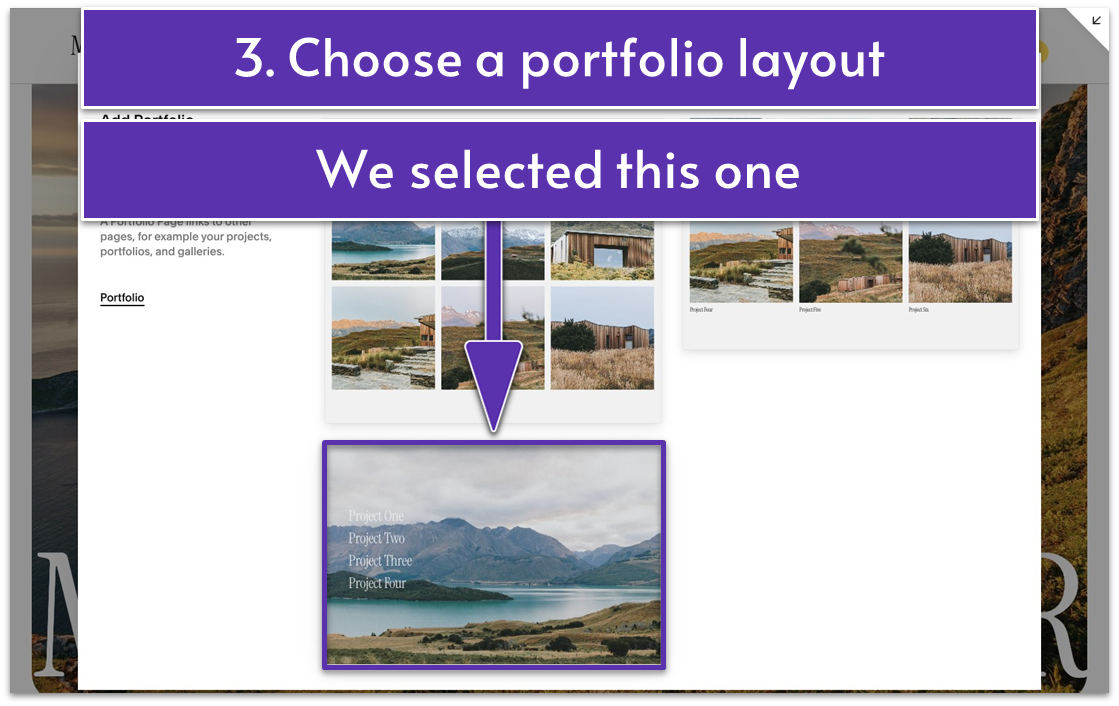
- Pick a portfolio layout. We selected the option that displays a vertical list of category names that change the background image when hovered over.
- Rename the page to “Portfolio.”
Step 2: Add a new project
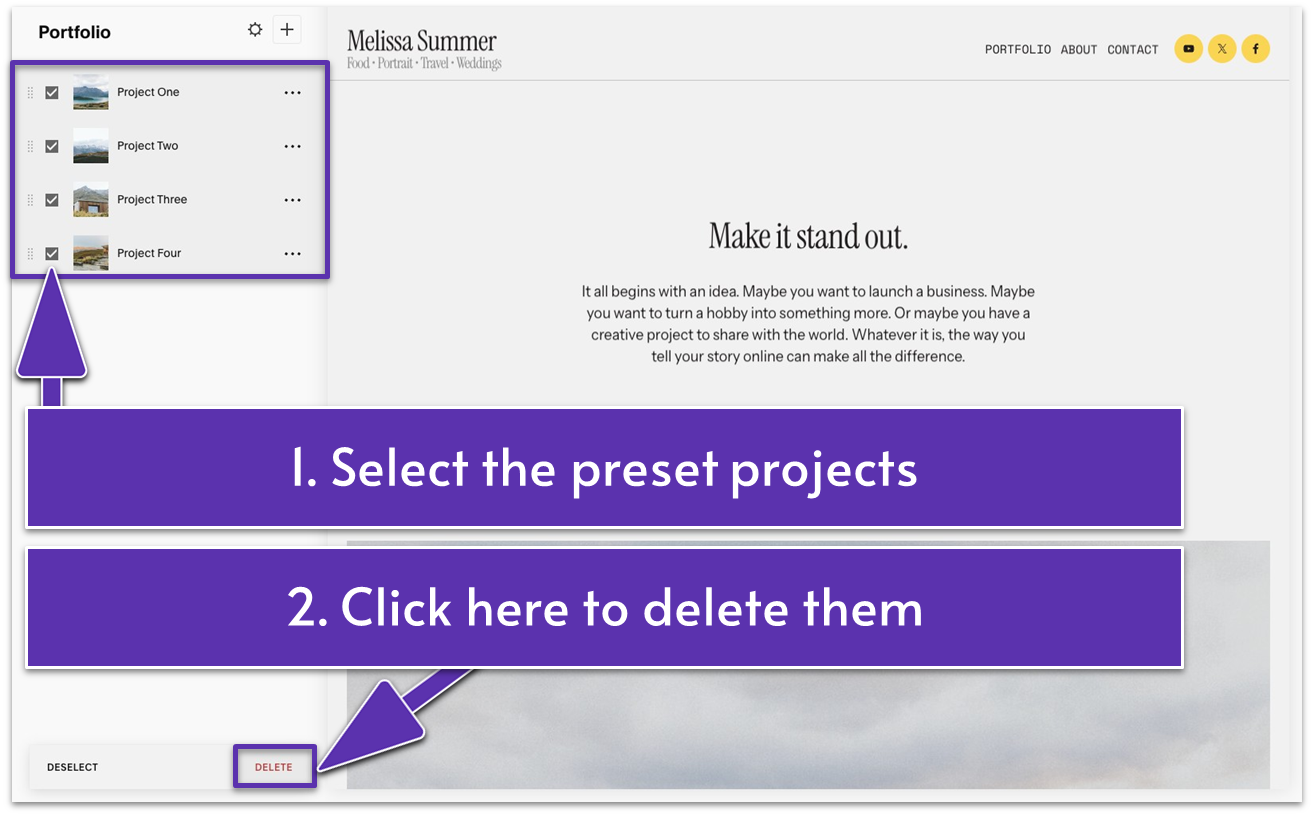
- Click the new “Portfolio” menu item to open a list of all “Project” items.
- Delete the “Project” items from the template. You can do this by selecting each item’s checkbox (“Project One,” “Project Two,” “Project Three,” etc) and clicking “Delete.”
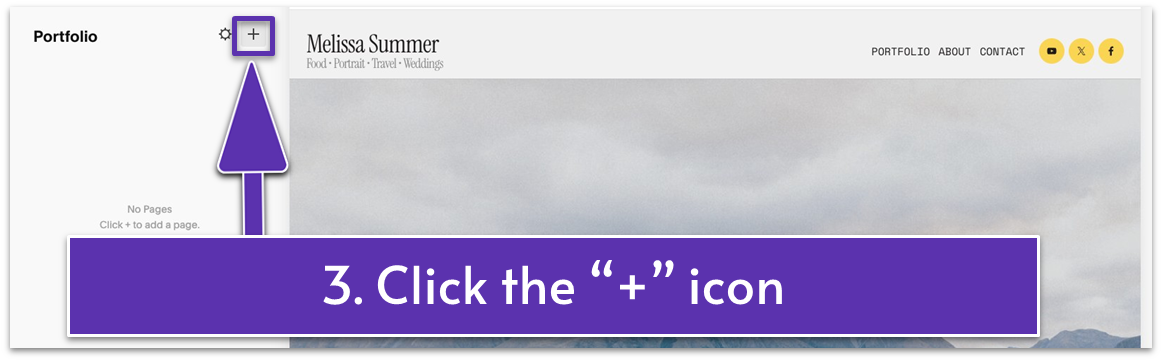
- Click the plus icon ( ) to add a new project subpage.
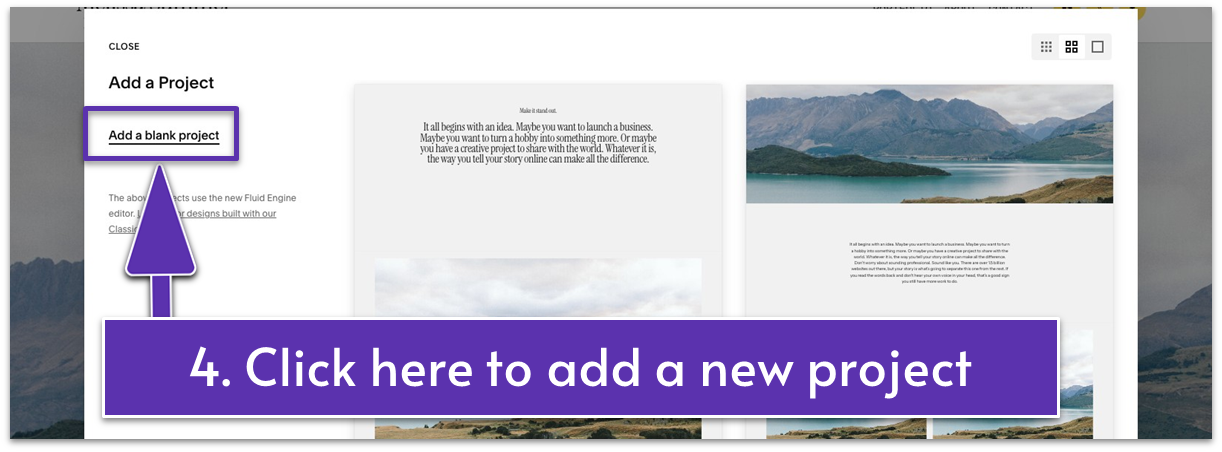
- Click “Add a Blank Project.” This opens the “Project Settings” menu.
This project will act as a subpage that you can link to from your main Portfolio page (or in our case, the homepage). It will be a standalone page, representing a separate category of your work.
For example, we divided our portfolio into four categories on our website: “Portrait,” Food,” “Travel,” and “Wedding.” This way, visitors can go straight to the category that interests them without wasting time filtering through irrelevant work examples.
Step 3: Customize your portfolio project (subpage)
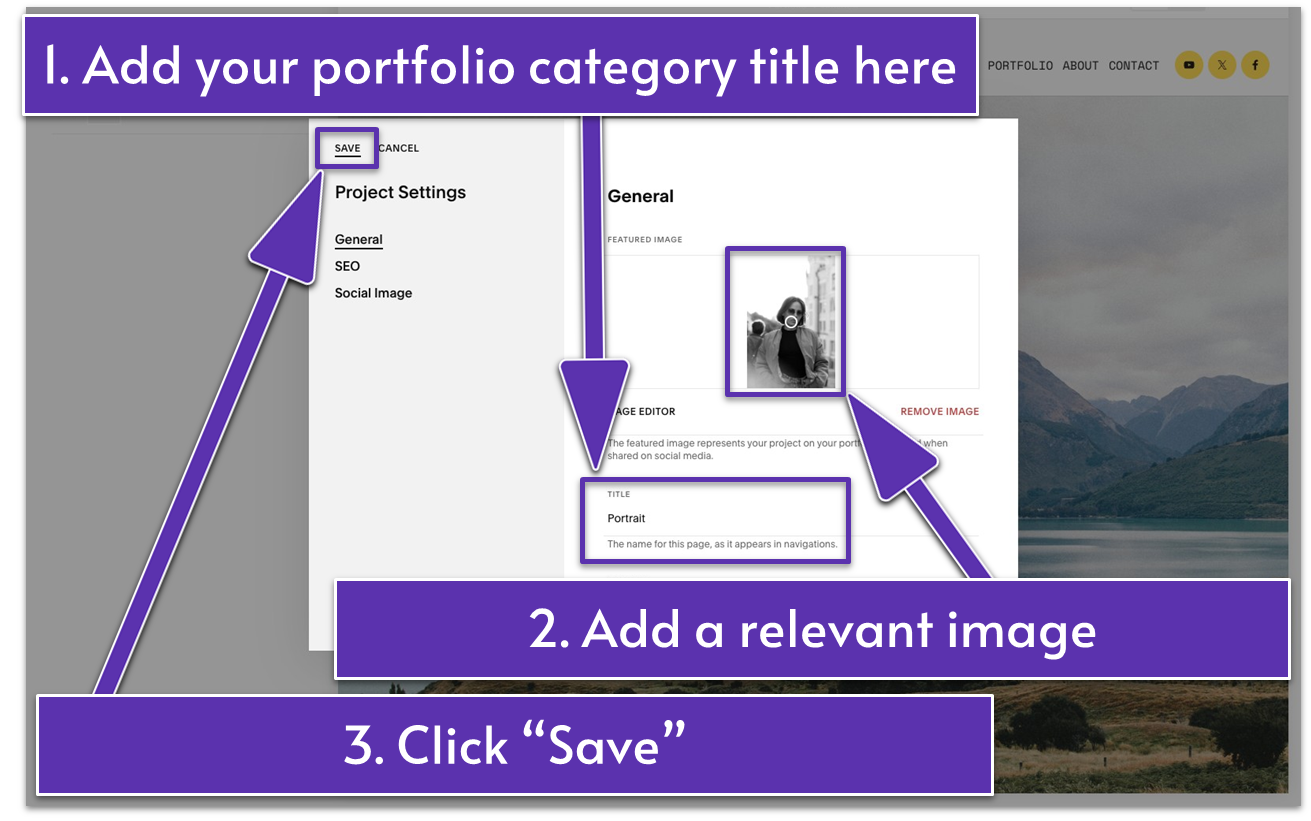
- In the “General” panel, replace the preset title with the name of your first portfolio category. This is how the page will appear in the navigation menu. On our photographer website, we titled our first project “Portrait.”
- Add an appropriate image that reflects the nature of your project. For instance, for our “Portrait” category, we added a black-and-white portrait image of a woman.
- Click “Save” in the upper left corner of the window.
Then, click “Edit” to open the editor and start customizing your first portfolio subpage.
4.2 Introduce Your First Portfolio Category (First Section)
It’s time to bring your Portfolio page to life by introducing your first category! This section includes your category title and a short description that gives visitors a glimpse into what this category is about.
Step 1: Add a new blank section
Step 2: Add text
- Add a text block.
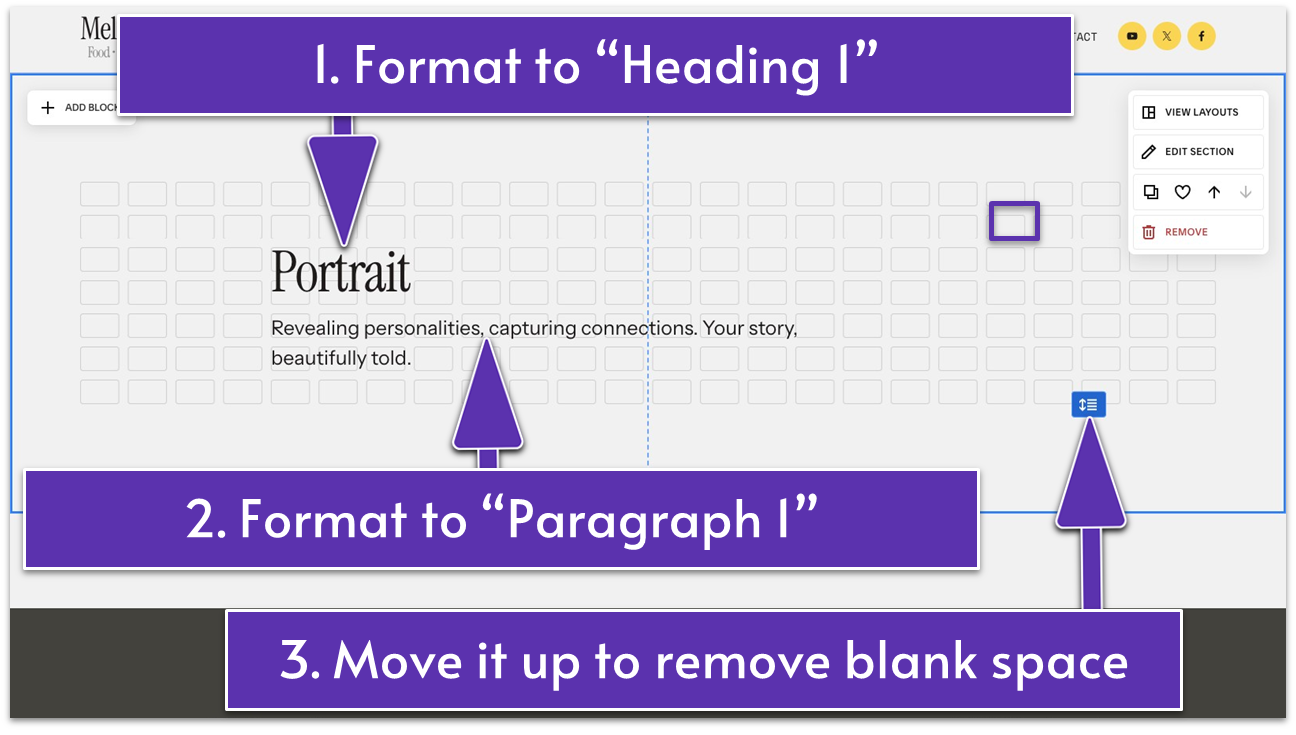
- Type the name of your first portfolio category and format it to “Heading 1.” We wrote “Portrait” on our website.
- Duplicate the existing text block by clicking from the main block toolbar or add a new one.
- Place the duplicate text block below the category name and stretch its corners to widen it.
- Replace the duplicate text with a short, compelling description of your portfolio category and format it to “Paragraph 1.” We wrote “Revealing personalities, capturing connections. Your story, beautifully told.” for our “Portrait” category.
- Use the grid adjuster ( ) to remove any unnecessary blank space.
You’re going places! The first section of your Portfolio page is done.
Keep up the good work – you’re on your way to creating a digital masterpiece that clients can’t resist!
4.3 Add a Gallery of Your Work (Second Section)
The gallery section is the heart of your subpage, especially if you’re a photographer or work in other visual fields. This is where your work truly speaks for itself, showcasing your skills and style. It allows potential clients to easily explore your work and envision the results they’ll get by hiring you.
Remember, your gallery isn’t just a collection of images – it’s a curated experience that tells a story and sparks emotions. If done right, it’ll captivate viewers, draw them into your creative world, and encourage them to take the next step – book you – with confidence.
Now, let’s get your gallery set up to wow your audience!
Step 1: Add a “Gallery” section
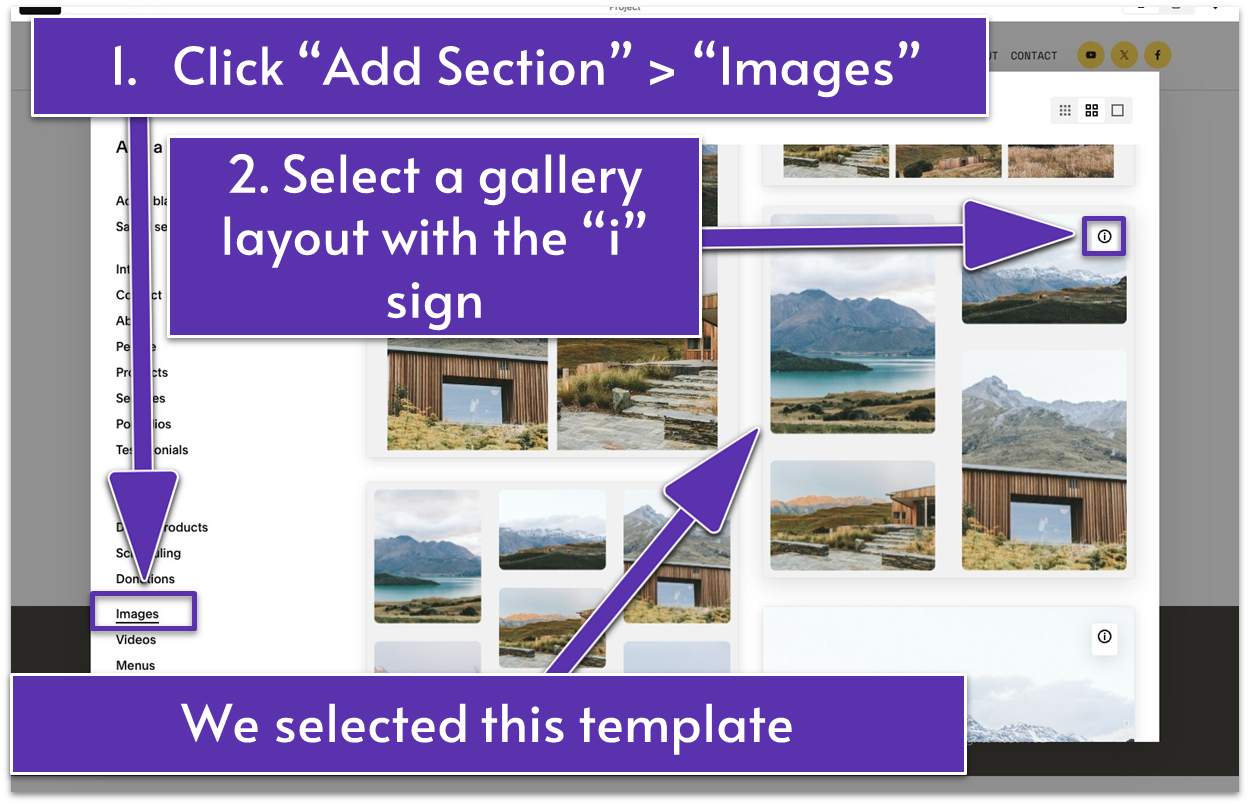
- Click the “Add Section” button.
- Scroll down and select “Images” from the menu on the left side of the window.
- Select a gallery template with the “i” sign. It means you can add content items and switch between layouts without having to rearrange them manually. We chose a two-column grid layout with rounded-corner images.
Step 2: Add your images to the gallery
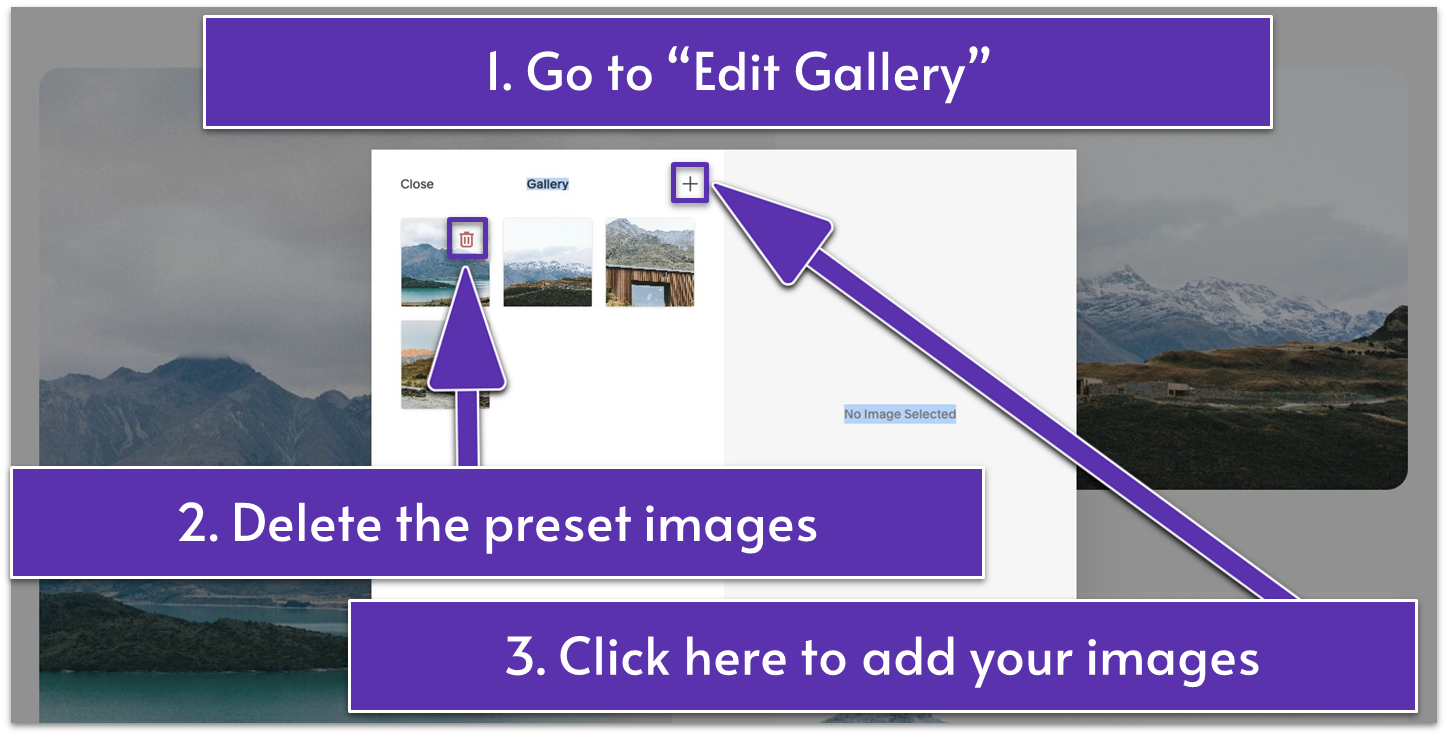
- Click “Edit Gallery.”
- Hover over a sample image, click the trash can icon ( ), and select “Confirm” in the dialog box to delete it. Repeat this step for the remaining images.
- Click the plus icon ( ) to add your images.
Look at you curating your work like a gallery boss! Now, let’s perfect your gallery design.
Step 3: Customize the design of your gallery
- Comment fonctionne le Bitcoin

If you want to replicate the adjustments we made to our gallery, here’s what you need to do:
- Set “Width” to “Inset.”
- Adjust the “Spacing” to 20.
- Enable “Lightbox” if you want people to be able to click on each image and view it in a bigger format.
Click by click, you’ve built a gallery that will make clients swoon!
Now, let’s move on to the last section of your Portfolio subpage.
4.4 Add a Design Flair With a Scrolling Element (Third Section)
As a creative, you know the power of a “wow” moment. Adding a scrolling element to your Portfolio page is one of those moments, bringing movement and energy to your site.
Why settle for the ordinary when something can be extraordinary? The internet has enough boring websites already. Plus, it’s all about the presentation in visual industries! A scrolling element allows you to share any text in a visually stunning, motion-infused format.
Let’s add that extra spark to your website and make it a fun space to explore!
Step 1: Add a blank section
Step 2: Add text
- Add a text block.
- Drag the text block to the upper middle part of the section.
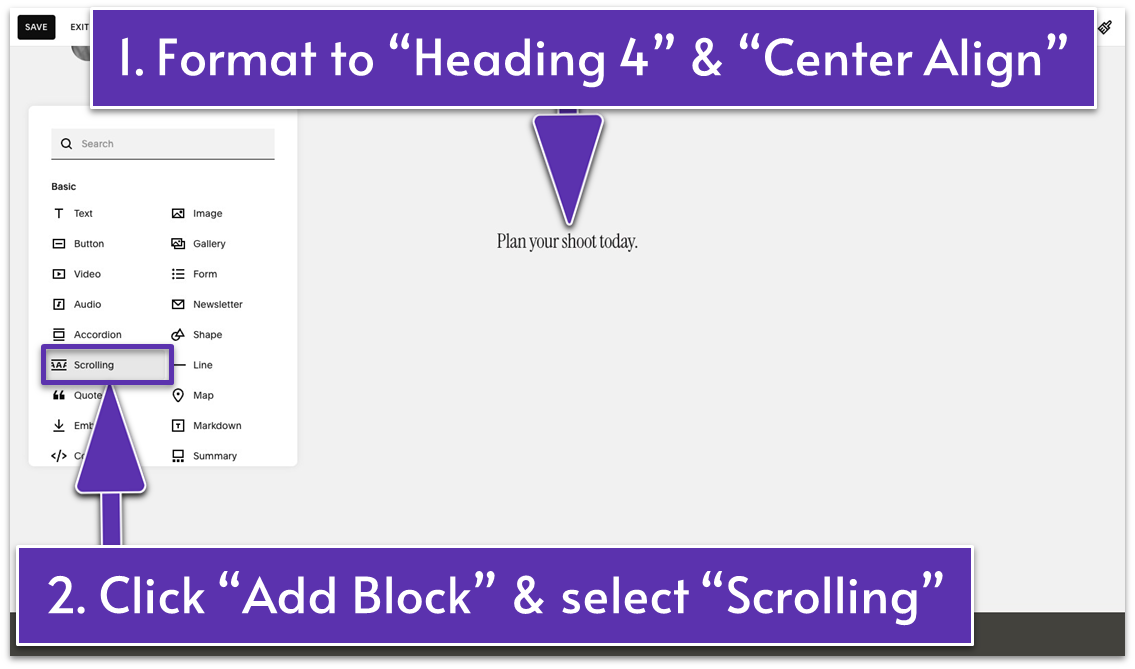
- Add text encouraging visitors to take action and format it as “Heading 4.” We wrote, “Plan Your Shoot Today.”
- Center the text using .
Step 3: Add a scrolling block

- Click “Add Block” and select “Scrolling” from the list.
- Place the scrolling block below the text block.
Step 4: Add text items to the scrolling block
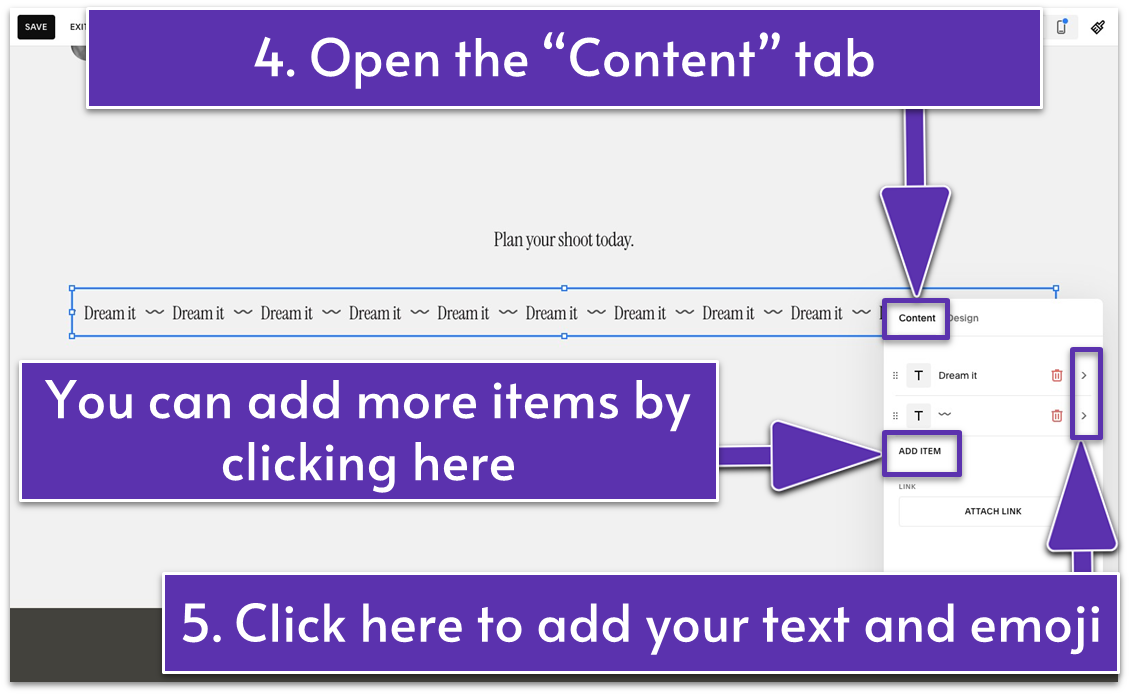
- Click the pencil icon ( ) and open the “Content” tab.
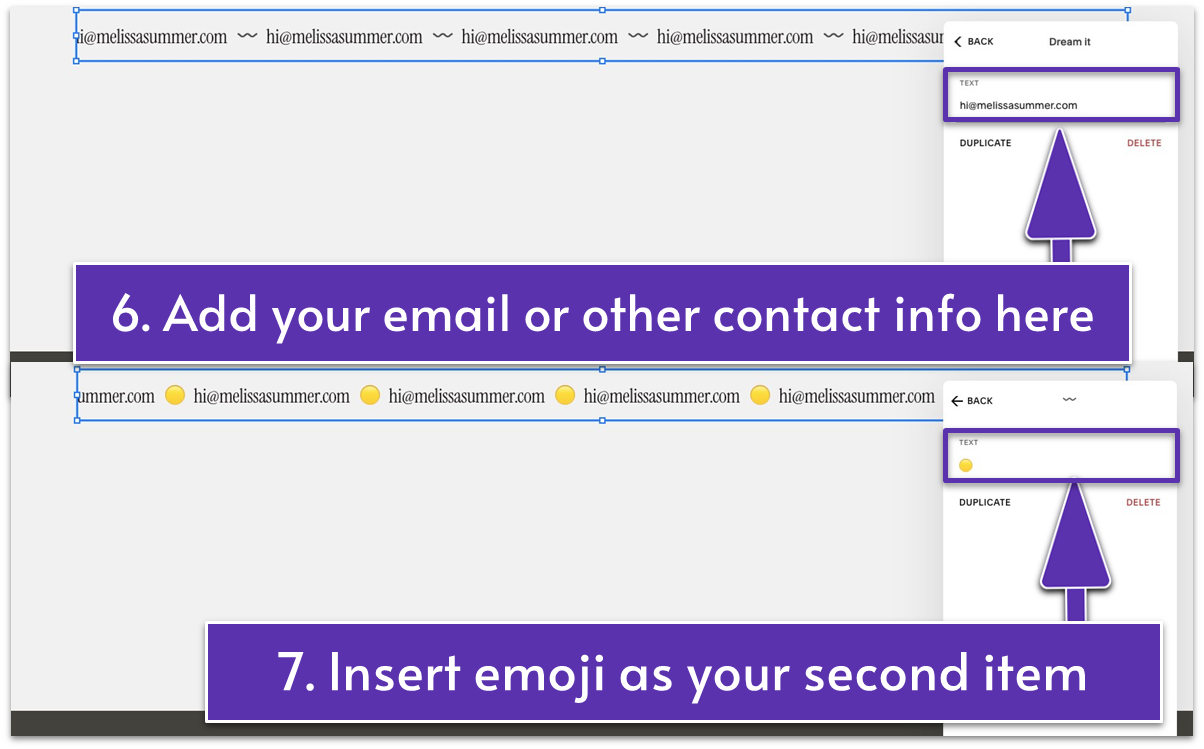
- Click the first item to add your email. Type your email address in the “Text” box.
- Click the second item to add an emoji. To add an emoji, you need to:
- Windows: Right-click on your device and select “Emoji,” or press the Windows key + period.
- Mac: Press Fn + E, + E, or Command + Control + Spacebar.
We selected the same yellow emoji we used on the About page on our website.
Step 5: Customize the design of your scrolling element
- Open the “Design” tab.
We liked most of the default settings but made a few minor tweaks to improve the design of our scrolling block. Here’s how to copy what we did:
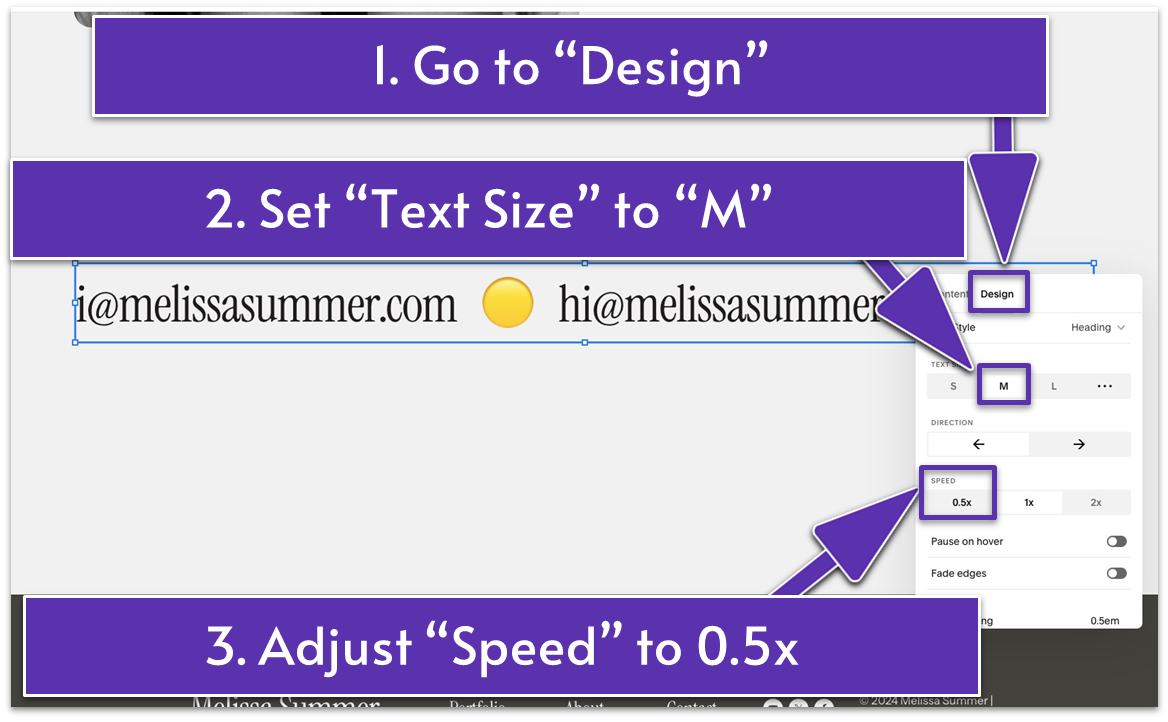
- Increase “Text Size” to “M.”
- Change the “Speed” to 0.5x.
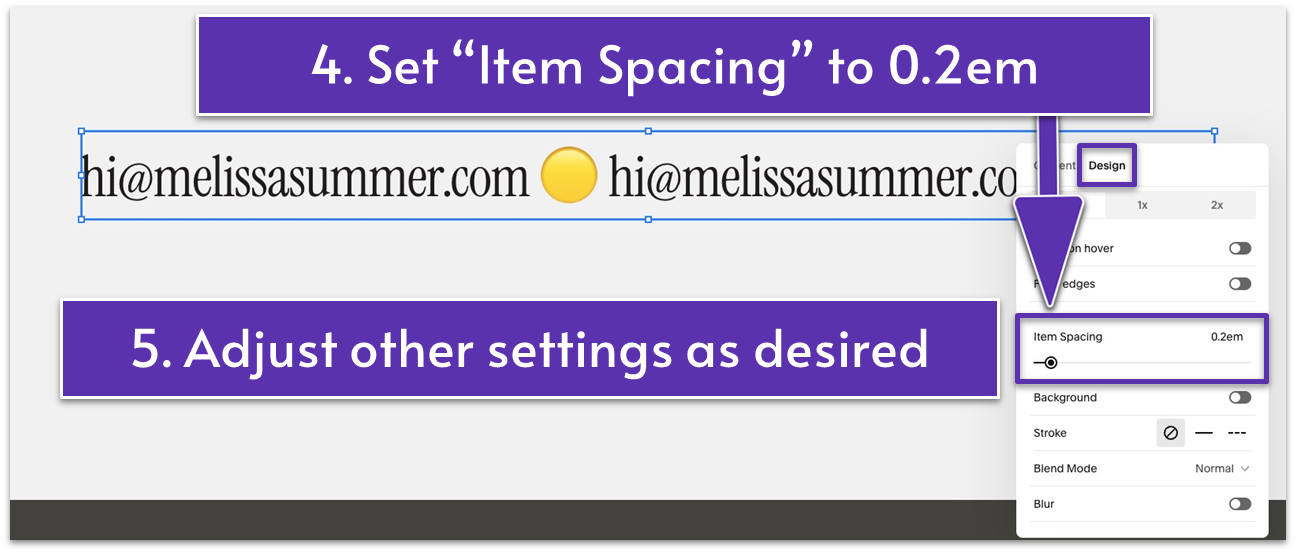
- Set “Item Spacing” to 0.2 em.
Step 6: Apply final touches to the section
You likely edit your work to perfection before handing it to clients – your website is no different.
This is how your scrolling section should look:

Here’s what you need to do to get the same result:
- Stretch the scrolling block horizontally from one end of the section to the other.
- Use the grid adjuster ( ) to remove any unnecessary blank space.
Bravo! Your page is turning into the kind of portfolio that deserves its own exhibition – keep going!
4.5 Optimize for Mobile
Your website should be as polished on mobile devices as it is on desktop. A seamless, mobile-friendly design ensures visitors can see your portfolio no matter the device used. Ensure your layout works well on smaller screens, with readable text, appropriately sized images, and visible and clickable buttons.
If you’ve customized your design beyond the recommendations in this guide, your mobile site may differ from the example provided. Take the time to review and test your site on mobile devices, making any adjustments needed to ensure it looks professional and functions flawlessly.
Step 1: Go to “Mobile View” ( )
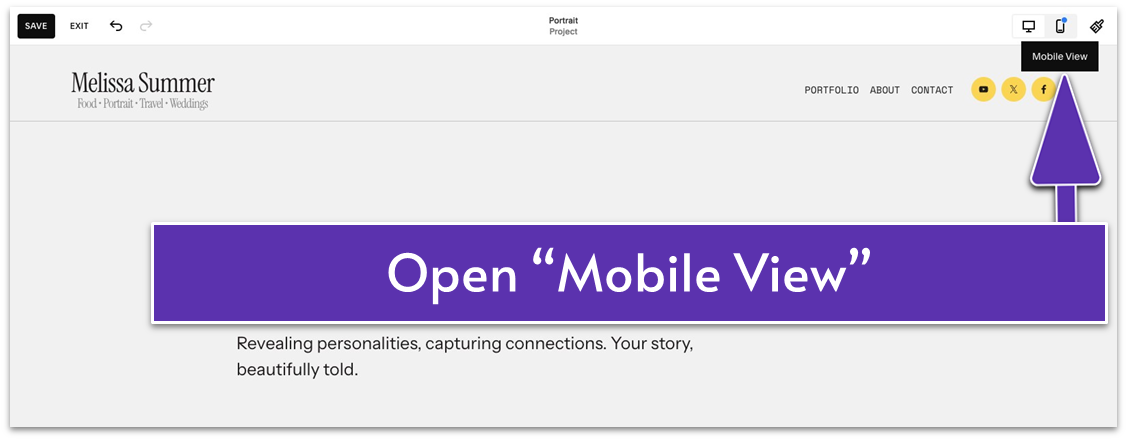
Everything looked great, even on our raw mobile preview. However, that might not be the case with your Portfolio subpage. Evaluate if it needs some attention before saving your progress.
This is what the mobile version should look like:
You rock! Your first Portfolio subpage is ready to show your talent to the world.
4.6 Save Your Portfolio Subpage
Let’s save what you’ve built so far so you can reuse it for your other Portfolio categories.
Step 1: Save your first Portfolio category
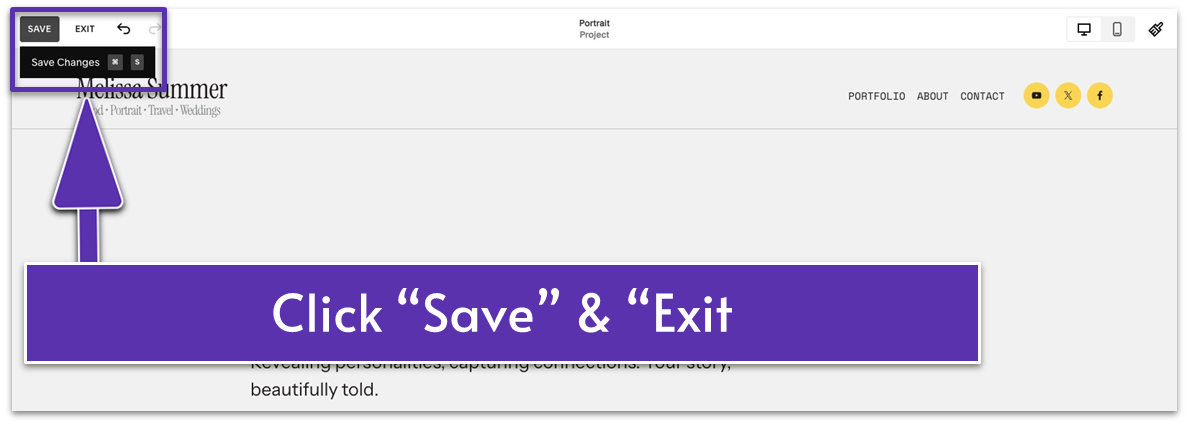
- Click “Save” in the upper left corner.
- Click “Exit” to leave the page.
We typically end our modules with this step. This module is slightly different, and you still have work to do.
That said, the toughest climb is over – you’re cruising downhill now! Moving forward, you can recycle everything you’ve built so far to complete your Portfolio.
4.7 Build Your Second Portfolio Category
Building the rest of your Portfolio categories is a breeze. You only need to duplicate the first subpage and swap it for your new content. With just a few clicks, you’ll have a brand-new subpage ready to showcase the versatility of your talent.
We’ll show you how to duplicate your existing layout and replace it with fresh content.
Step 1: Duplicate the first subpage you just built
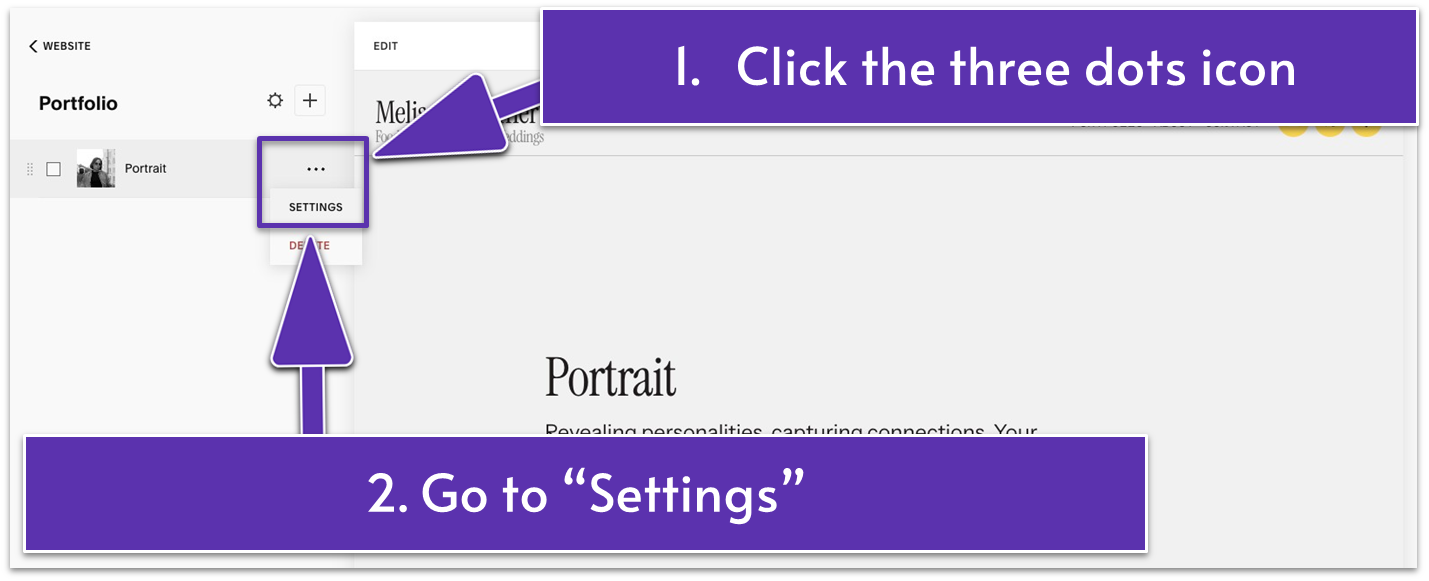
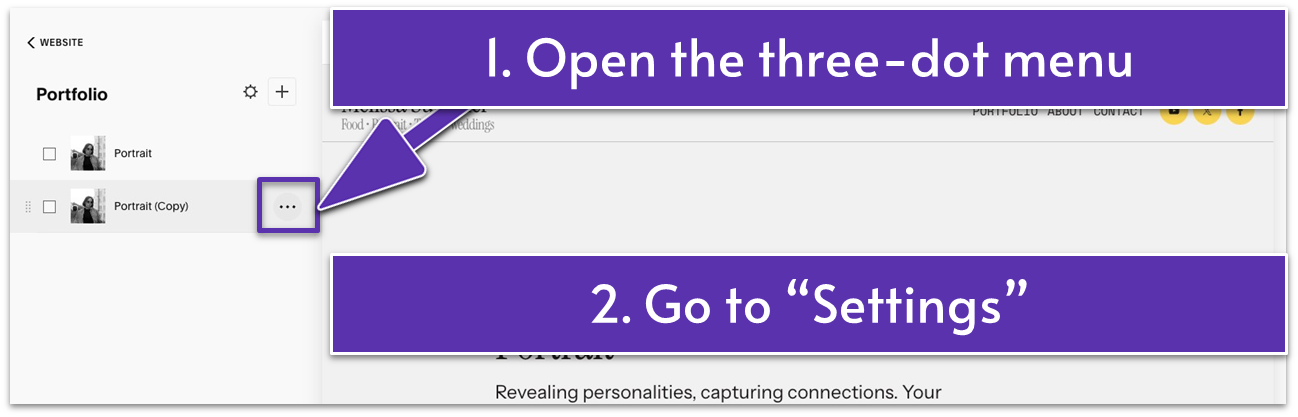
- Click the three dots icon ( )
- Select “Settings” from the menu.
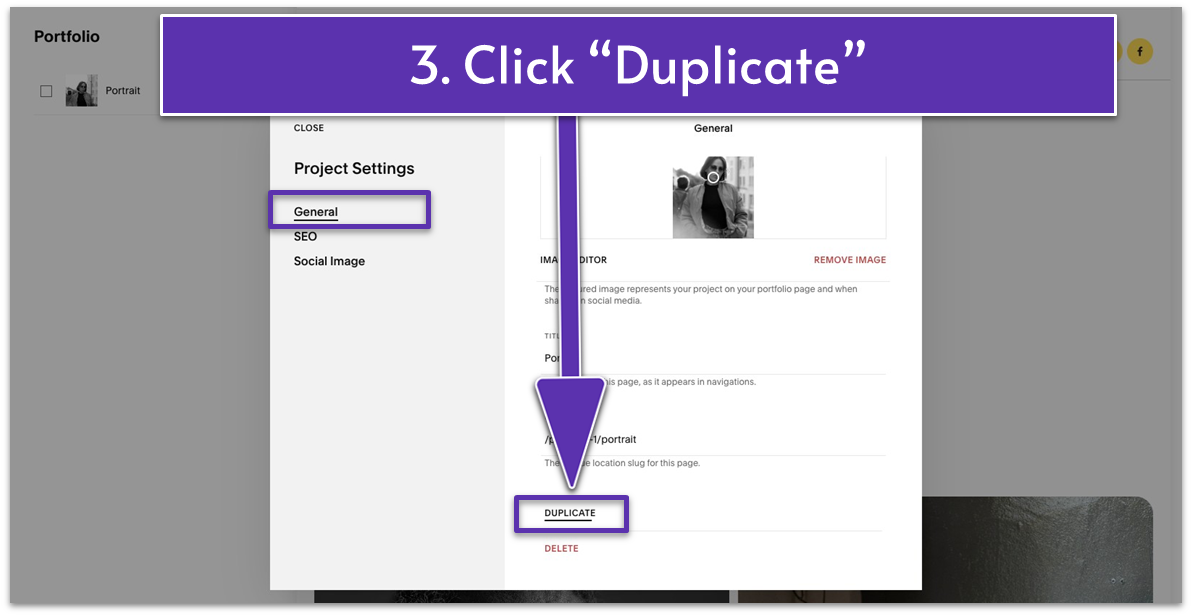
- A window with “General” settings will pop up. Scroll down to the bottom of the “General” menu and click “Duplicate.” Then, select “Confirm” in the dialog box to create a copy.
Step 2: Customize the settings of the duplicated project
- Click the three dots icon ( ) next to the duplicated project and open its “Settings” menu.
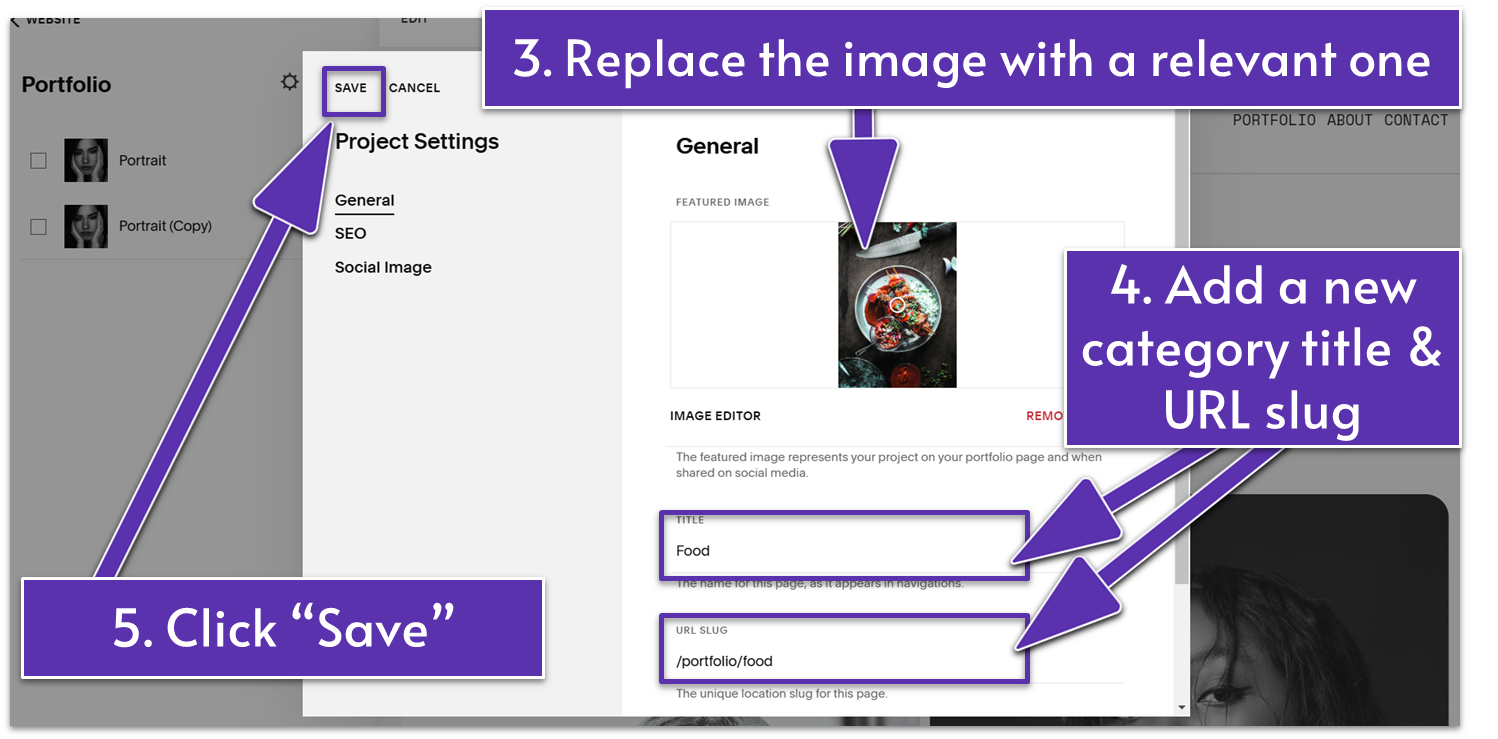
- Replace the existing image with a new image relevant to your second Portfolio category.
- Add the title of your new Portfolio subpage. We renamed the second subpage to “Food.”
- Change the URL slug to reflect the new category. For example, we wrote “food” as the URL slug for our second subpage.
- Click “Save” and exit the “General” window.
Click “Edit” to launch the website editor and start creating your second Portfolio category page.
Step 3: Update the duplicated subpage
- Replace the duplicated title, description, and gallery images with new content to reflect your new portfolio category.
This portfolio page screams “Hire me!” in the classiest way – keep the momentum going!
4.8 Build the Rest of Your Portfolio
Repeat the entire process described in 4.7 until you complete all your Portfolio page categories. There are four portfolio categories on our website: “Portrait,” “Food,” “Travel,” and “Wedding,” meaning we had to repeat the process three more times after building the first subpage.
Remember to save your work every time you finalize a portfolio project. When you have completed all your portfolio categories, exit the editor.
Look at you, framing your portfolio page like a pro. There are only a few more steps until your portfolio page is ready to tell your talent story to the world.
4.9 Add a Dropdown Menu in Your Site’s Main Navigation
When your portfolio is divided into different category subpages (like on our website), attaching a dropdown menu with direct links to the separate categories can help visitors quickly find what they are looking for.
When visitors hover over the Portfolio page in your site’s main navigation (the top menu of your site), a dropdown menu will show all your portfolio subpages. Clicking on any of them will take them directly to the category that they want to see.
For example, our Portfolio page is divided into “Portrait,” “Food,” “Travel,” and “Wedding.” We built a Portfolio dropdown menu with these four categories. If a restaurant owner visited our site, they could access our “Food” category directly from our site’s main navigation.
With average site attention spans of eight seconds, making it as easy as possible for visitors to access your work is not a bonus – it’s a necessity.
Step 1: Add a dropdown menu
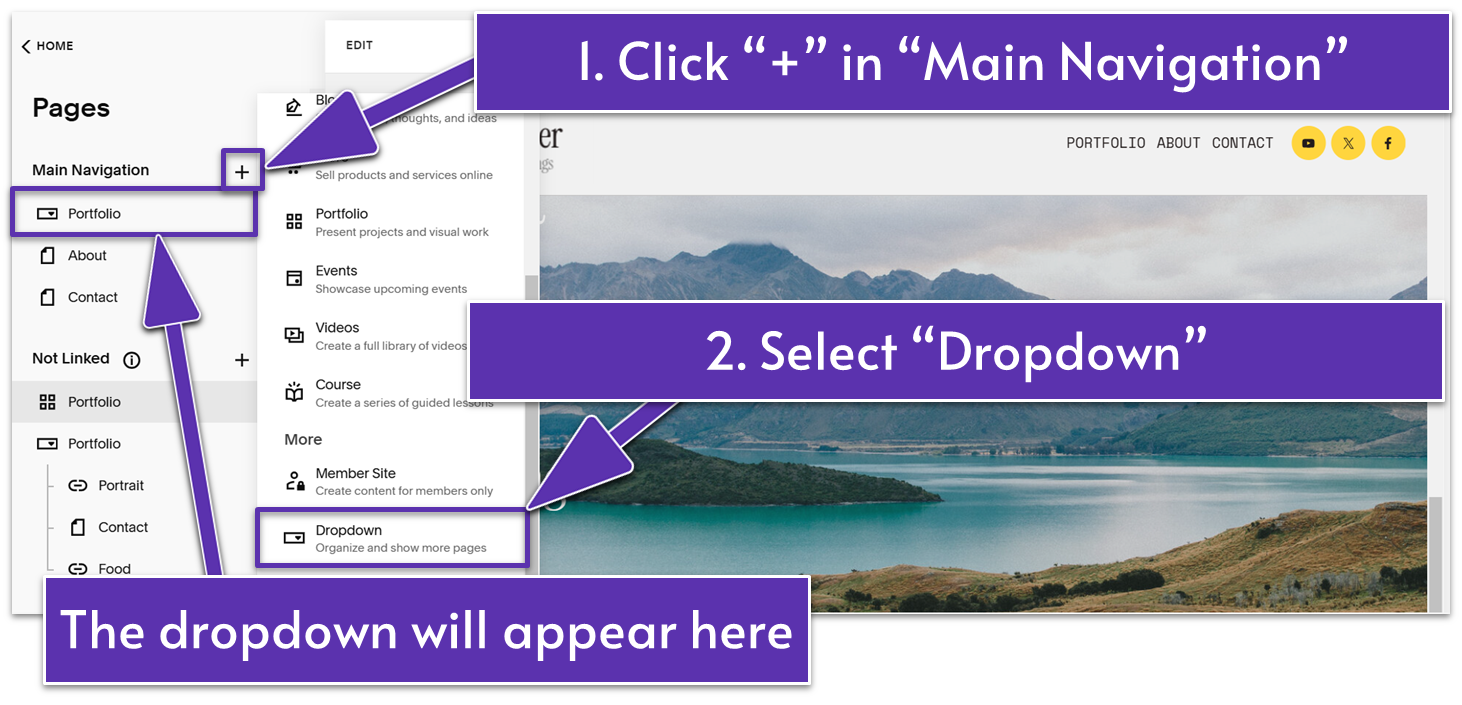
- Back to the “Pages” menu, click the plus icon ( ) to open the “Main Navigation” menu.
- Select “Dropdown” from the menu.
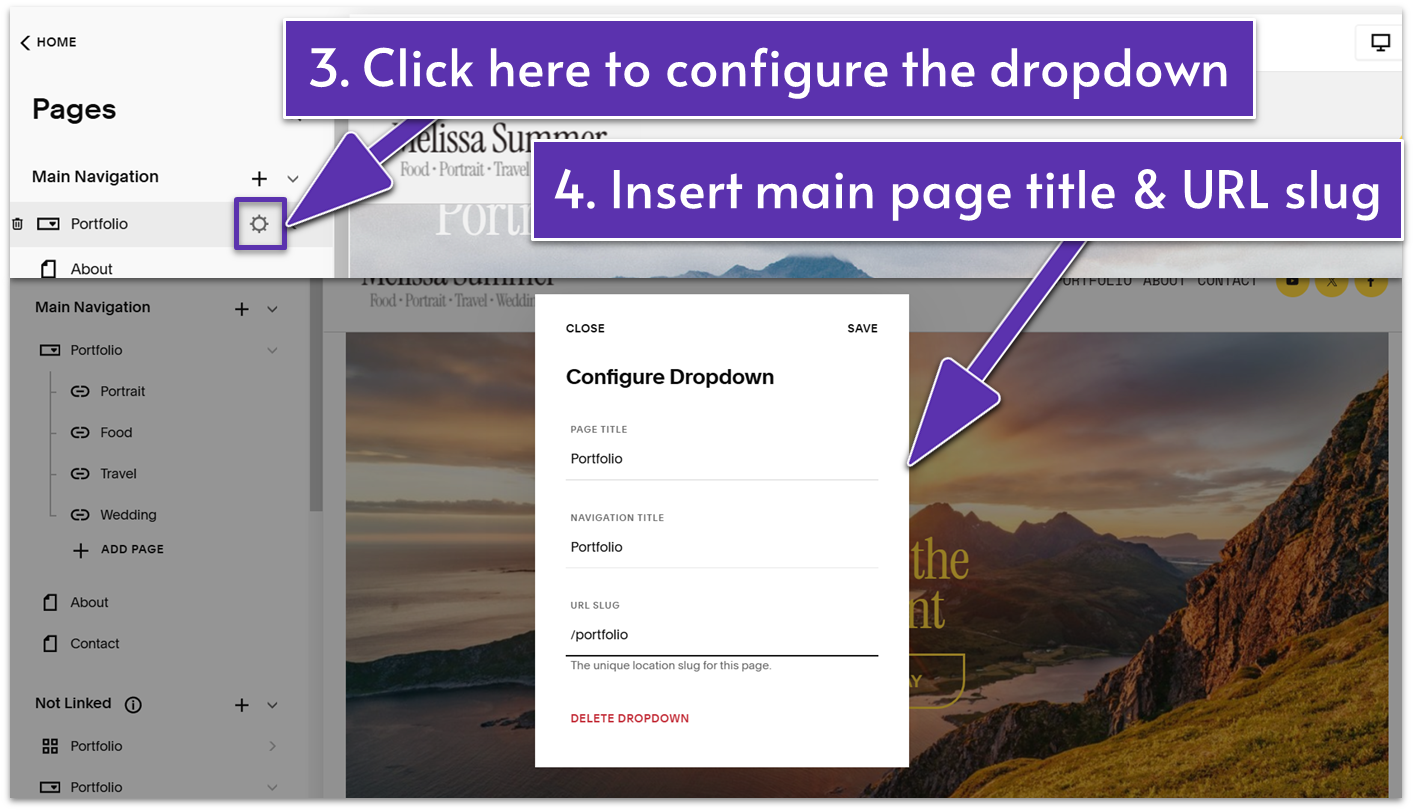
- Click the gear wheel icon ( ) to configure your dropdown menu.
- Add the “Page Title,” “Navigation Title,” and “URL Slug” of your main Portfolio page. In our case, the page and navigation title is “Portfolio,” and the slug is “portfolio.”
Step 2: Add items to your dropdown menu
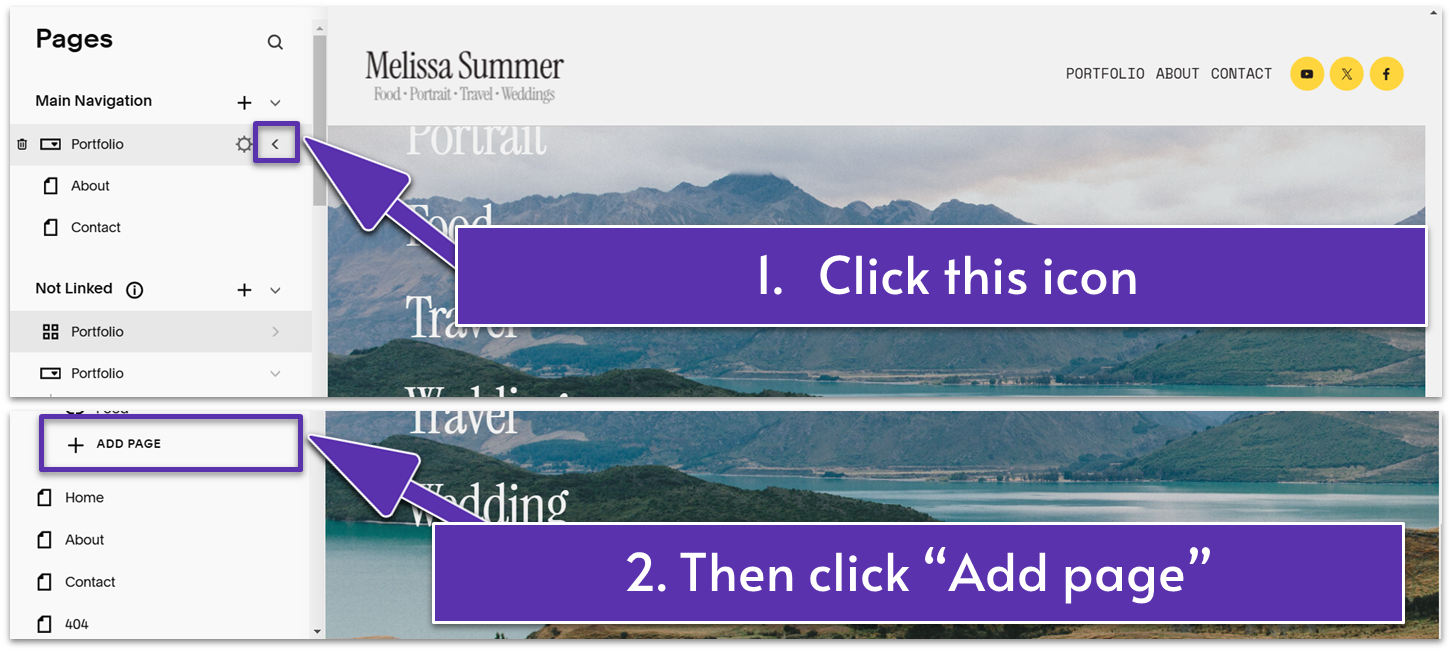
- Open the dropdown menu by clicking the left arrow icon ( ).
- Click “Add Page.”
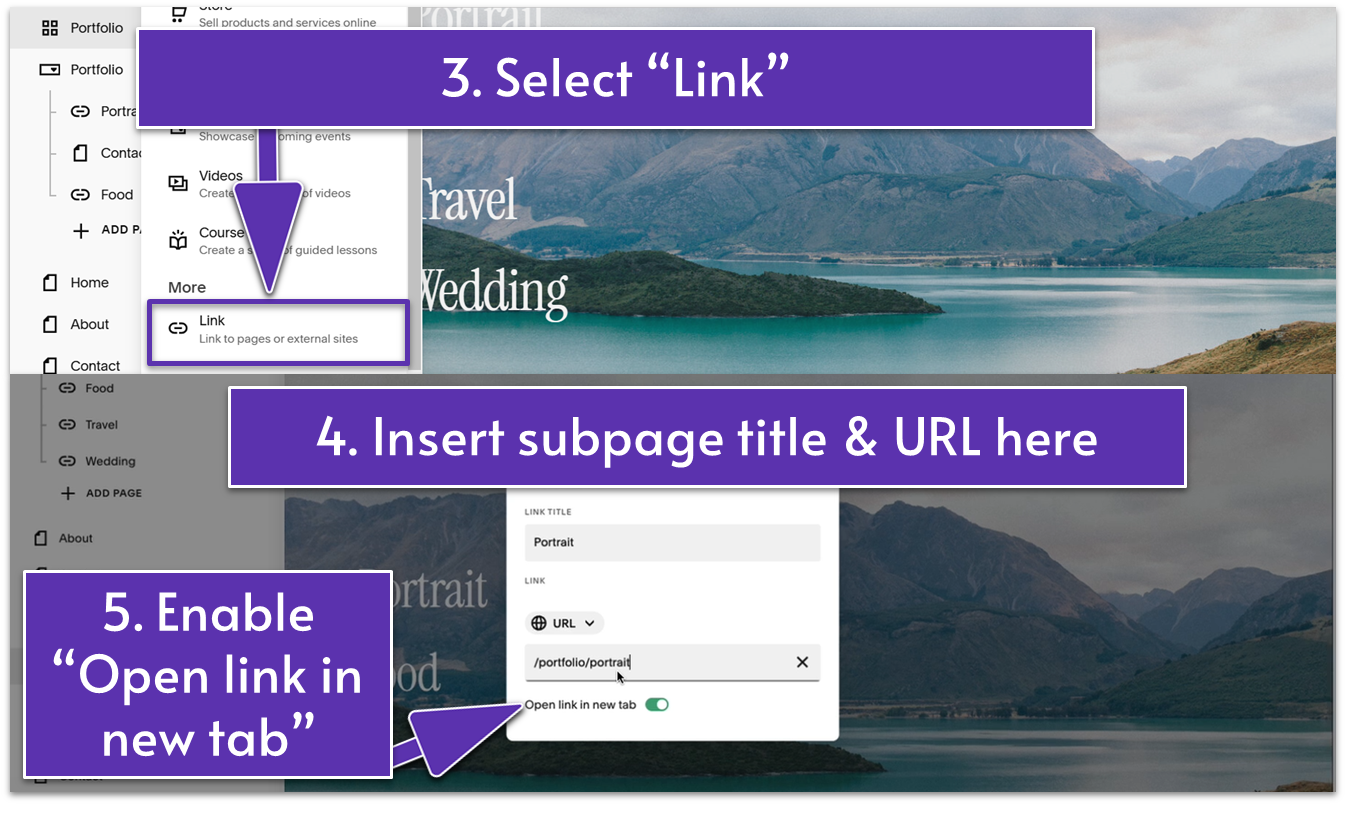
- Scroll down to the bottom of the list and click “Link.”
- Add the name of your portfolio subpage under “Link Title.” For example, we wrote “Portrait” for the first portfolio category on our website.
- Insert a link to the relevant portfolio category in the “URL” box. For example, we typed “/portfolio/portrait” in the field, so the link text directs users to your “Portrait” subpage on the “Portfolio” page.
- Optionally, toggle on “Open link in new tab.”
- Repeat the process for all your portfolio categories.
Congrats – your portfolio is coming to life online, and it’s got excellence written all over it!
By creating your Portfolio, you’ve already laid the foundation for one of the most important parts of your website: the Portfolio page. Your actual Portfolio section will take center stage here as a gateway to your stunning work.
You’re so close to tying everything into a cohesive, eye-catching design. Your Portfolio page will reflect all the effort and creativity you’ve poured into your website, setting the tone for a wow-worthy online presence.
Let’s build the home of your site!
