


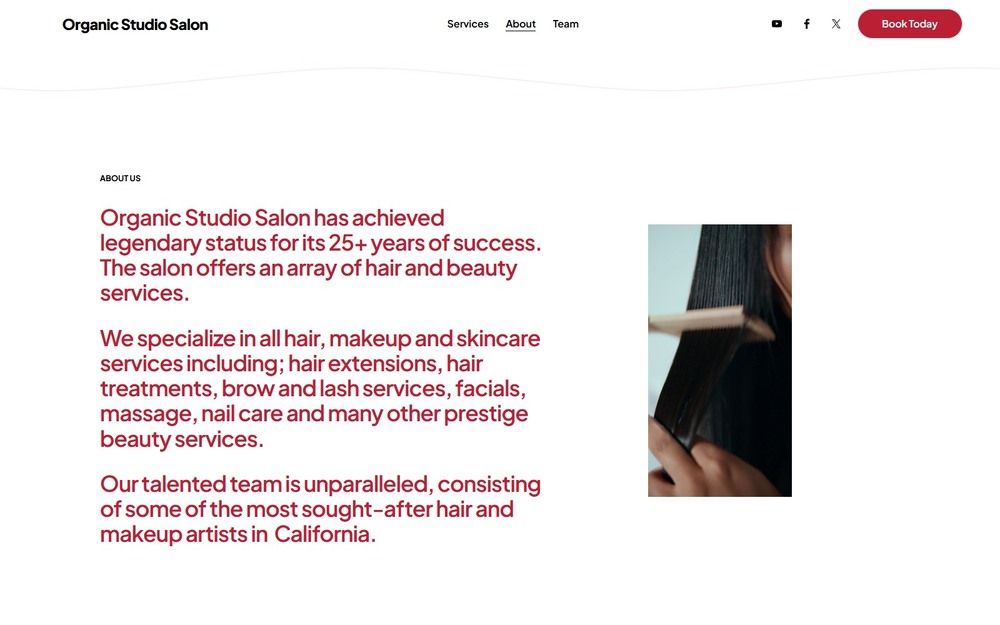
Your About page isn’t just about you – it’s more about your clients and their needs. It should highlight your expertise and talent without going too far into your work. Leave the details for your Portfolio page, which we’ll build together later.
For now, let’s give your visitors a glimpse into your impressive personality and work.
Say cheese – we’ll help you create this beautiful About page with ease! Let’s begin.
3.1 Add a New Page
We’ll start the process with a new blank page and go over every step together. So, let’s turn this blank canvas into your unique page!
Step 1: Add a blank page under “Main Navigation”
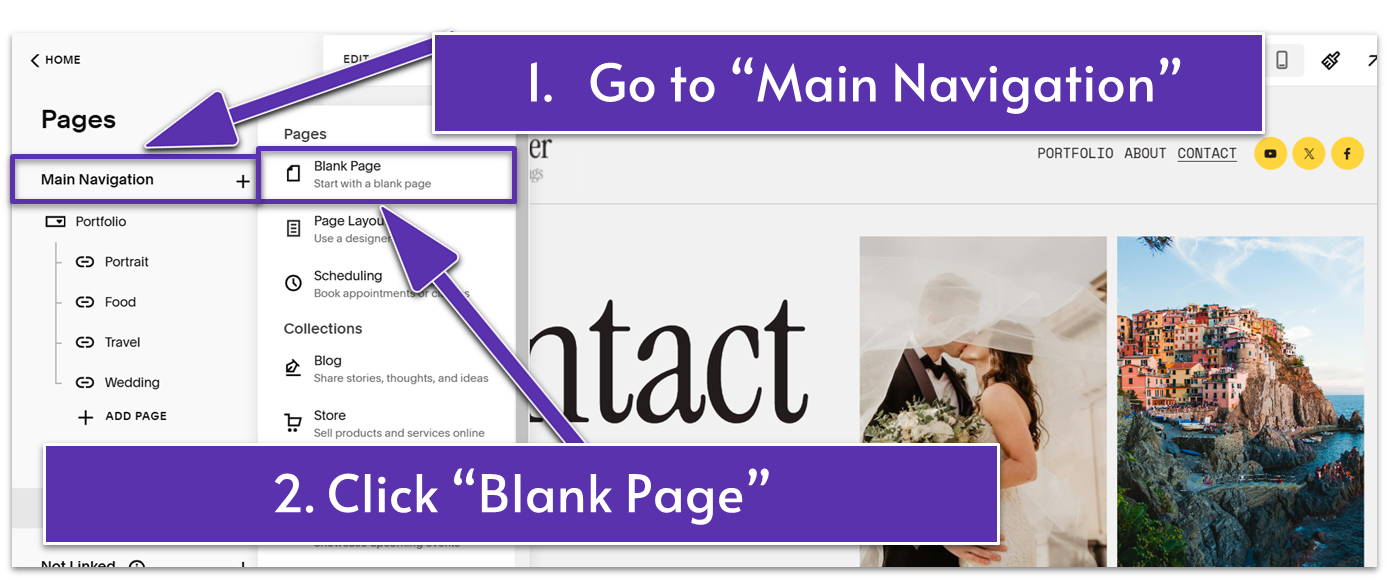
- Choose “Blank Page” from the “Main Navigation” menu. This page will appear in your site’s main navigation (the top menu of your website).
Step 2: Rename the page to “About”
Here comes the fun part! Let’s work together to create a powerful About page.
3.2 Introduce Yourself & Your Work (First Section)
Briefly introduce yourself and what you do in this section. Keep it concise, and make it visually impactful. Use text, images, and a playful layout to create a memorable introductory About section.
Step 1: Click “Edit” to enter the page editor
Step 2: Add a blank section
Step 3: Add a text block

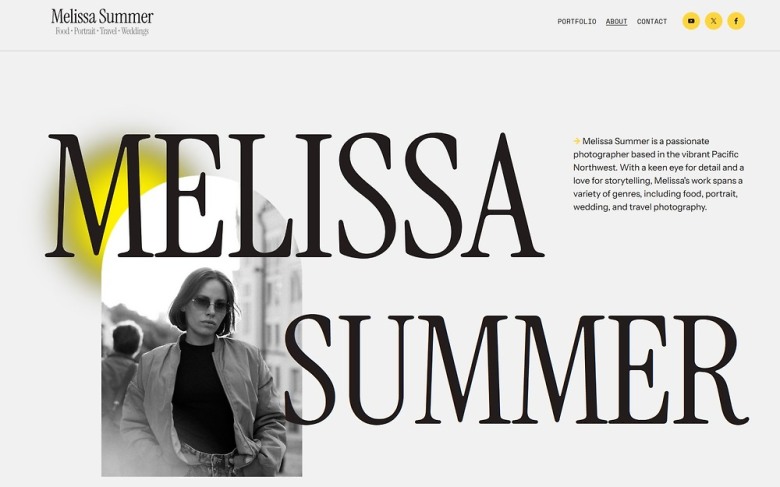
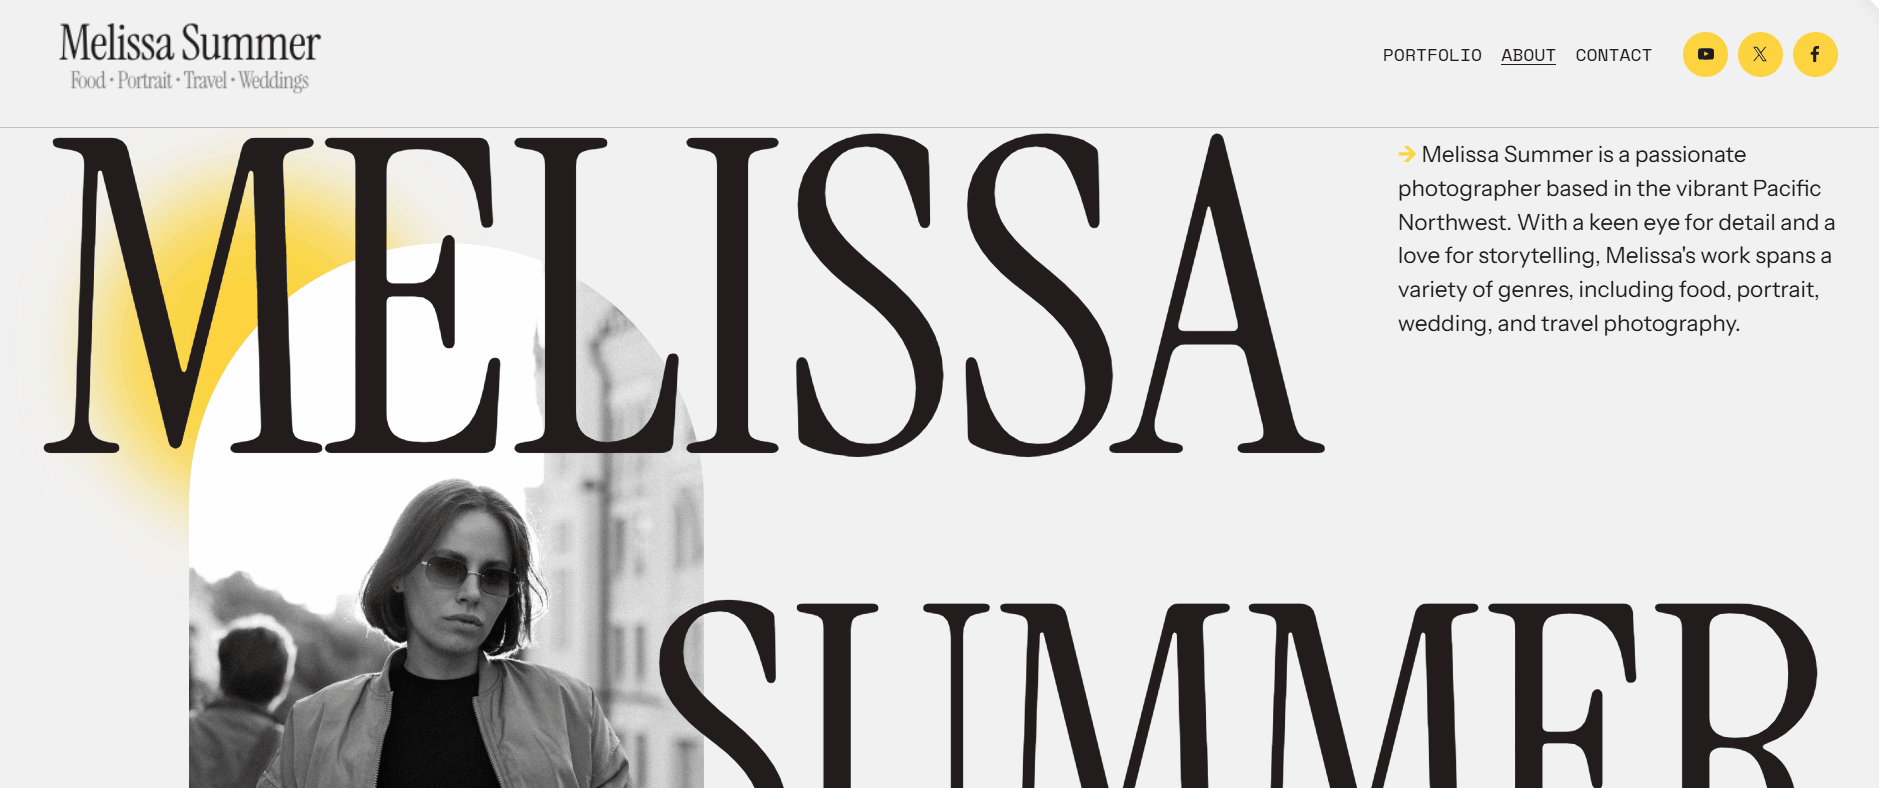
- Write your name or business name. We wrote our fictional site owner’s name, “MELISSA” (all capital letters), in this text block. Format it to “Heading 1.”
- We applied “Scale Text” to fill the entire text block. You can do this by clicking the pencil icon ( ) and then the “Scale Text” icon ( ).
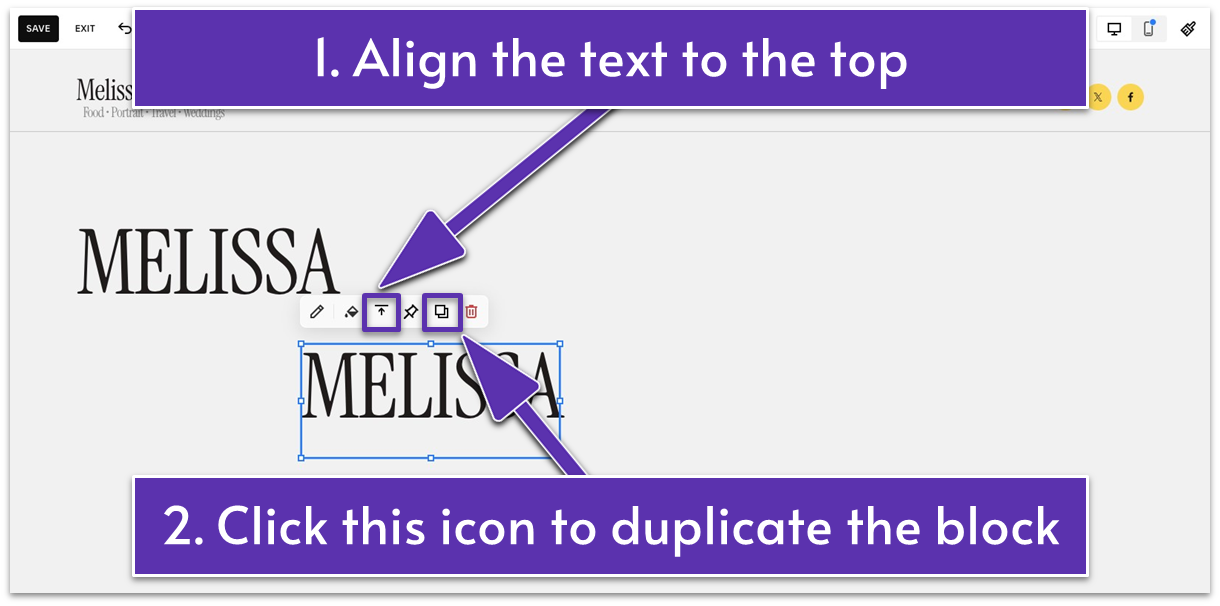
- Finally, we aligned the text to the top edge of the block. You can do this by clicking the “Align Vertically” icon ( ) in the main text block toolbar. Then select “Align Top” (the first option with the same icon) from the menu that will pop up.
Step 4: Duplicate text block
Add another text block with the same format as the first. But instead of repeating the steps above, it’s easier to duplicate the previous block to keep all the edits. This way, you’ll only need to replace the text.
- Select the first text block. Then click the “Duplicate” icon ( ) on the toolbar.
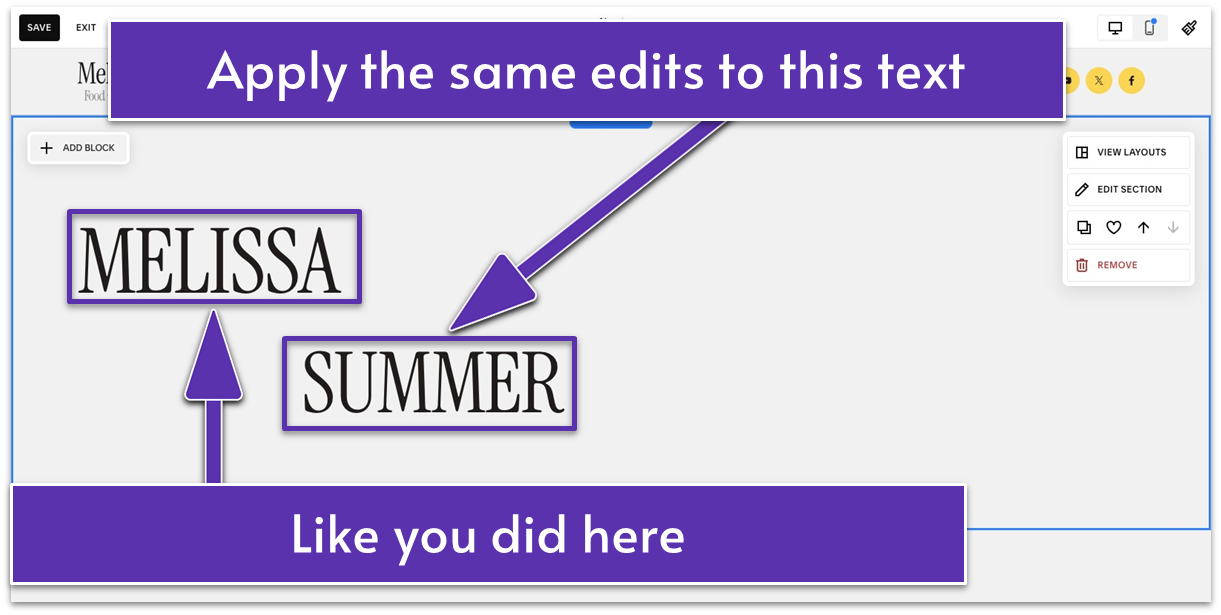
- Write your last name or the next word of your business name. We wrote our fictional site owner’s last name, “SUMMER,” in all capital letters.
Alternatively, you could add a new text block and apply the same edits from the previous step.
Step 5: Add a new text block
- Move this text block to the right half of the section.

- Use this text block to briefly introduce yourself and your work.
We wrote: “Melissa Summer is a passionate photographer based in the vibrant Pacific Northwest. With a keen eye for detail and a love for storytelling, Melissa’s work spans a variety of genres, including food, portrait, wedding, and travel photography.”
- Format this text block to “Paragraph 2” or as desired.
3.3 Add Graphics to Your Intro Section
Graphics like emojis and images can boost your website’s visual appeal and enhance the user experience by directing attention and adding structure. They also help to break up the text, emphasize important information, and make the overall design more attractive.
Let’s give your website some flair!
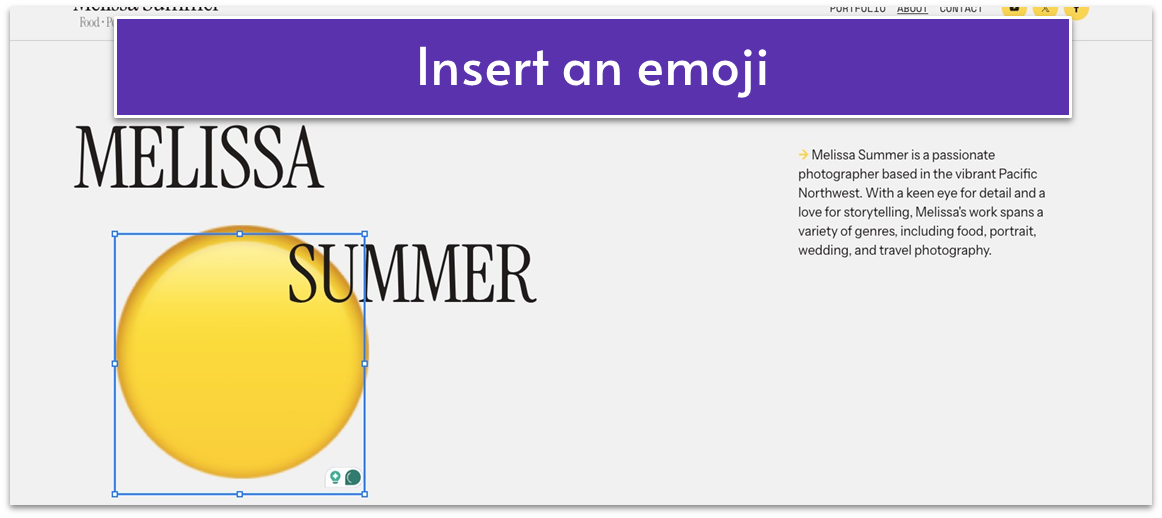
Step 1: Add a new text block with an emoji
You can add an emoji in two ways:
Option 1: Duplicate an existing text block
To add an emoji in the text block:
- Windows: Right-click on your device and select “Emoji.” You can also press the Windows key + period.
- Mac: Press Fn + E, + E, or Command + Control + Spacebar.
- Select the emoji of your choice from the menu. We chose a yellow circle.
The emoji will appear large because it picked up the formatting from the duplicated block. If the size is fine, you’re good to go! You can also resize it if needed.
Option 2: Add a new text block
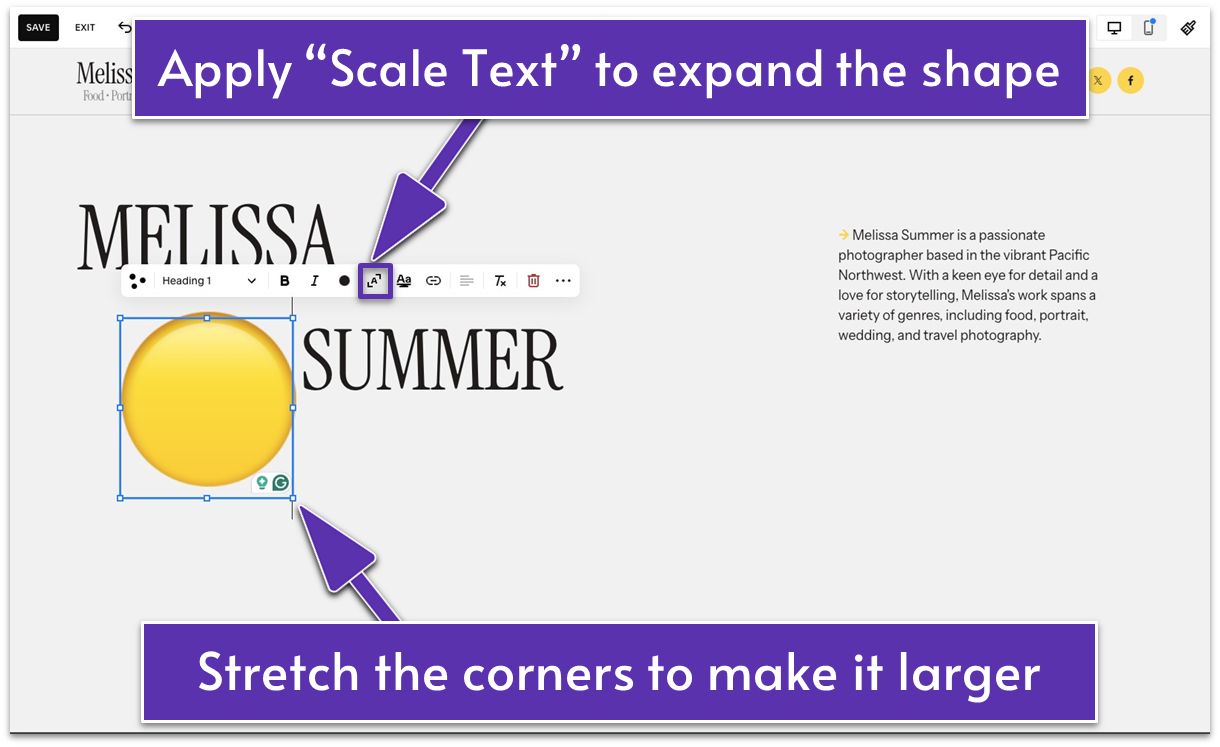
- Insert an emoji into the new text block.
- Click the pencil icon and apply “Scale Text” ( ). The emoji will expand and fill the entire text block.
- Stretch the edges of the text block to adjust the emoji’s size.
Step 2: Add an image block
- Upload your image.
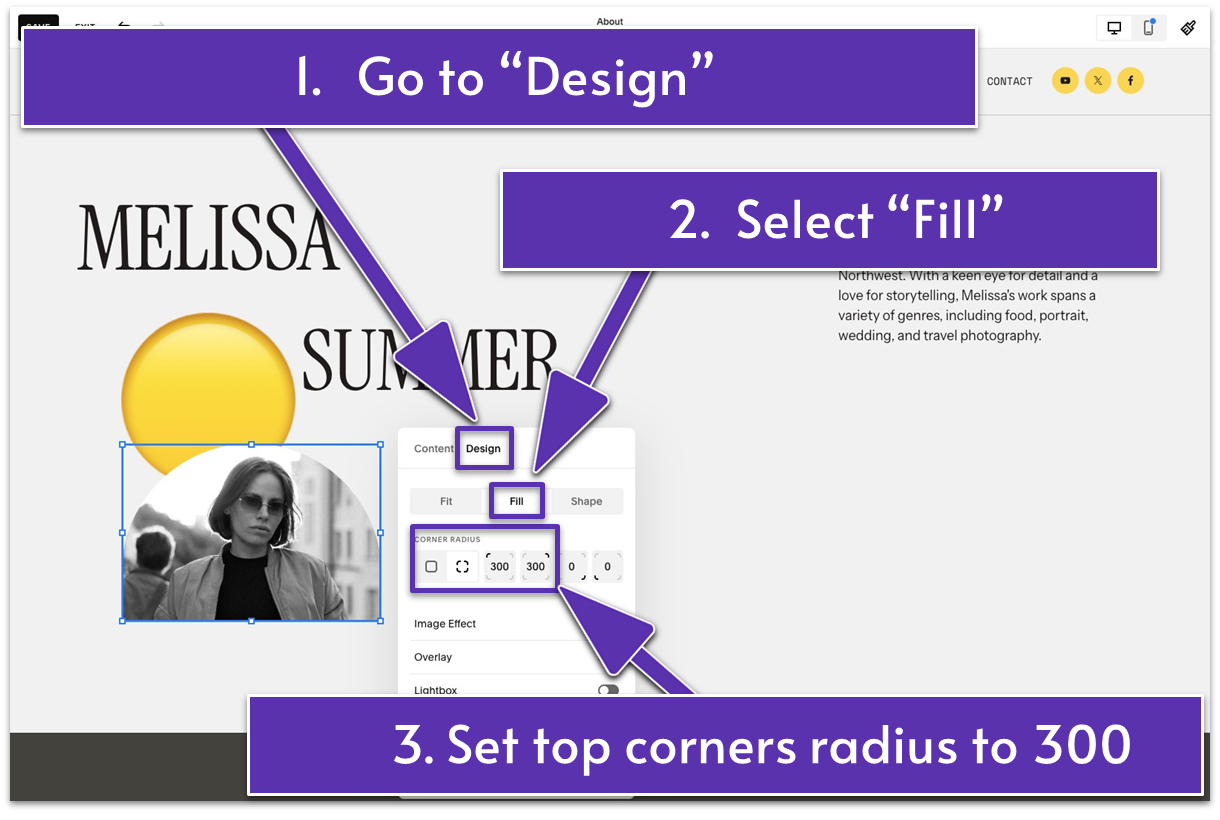
- Once you upload your image, double-click the image block to open the editing panel.
- Go to the “Design” tab.
- Apply “Fill.”
- Click under “Corner Radius” to adjust the roundness of each corner of your image. We did 300 on the top corners.
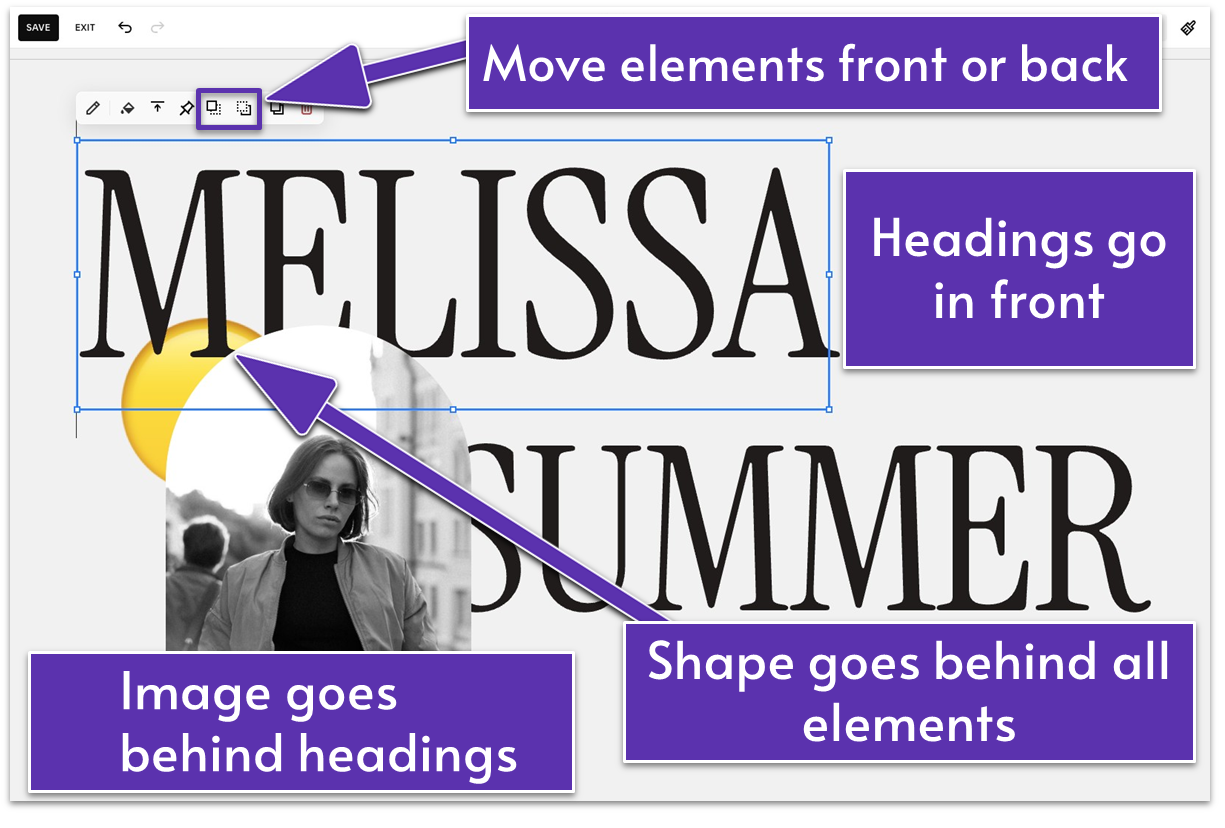
- Your section’s title (“MELISSA SUMMER” on our website) should be placed in front of the emoji and image. You can bring it forward by clicking or moving the graphics backward with . We placed the emoji at the very back, behind all other elements.
Your page might look messy, but worry not – it’s an easy fix. Simply drag and drop the elements into the desired positions, using the grid as guidance, and adjust their size until you’re satisfied with the result.
Step 3: Edit the emoji
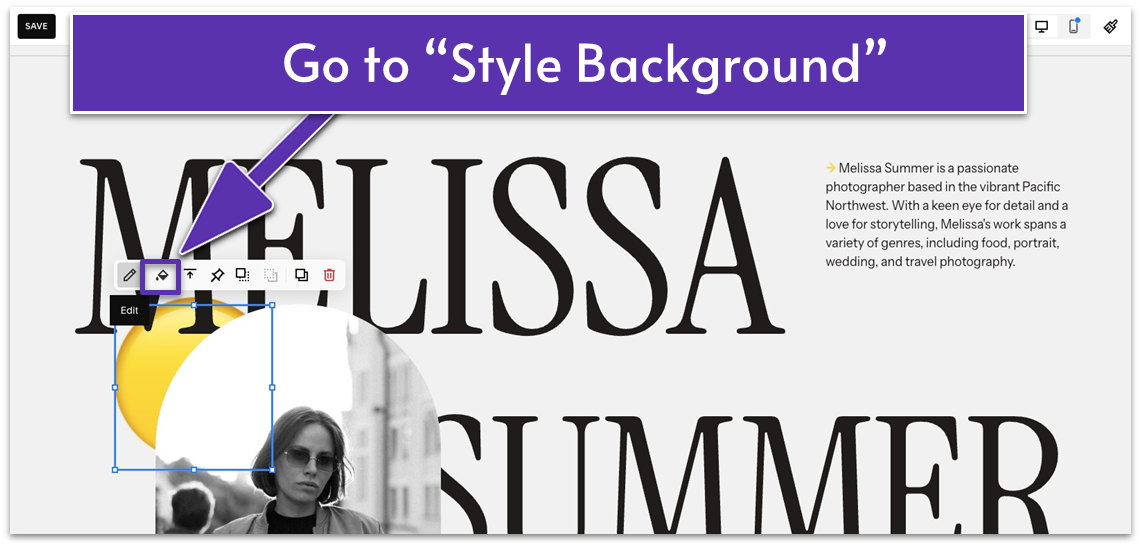
- Select the text block with the emoji.
- Click the paint bucket icon ( ) to open the “Style Background” panel.
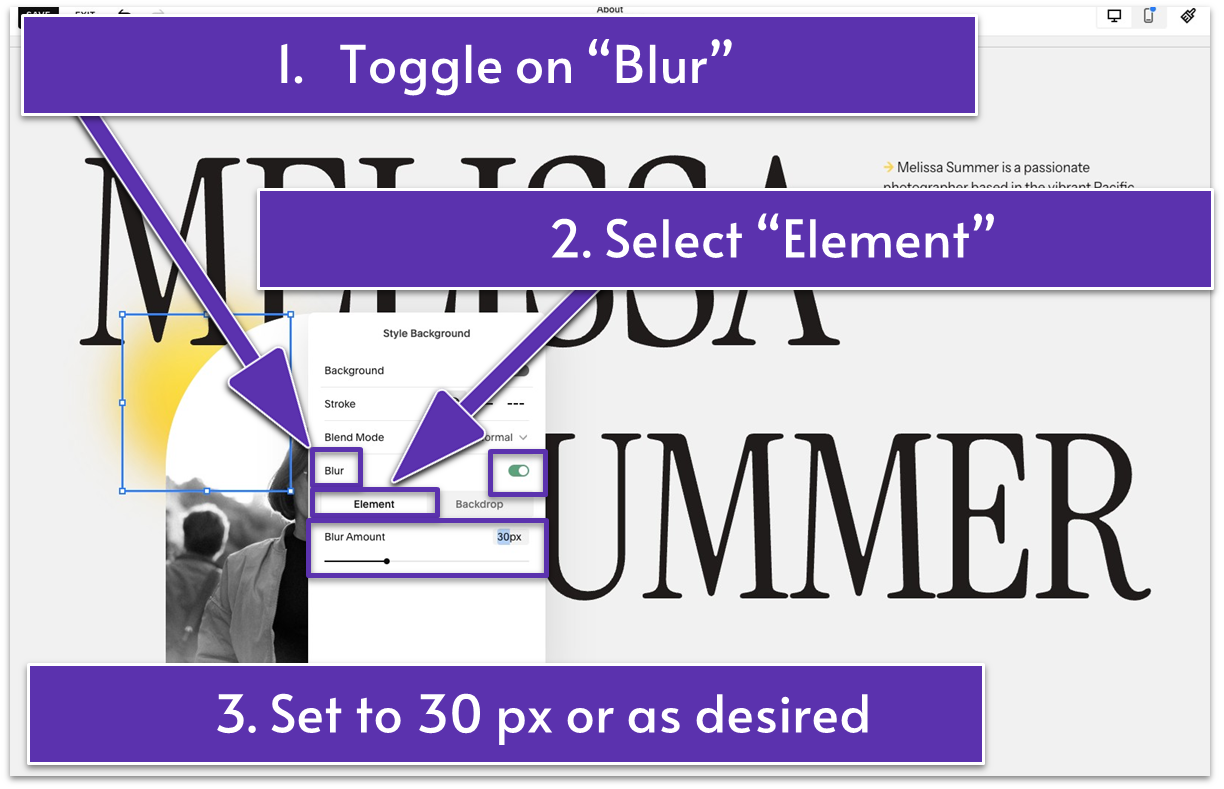
- Toggle on “Blur” and select “Element.”
- Adjust “Blur Amount.” We went with 30 px.
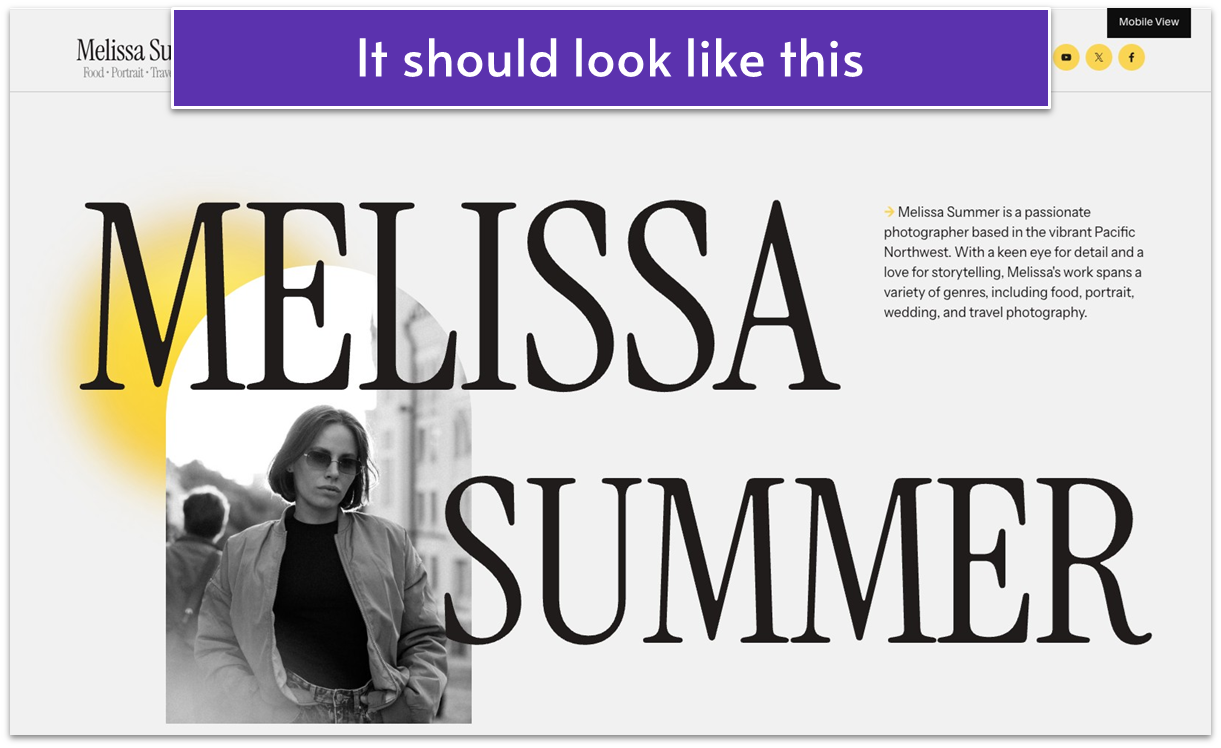
See how easy it is to create cool stuff in Squarespace? We turned the loud yellow emoji into a detail that gives just the right dose of oomph to the section without overshadowing the key elements: the title and the brief intro.
Finally, the section needs to be analyzed to see if additional adjustments are needed for a more harmonious look.
Done? You rock! The first section of your About page is ready to greet visitors.
3.4 Tell Your Story (Second Section)
This is where you can go deeper into your story – who you are, what inspires you, the experiences that shaped your work – anything relevant that helps clients connect with you. The personal touch can build warmth and trust with your visitors.
Don’t forget to include your style and areas of expertise, whether it’s weddings, portraits, landscapes, etc. Highlighting your skills will attract potential clients looking for what you offer.
Step 1: Add a new section
Remember we advised you to save your contact form section so you can reuse it in other parts of your website? This is the moment you get to enjoy the fruits of your past labor!
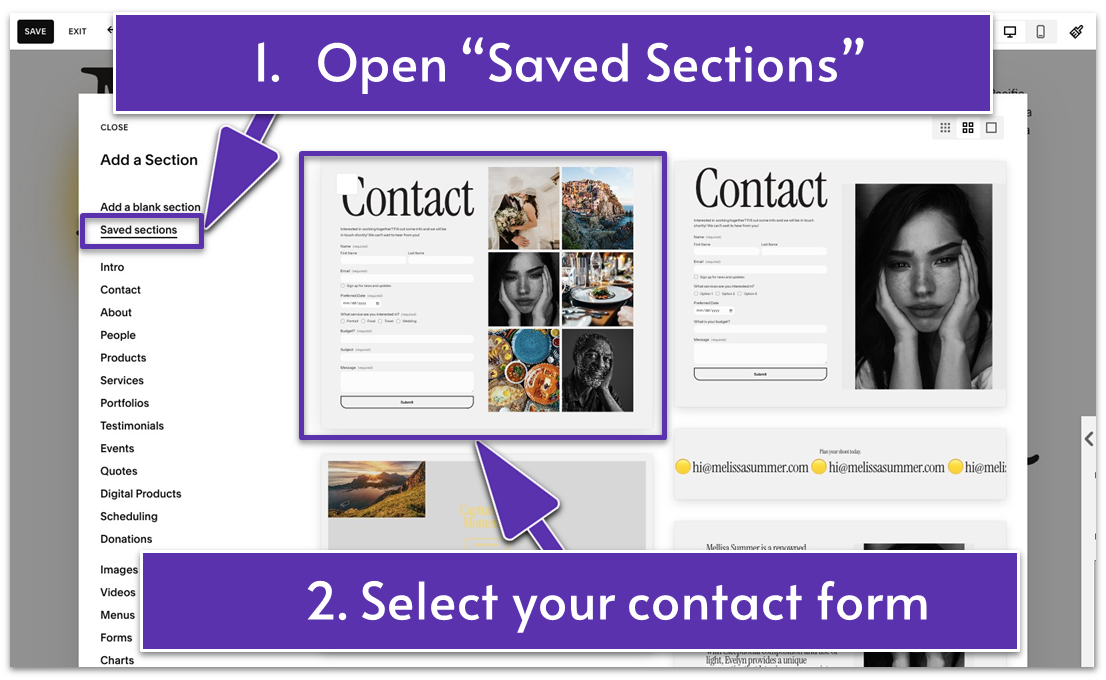
- Go to “Saved Sections” and select your contact form section.
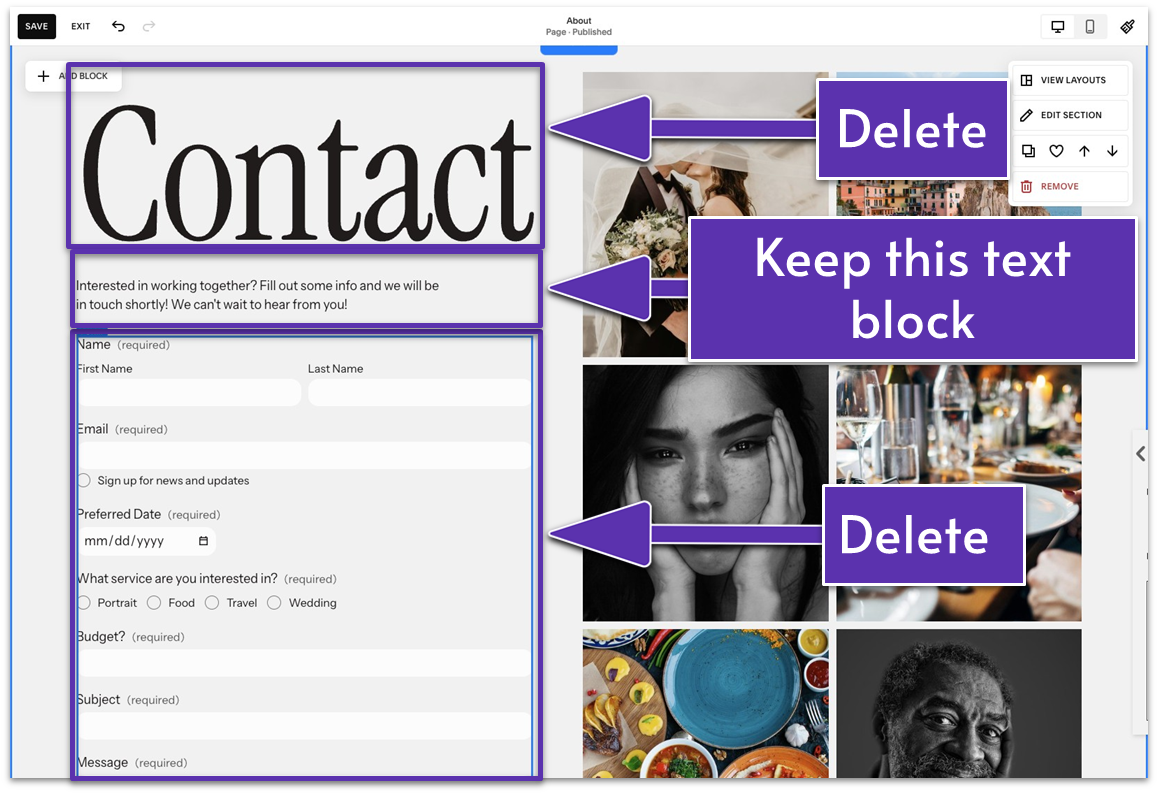
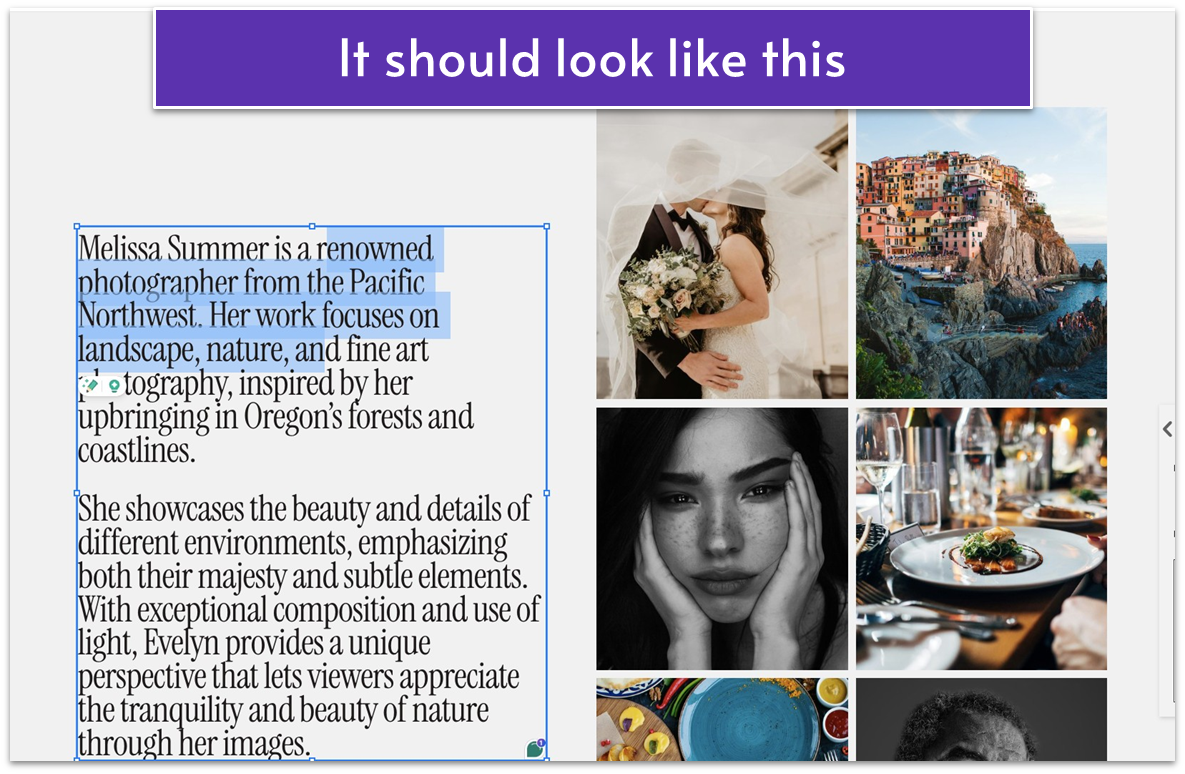
- Delete the “Contact” title and contact form blocks by selecting them and clicking the trash can icon ( ). This leaves you with the second text block below the title and the gallery on the right side.
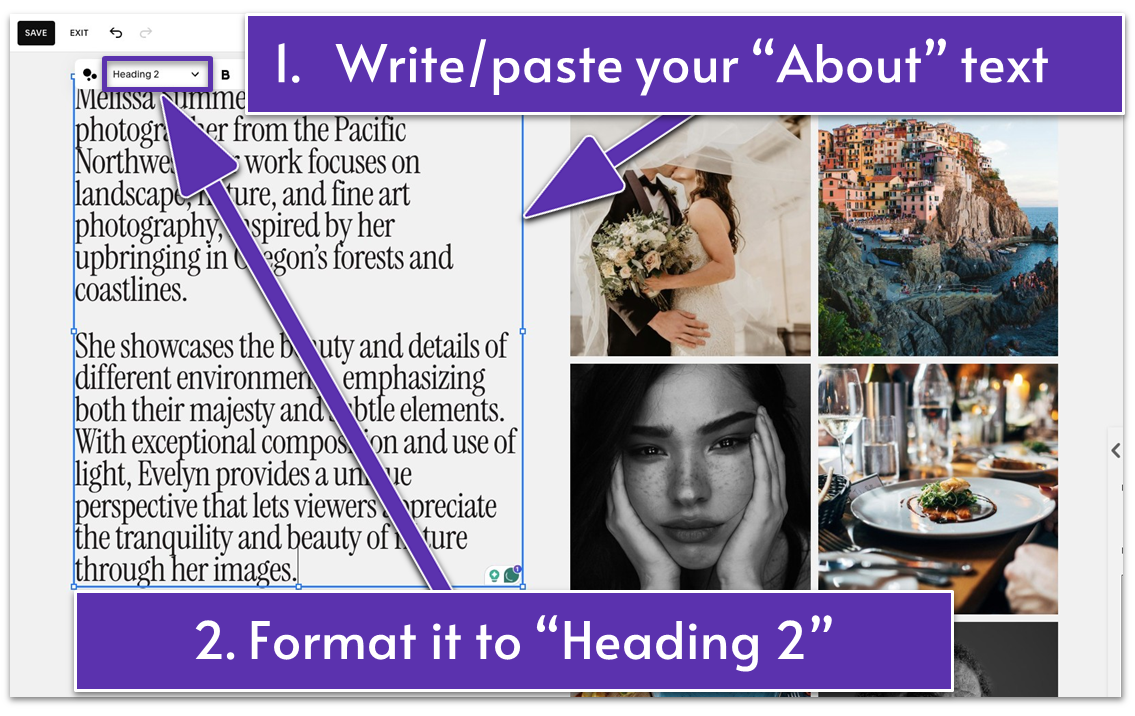
- Delete the text in the remaining text block and type or paste your About page bio. Alternatively, you can add a new text block.
- Format the new text to “Heading 2.”
We left the gallery as is, but you can add more or fewer images, create a different layout, and edit them as desired.
Step 2: Align the elements
This process might look different on your end, depending on your text, added graphics, gallery layout, etc. In general, you need to evaluate your section and adjust the elements to create a harmonious, visually pleasing look.
In case you want to copy what we did, here are the exact steps:
- Go to “Edit Section.”
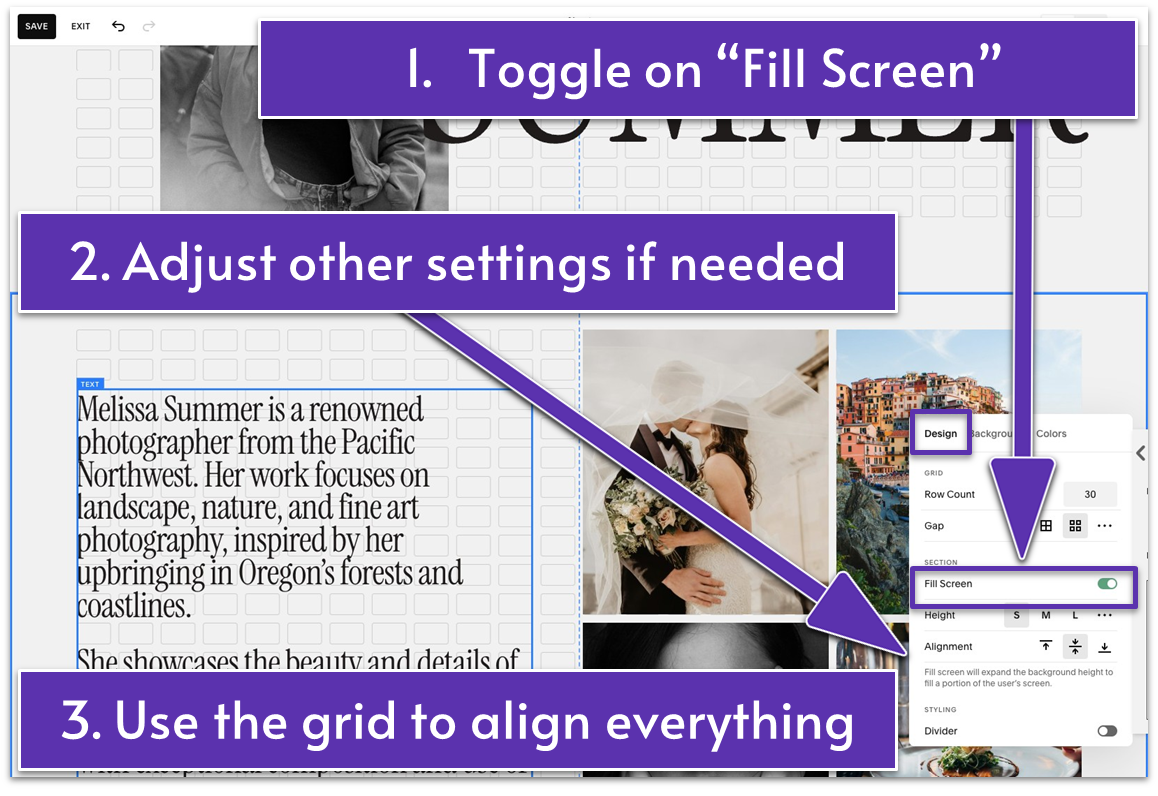
- Under the “Design” tab, toggle on “Fill Screen.”
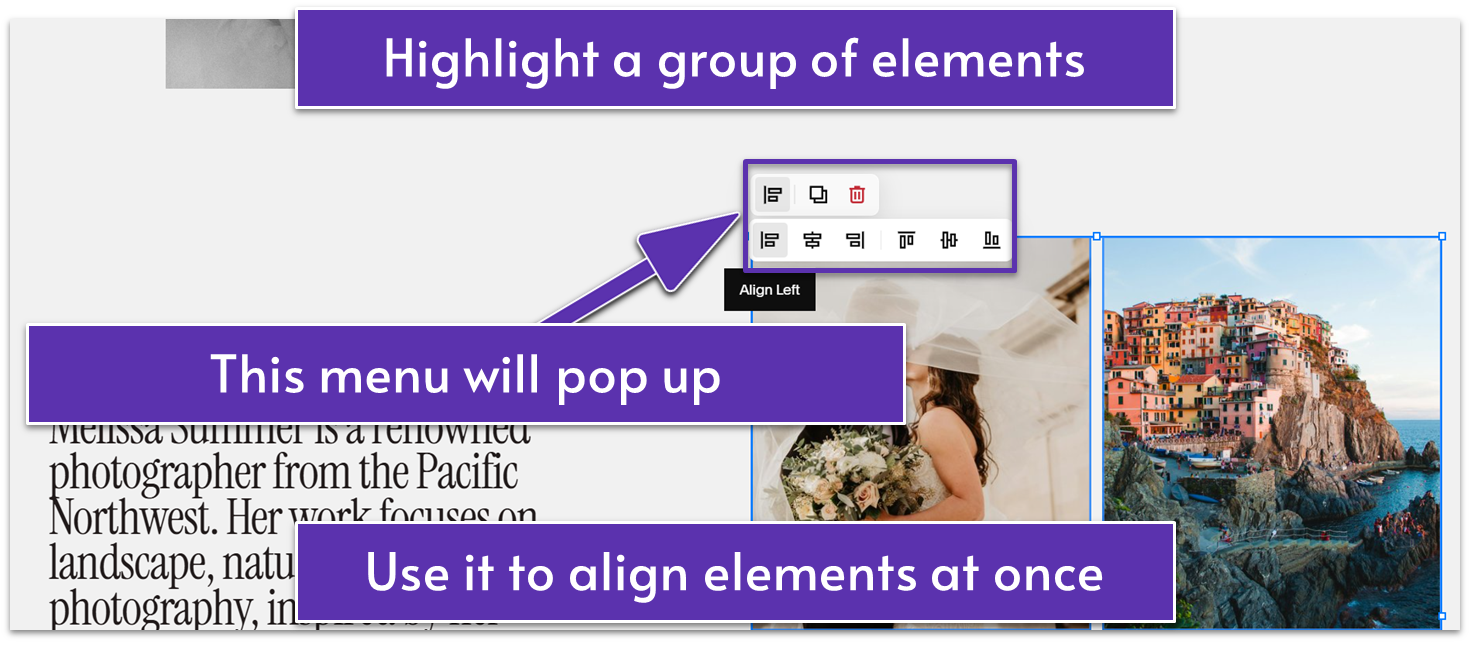
- Click and drag the cursor to select all the elements in the section and reveal a toolbar.
- Click the “Align Group” icon ( ) to open the menu with different alignment options. We selected “Align Vertical Center” ( ) to evenly center the elements within the section.
- Drag up the grid adjuster icon ( ) to tighten the entire section.
There you have it. Your second section is all set!
Let’s keep the party going!
3.5 Add a “Gallery” Title as a Separate Section (Third Section)
Gallery templates are treated as sections in Squarespace. For this reason, you need to create two separate sections: one with the title and one with the gallery. While there are two sections in the website editor, they will appear as one to visitors.
Step 1: Add a new blank section
Step 2: Add a text block
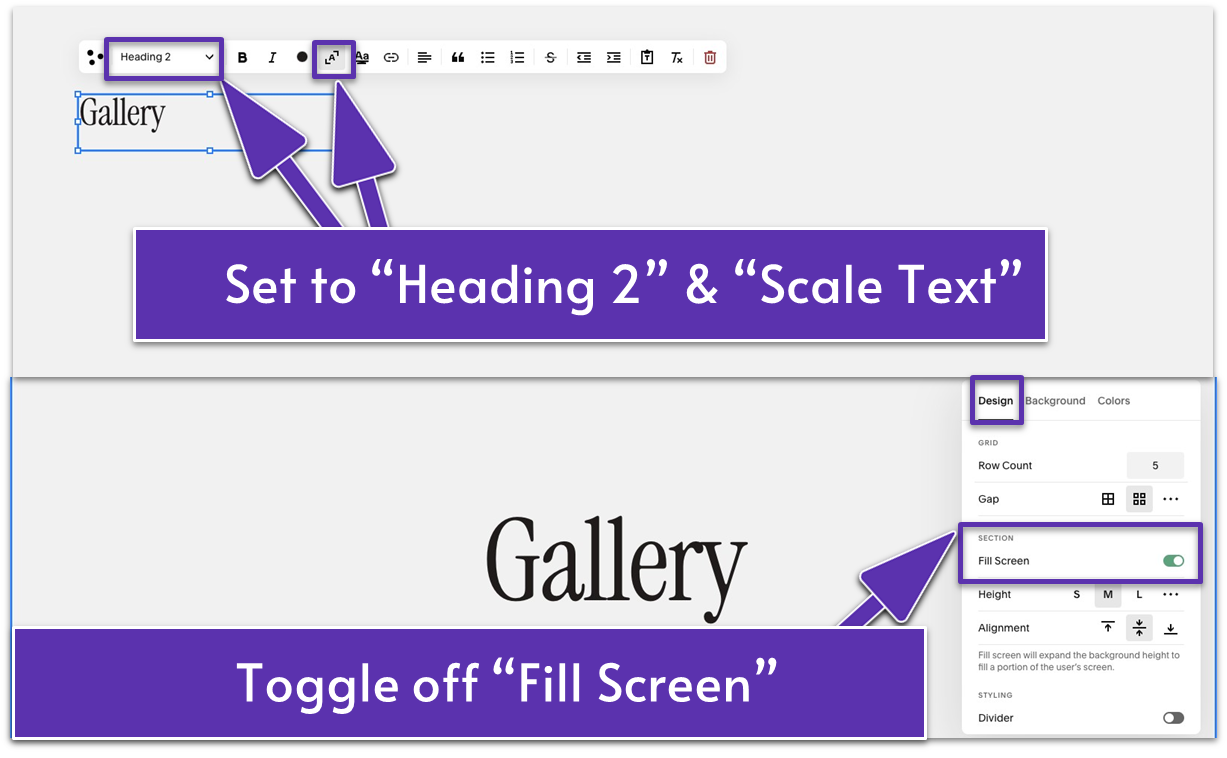
- Write “Gallery” or a title of your choice in this text block.
- Format it to “Heading 2”
- Scale the text to fill the entire block by clicking the “Scale text” icon ( ) in the editing toolbar.
- Drag it to the center of the section.
- Go to “Edit Section.”
- Under the “Design” tab, toggle off “Fill Screen.”
3.6 Add a Gallery Section (Fourth Section)
Including a gallery on your About page is a powerful way to give visitors an immediate sense of your style and expertise. It serves as a preview of what potential clients can expect from your work and enhances the look of your About page.
Showcase a selection of your best work on your About page to create a visual narrative that complements your story and helps clients connect with your artistic vision.
Step 1: Add an image section
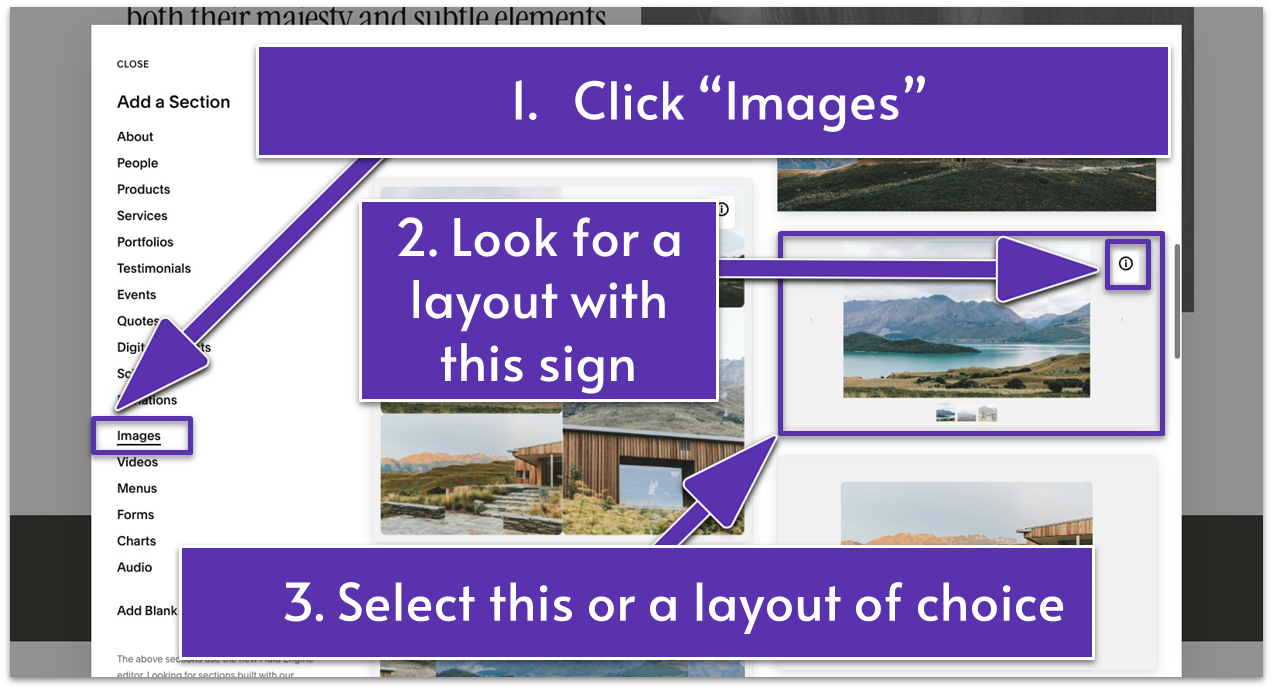
- Click the “Add Section” button.
- Select “Images” in the “Add a Section” menu to view gallery layout options.
- Select a layout that you like. We selected a slideshow layout for our example.
Step 2: Edit the gallery
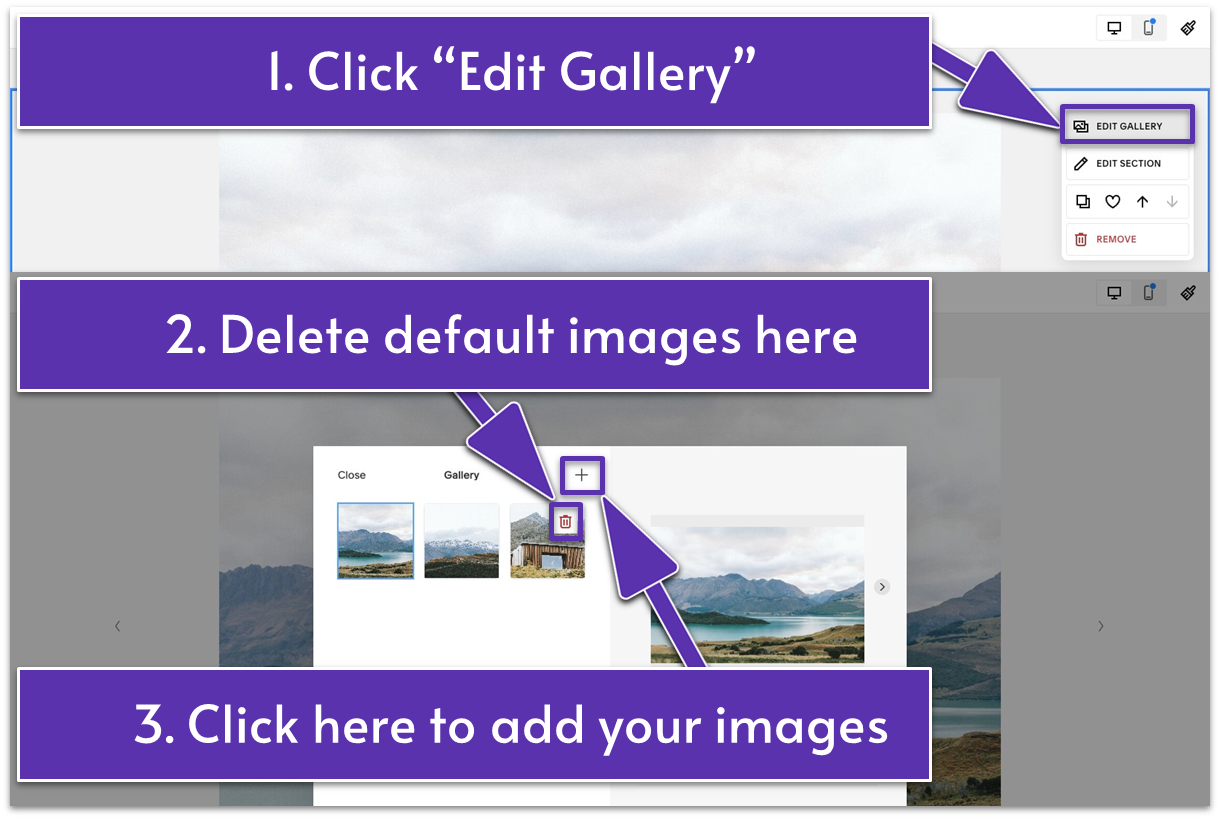
- Go to “Edit Gallery”
- Delete the default images by clicking the trash can icon ( )
- Click the “+” sign to add your images.
- Click “Edit Section.” Customize the section as desired. Test the different settings to see what looks best on your gallery.
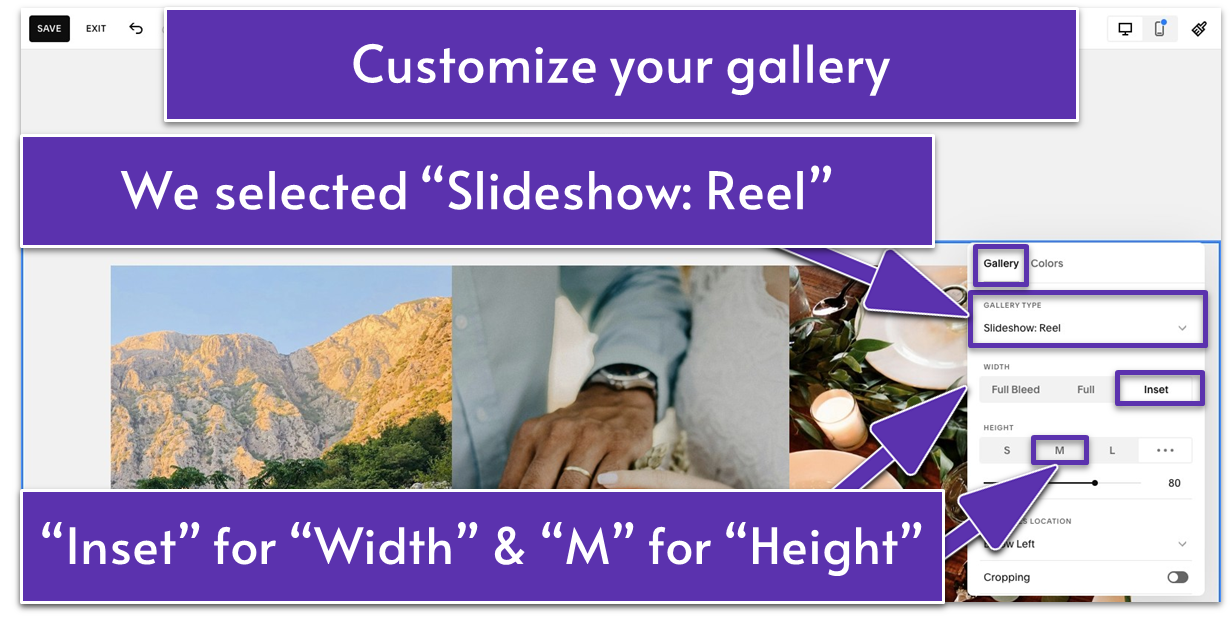
If you want to copy what we did, here are the exact edits we made:
- Slideshow: “Reel”
- Width: “Inset”
- Height: “M”
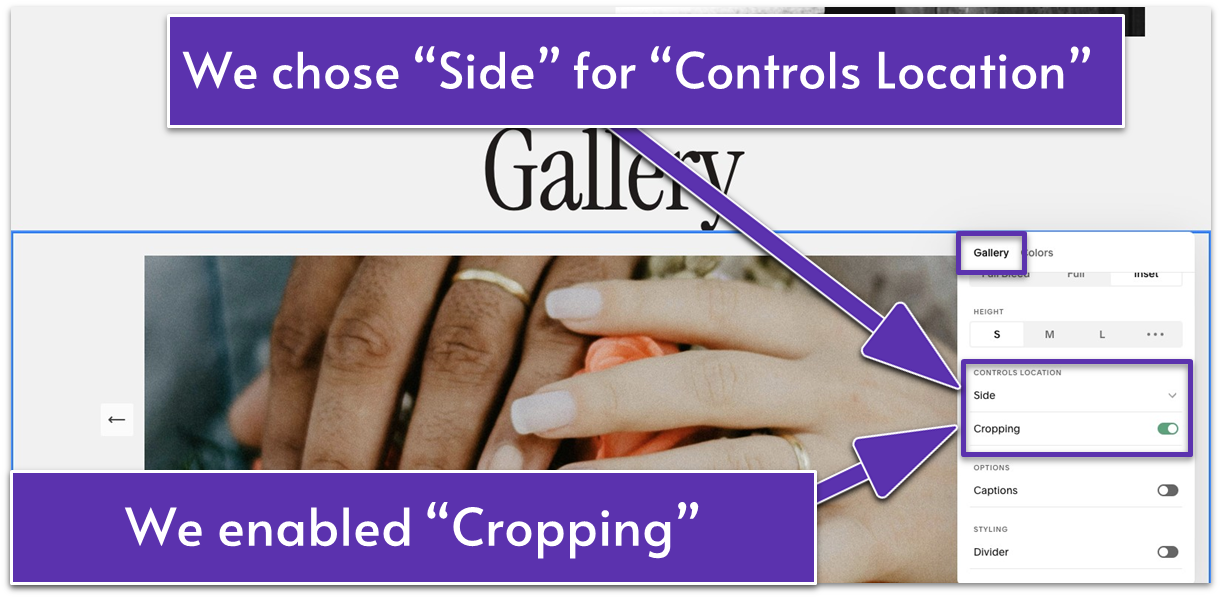
- Controls Location: “Side” and “Cropping” toggled on.
Congrats! Your About page is ready for desktop screens. Now, let’s make sure it’s optimized for mobile, too.
3.7 Optimize for Mobile
Some elements may appear out of place in the mobile preview but don’t worry – optimizing for mobile on Squarespace is simple. We’ll go over the key adjustments needed to create a seamless mobile experience.
If your About page includes elements not discussed in this guide, or if you’ve removed certain elements, your mobile preview may differ from ours. In that case, you may need to make more or fewer tweaks than what is covered here. However, by the end of this section, you’ll be well-equipped to handle mobile optimization on your own.
Step 1: Get into “Mobile View”
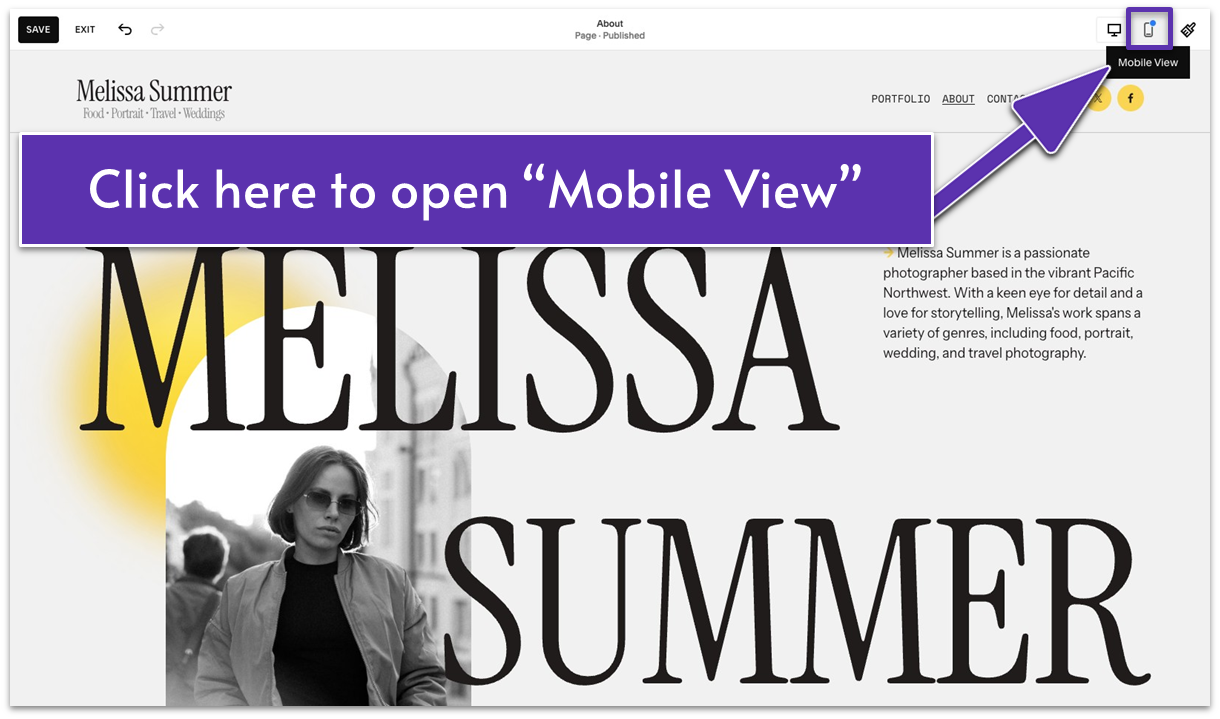
- Click the mobile phone icon ( ) in the upper-right corner to activate “Mobile View.”
Step 2: Optimize the first section for mobile

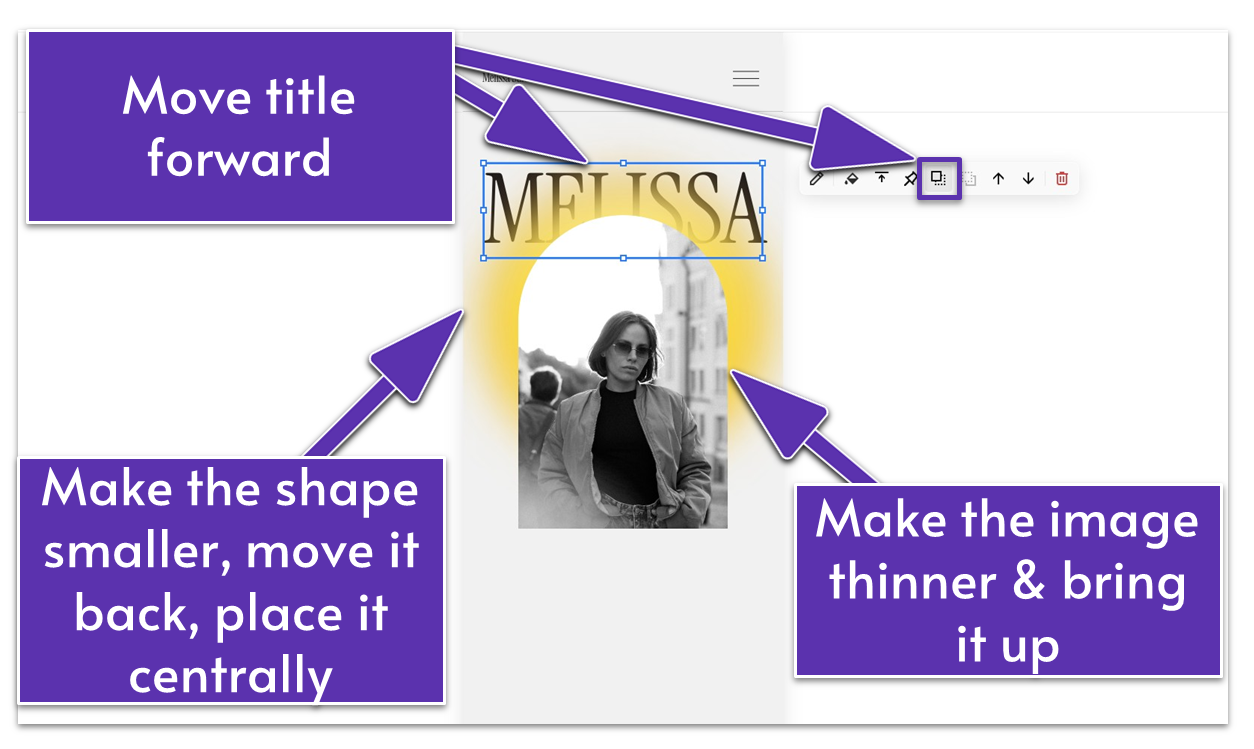
- Stretch the image to fit a tall, narrow mobile view. Move it up right below the text block with your first name or business name (the “MELISSA” on our site).
- Make the emoji (the blurred yellow circle on our site) smaller. Move it up so it sits partially behind the top of the image and the lower part of the first text block.
- Move the first text block (“MELISSA”) forward by clicking the “Move Forward” icon ( ).
- Move up the second text block with your last name or the next word of your business name (“SUMMER” on our site). Place it right below the image and move it forward ( ).
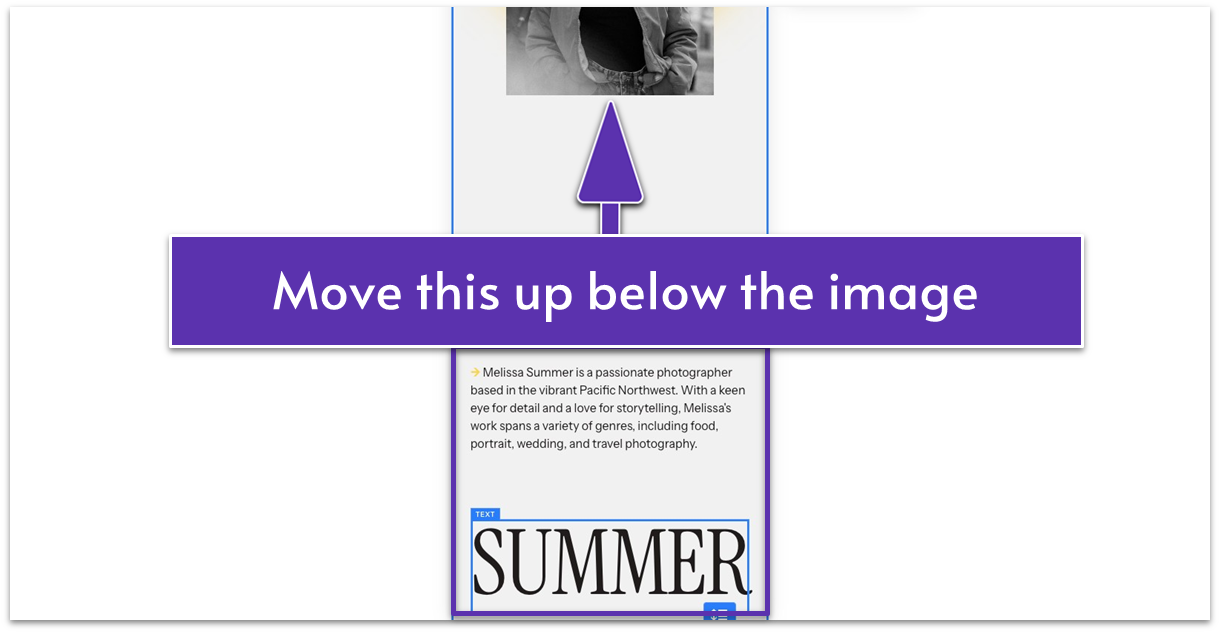
- Place the brief About text below the second text block (“SUMMER”).
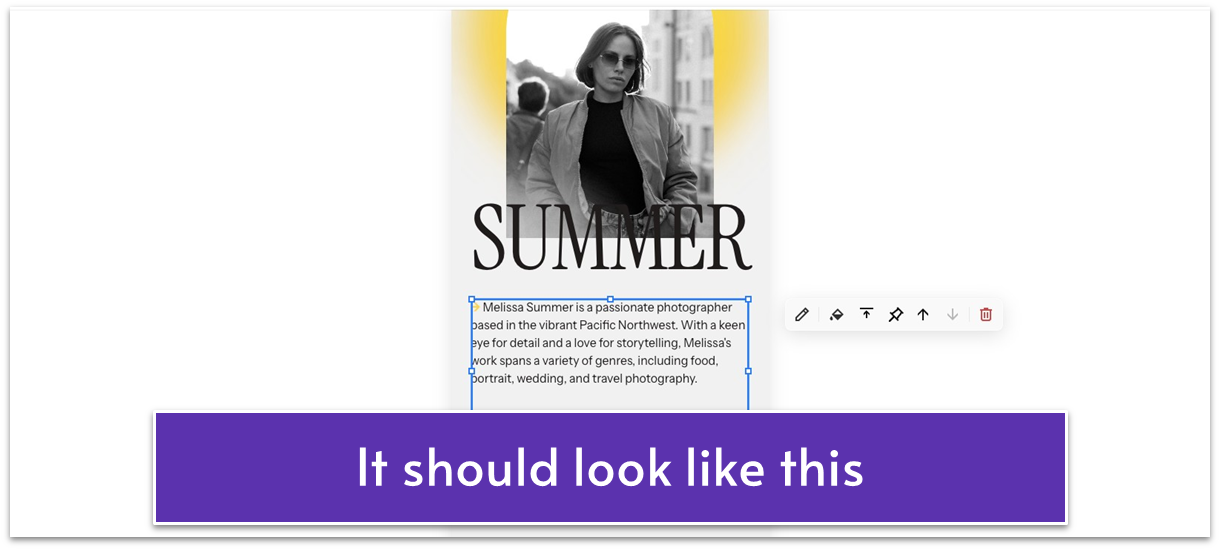
- Center all elements within the grid.
- Remove extra blank space by dragging the grid adjuster ( ) up. This brings the section frame as close to the last text block as possible.
Step 3: Optimize the second section for mobile
The second section looked fine on mobile. While we decided to keep it as is, you can make small modifications based on your preferences. For example, you can move the gallery up before the text.
Step 4: Optimize the third section for mobile
- Add one grid row to separate the “GALLERY” title section from the actual gallery section with images.
The rest of the page looks great as it is.
Nothing is set in stone when it comes to mobile optimization. Simply evaluate what looks off and make the necessary adjustments, whether in positions, spacing, or other edits.
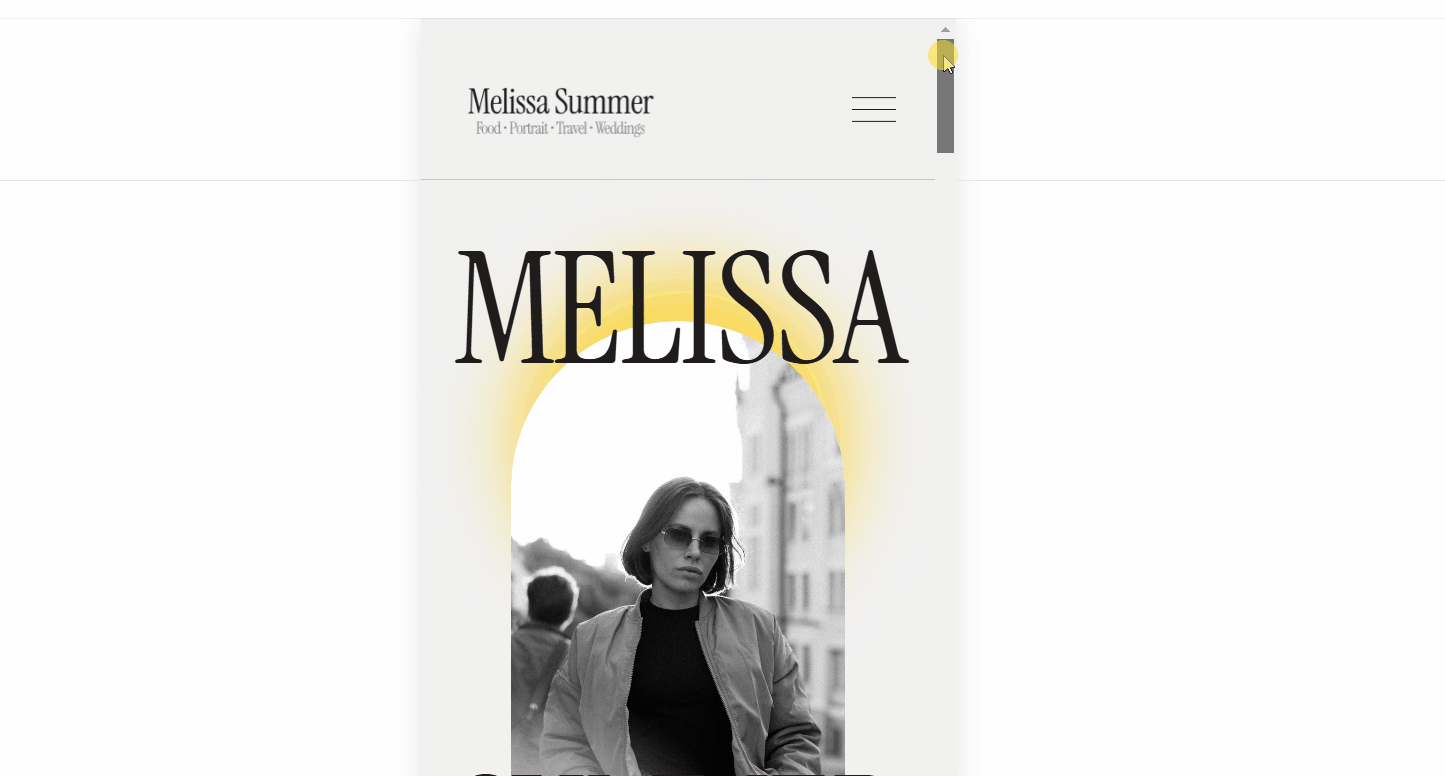
Here is the final look of our mobile-optimized About page:
Now that your page is optimized for mobile, save any section you anticipate using again by clicking the heart icon ( ).
Ta-da! Your About page is ready to take over the exciting World Wide Web.
Finally, save everything and exit the page.
Now let’s create your Services page!
