

You might wonder why we’re starting with the contact page instead of the Homepage. It might seem counterintuitive, but the contact page is actually much easier to build, so it makes for an easier start.
We want you to get familiar with Squarespace before tackling the more complex pages. By the time we get to the Homepage, you’ll know how Squarespace works and use it with ease.
Without further ado, let’s begin!
Select Your Site Styles
We covered how to set your site styles in Squarespace in our Quick Prep Guide. This is entirely up to you and your brand aesthetic. Remember, you can always go back and change them at any time.
If you want to follow exactly what we’ve done on our site, we’ve chosen the following:
Fonts (Headings)
- Family: Plus Jakarta Sans
- Weight: 600
- Style: Normal
- Line height: 1.2 em
- Letter spacing: -0.03 em
- Text transform: None
- Size:
- Heading 1: 4 rem
- Heading 2: 2.8 rem
- Heading 3: 2.2 rem
- Heading 4: 1.6 rem
Fonts (Paragraphs)
- Family: Plus Jakarta Sans
- Weight: 400
- Style: Normal
- Line height: 1.5 em
- Letter spacing: 0 em
- Text transform: None
- Size:
- Paragraph: 1.4 rem
- Paragraph 2: 1 rem
- Paragraph 3: 0.8 rem
Fonts (Buttons)
- Family: Plus Jakarta Sans
- Weight: 600
- Style: Normal
- Letter spacing: 0 em
- Text transform: None
- Size: 1 rem
Fonts (Miscellaneous)
- Family: Plus Jakarta Sans
- Weight: 600
- Style: Normal
- Line height: 1.5 em
- Letter spacing: 0 em
- Text transform: None
- Size: 1 rem
Main Color Palette
- HEX #FFFFFF (white)
- HEX #FAEFF0
- HEX #BA1F33
- HEX #421820
- HEX #000000 (black)
Squarespace will generate 10 color themes based on your primary color palette, which you can tweak to your preferences.
Buttons
- Shape: Pill
Forms
- Field shape: Custom
Miscellaneous
- Animations: Clip at a slow speed
Now, let’s get to the fun part – page design!
2.1 Add a New Page
Squarespace offers templates for pages like Blog, Store, and Portfolio. You can also choose from ready-made designer page layouts, which are great if you want to get online faster and simplify the building process.
However, we’ll show you that starting from scratch in Squarespace is not nearly as intimidating as it may sound. We’ll start with a blank page and guide you through every step – from a blank canvas to a unique page that fully aligns with your business goals.
Step 1: Go to the “Pages” menu
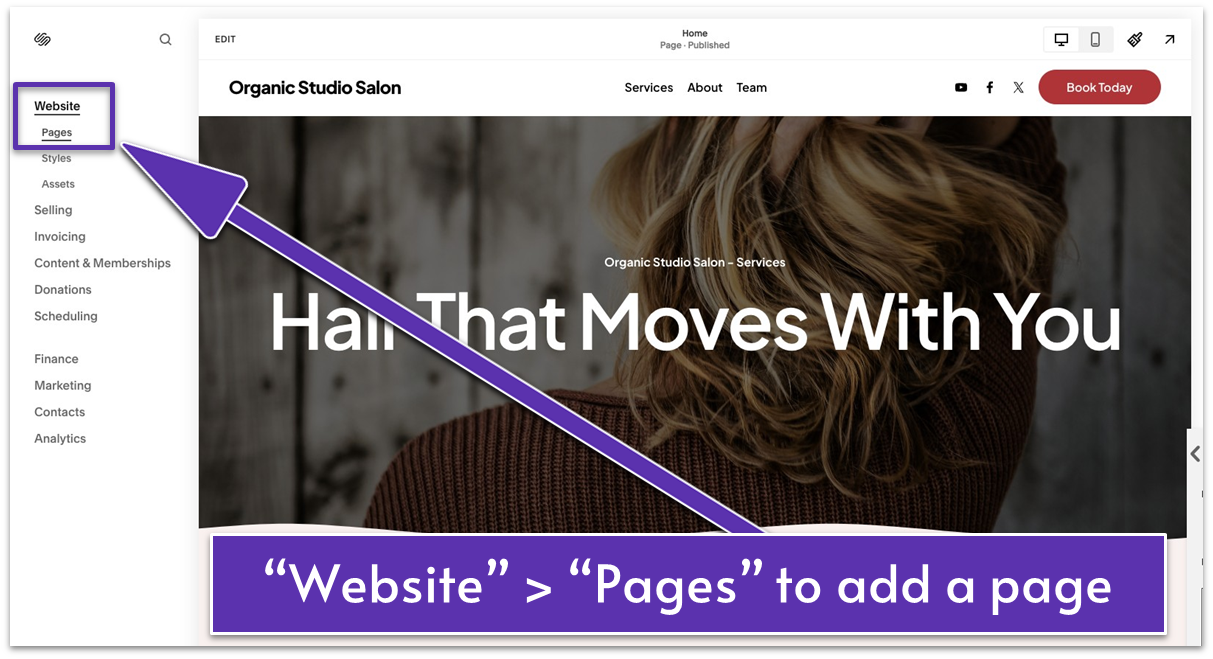
- Go to the left sidebar of Squarespace’s editor. Under the “Website” section, you’ll find “Pages.”
- Click “Pages” to add a new page.
Step 2: Add a “Not Linked” blank page
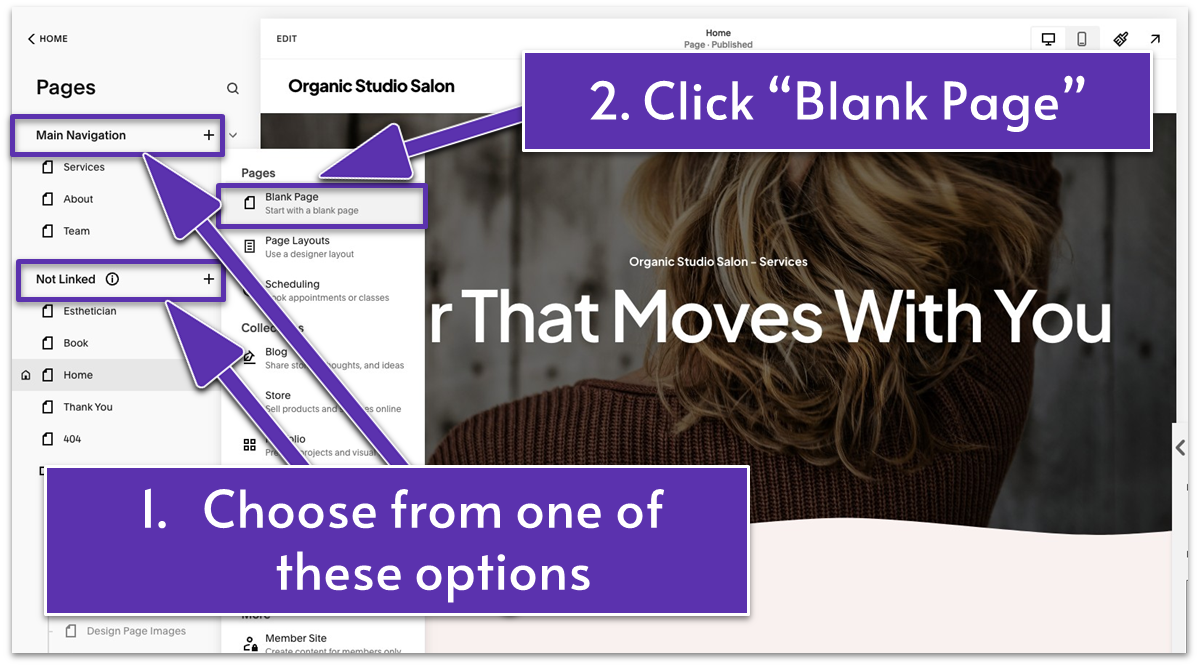
- Click the plus sign ( ) next to the “Not Linked” menu to add a “Blank Page.” This will hide your Contact page from the site’s main navigation bar (the top menu).
- If you want the page to be part of the main navigation bar, add it through the “Main Navigation” menu. You can always move your pages between “Main Navigation” and “Not Linked” later if needed.
Step 3: Name your Contact page
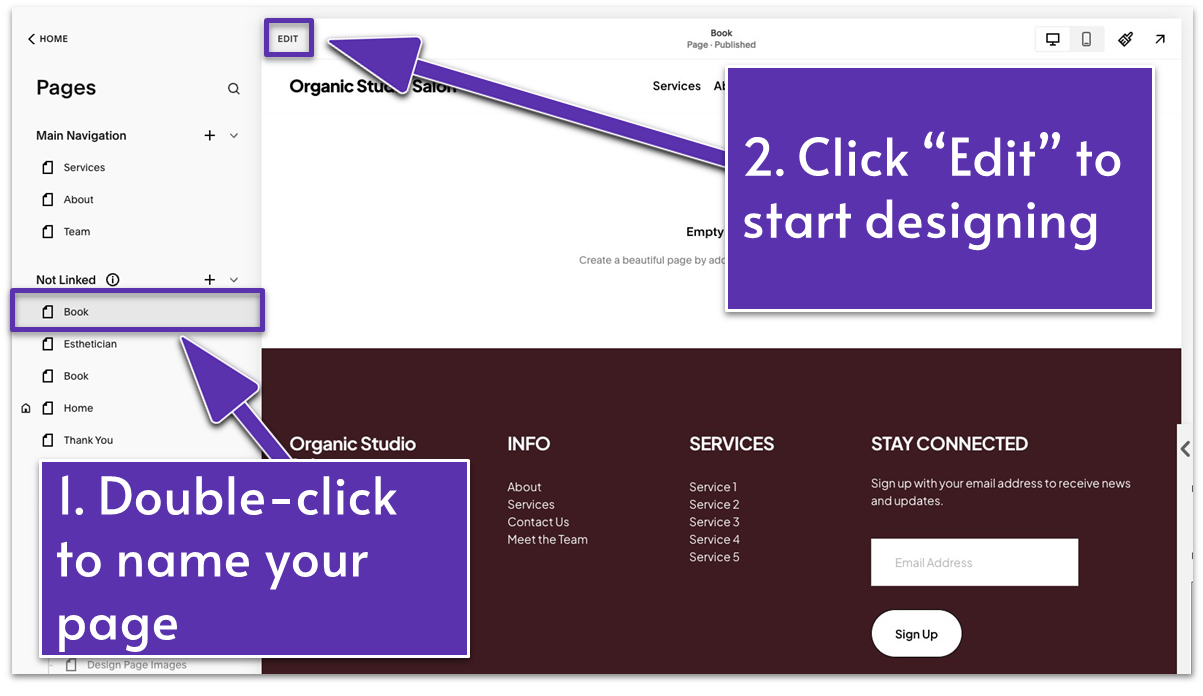
- The newly added page will show up as “New Page” in the “Not Linked” menu.
- To rename it, double-click “New Page” and enter your preferred title. We named it “Book.”
- Follow the same process for every page you want to add to your site.
Now that you’ve learned how to add pages to your website, let’s make them truly unique!
Step 4: Start designing your page
- Select the “Book” page from the “Not Linked” section.
- After that, click “Edit” in the top-left corner of the page preview to access the page editor.
2.2 Add a Section
In Squarespace, you can start with a customizable blank section or choose from predesigned section templates like image galleries and contact forms. These templates can help you easily build a professional-looking site even without advanced design skills.
However, you can also achieve visually pleasing results that fit your brand aesthetic and business goals from scratch without trouble. Here’s how:
Step 1: Add your first section
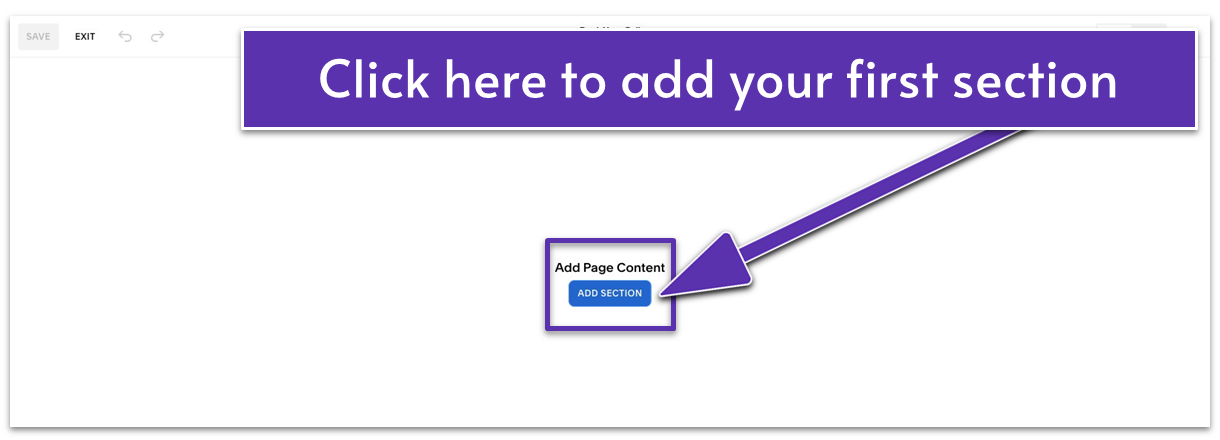
- Go to the section between the site header and footer where it says “Add Page Content.”
- Click the blue “Add Section” button. A menu will appear with different section options.
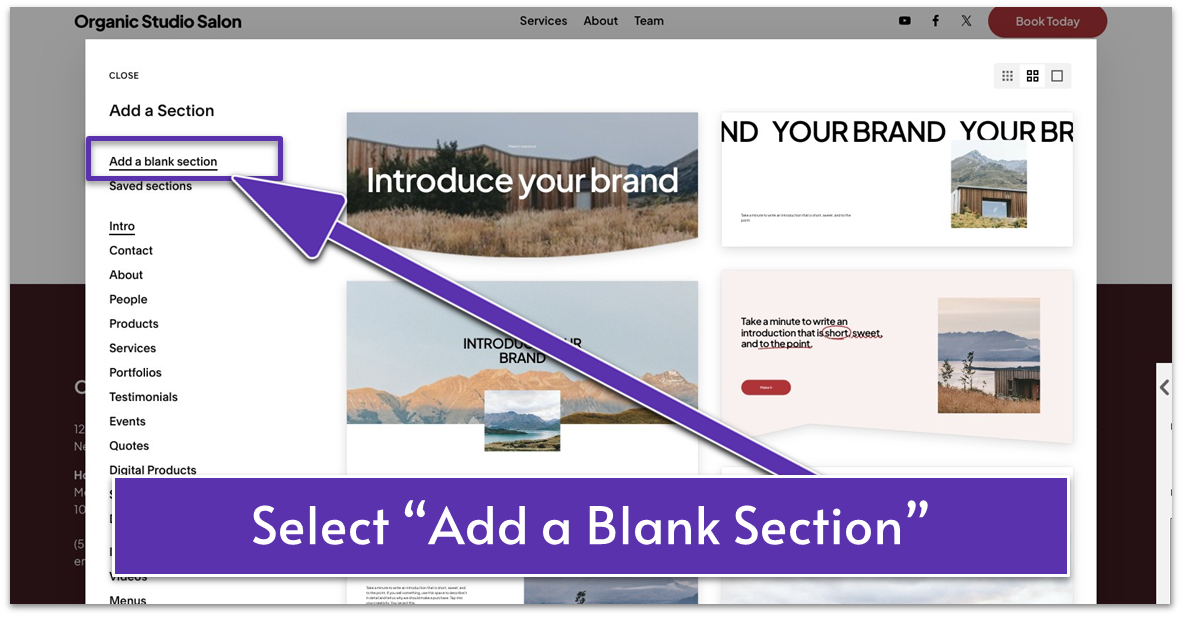
- Choose “Add a Blank Section” in the menu.
Step 2: Add background to your section
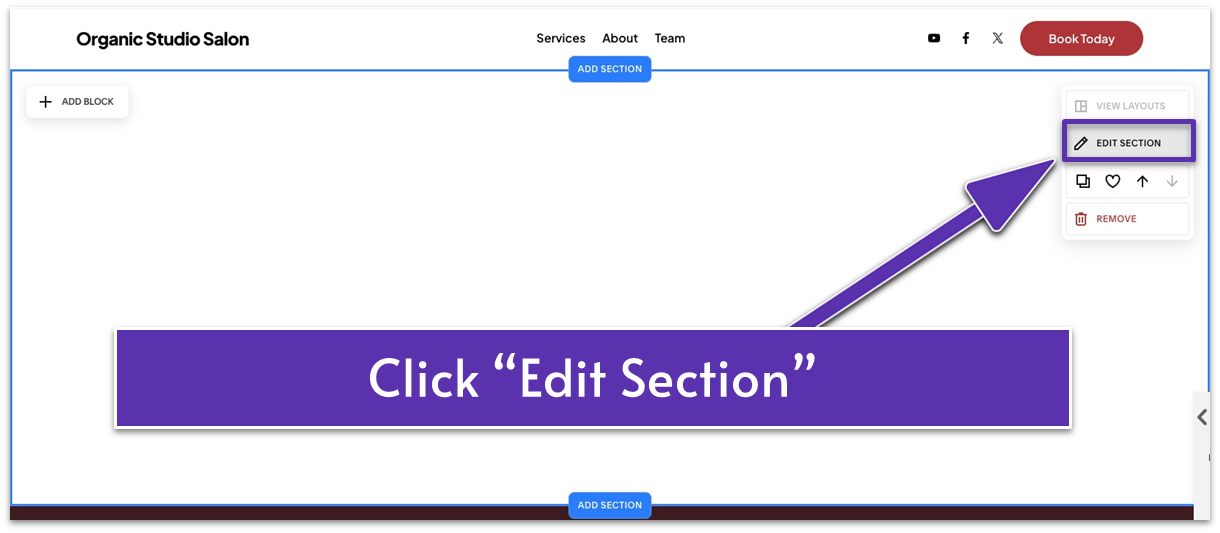
- Click “Edit Section.”
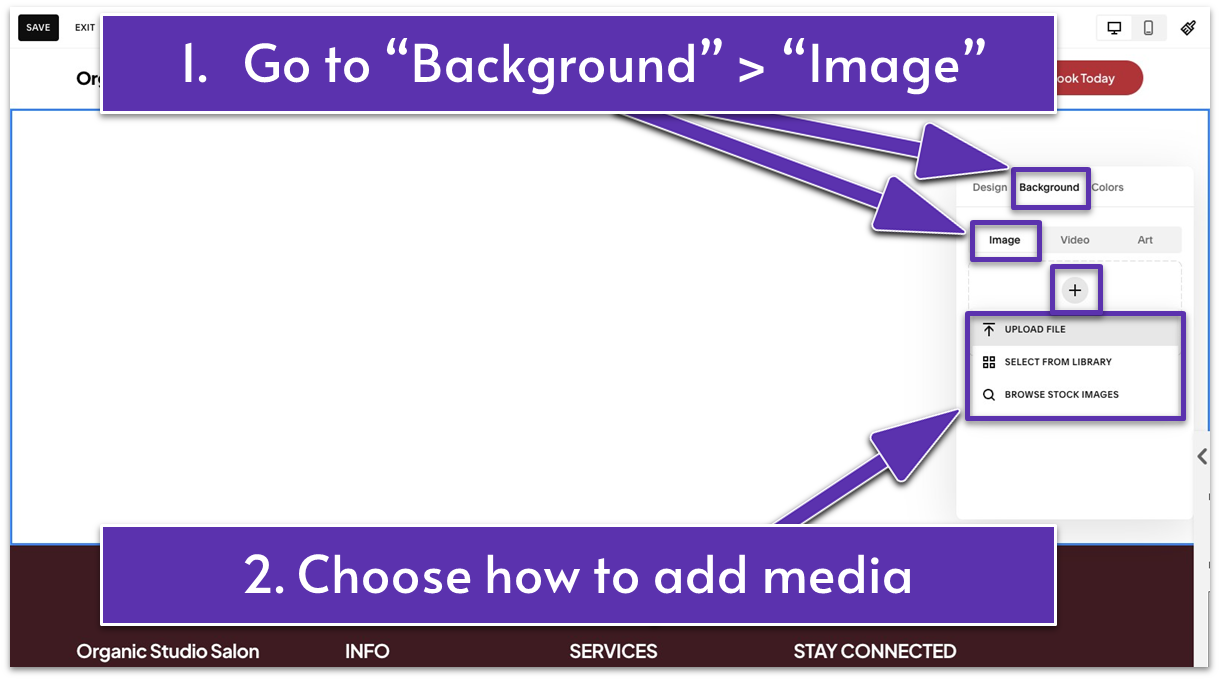
- Open the “Background” tab.
- You’ll see that you can set an “Image,” “Video,” or “Art” as a section background. We’ll choose “Image” here.
- Click the plus sign. A drop-down menu with options will pop up. There are a few ways you can upload media to your site:
- Select “Upload File” if you need to upload it from your device.
- Choose “Select From Library” if you’ve already saved the file in your Squarespace library.
- Go to “Browse Stock Images” if you haven’t chosen an image yet. You can access Squarespace’s collection of free and premium images you can use on your site.
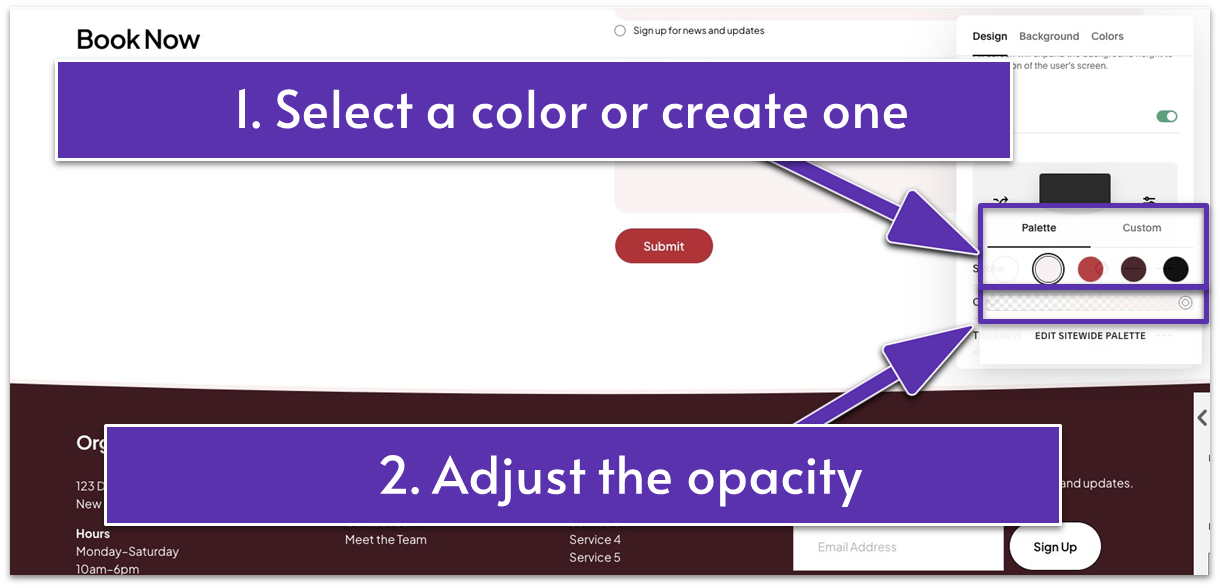
Step 3: Change the section color
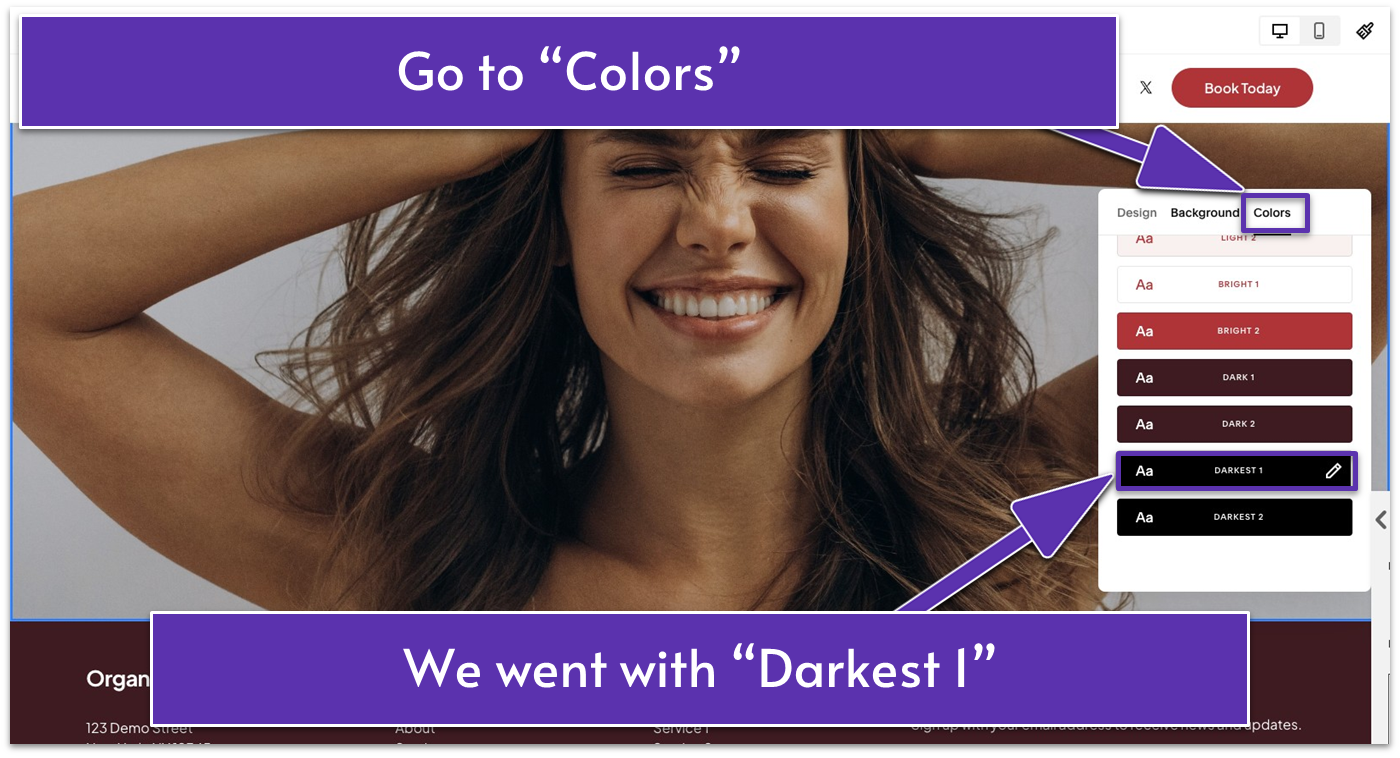
- Once you upload your image, head to the “Colors” tab.
- Select a color theme of your choice. If you want to follow what we did, select one of the darkest color combinations. We went with “Darkest 1.”
Step 4: Edit your background
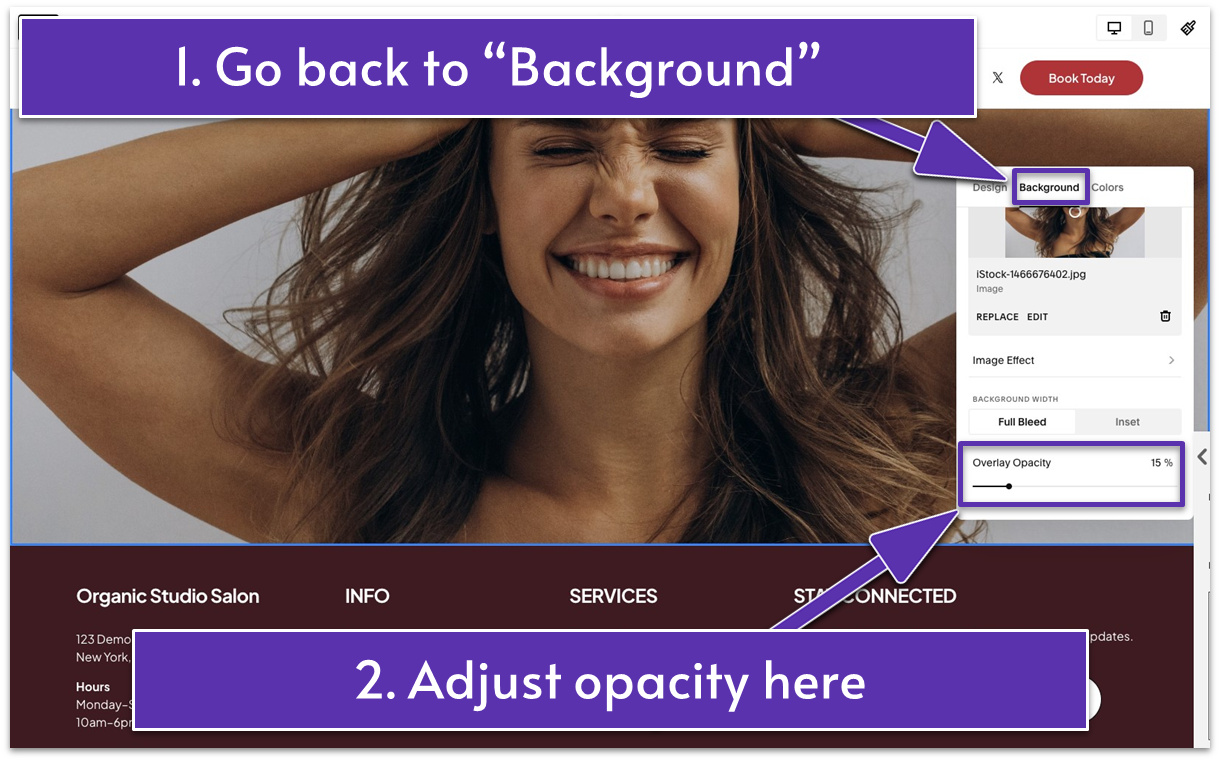
- Go back to the “Background” tab. Move the “Overlay Opacity” sliding bar to make the background image more transparent or opaque. We adjusted it to 30%.
To style your section background image, you can also:
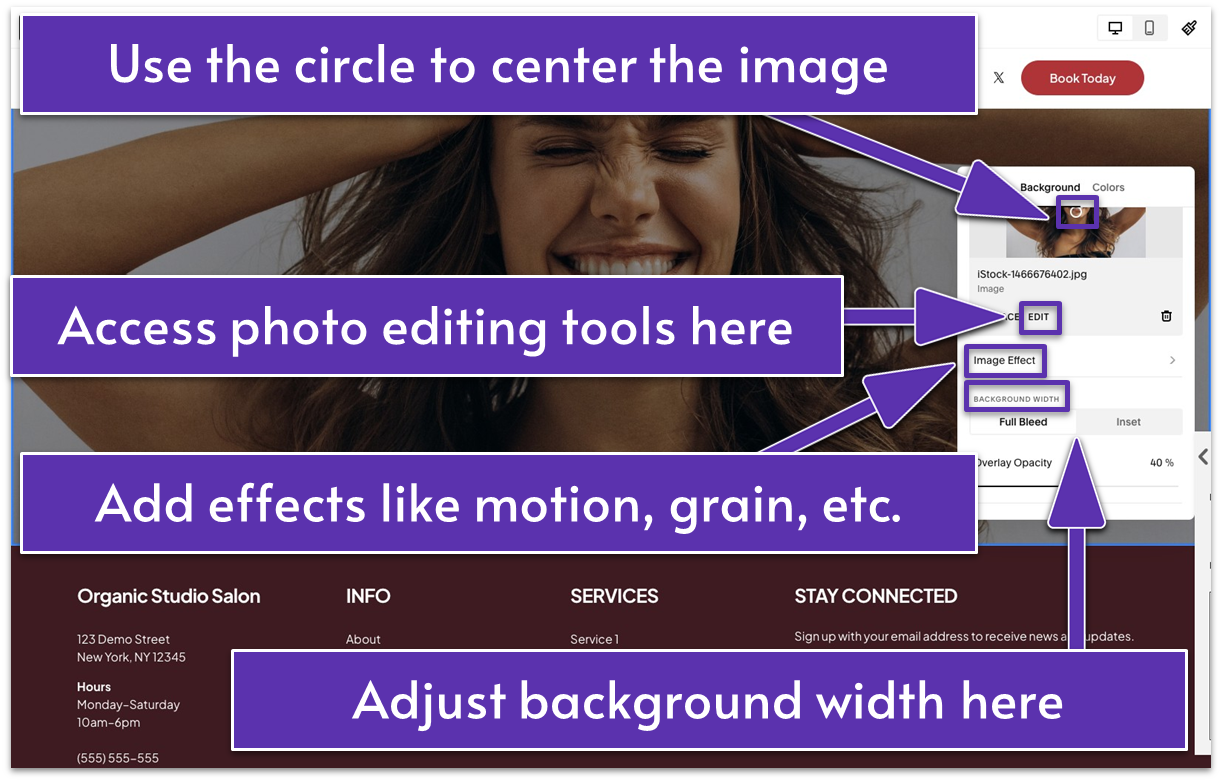
- Move the small circle on the image to center it in a way that looks best with the other page elements. It’s best to leave this for later when you add all the other elements to your section.
- Adjust your background image’s brightness, saturation, etc., using Squarespace’s built-in photo editing tools. Click “Edit” below the image to access these tools.
- Add image effects. For example, you can add motion or grain effects to your background image.
- Adjust the background width by choosing “Full Bleed” (image stretches fully) or “Inset” (image fits inside the section).
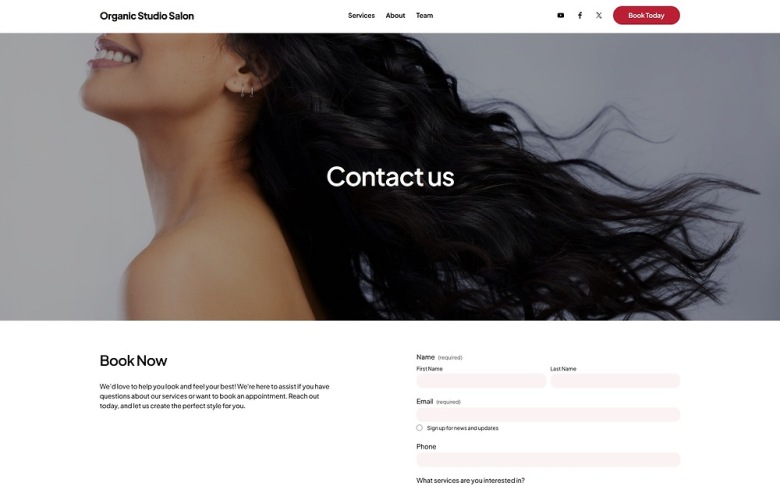
2.3 Add Text to Your Contact Page
The text on your Contact page should be short and clear. This includes your business’s contact details like your email address, phone number, and physical address. You’ll also want to include a contact form for direct inquiries.
Step 1: Add a text block
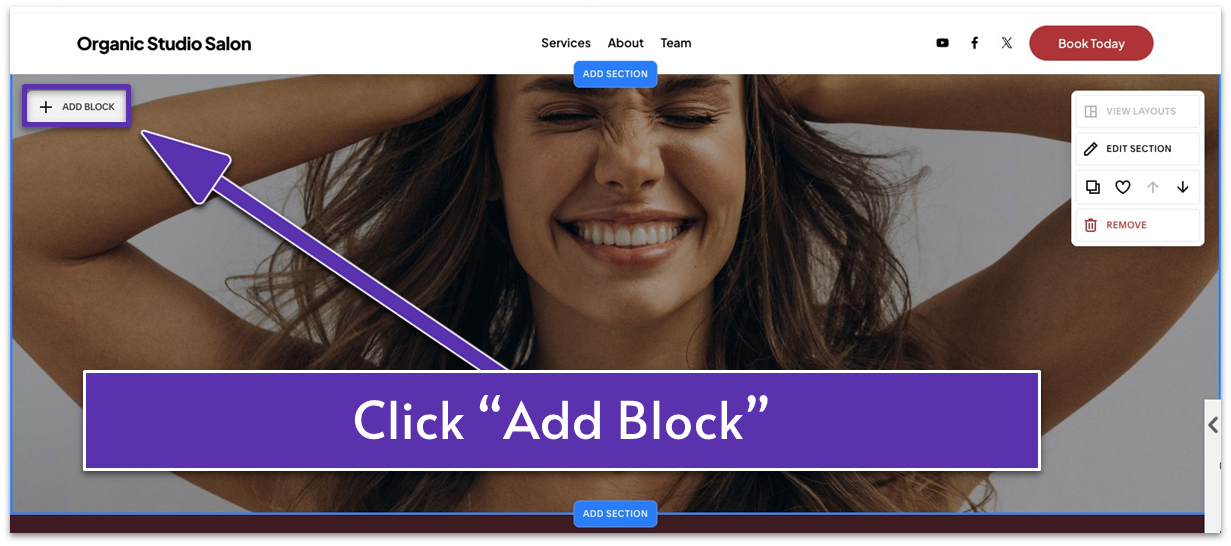
- Hover over the blank section to display the section buttons.
- Click the “Add Block” button in the upper-left corner of the section.
- Then, click or drag the “Text” block and place it in the upper-center part of the section.
Step 2: Add a title to the Contact page
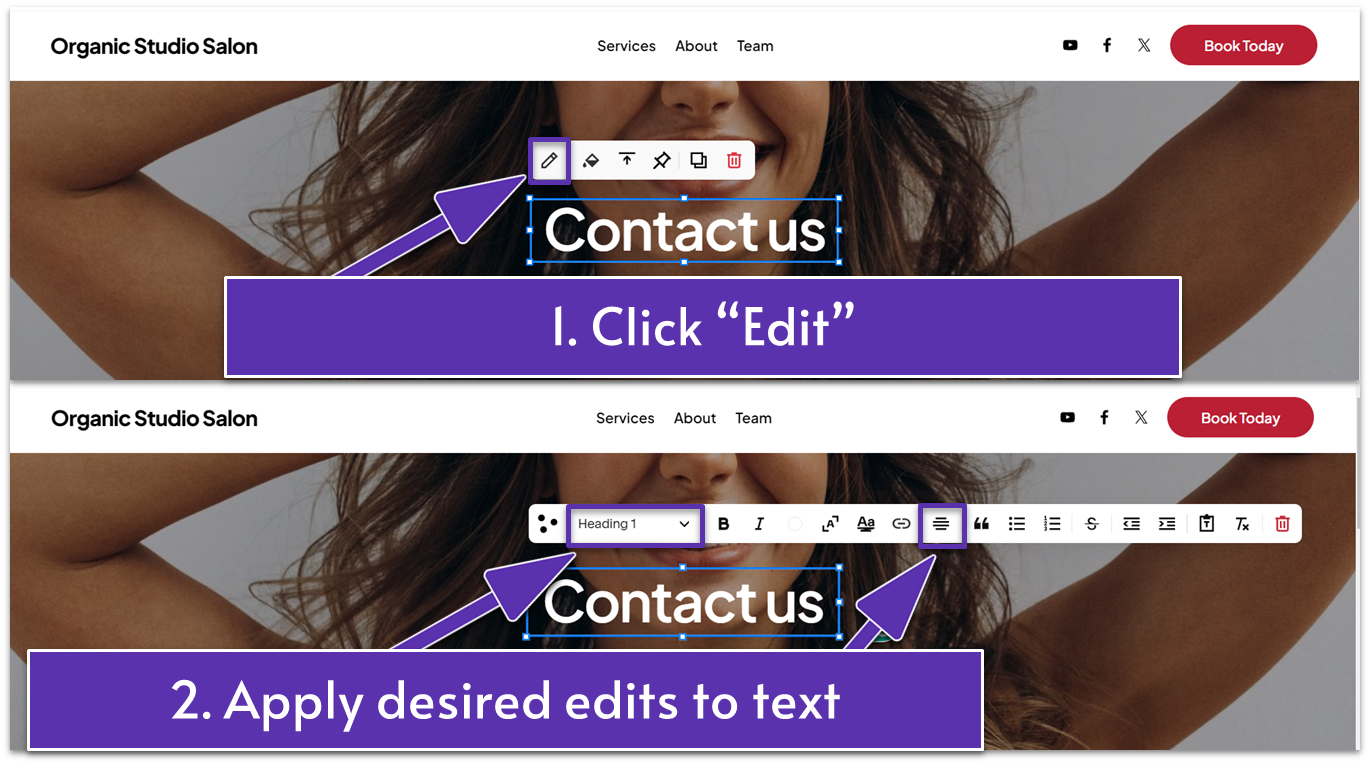
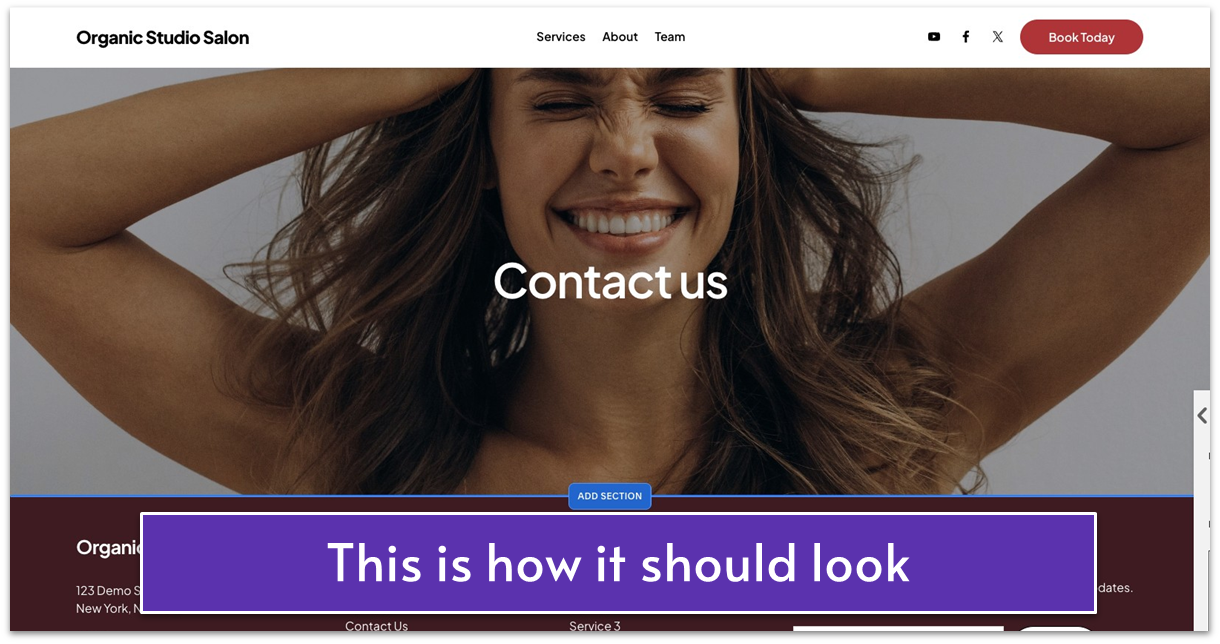
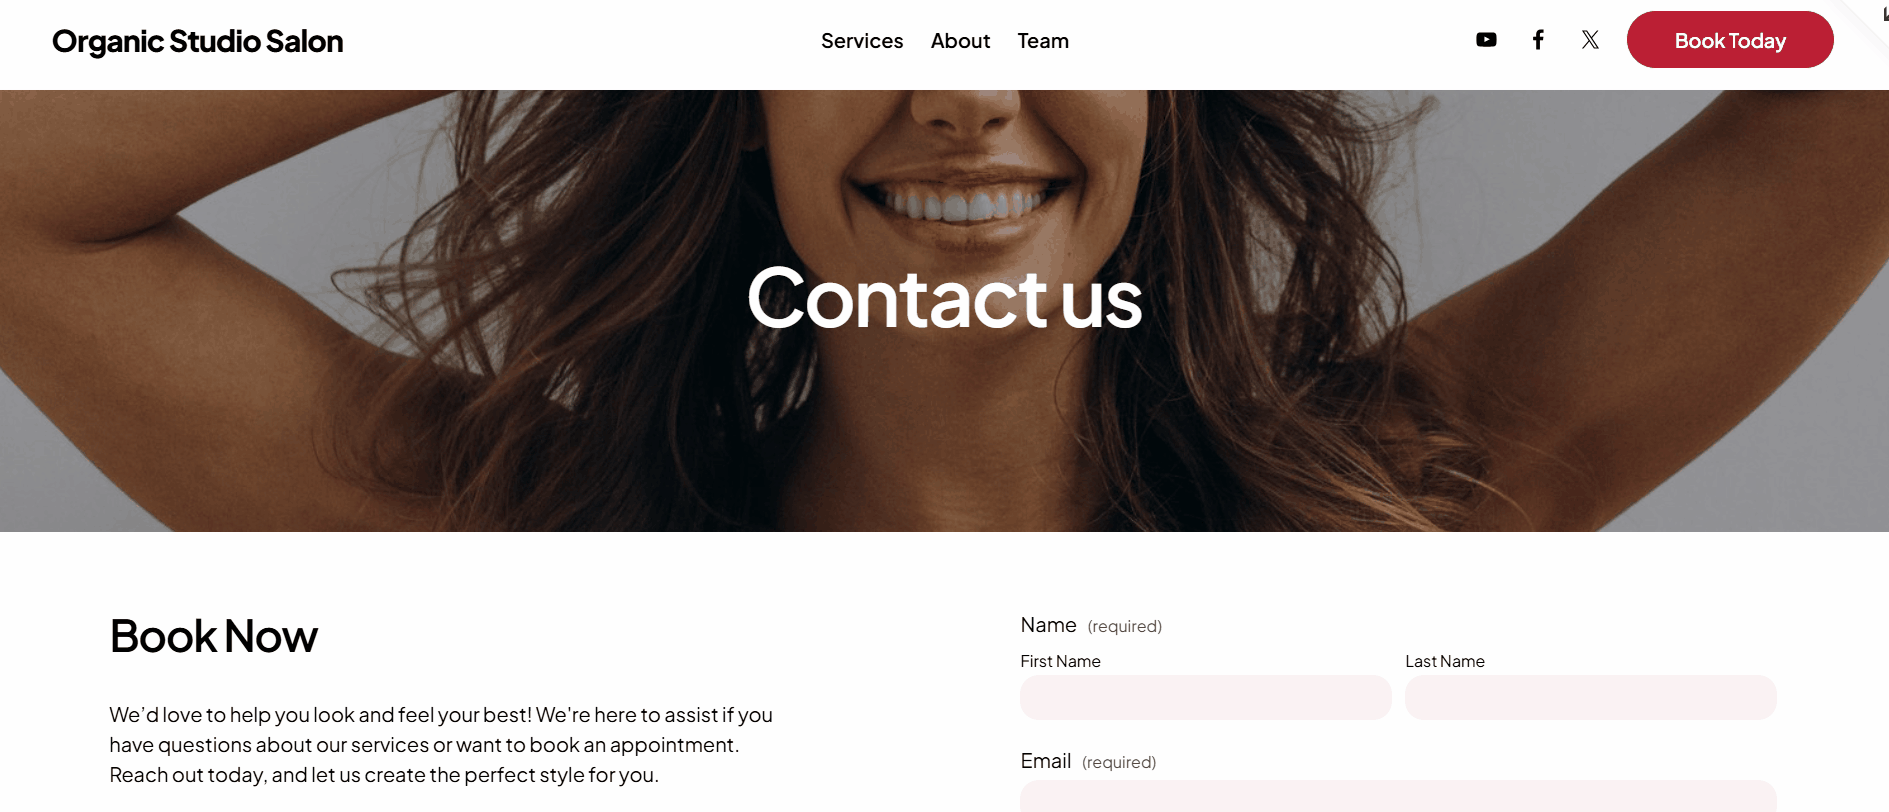
- Type the title of the Contact page in the text block. We wrote “Contact Us” on our site.
- To format the text, click the pencil icon ( ) labeled “Edit.” This will open the text formatting toolbar, where you can edit text styles, alignment, and more.
- From the format drop-down menu, choose “Heading 1” to make the text your page title.
- Go to “Text Alignment” and select “Center Align ( ).”
- Move and resize the text block if needed. You can drag the corner points of the text block to change its size.
- Finally, make sure there’s no unnecessary blank space around your title.
Optional: We made a small change to the section height. Feel free to skip this step if you like it as it is. If you want to follow our example, here’s how:
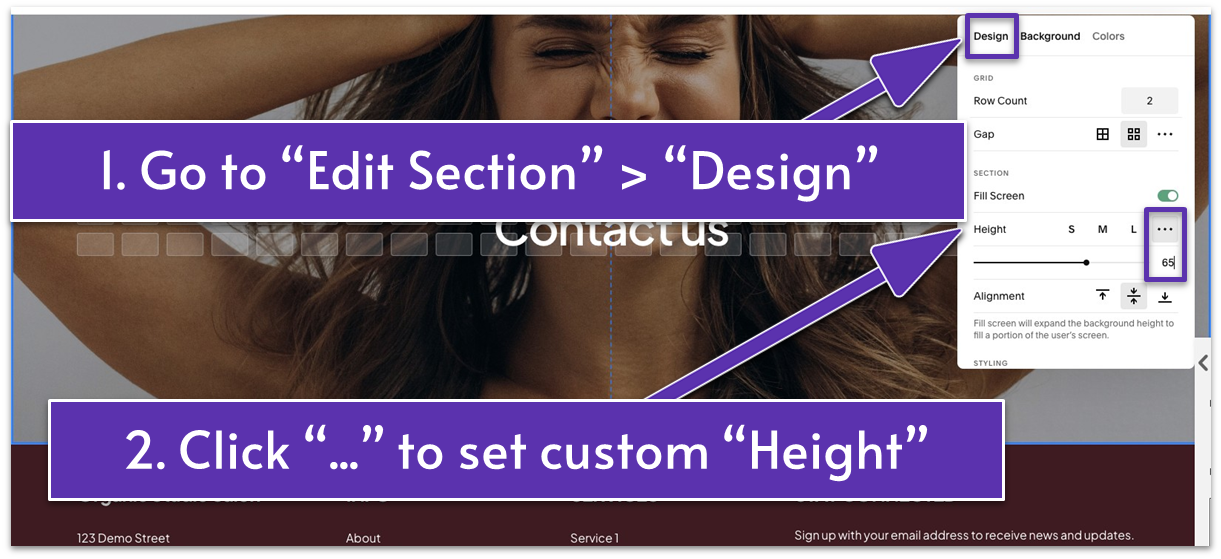
- Go back to “Edit Section.”
- Under the “Design” tab, go to “Height.”
- Click the three dots icon ( ) to set the section’s custom height. We did 65 here.
2.4 Create an Inviting Contact Message
Add a warm, inviting message on your salon’s Contact page to build a personal connection with your potential clients. Somewhere within the Contact page, you’ll also want to include a strong call to action (CTA). It’s a short phrase, such as “Contact Us” or “Book an Appointment,” that guides your visitors to take the next step.
Step 1: Add a new blank section
Step 2: Add a text block
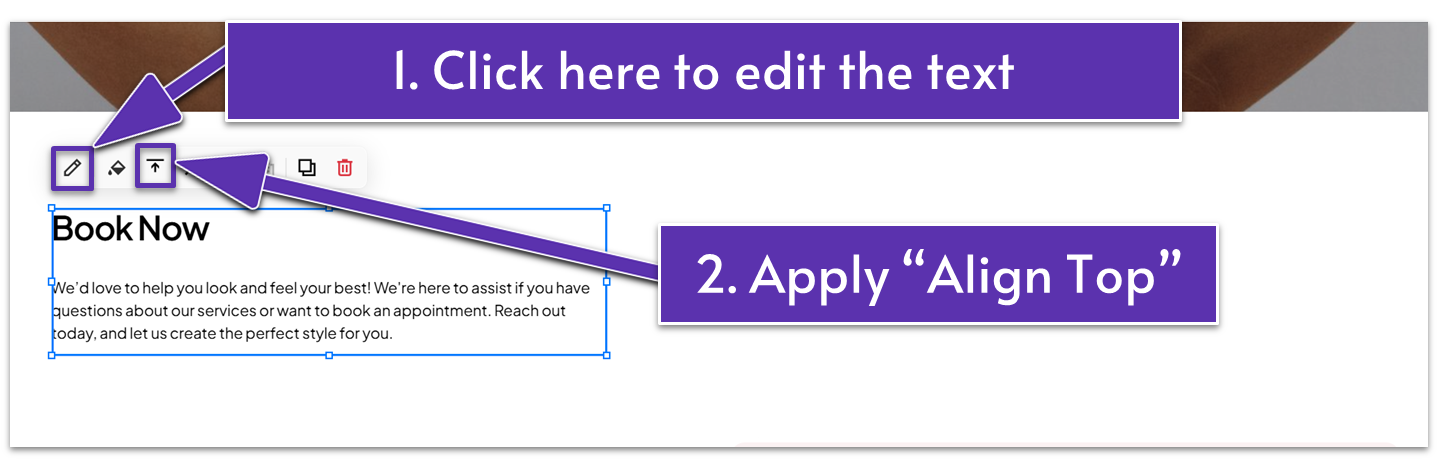
- We wrote “Book Now” in this text block and formatted it to “Heading 3.”
- Go back to the main text block toolbar and click “Align Top” ( ).
- Below this title, write a short, welcoming message to encourage visitors to contact you or book your services.
- Move the text block to the left half of the section. You’ll want to leave the right half for the contact form, which you’ll add in a minute.
Step 3: Pin the text
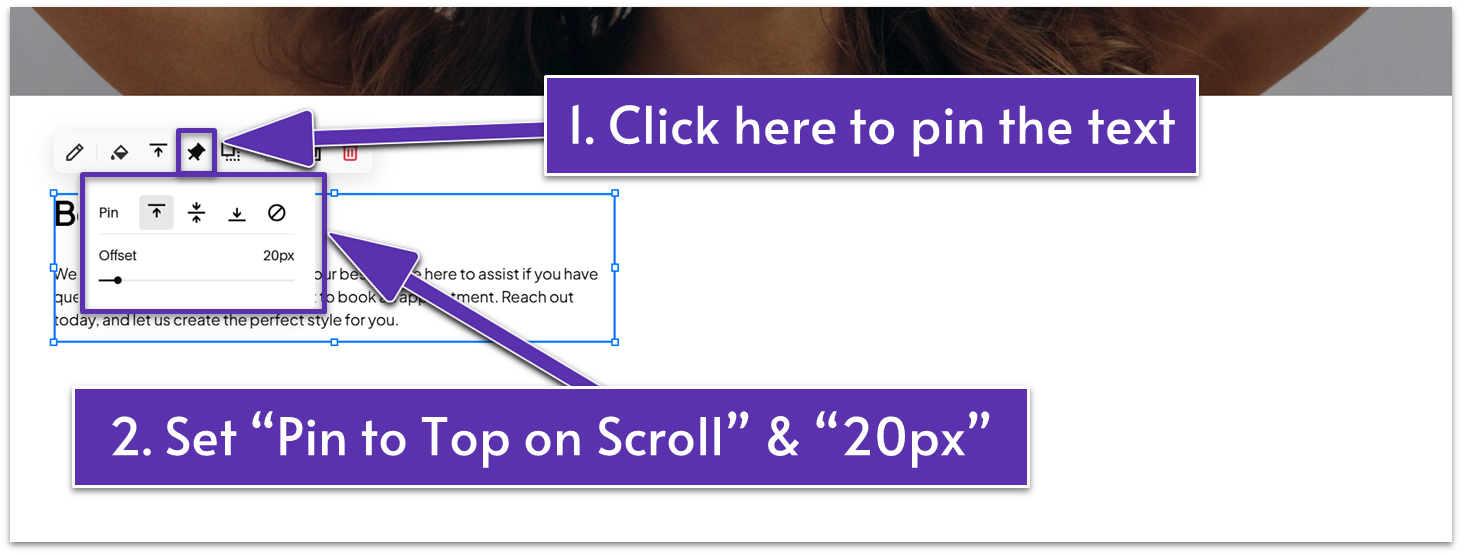
- Click the pin icon ( ) from the main block toolbar to pin the text block. This keeps the text visible as your visitors scroll up and down the section.
- Set “Pin to Top on Scroll” and “Offset” to 20 px or whatever you prefer.
2.5 Add a Contact Form
Your contact form should include essential fields like name, email address, and a message box to allow visitors to explain their inquiry. You may also add fields for preferred contact method, or appointment requests. However, your form shouldn’t overwhelm users with too many required fields or unnecessary personal details, as this can deter people from reaching out.
Step 1: Add a form block
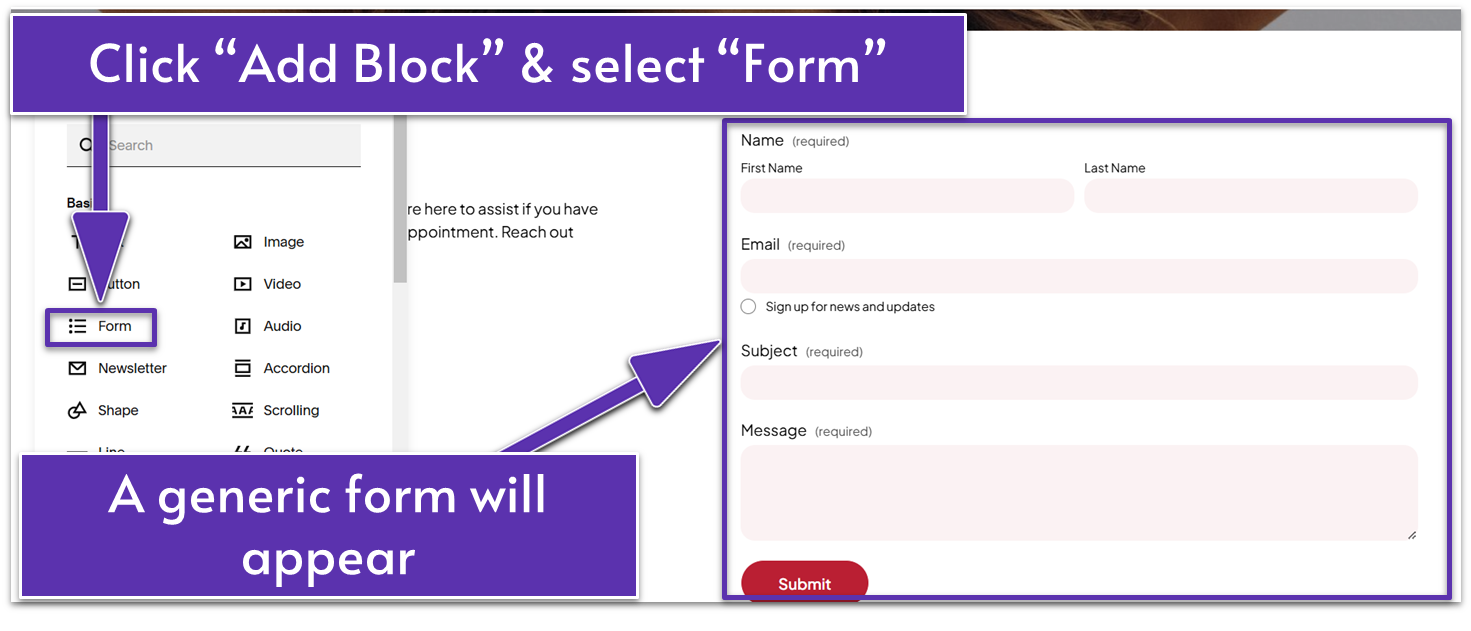
- Go to “Add Block.”
- Select “Form.”
- Move the form block to the right half of the section. Drag it to your desired position and stretch it to your preferred size.
- Drag up the gridline using ( ) to remove the unnecessary blank space around the form.
Step 2: Customize your contact form
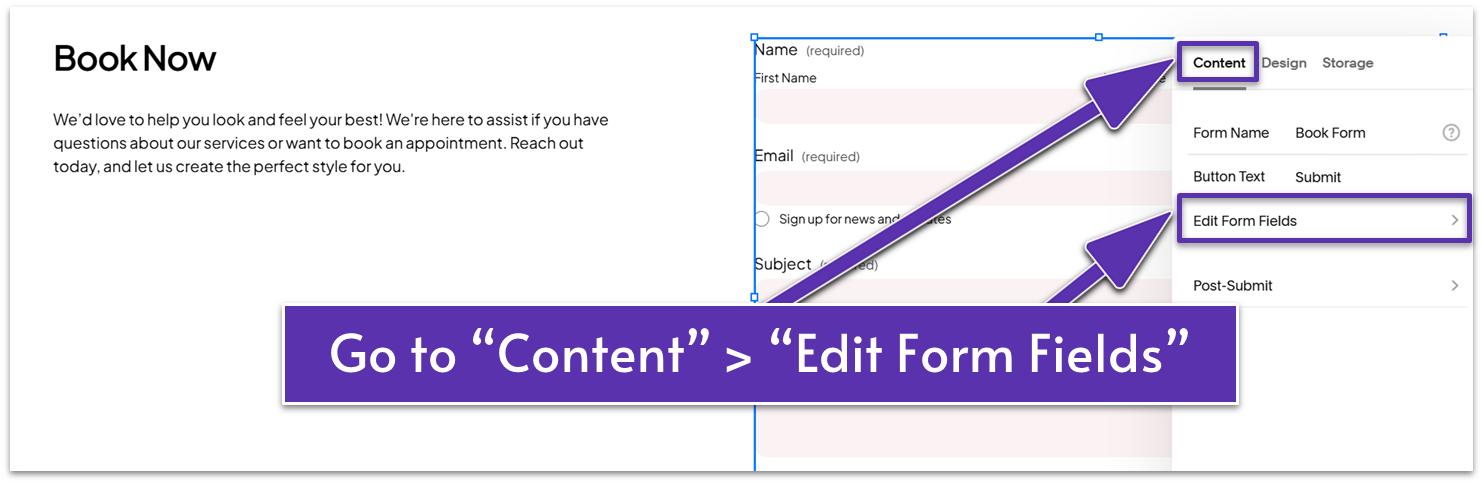
- Click on the form to display the block toolbar.
- Click the pencil icon ( ).
- Go to the “Content” tab and click “Edit Form Fields” to customize your contact form.
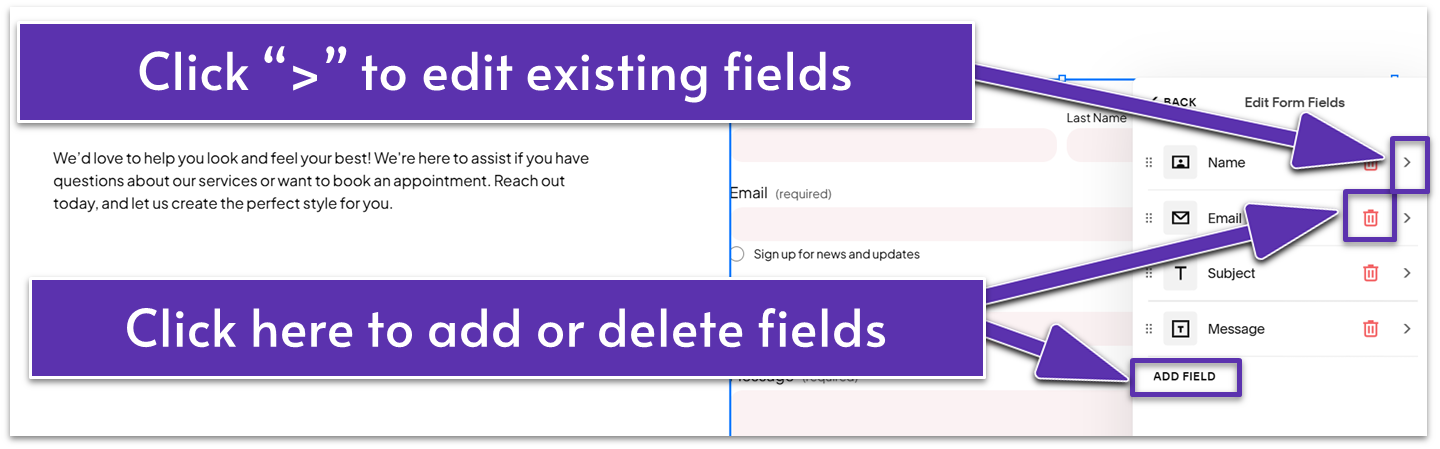
- In the “Edit Form Fields” panel, you can add, delete (by clicking ), and drag and drop form fields in your desired order.
- You can add new fields from the “Add Field” list, which includes different fields like “Date,” “Time,” and “Currency.”
Now that we have covered the basics let’s make your form salon-ready!
You can tailor your form based on your salon’s needs. Here’s what we did to make the generic form suitable for a salon business.
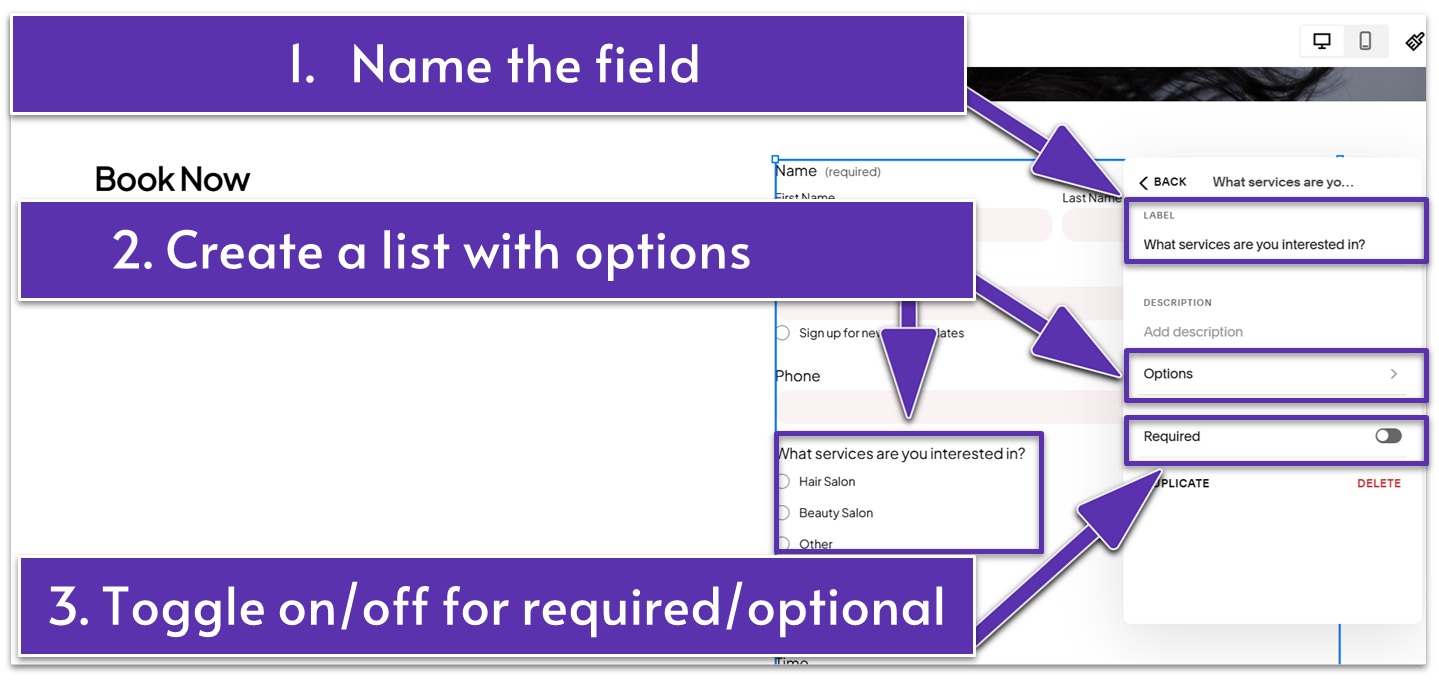
Step 3: Customize an existing field
We renamed the “Subject” field to “Phone” and made it optional.
Here’s how:
- Click on “Subject” in the “Edit Form Fields” panel.
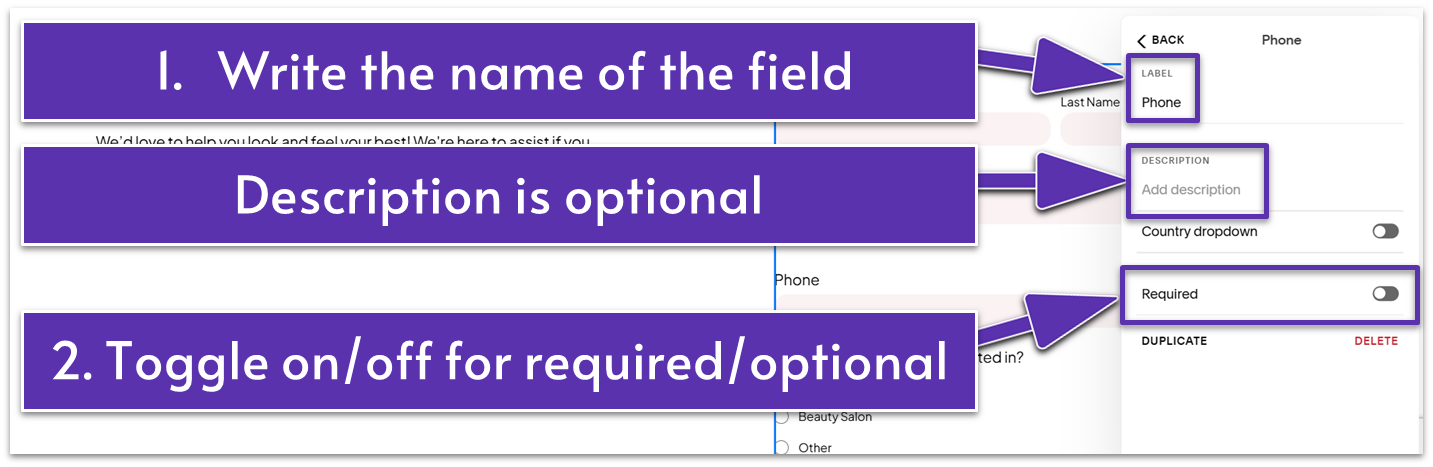
- Under “Label,” write the new name of the field. We renamed this field to “Phone” on our website.
- Add a description if the field needs an additional explanation like “We need your phone number to contact you regarding your appointment request.”
- Toggle on/off the “Required” bar to make the field mandatory or optional.
- At the bottom of this menu, you can duplicate or delete the field.
Step 4: Add a “Checkbox” field
We added a “Checkbox” field to list the available services at our fictional salon, allowing clients to check multiple options.
Here’s how to add and customize a “Checkbox” field on your contact form:
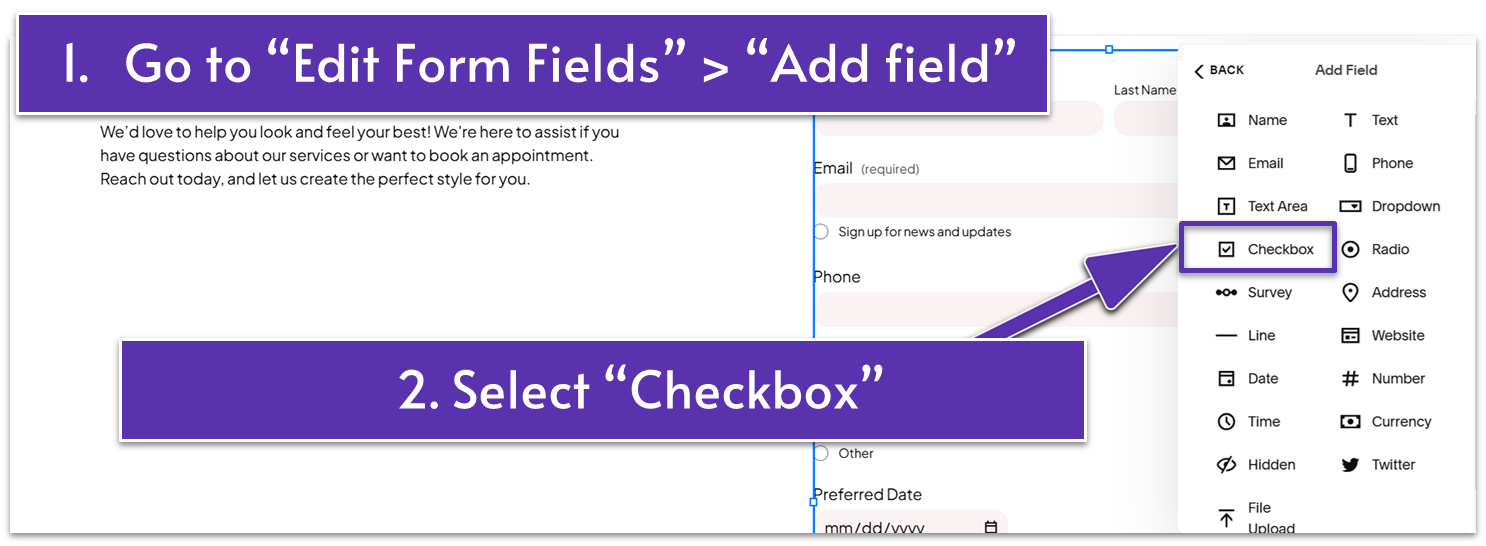
- Click the pencil icon ( ).
- Under the “Content” tab, click “Edit Form Fields.”
- Scroll down to the bottom of the list and click “Add Field.”
- Select “Checkbox” from the menu with options.
- Open the field you just added from the “Edit Form Fields” list to customize it.
- Name the field. We labeled this field “What services are you interested in?”
- Add a description if needed. For example, for a checkbox field, you can add “Check all that apply.”
- Click “Options” to add your service list. We added “Hair Salon,” “Beauty Salon,” and “Other.” Depending on your salon business, you can list specific services here. For example, if you own a hair salon, you can add services like “Haircut,” “Hair Coloring,” and “Hair Botox” as your “Options.”
- Add as many options as you need.
Step 5: Add “Date” and “Time” fields
These fields are not a substitute for booking software. Still, including them on your form gives you an idea about clients’ availability and preferences. You can then email or call them to discuss the details.
Here’s how to add “Date” and “Time” fields:
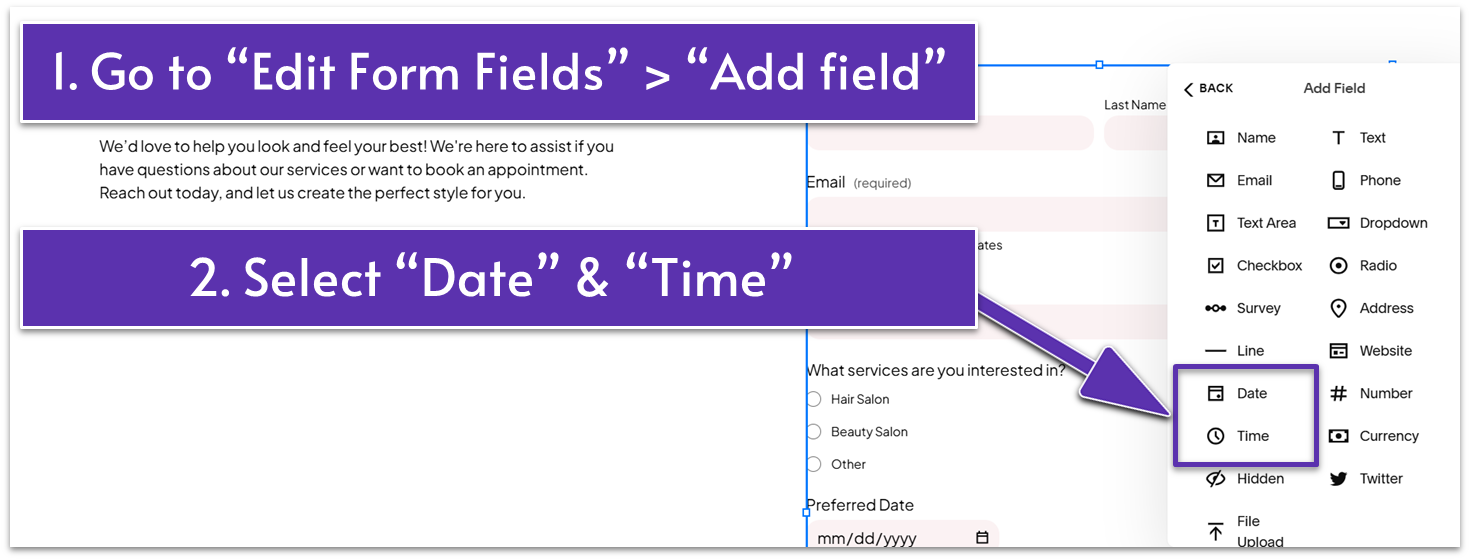
- Add a “Date” field.
- Open the “Date” field from the “Edit Form Fields” list to customize it.
- Name the field. We changed the name to “Preferred Date.”
- Repeat the same process to add a “Time” field.
Step 6: Add a “Dropdown” field
We customized a “Dropdown” field to “How did you hear of us?” field on our form. If you want to replicate this on your contact form:
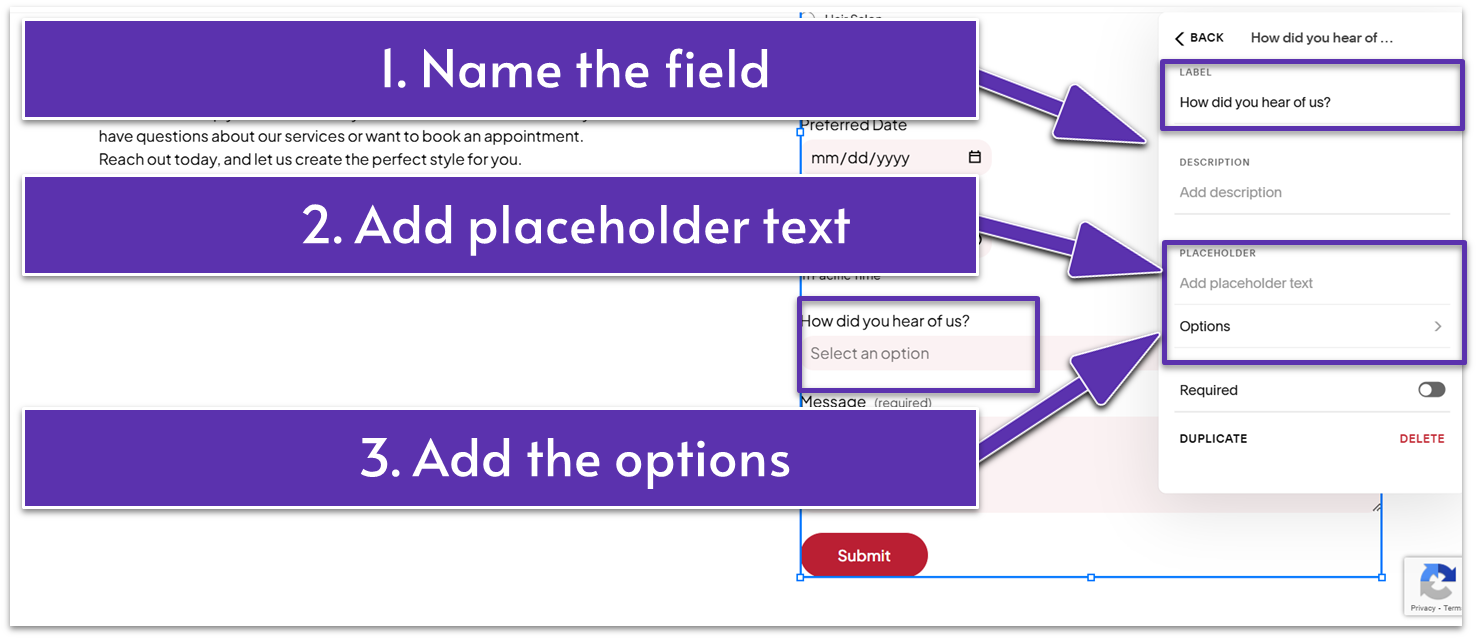
- Add a “Dropdown” field.
- Name the field and add a “Placeholder” text. We named the field “How did you hear of us?” and added “Select an Option” for “Placeholder.”
- Add “Options.” For example, you can add “Social Media,” “Ads,” and “Recommendation” as options.
We tailored our contact form to suit most salon businesses, but every salon has a unique story. You may not need all of these fields or may decide to add additional ones – it’s up to you. It’s important that your contact form gets clients closer to you and makes your job easier.
Once done with customizing your form, let’s add an email where you’ll receive your clients’ messages.
2.6 Connect an Email To Receive Website Submissions
Having an email address with your business domain, like [email protected], looks more professional and keeps your messages organized and easy to manage. Avoid using the same email for business and personal activities to prevent customer inquiries from getting lost among dozens of personal emails.
Once you’ve set up your business email, follow these steps to link it to your Contact page:
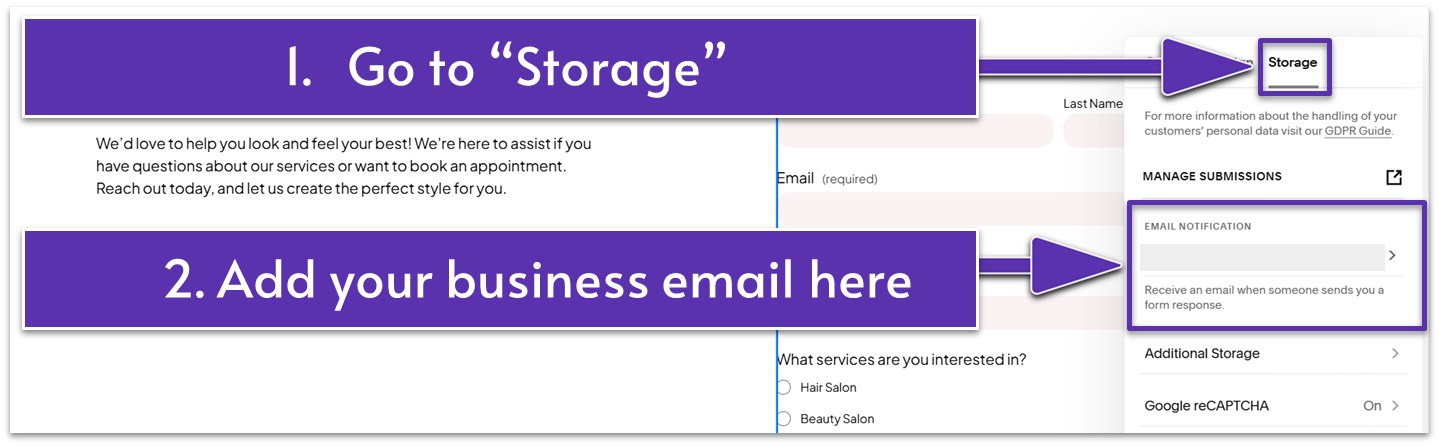
- Double-click the form and go to the “Storage” tab.
- Click the “Email Notification” field and type your business email. You can now receive client form submissions straight to your mailbox.
Now that your form is aligned with your business needs and linked to your email, it’s time to show potential customers where and when they can find you.
But before we do that, let’s spice things up a bit.
2.7 Add a Section Divider
A section divider visually breaks up content, guiding your visitor’s eye from one section to another. It’s an optional element you can use when transitioning between different types of content. In our case, we used it to separate the contact form and map sections. This detail can also add a touch of design flair.
Step 1: Add a divider
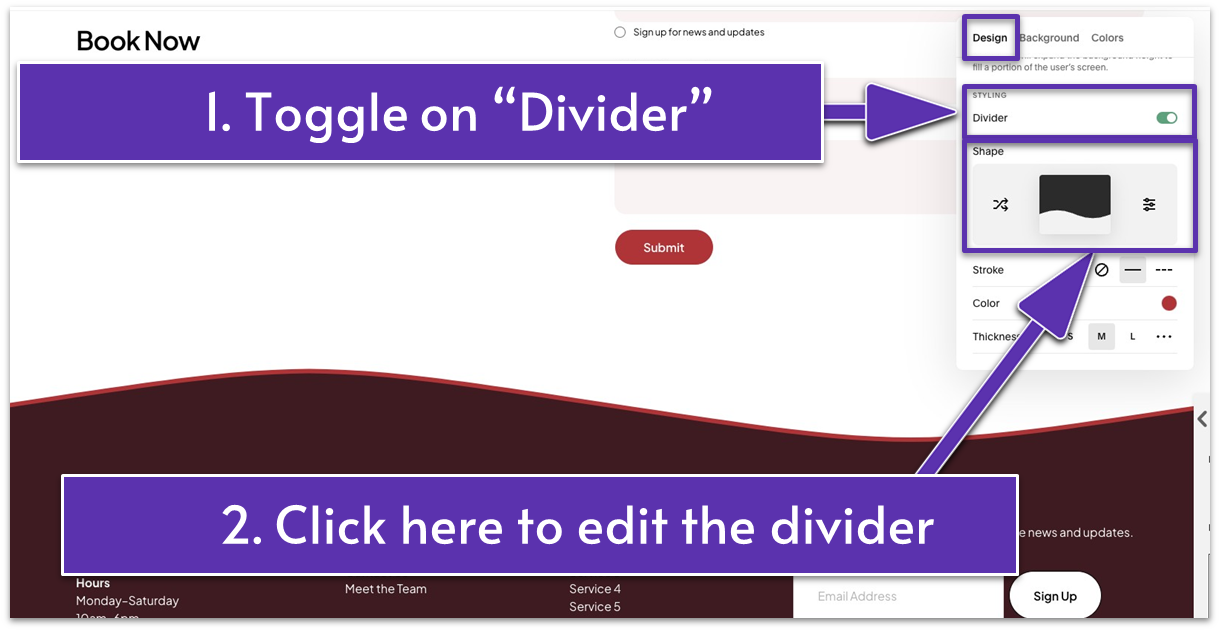
- Go to “Edit Section.”
- Under the “Design” tab, head to “Styling” and turn on the “Divider” switch.
Step 2: Choose the desired divider style
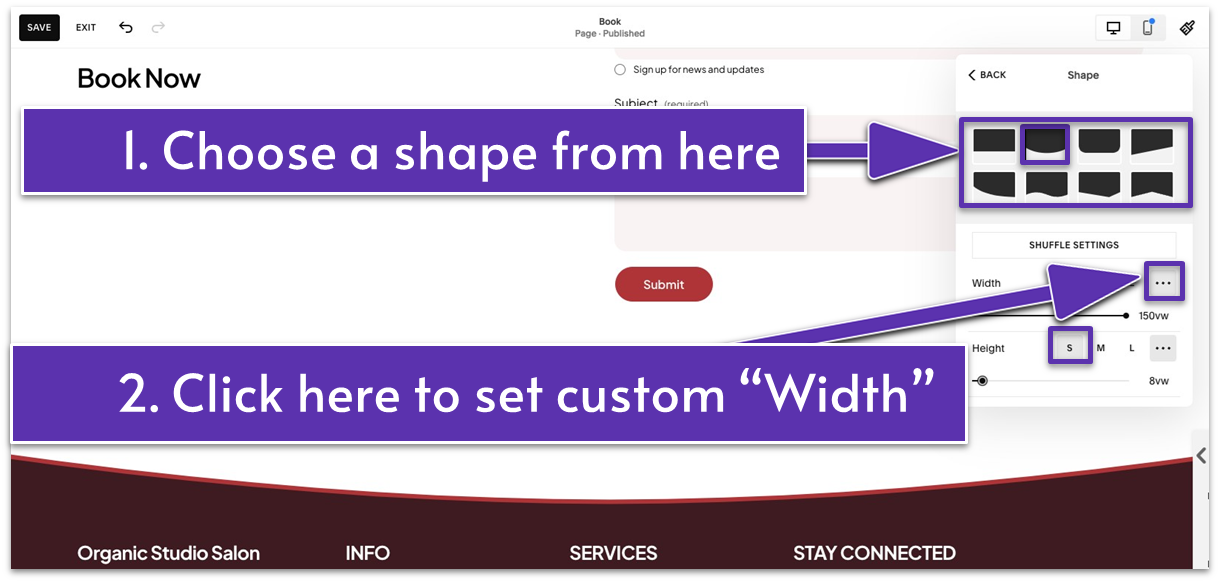
- Select your preferred divider shape. We chose the “Rounded Shape” here.
- We customized the shape’s “Width” by clicking the three dots icon ( ). We set it to 150 vw. For the “Height,” we selected “S” (small).
Step 3: Edit the divider
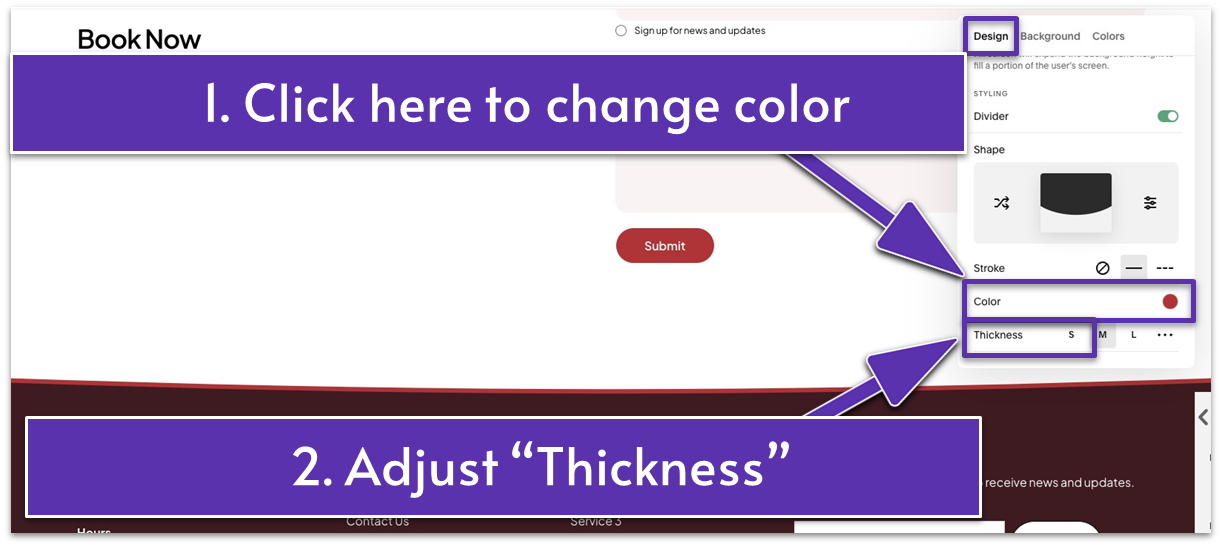
- Go back to the “Design” tab if you want to change the color and adjust the thickness of the divider.
- Set your desired color from the “Color” menu. We selected the second light color from the palette.
- Just below “Color,” you can adjust the “Thickness.” We went with “S” here to make the divider less prominent.
2.8 Add Your Location & Business Hours
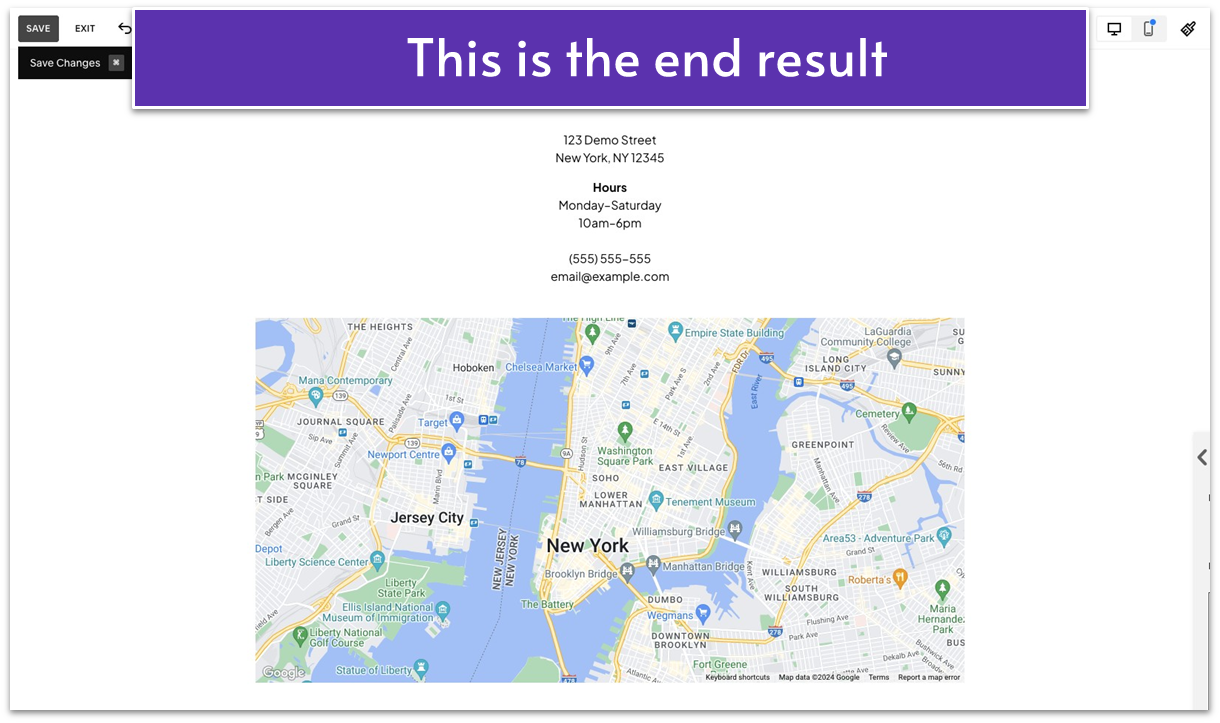
Adding a map to your salon website shows potential customers where your salon is located. This helps them decide to visit and makes it easier for them to find you. You won’t have to waste time explaining your location over and over again. Additionally, clearly listing your business hours ensures clients know when they can visit or book appointments. Both elements build trust and make your salon more approachable to potential clients.
Step 1: Add a new blank section
Step 2: Add a text block
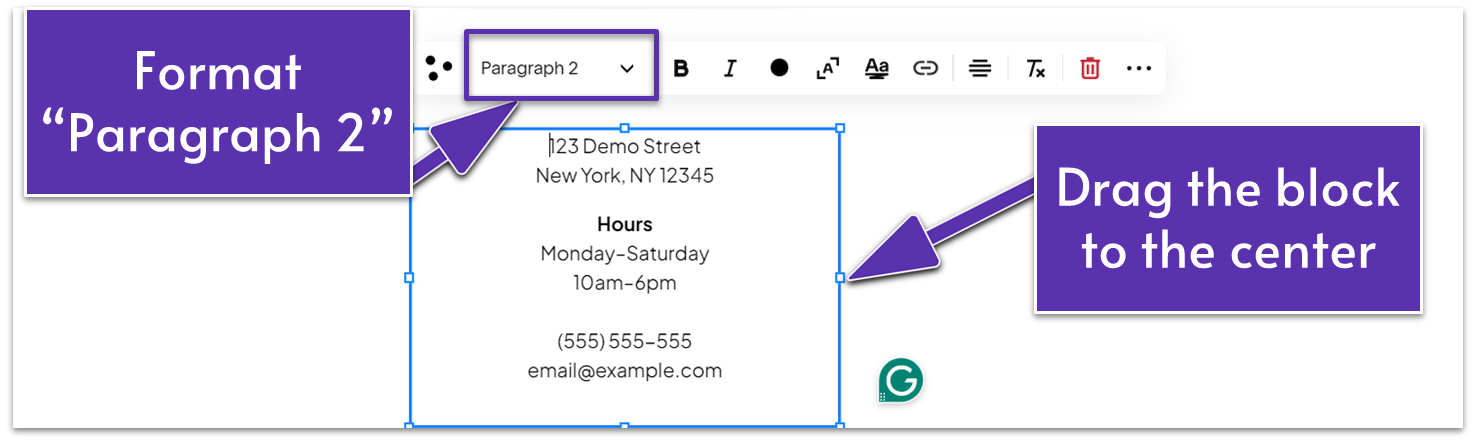
- Write your address, hours of operation, phone number, email, and any relevant business information in the text block.
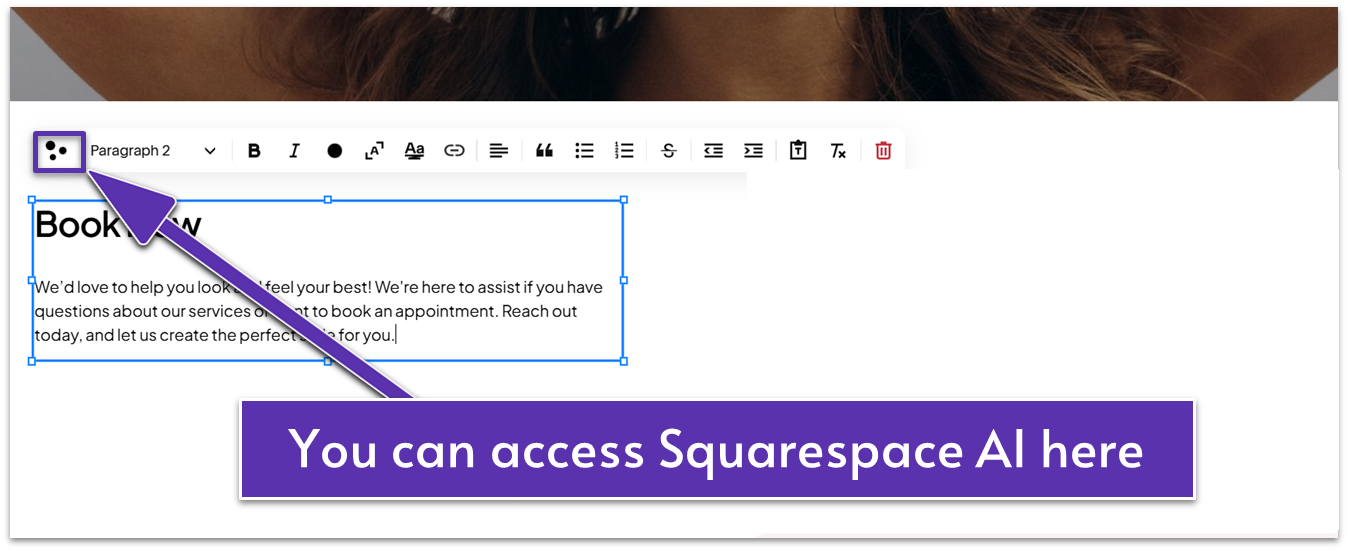
- Format the text as desired. We formatted all text “Paragraph 2” and applied “Bold” to “Hours.”
- Place the text block in the middle of the section.
Step 3: Add a map
- Head to “Add Block.”
- Select “Map” from the list.
- Drag it to the center and make it wider.
Step 4: Edit the map
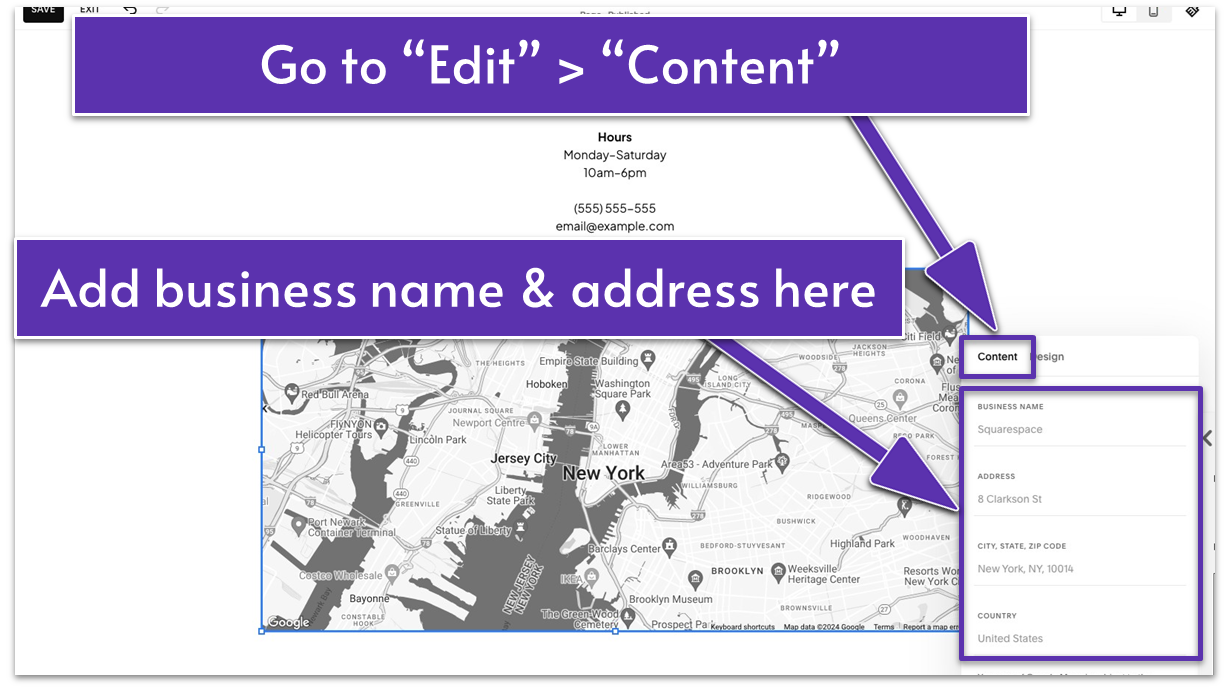
- Click the pencil icon ( ) to edit the map.
- Insert your business name and address in the fields under the “Content” tab.
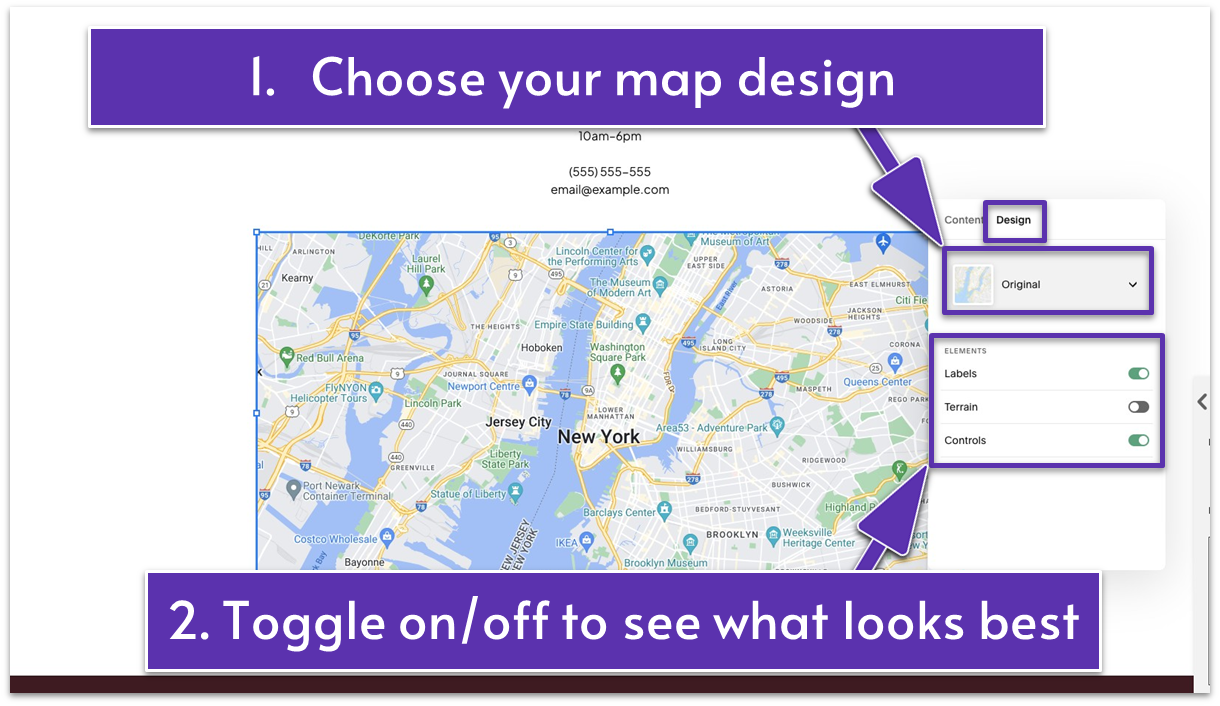
- Then, head over to the “Design” tab. From here, you can change the color setting of your map. We selected “Original.”
- We kept the original settings under “Elements.” Toggle them on if you want your map to display location names (Labels), terrain features (Terrain), and map controls (Controls).
2.9 Align the Page Elements
Ensuring proper alignment of your page elements is essential for creating a professional and visually attractive website. Well-aligned components guide users’ attention naturally through the content, enhancing readability and usability.
Here’s how to effectively align elements for a balanced and user-friendly design:
- Click “G” on your keyboard to show the grid.
- Use the grid as a guide and drag and drop the elements until you achieve a harmonious and visually appealing arrangement.
- Drag up to align the elements tightly and remove unnecessary blank spaces. Repeat this process for each section of your website.
See how simple that was? Your Contact page is almost ready to rock and roll!
2.10 Optimize for Mobile
Adjusting elements in mobile view is just as straightforward as using the desktop view in Squarespace. Simply identify what needs to be fixed, such as misaligned or cut-off elements, and make the necessary tweaks.
Step 1: Switch to “Mobile View”
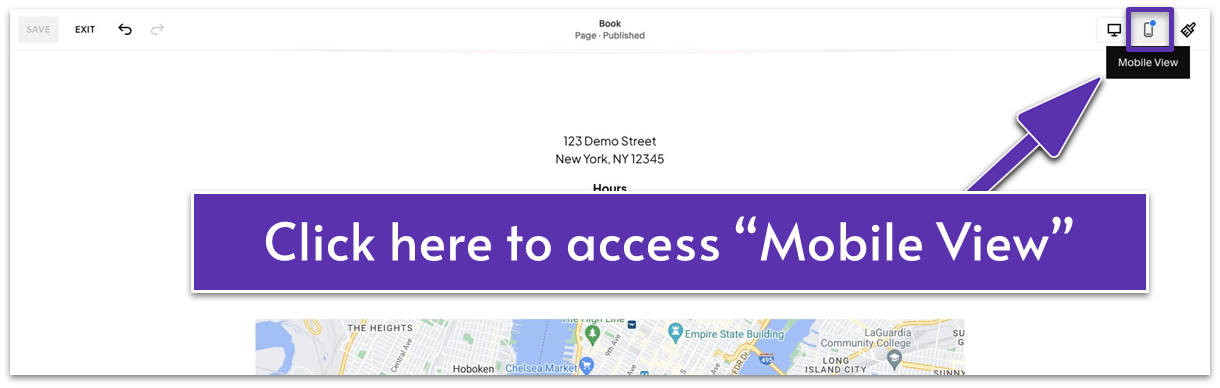
- Click the phone icon ( ) in the top-right corner of the editor. You’ll see the mobile preview of your website.

If you’ve followed what we did to the tiniest detail, you won’t need to adjust anything on your site. That said, this isn’t a common scenario. You’ll likely need to adjust the other pages you’ll build.
Worry not – we’ll make all the necessary adjustments in future modules together.
2.11 Save a Section
By saving a section in Squarespace, you can easily reuse it on multiple pages without recreating it. This saves you time adding frequently used sections like contact forms, promotional banners, or testimonials. I suggest saving the section after you’ve finalized everything, including the mobile optimization.
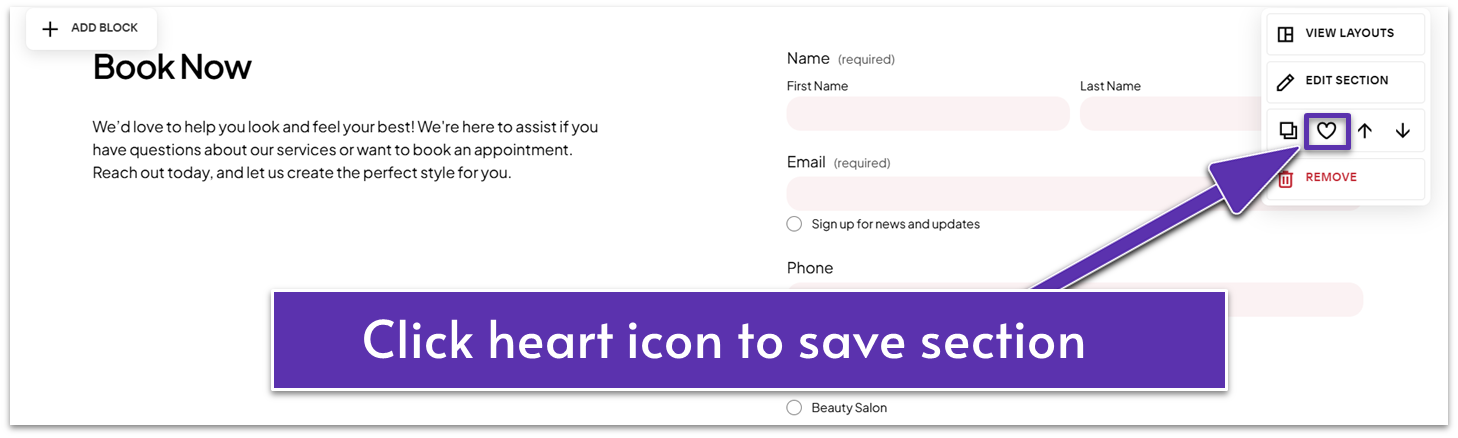
- Go back to the contact form section.
- Click the heart icon ( ) to save it.
The section will now be stored in your “Saved Sections.” You can reuse it as often as needed. I highly recommend saving any sections you expect to use multiple times.
2.12 Save Your Contact Page
Save your progress before exiting the page. You’ll need to repeat this step for every page you’ll build in Squarespace.
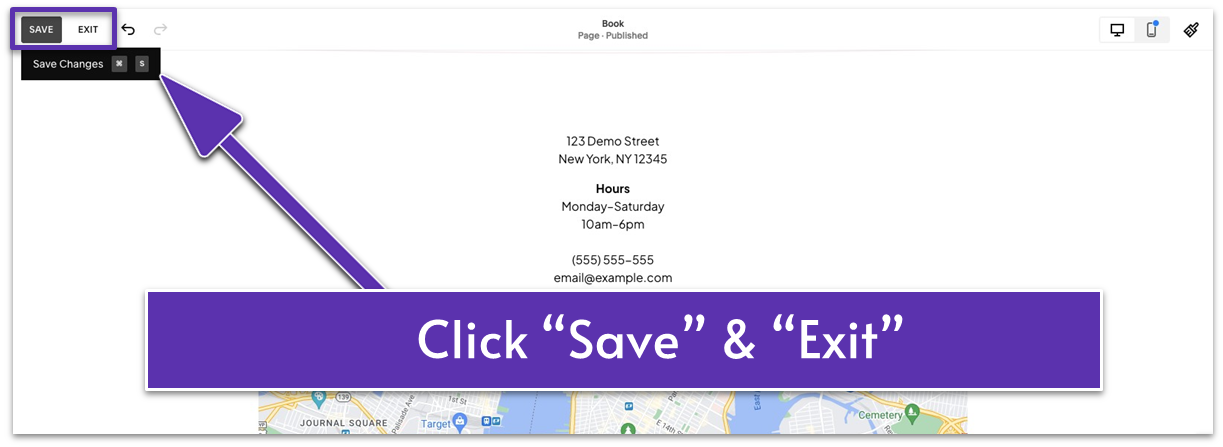
- Click the “Save” button in the upper right corner.
- Click “Exit” to leave the page.
That’s it – your stunning Contact page is complete!
Now that we’ve covered the basics of building your website in Squarespace, creating your About page will be a breeze.
Ready to continue? Let’s go!
