

You might wonder why we’re starting with the contact page instead of the Homepage. It might seem counterintuitive, but the contact page is actually much easier to build, so it makes for an easier start.
We want you to get familiar with Squarespace before tackling the more complex pages. By the time we get to the Homepage, you’ll know how Squarespace works and use it with ease.
Without further ado, let’s begin!
Set Your Site Styles
We covered how to set your site styles in Squarespace in our Quick Prep Guide. This is entirely up to you and your brand aesthetic. Remember, you can always go back and change them at any time.
If you want to follow exactly what we’ve done on our site, we’ve chosen the following:
Fonts (Headings)
- Family: Instrument Serif
- Weight: 400
- Style: Normal
- Line height: 1 em
- Letter spacing: -0.02 em
- Text transform: None
- Size:
- Heading 1: 4 rem
- Heading 2: 2.8 rem
- Heading 3: 2.2 rem
- Heading 4: 1.6 rem
Fonts (Paragraphs)
- Family: Instrument Sans/Space Mono
- Weight: 400
- Style: Normal
- Liner height: 1.5 em
- Letter spacing: 0 em
- Text transform: None
- Size:
- Paragraph 1: 1.4 rem
- Paragraph 2: 1 rem
- Paragraph 3: 0.9 rem
Fonts (Buttons)
- Family: Instrument Sans
- Weight: 600
- Style: Normal
- Letter spacing: 1 em
- Text transform: None
- Size (primary, secondary, and tertiary buttons): 1 rem
Fonts (Miscellaneous)
- Family: Space Mono
- Weight: 400
- Style: Normal
- Line height: 1.5 em
- Letter spacing: 0 em
- Text transform: None
- Size: 0.8 rem
Main Color Palette
- HEX #F1F1F1
- HEX #FFFFFF (white)
- HEX #FFD53E
- HEX #44423B
- HEX #221C1C
Squarespace will derive 10 color themes from your main color palette. These color themes are fully customizable.
Buttons (Shape)
- Primary: Custom
- Secondary: Custom
- Tertiary: Pill
Forms
- Field shape: Custom
Miscellaneous
- Animations: Flex at a slow speed
Without further ado, let’s build your Contact page!
2.1 Add a New Page
Squarespace offers templates for pages like Blog, Store, and Portfolio. You can also choose from ready-made designer page layouts, which are great if you want to get online faster and simplify the building process.
However, we’ll show you that starting from scratch in Squarespace is not nearly as intimidating as it may sound. We’ll start with a blank page and guide you through every step – from a blank canvas to a unique page that fully aligns with your business goals.
Step 1: Go to the “Pages” menu
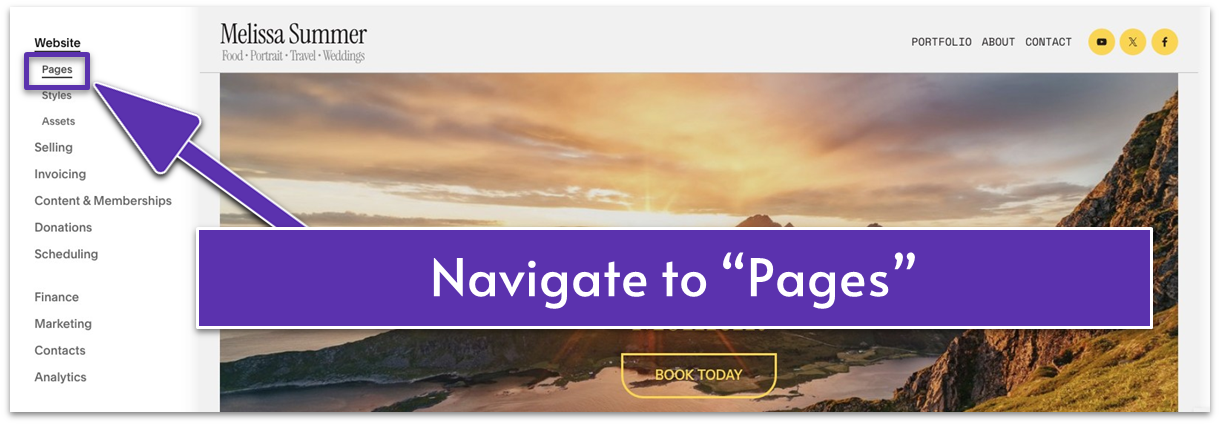
- Open the “Pages” menu located on the Squarespace editor’s left sidebar.
Step 2: Add a “Main Navigation” blank page
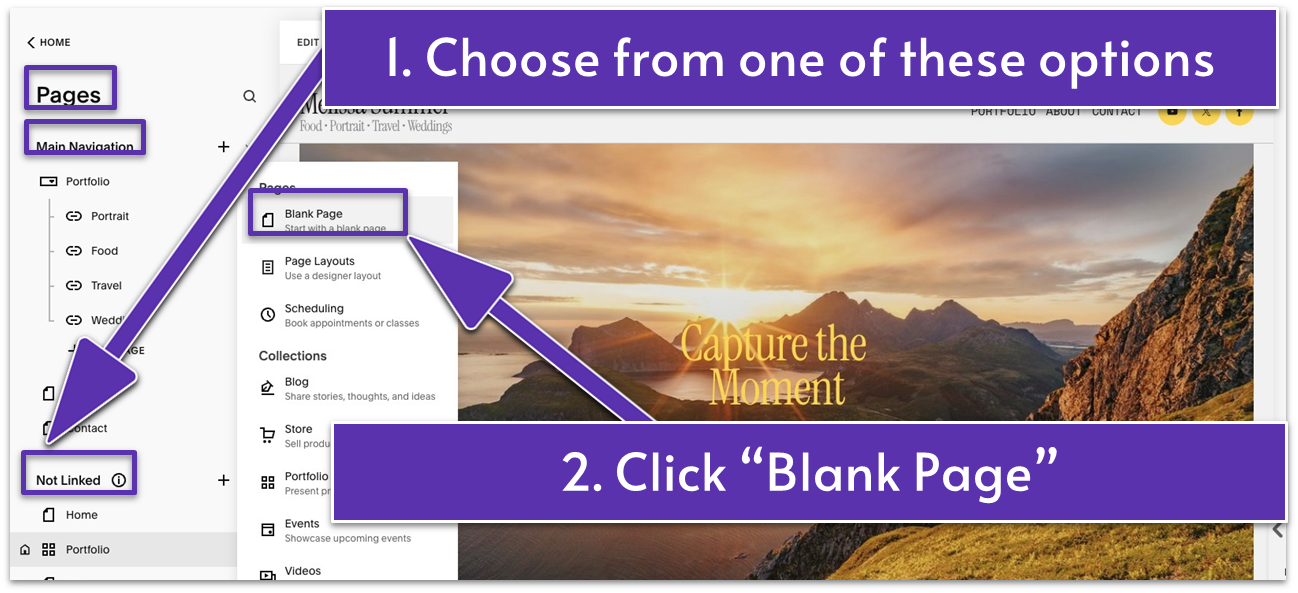
- Click the “+” sign next to “Main Navigation” and select “Blank Page.” A “New Page” will appear in the left sidebar and your website’s main navigation bar (the top menu of your site).
- If you don’t want a page to appear in the main navigation, add it from the “Not Linked” menu.
You can always move a page between “Main Navigation” and “Not Linked,” no matter where you first added it.
Step 3: Name the new page
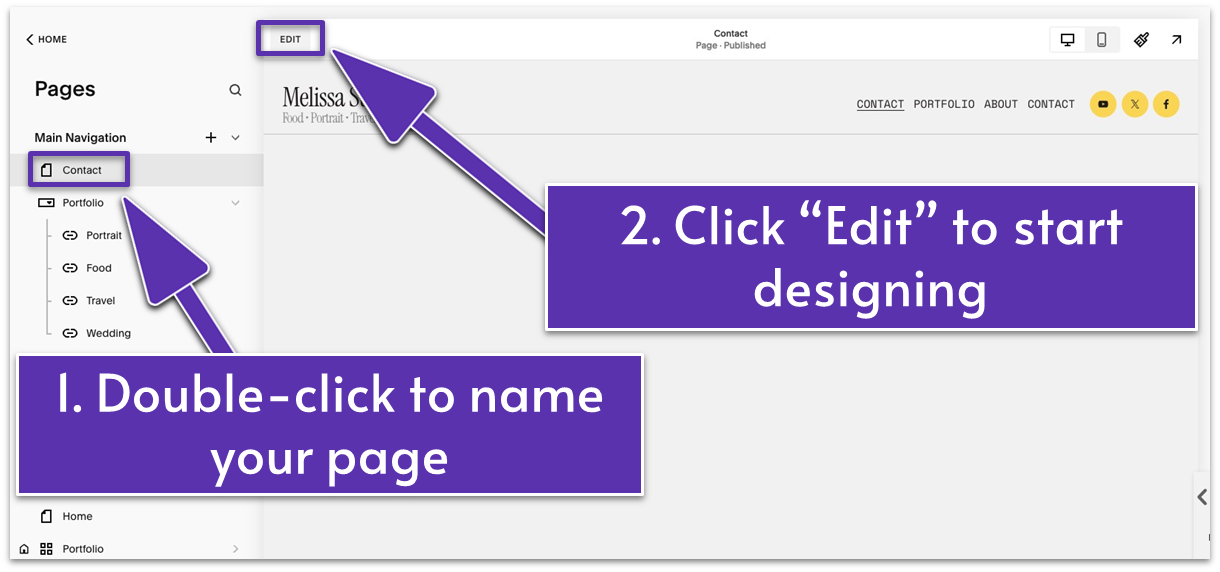
- Double-click “New Page” in the “Main Navigation” menu to rename it. We’ll name it simply “Contact.”
- Repeat this process for every new page you want to add.
Now, let’s move to the fun part – page design!
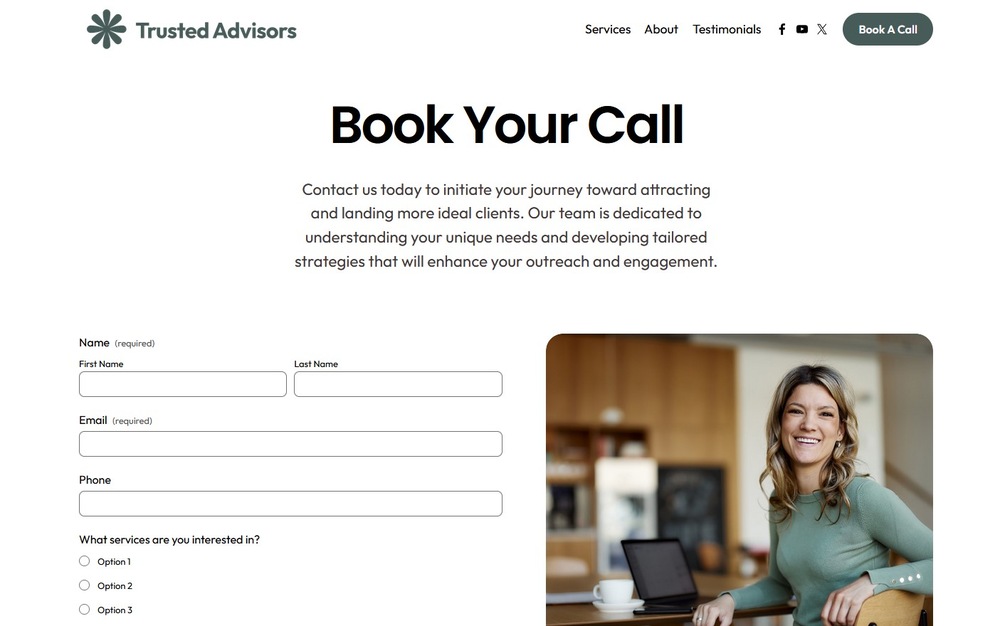
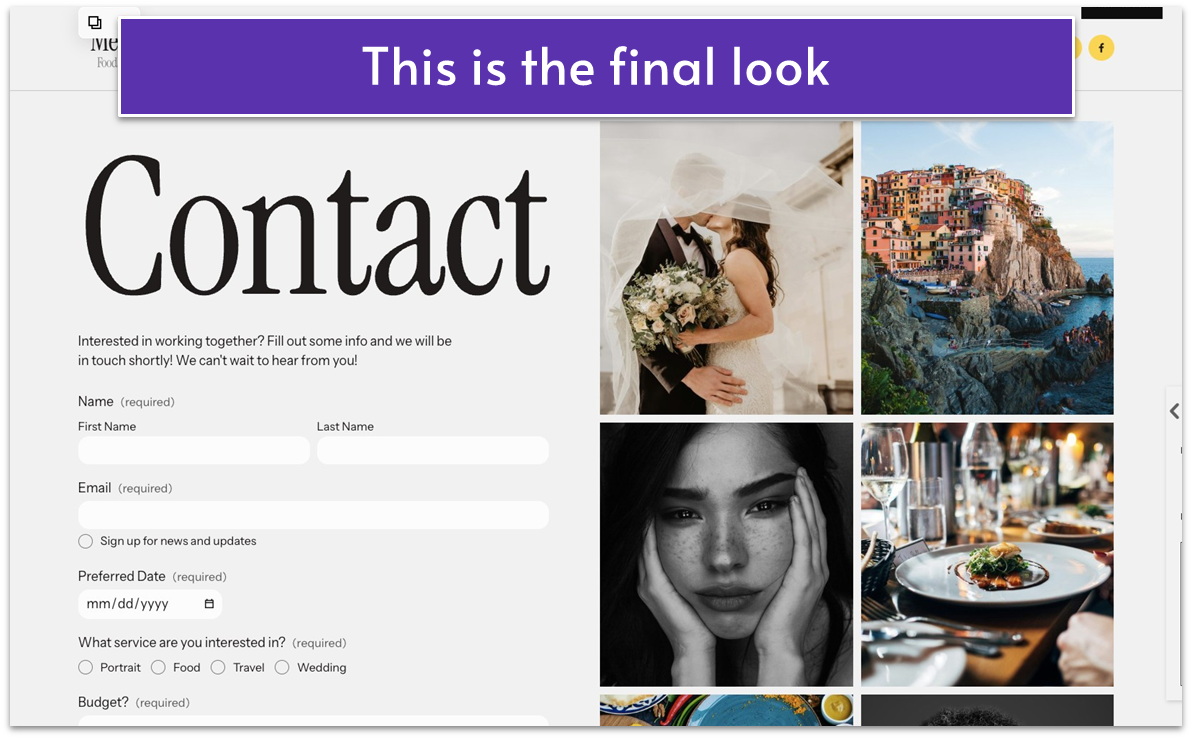
2.2 Add Text to the Contact Page
You’ll need to include the best ways for visitors to reach you on your contact page. These could be your social media accounts, phone number, contact form, or email address. You can also add a short message to encourage your visitors to reach out.
For this contact page, we’ll add:
- A title
- A contact form
- A brief message inviting your visitors to fill out the contact form
- A sneak peek gallery of your portfolio
Step 1: Open the page editor to start the design process
- Click on the Contact page from the “Main Navigation” menu.
- Click the “Edit” button (top-left corner of the page preview) to enter the page editor.
Step 2: Add your first section
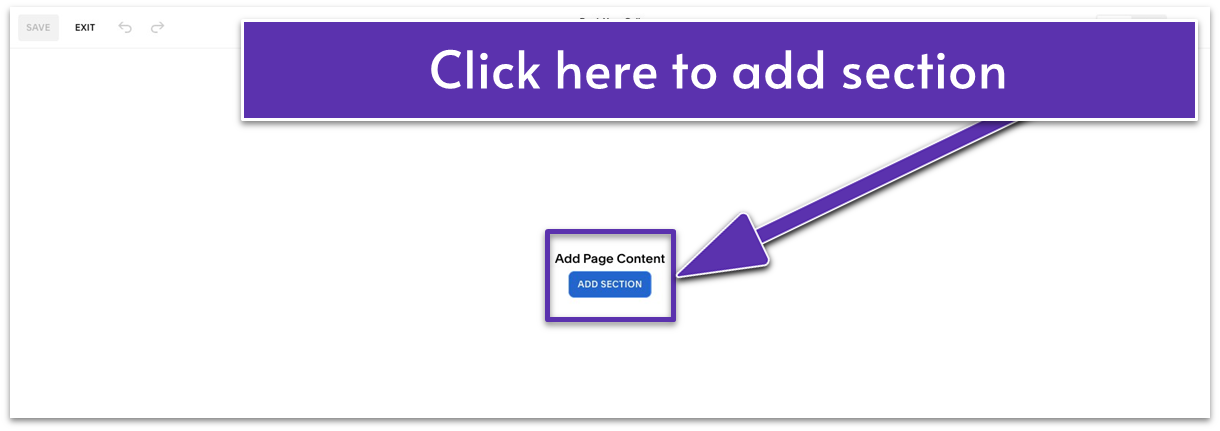
- Click the blue “Add Section” button in the blank space.
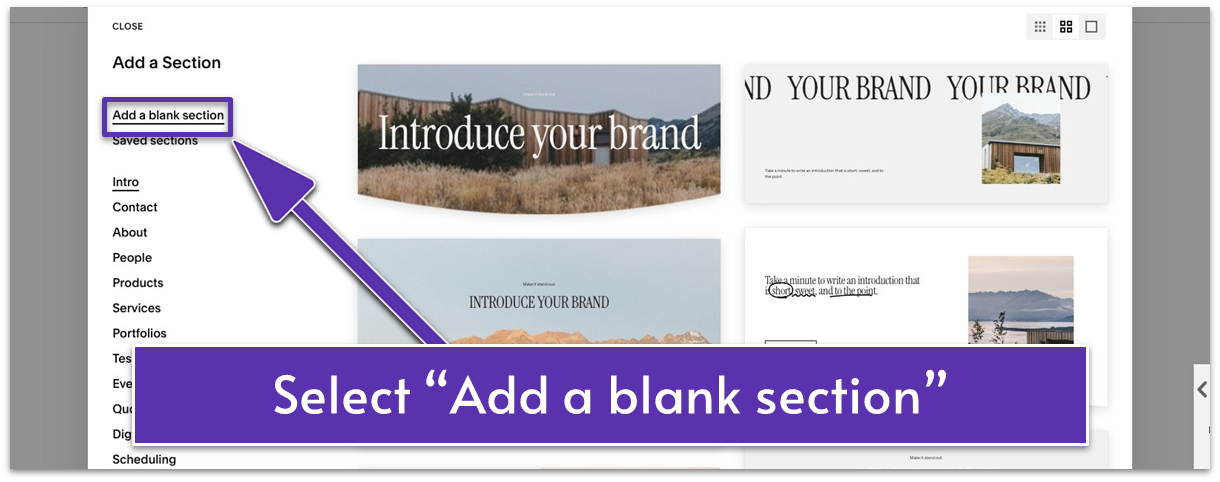
- Choose “Add a Blank Section” from the “Add a Section” menu that will pop up.
Step 3: Add a text block
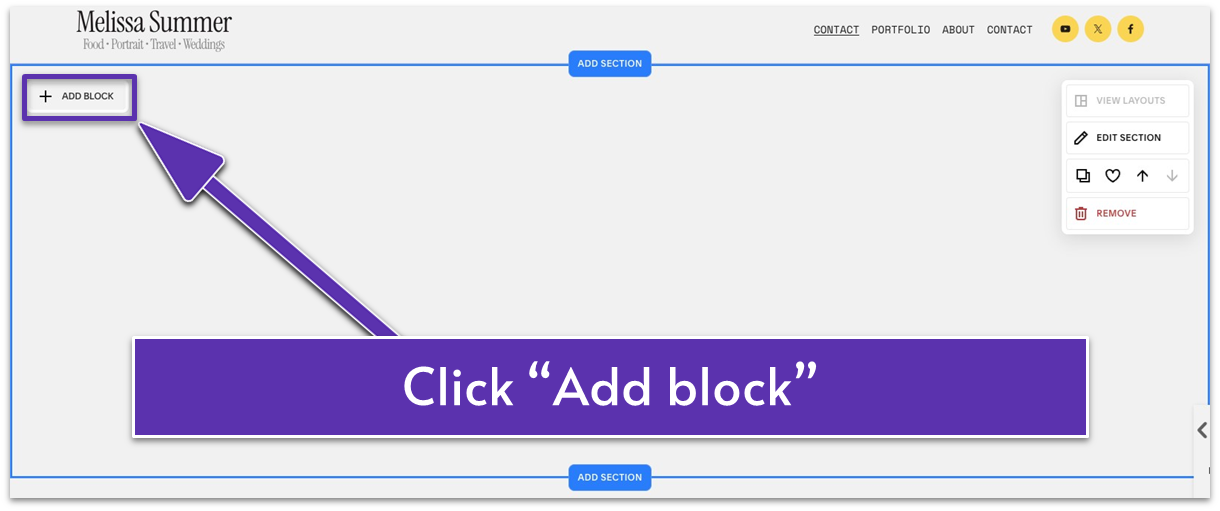
- Hover over the blank section to reveal the “Add Block” button in the top-left corner of the section.
- Click “Add Block.”
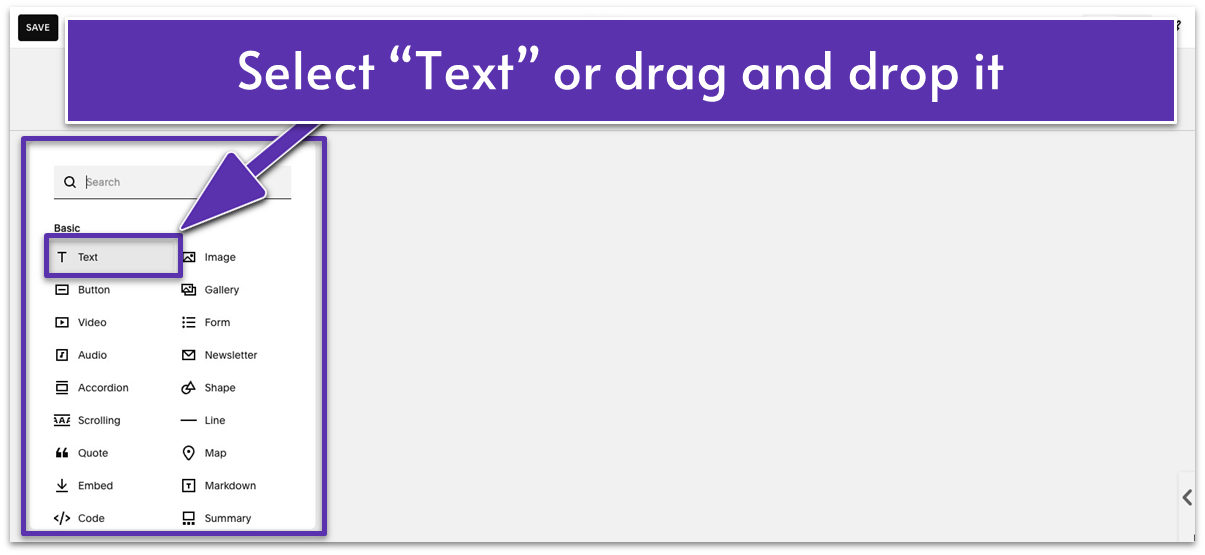
- Select “Text” from the menu.
- Drag the text block to cover half of the page.
Step 4: Add a title to the Contact page
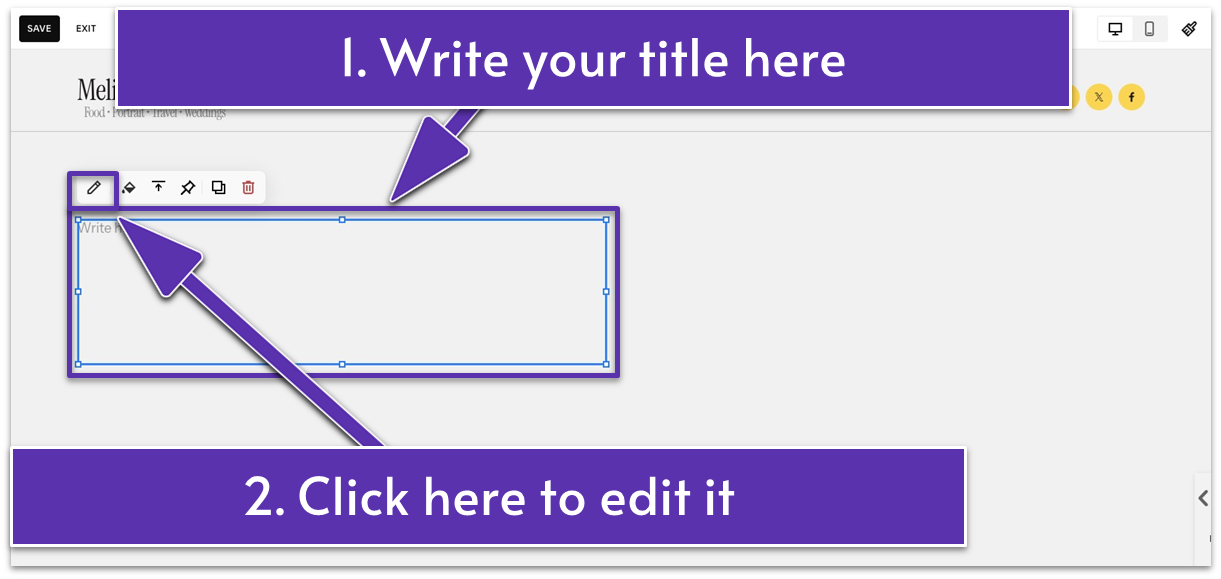
- Write the Contact page title in the text block. We wrote “Contact” here.
- Click the pencil icon ( ) to access the editing toolbar. The bar will appear above the text box. From the bar, you can access standard text editing options like heading and paragraph styles, colors, alignment, and bullets.
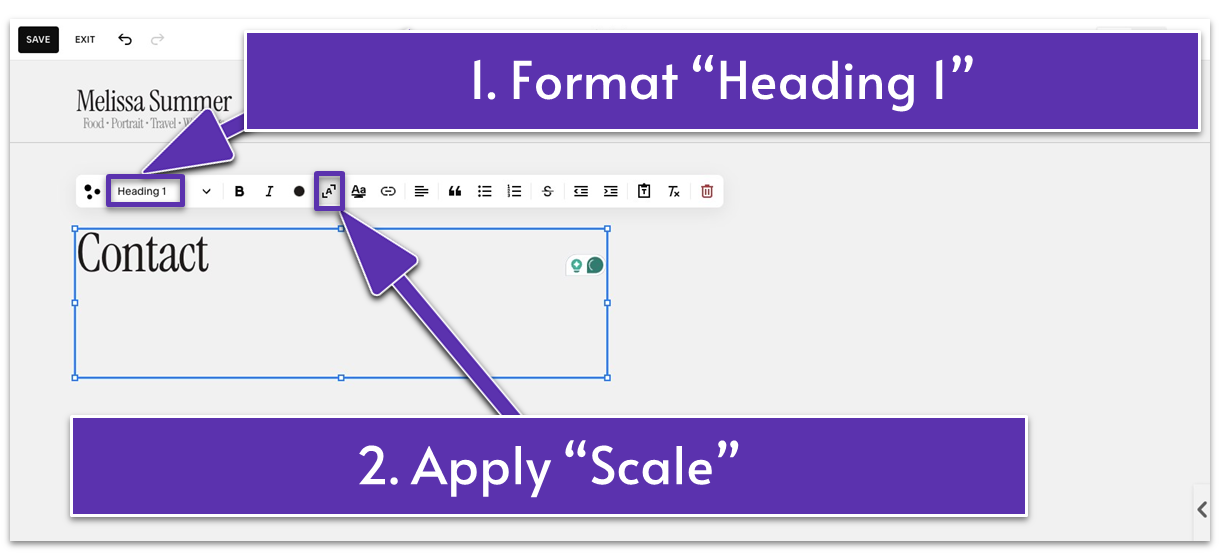
- Click the format drop-down menu and make this text a “Heading 1.” You’ll likely use this formatting only once on every page for your page title.
- Click to automatically resize the text to fit the text block.

- Click anywhere outside the block and select it again to reopen the block toolbar. Click to bottom-align the text.
Step 5: Add another text block
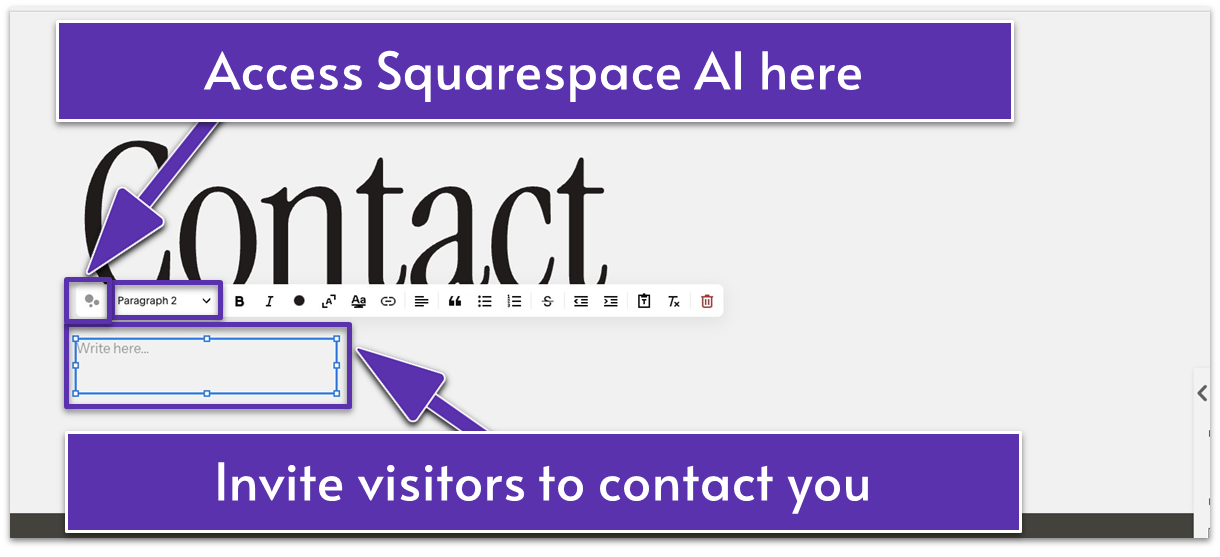
- Place the text block below the title. Click the pencil icon ( ) to access the editing toolbar and select “Paragraph 2” from the format drop-down menu.
- Write a short, inviting message for visitors to contact you.
Step 6: Align the elements
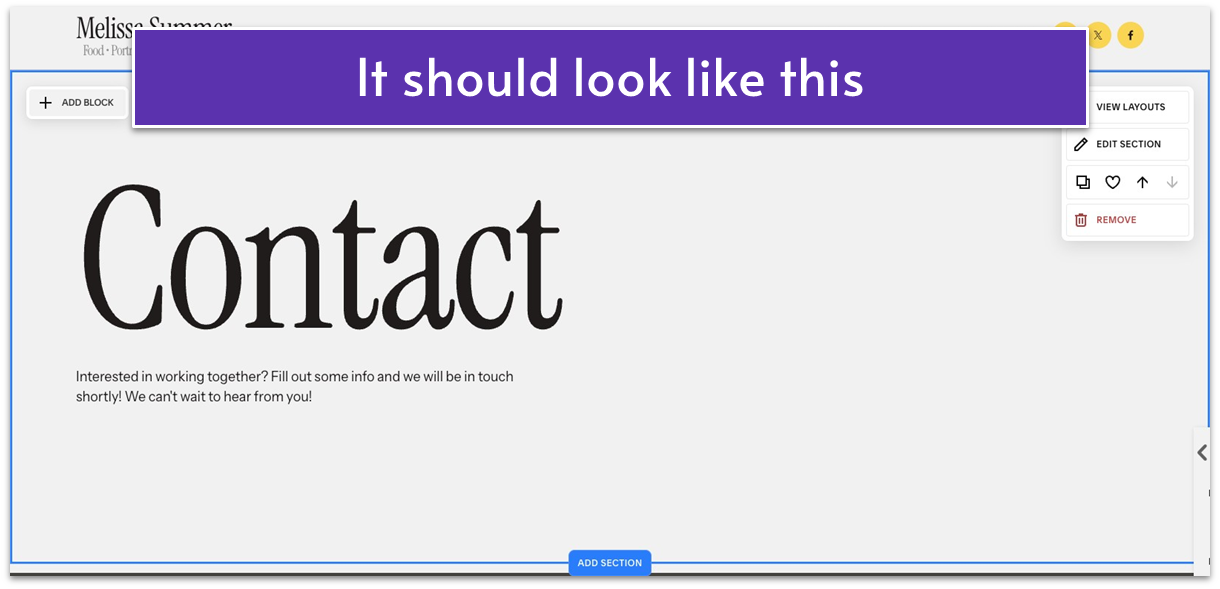
- If needed, drag and resize the text blocks to align them. For this Contact page, we made the “Contact” text block a bit smaller and brought the two text blocks closer together.
Now, you’ll add the actual contact form below these two text blocks.
2.3 Add a Contact Form
Your potential customers will likely have questions before hiring you, so it’s important to add a simple contact form for inquiries. With Squarespace, you can add a ready-made contact form you can customize to your needs. Consider keeping it easy to answer by adding only essential fields in a clear order.
Step 1: Add a form block
- Click “Add Block.”
- Select “Form” from the list of options to open a contact form template. Drag it below the text blocks.
Step 2: Customize the contact form
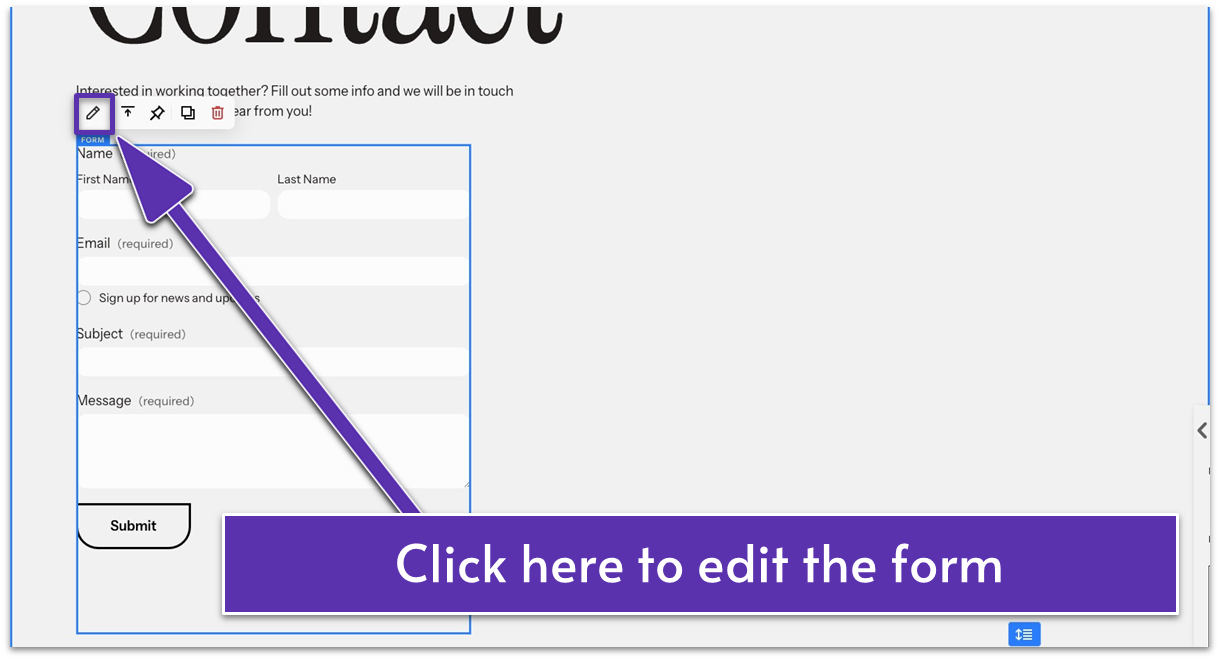
- Click the form to reveal the block toolbar.
- Click the pencil icon ( ).
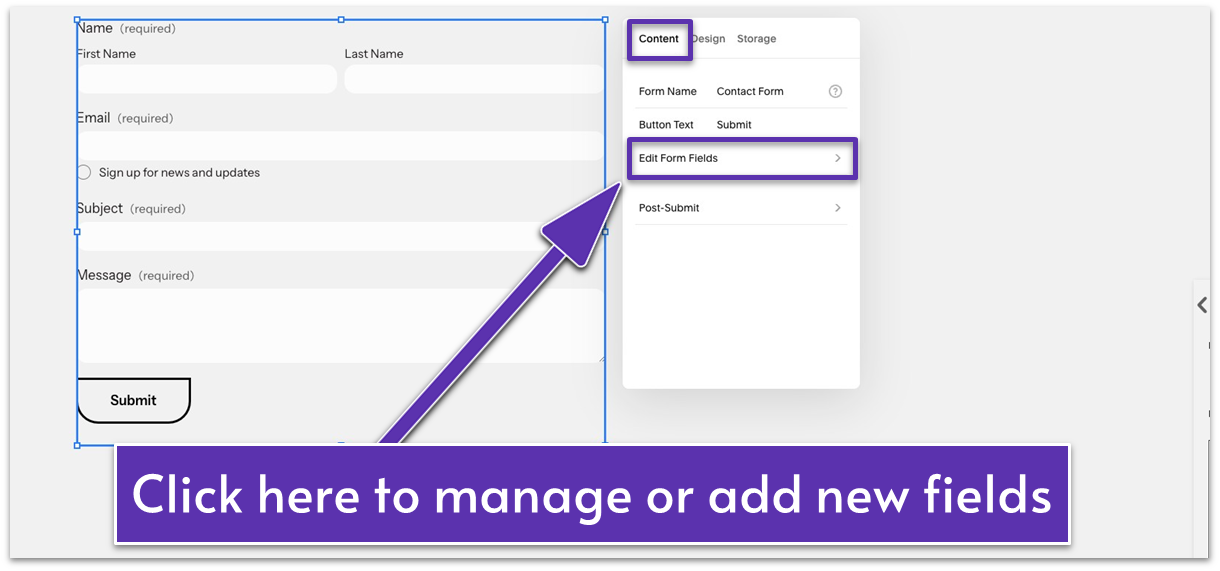
- Click “Edit Form Fields” under the “Content” tab to add, remove, or rename fields.
- Optional: In “Edit Form Fields,” select “Email” and turn on “Email Signup” to let visitors subscribe to your newsletters. You’ll see it as the “Sign up for news and updates” option in the form.
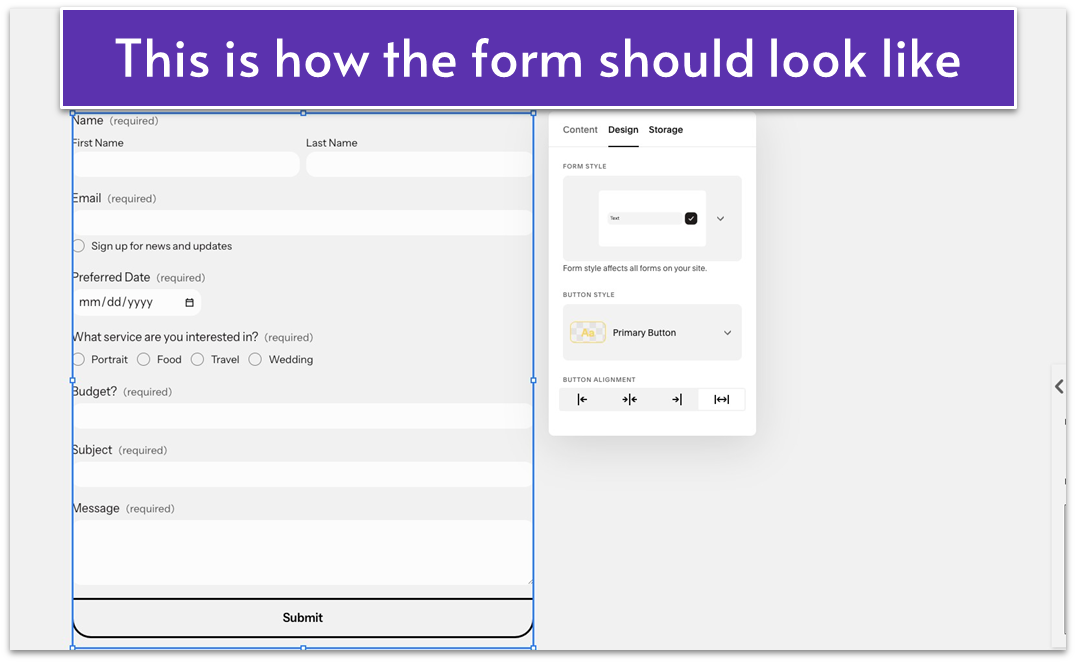
Step 3: Add a “Radio” field to your form
The “Radio” field lets you create a list of options for your visitors to select a single answer. I’ll show you how to add and customize a new field using this feature.
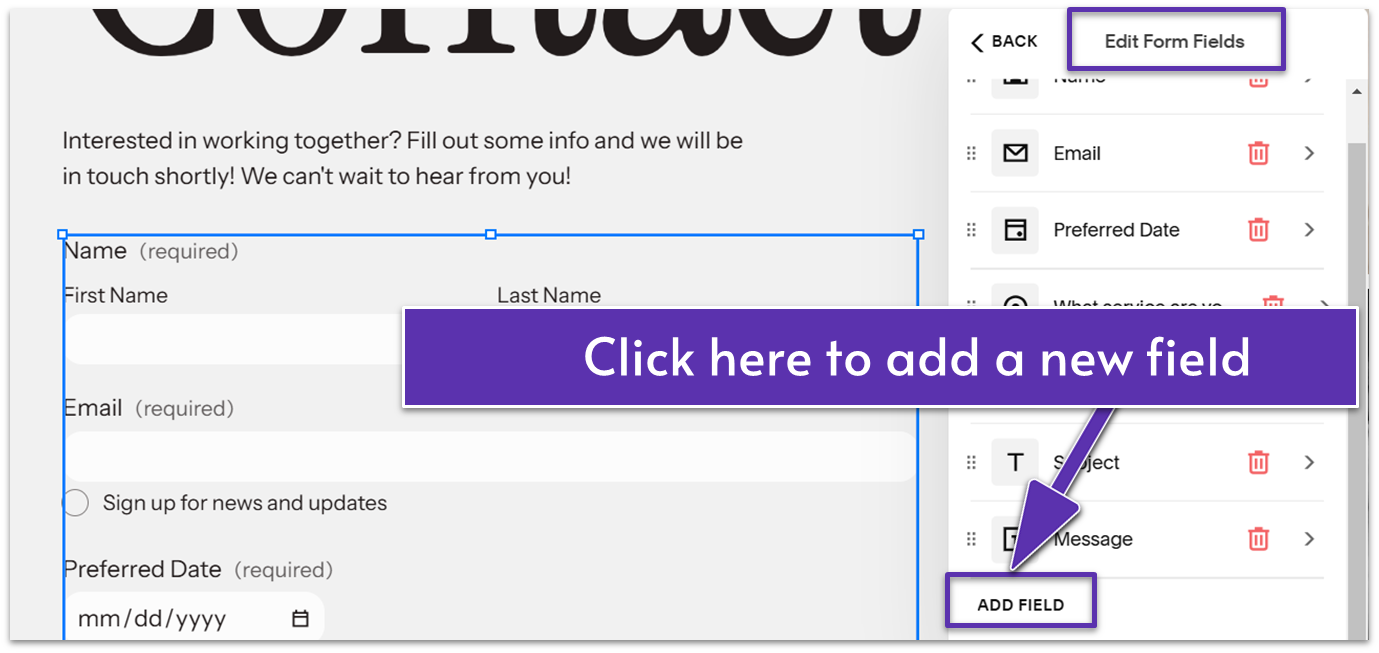
- In the “Edit Form Fields” panel, click “Add Field.”
- Select the “Radio” option from the list of available field types.
- Click on the newly added “Radio” field in the “Edit Form Fields” panel
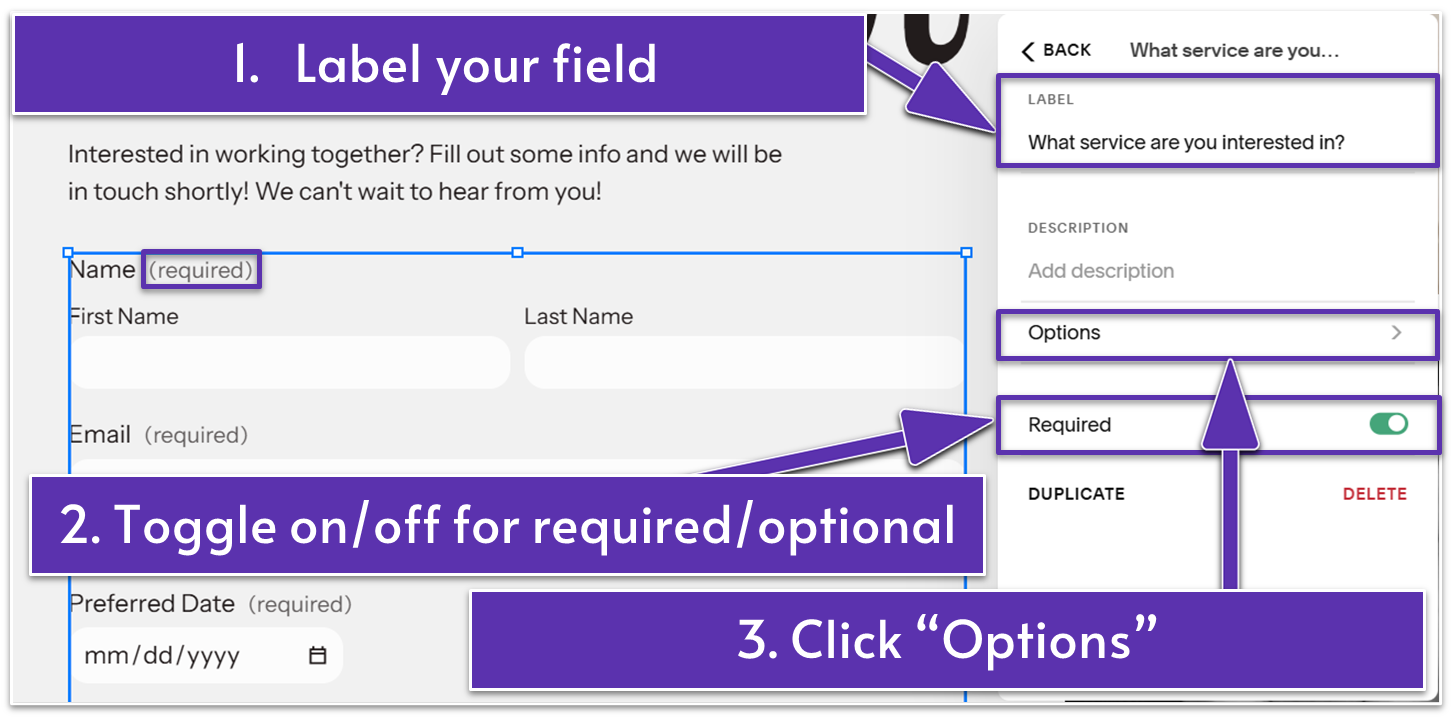
- Write your field’s new name under “Label.” We named this field “What services are you interested in?” You’ll have to do this for every field you want to label with a custom name.
- If you want to make this field mandatory, toggle on the “Required” switch.
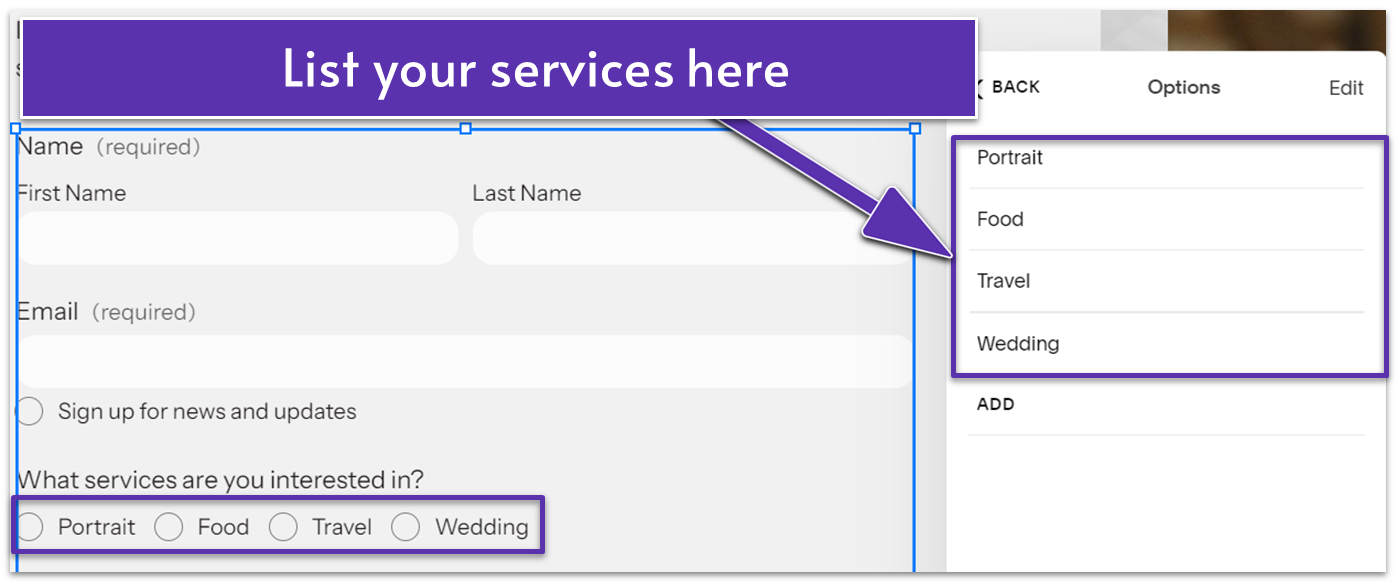
- Click on “Options” to list the services you offer. For example, on our website, we added four options: “Portrait,” “Food,” “Travel,” and “Wedding.” You can add as many options as necessary.
Step 4: Add a “Date” field
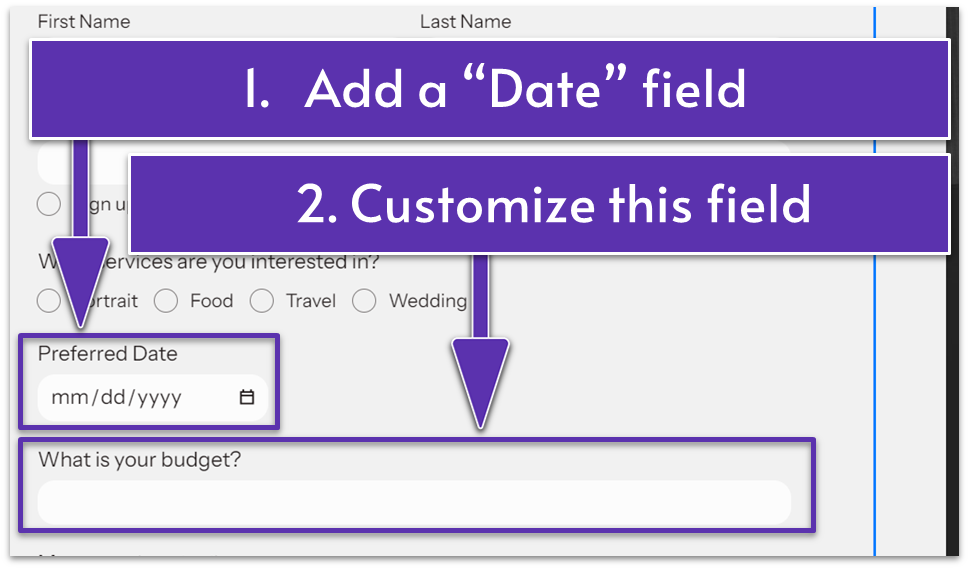
- We renamed the “Date” field “Preferred Date.”
Step 5: Customize an existing “Subject” field
- Select “Subject” from the list of fields in the “Edit Form Fields” panel.
- Rename the field. We changed the name to “What is your budget?” and made it an optional field.
Step 6: Arrange the fields in the desired order
- Go back to the “Edit Form Fields” panel.
- Drag and drop the fields in the desired order.
Step 7: Adjust button alignment
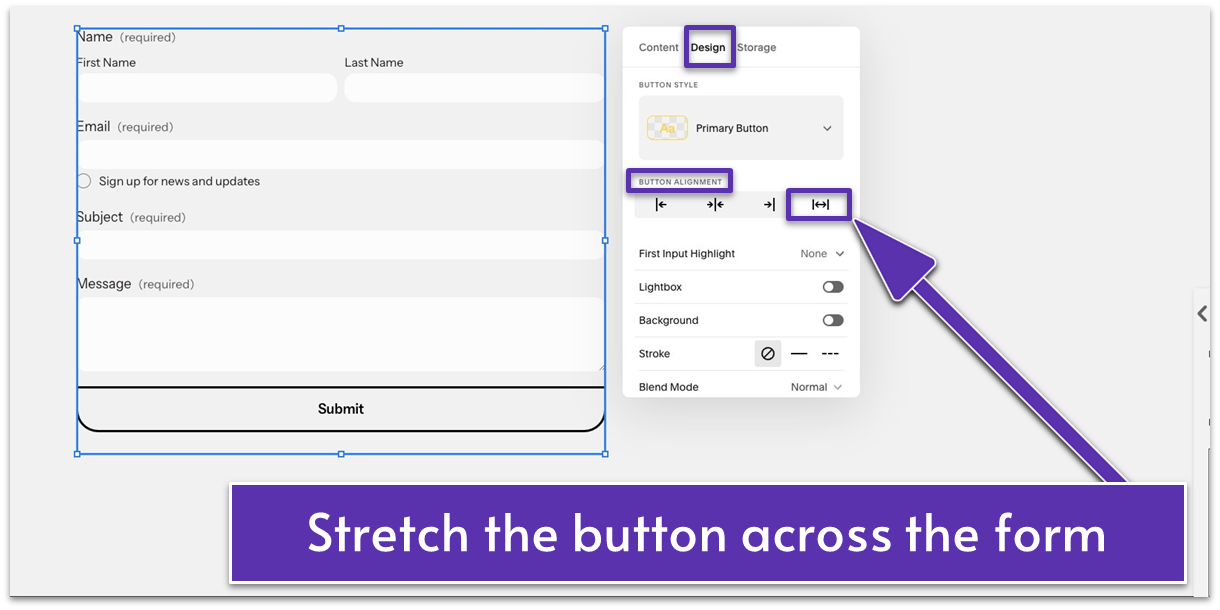
- Go back to the editing panel and go to the “Design” tab.
- You’ll see four icons under “Button Alignment.” To stretch the “Submit” button across the form as we did on our website, click the last icon ( ).
2.4 Connect an Email To Receive Website Submissions
Get an email with your business domain, like [email protected], to appear professional in the eyes of your visitors. This should be a dedicated email you’ll use solely for client interactions – you don’t want your client messages to get buried under sale alerts from your favorite online store.
Once you create an email with your business domain, you’ll need to add it to your Contact page.
Here’s how:
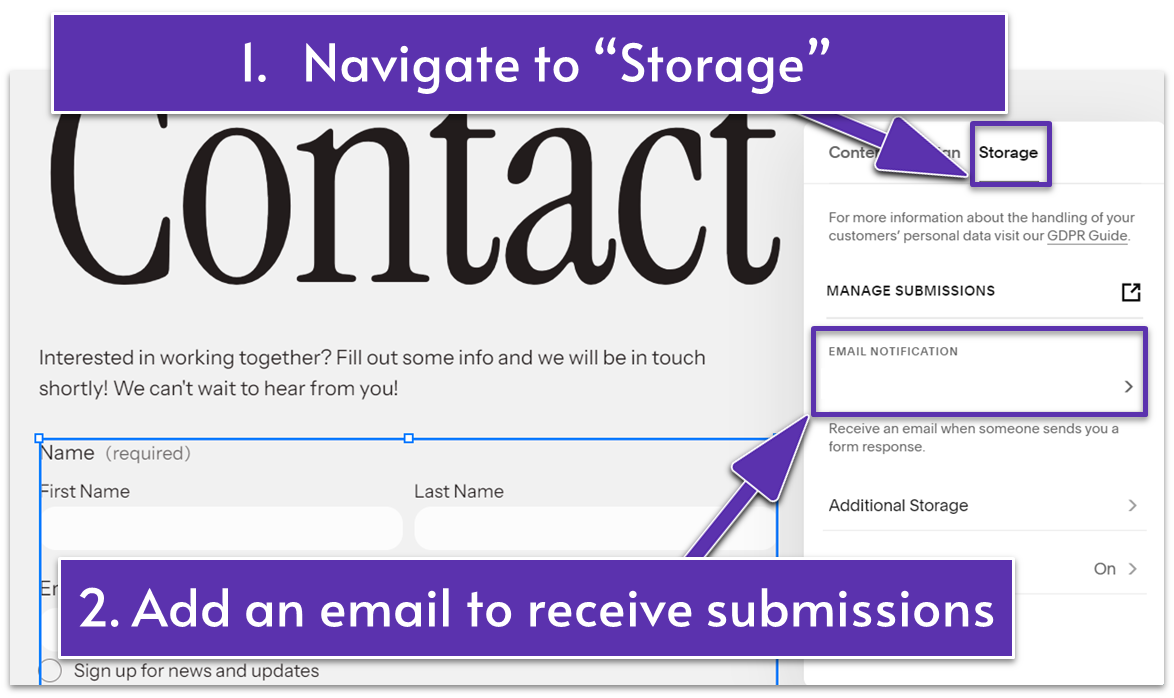
- Double-click your form to open the editing panel and click the “Storage” tab.
- Click the “Email Notification” field and type your business email address.
Congrats! You now have a fully functional contact form that can bring business straight to your mailbox.
Now, let’s jazz it up.
2.5 Add a Gallery Next to the Contact Form
Think of a gallery next to your contact form as a mini portfolio that showcases your work. You can also add logos of brands you’ve worked with, images of yourself and your team, or screenshots of work you’ve produced – whatever works best for your business. If you specialize in multiple areas like weddings, hospitality, or travel, make sure your gallery reflects your diverse talent and experience.
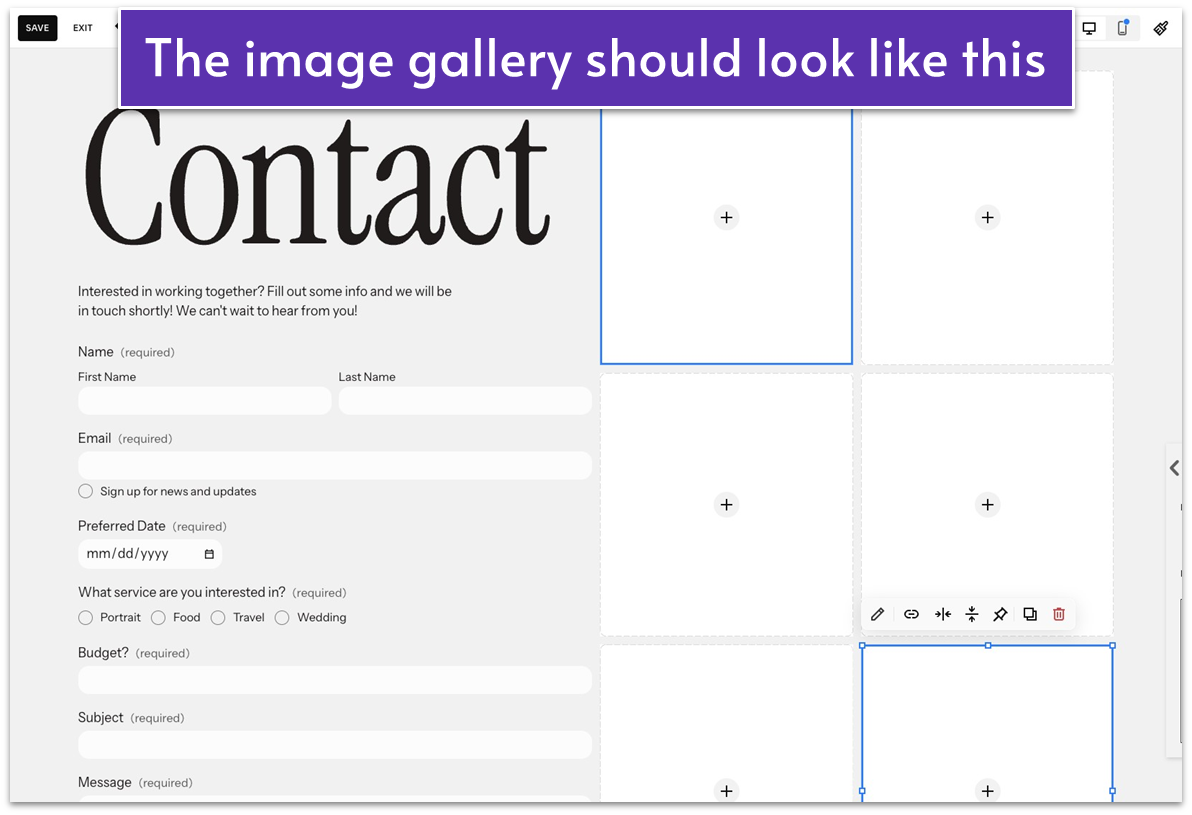
Step 1: Create a gallery with images
- Click “Add Block.”
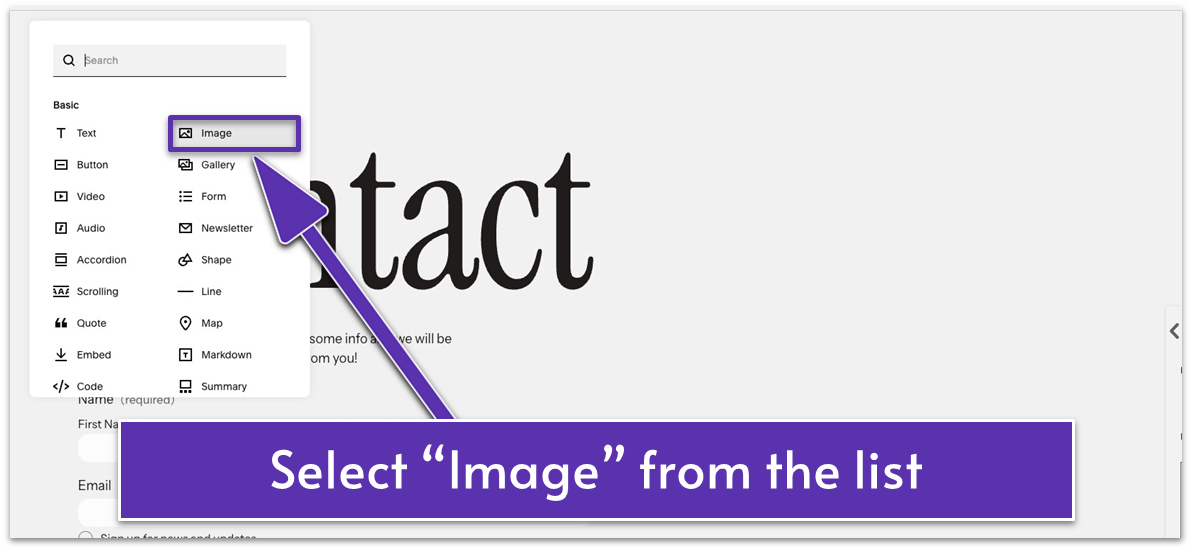
- Select “Image” from the list.
- Drag the image block to the right half of the section.
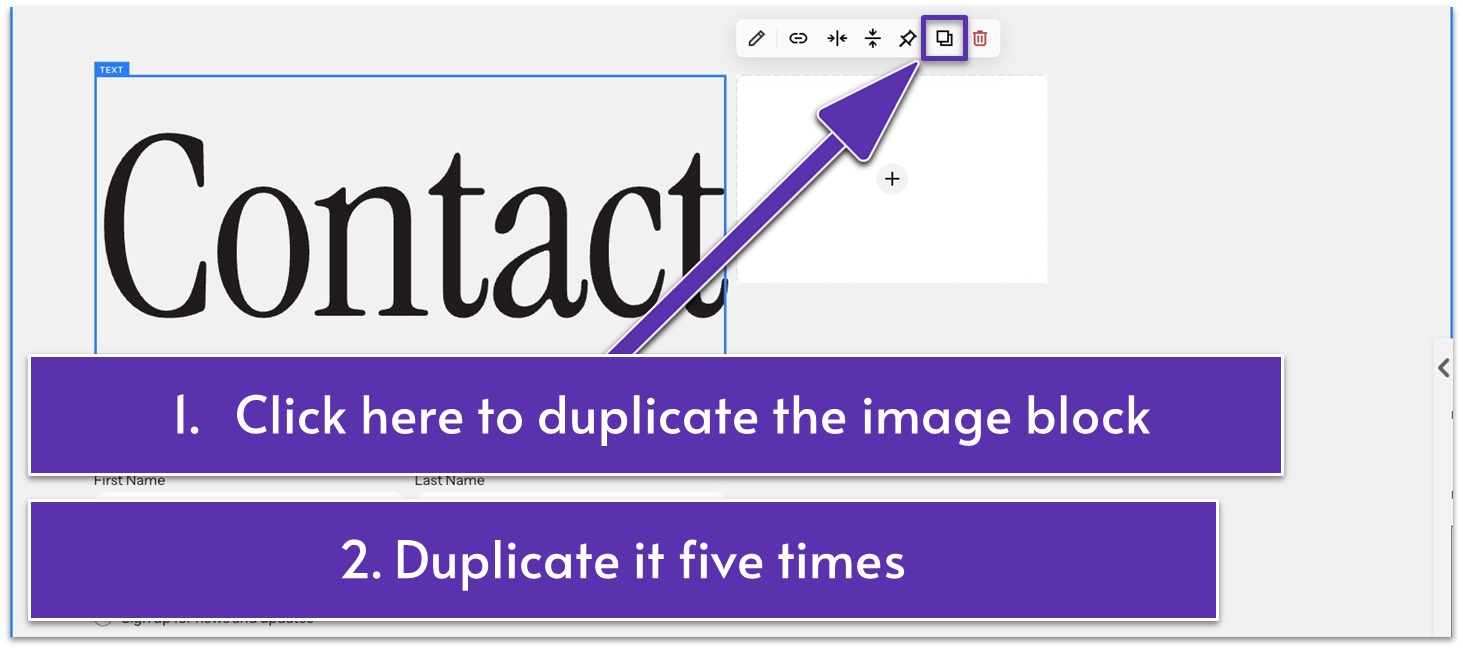
- Duplicate the image block by clicking five times. You need a total of six image blocks.
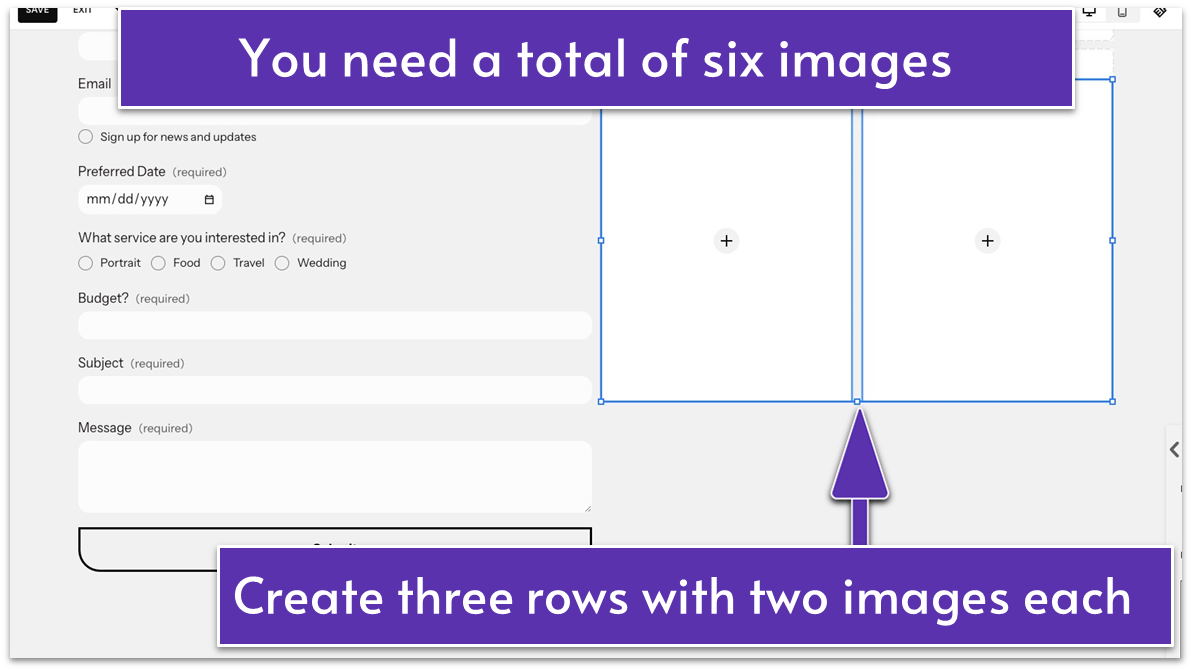
- Place two image blocks in a row. You need to create three rows with two images in each row.
Step 2: Upload the images
There are two ways to upload an image in Squarespace:

Option 1: Click the “+” sign in the middle of the image block.
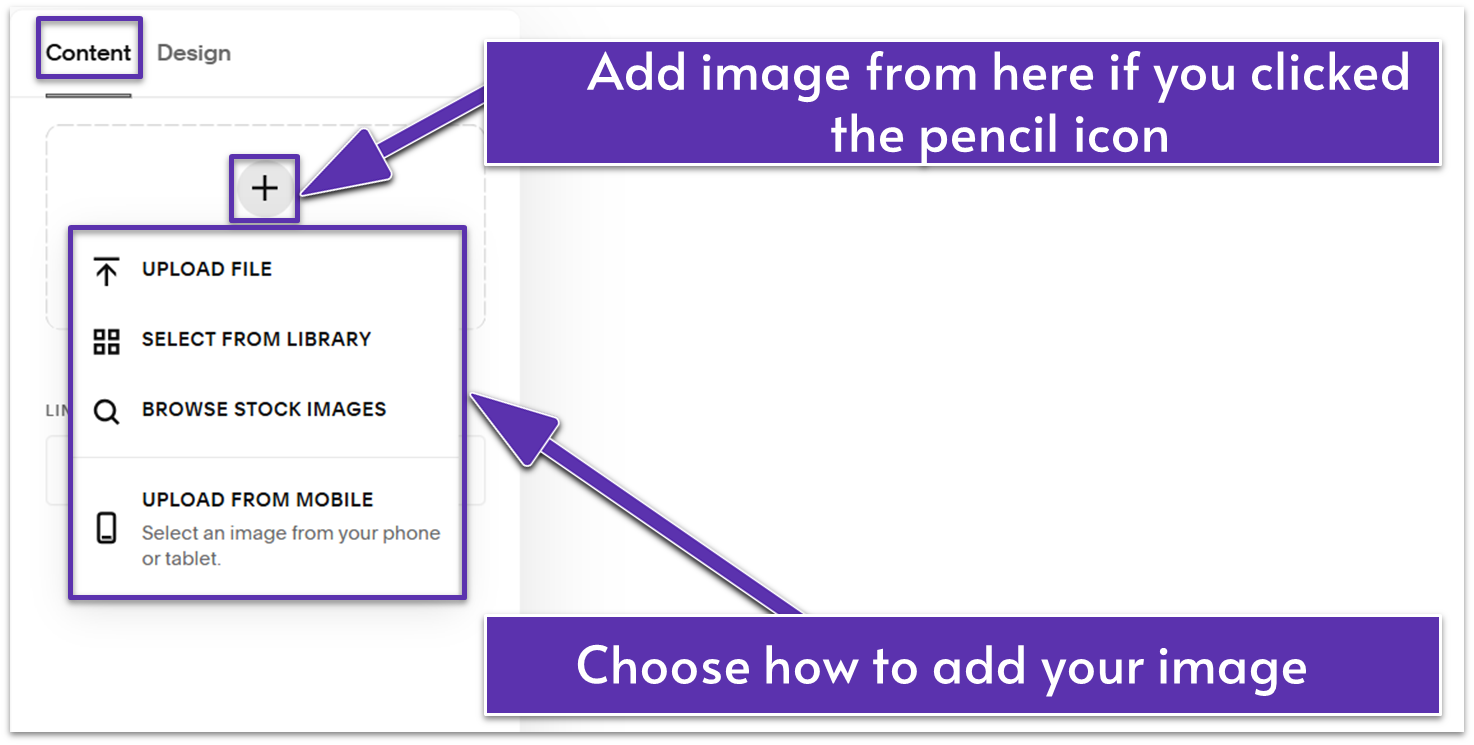
Option 2: Click the “Edit” pencil icon ( ) above the image block. Under the “Content” tab, click the “+” sign where it says “Add an Image.”
- Select how you want to add an image:
- “Upload File” to upload an image from your device
- “Select From Library” to add an image from your Squarespace library
- “Browse Stock Images” to source the image from Squarespace’s stock of free and premium images
- “Upload From Mobile” to upload an image from your phone or tablet
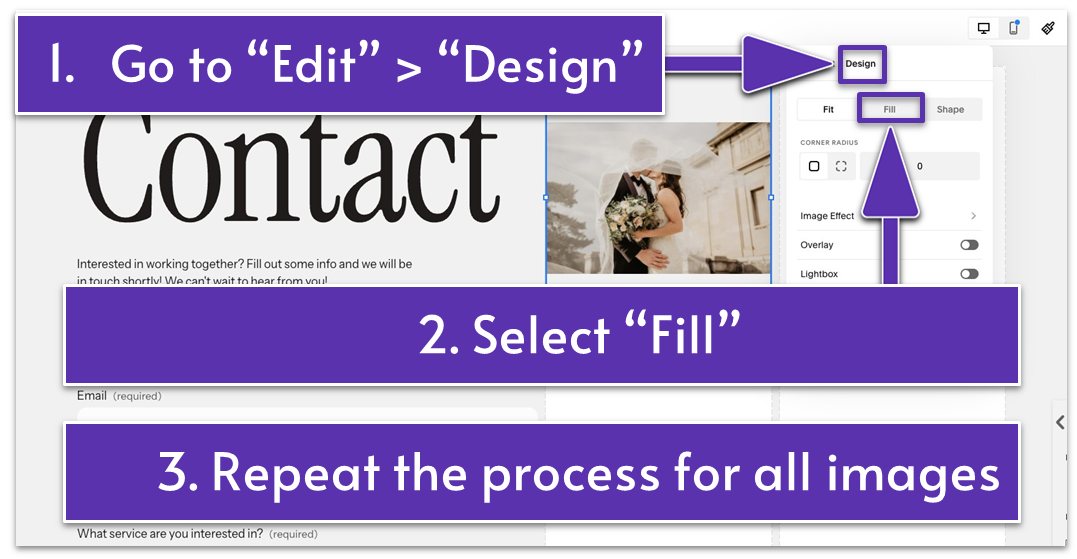
- Once you add your first image, click the pencil icon ( ) above it. Go to the “Design” tab.
- Select “Fill.”
- Repeat the process for all six images.

Step 3: Make final edits
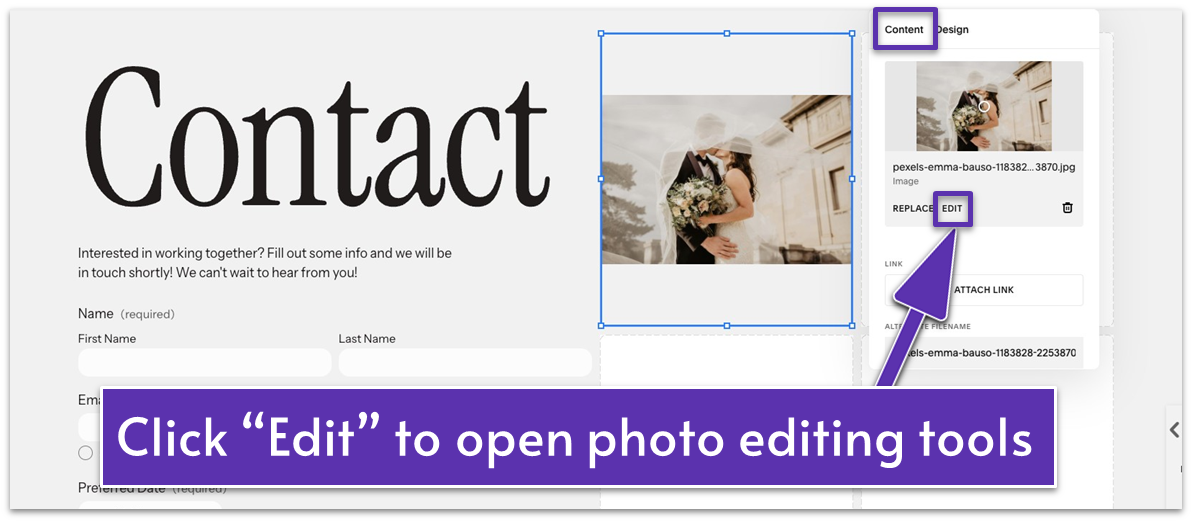
Squarespace has a built-in photo editing toolkit with basic photo settings like brightness, contrast, and saturation. To access it:
- Select an image you need to alter and crop.
- Click the pencil icon ( ) in the toolbar.
- Click “Edit” below the uploaded image in the “Content” tab.
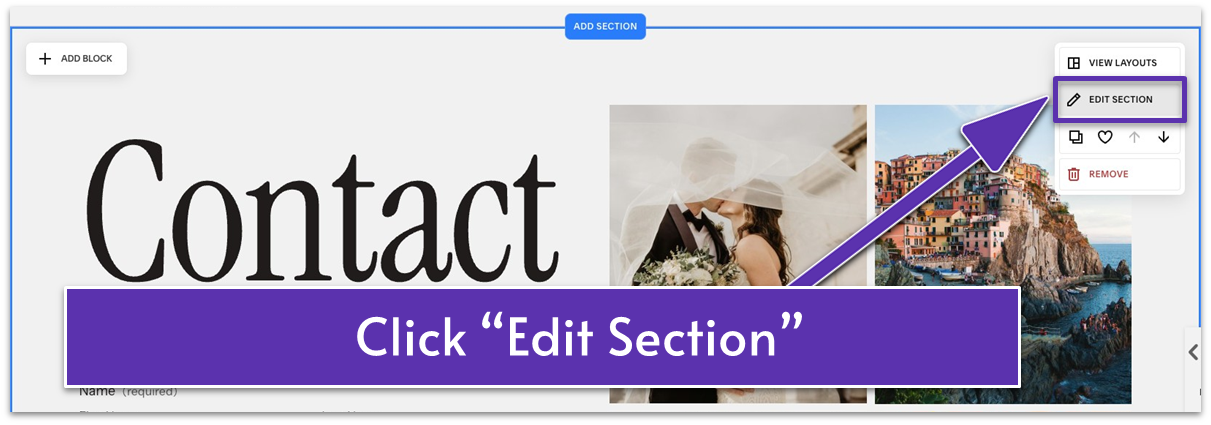
- Click “Edit Section.”
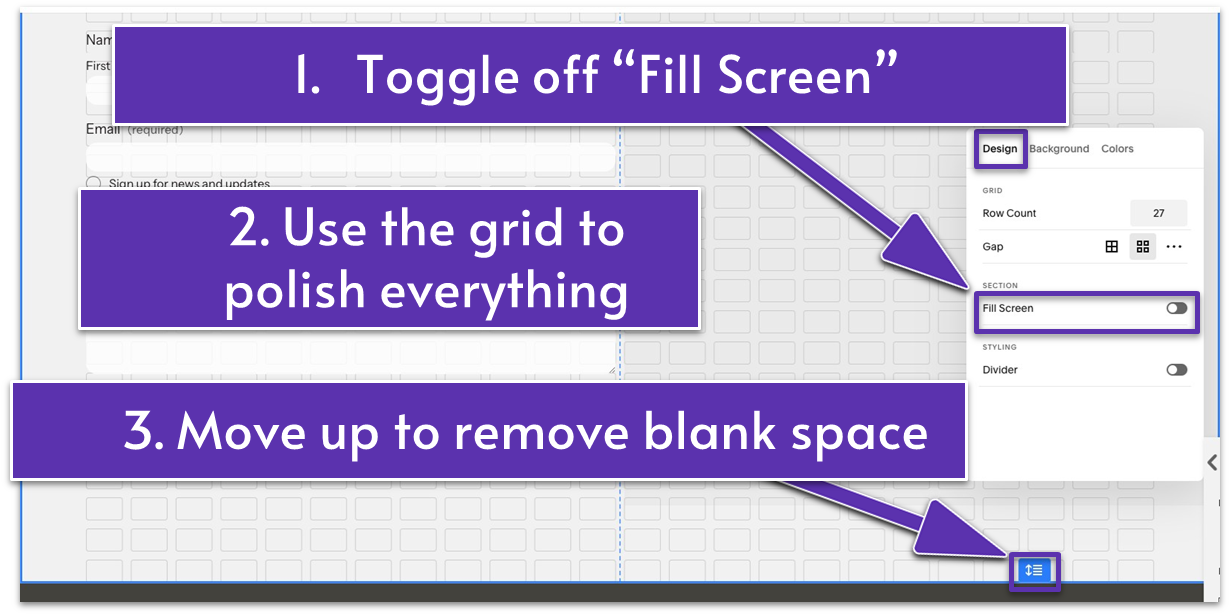
- Disable “Fill Screen”
Drag and drop the elements, using the grid as a guide to align them properly until you’re satisfied with the result. Play around with different settings to see what looks best, and tightly align elements to reduce unnecessary blank space. You’ll need to repeat this for every section on your website.
2.6 Optimize for Mobile
Some elements might not appear in the correct order, overlap, or get cut off in the mobile preview. That’s completely normal and pretty easy to fix in Squarespace. Check for these issues and fix them directly in the mobile preview.
Step 1: Launch “Mobile View”
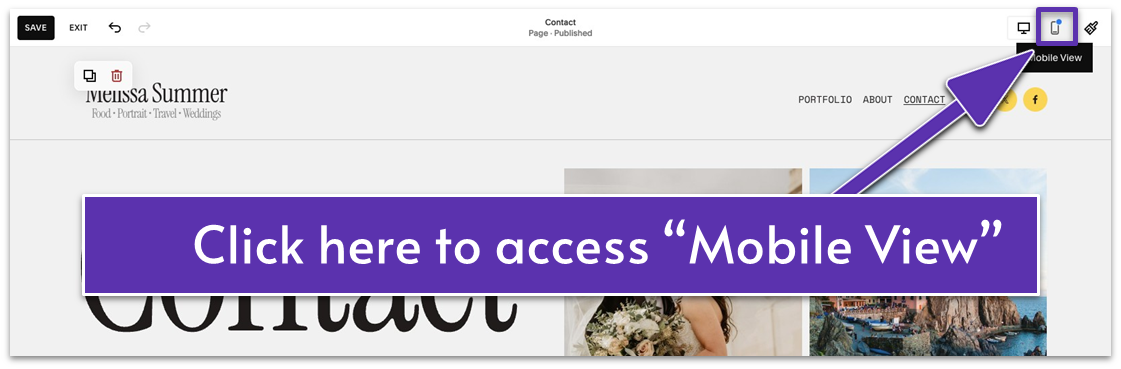
- Click the icon that looks like a mobile phone ( ) in the editor’s upper-right corner.
Step 2: Make adjustments for mobile
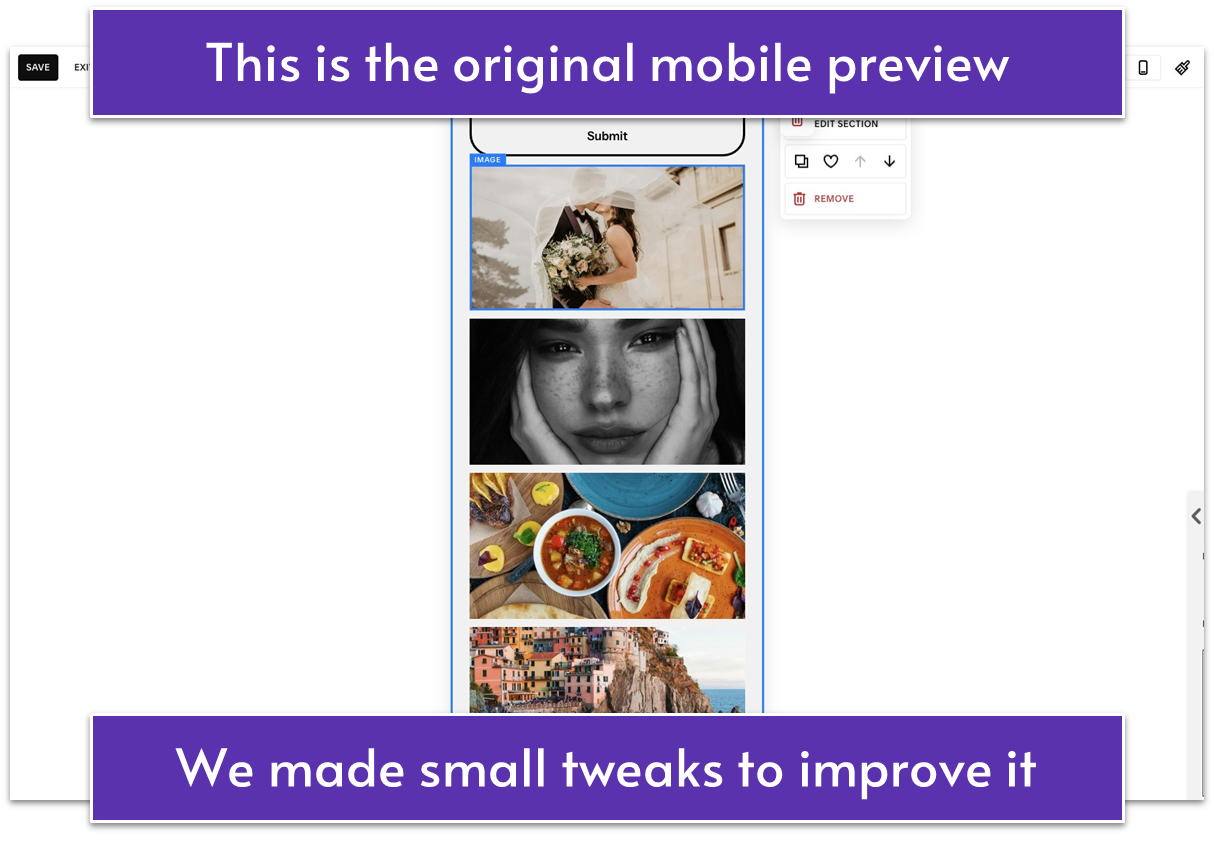
There isn’t anything wrong with the unedited mobile preview, but we wanted to shake things up to make it more appealing.
Here’s what we did:
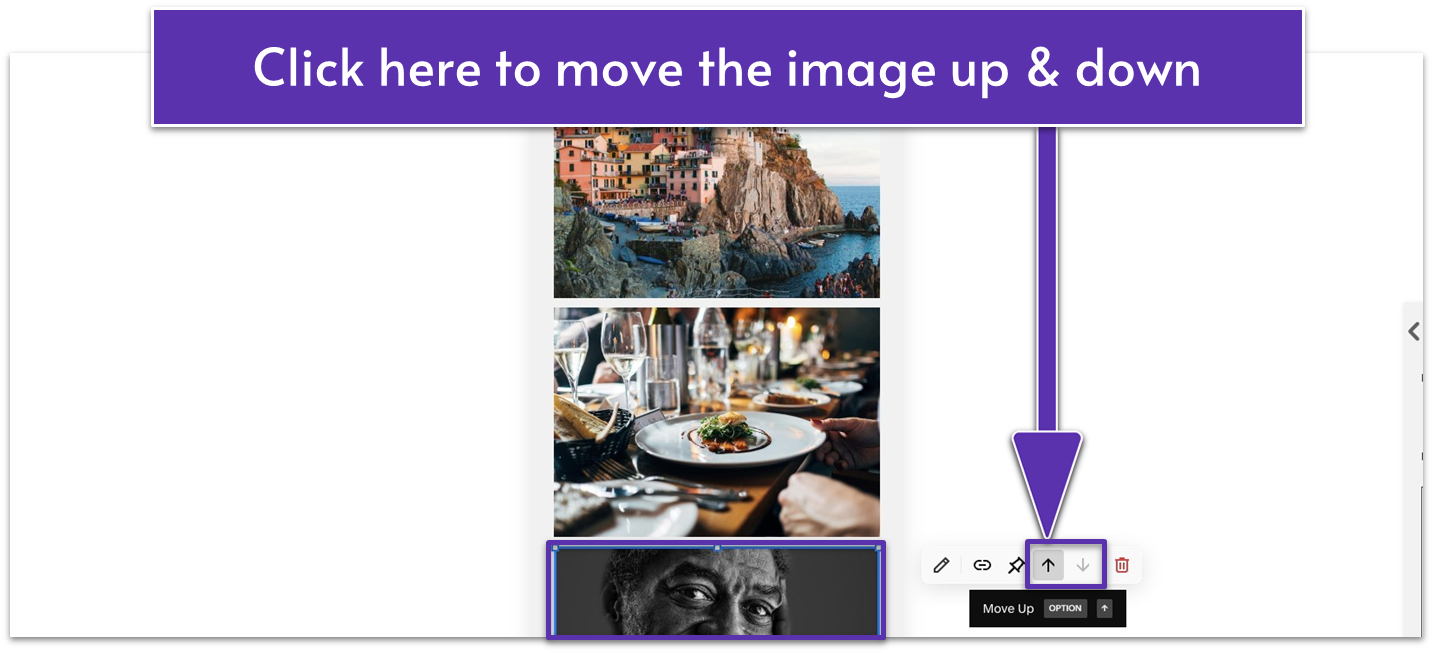
- To group images with similar visual styles, use the move icons ( and ) to organize them. We moved up the black-and-white image at the bottom of the gallery next to the first black-and-white image.
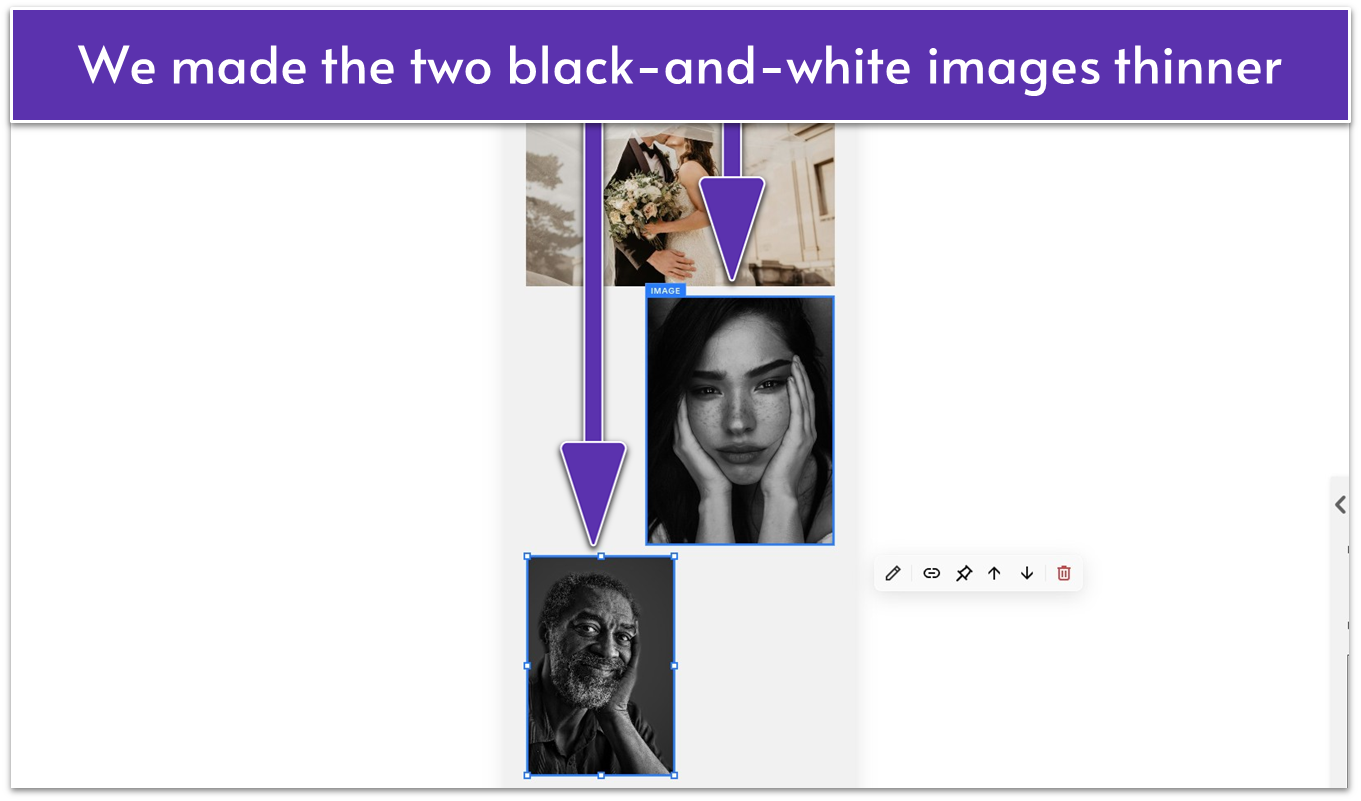
- Then, we made the images thinner so both could fit into one row.
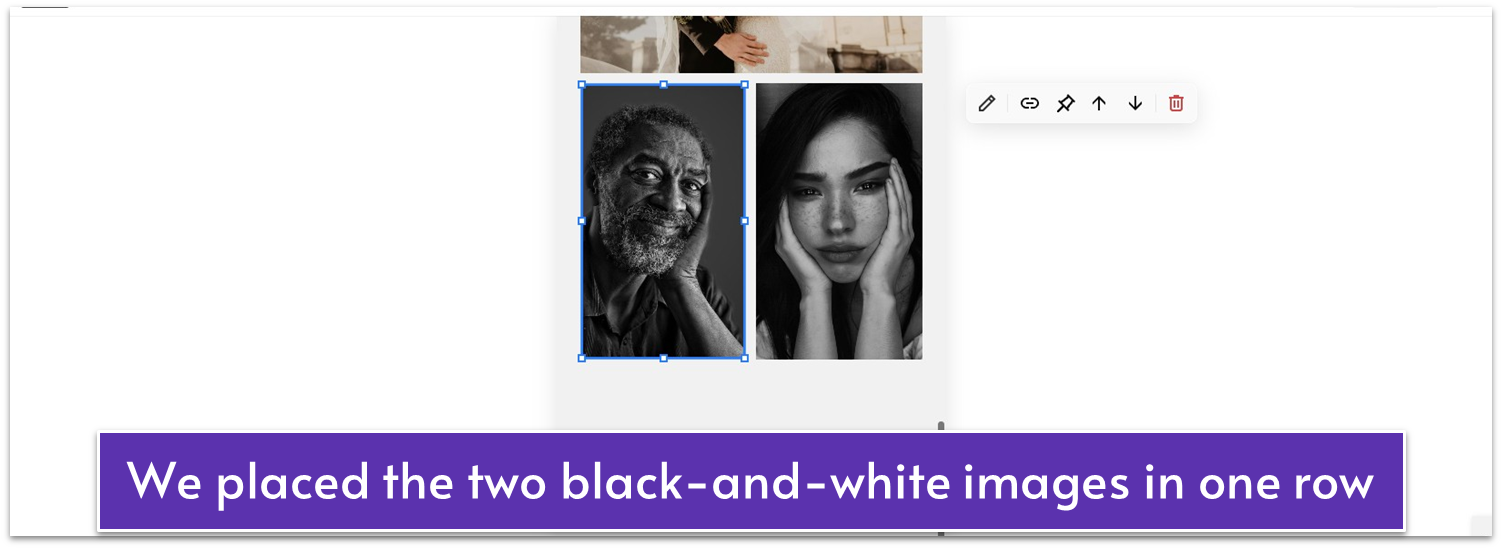
- We placed the black-and-white images next to each other.
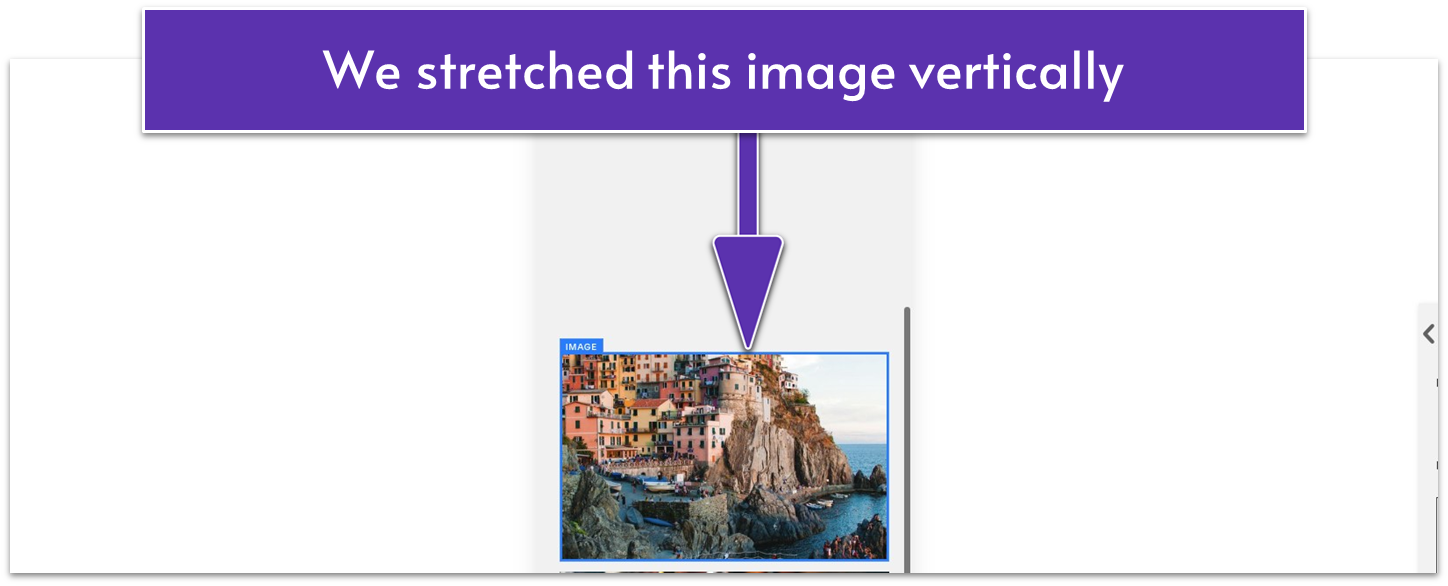
- We made one of the images longer to add more playfulness to the gallery. If you decide to do this, make sure you use an image with a vertical layout.
- Move up to remove unnecessary blank space.
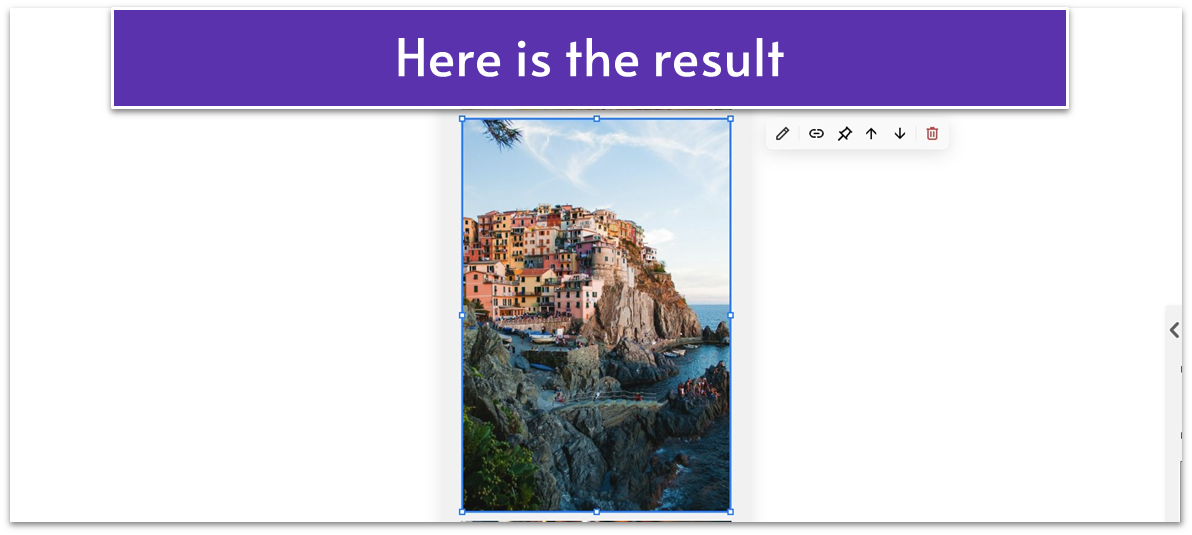
Here’s our mobile-optimized Contact page:

If you followed every step from our guide, that should be it. However, you might need to make different adjustments if you add or remove some elements. The process is pretty intuitive – simply tweak what looks off.
2.7 Save the Section
You may need to reuse some sections, like the contact form or testimonials, many times throughout your website. You can save these sections for future use, so you don’t have to rebuild them from scratch. This not only saves you time but ensures a consistent look throughout your site.
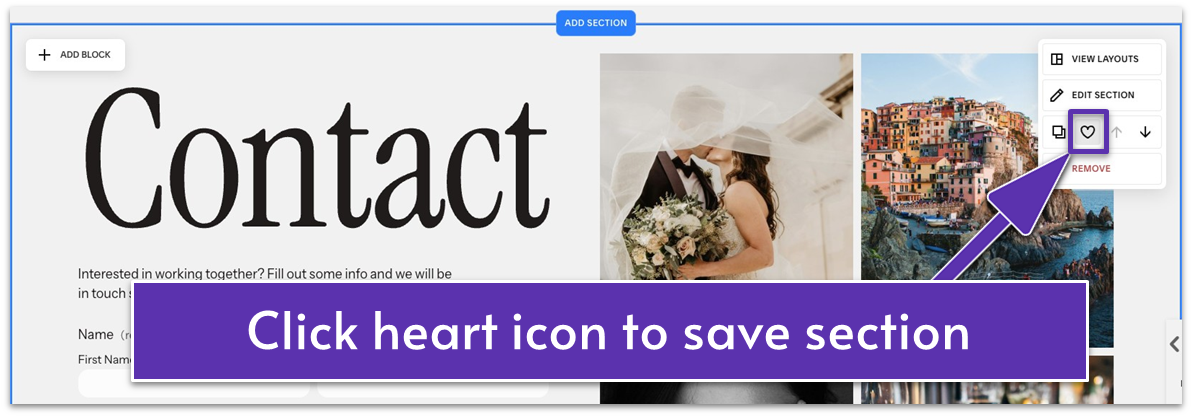
- Click outside the elements of the Contact section to reveal section buttons.
- Hit the heart icon ( ) to save it.
Now, let’s save your entire progress so far!
2.8 Save Your Contact Page
Just one tiny step, and you can go off to your next adventure – your About page. You’ll need to repeat this step whenever you finalize a page design – or need a break to cuddle with your cat.
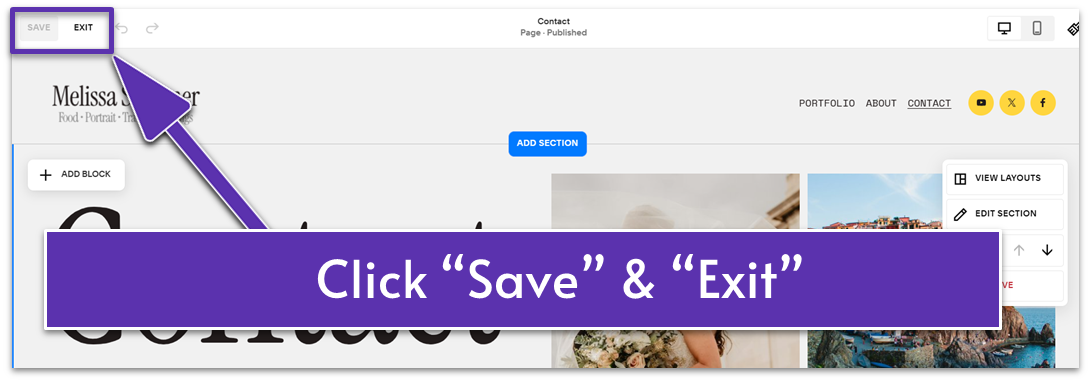
- You’ll see two buttons in your upper left corner. Click the “Save” button first.
- Then click “Exit” to leave the page.
Your Contact page is ready to receive visitor submissions. Now, let’s apply what you’ve learned to create your About page. Things will only get easier from now on!
Ready?
