

You might wonder why we’re starting with the contact page instead of the Homepage. It might seem counterintuitive, but the contact page is actually much easier to build, so it makes for an easier start.
We want you to get familiar with Squarespace before tackling the more complex pages. By the time we get to the Homepage, you’ll know how Squarespace works and use it with ease.
Without further ado, let’s begin!
Select Your Site Styles
We covered how to set your site styles in Squarespace in our Quick Prep Guide. This is entirely up to you and your brand aesthetic. Remember, you can always go back and change them at any time.
If you want to follow exactly what we’ve done on our site, we’ve chosen the following:
Fonts (Headings)
- Family: Poppins
- Weight: 600
- Style: Normal
- Letter height: 1.2 em
- Letter spacing: -0.04 em
- Text transform: None
- Size: Heading 1 – 4.6 rem, Heading 2 – 3.2 rem, Heading 3 – 2.4 rem, Heading 4 – 1.8 rem
Fonts (Paragraphs and Miscellaneous)
- Family: Outfit
- Weight: 400
- Style: Normal
- Letter height: 1.5em
- Letter spacing: 0 em
- Text transform: None
- Size: Paragraph – 1.4 rem, Paragraph 2 – 1 rem, Paragraph 3 – 0.8 rem, Miscellaneous – 1 rem
Fonts (Buttons)
- Family: Poppins
- Weight: 600
- Style: Normal
- Letter Spacing: 0em
- Text Transform: None
- Size: primary and secondary – 1 rem, Tertiary – 0.9 rem
Main Color Palette
- HEX #FFFFFF (white)
- HEX #DDE4E3
- HEX #475C58
- HEX #243756
- HEX #000000 (black)
Squarespace will create ten color themes using your main color palette that you can further customize.
As part of your site styles, you also have to choose the design of your buttons and form fields. We went for a pill shape for primary and secondary buttons and a rounded rectangle for tertiary buttons. We also selected a rounded rectangle form for our form fields. Lastly, we used Flex-style animation at a fast speed.
Now, let’s get to building your Contact page!
2.1 Add a New Page
Squarespace offers templates for pages like Blog, Store, and Portfolio. You can also choose from ready-made designer page layouts, which are great if you want to get online faster and simplify the building process.
However, we’ll show you that starting from scratch in Squarespace is not nearly as intimidating as it may sound. We’ll start with a blank page and guide you through every step – from a blank canvas to a unique page that fully aligns with your business goals.
Step 1: Navigate to the Pages menu
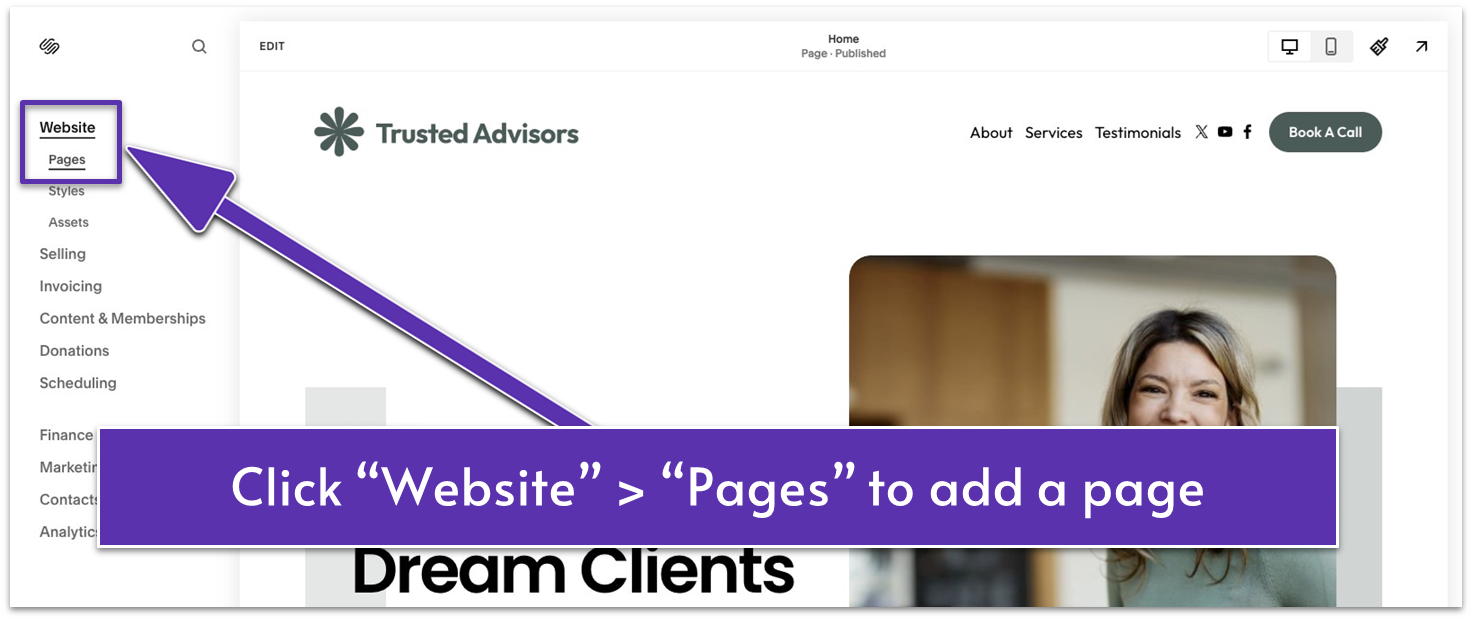
- On the Squarespace editor’s left sidebar, below Website, you’ll see Pages. Open the Pages menu to add a new page.
Step 2: Add a Not Linked blank page
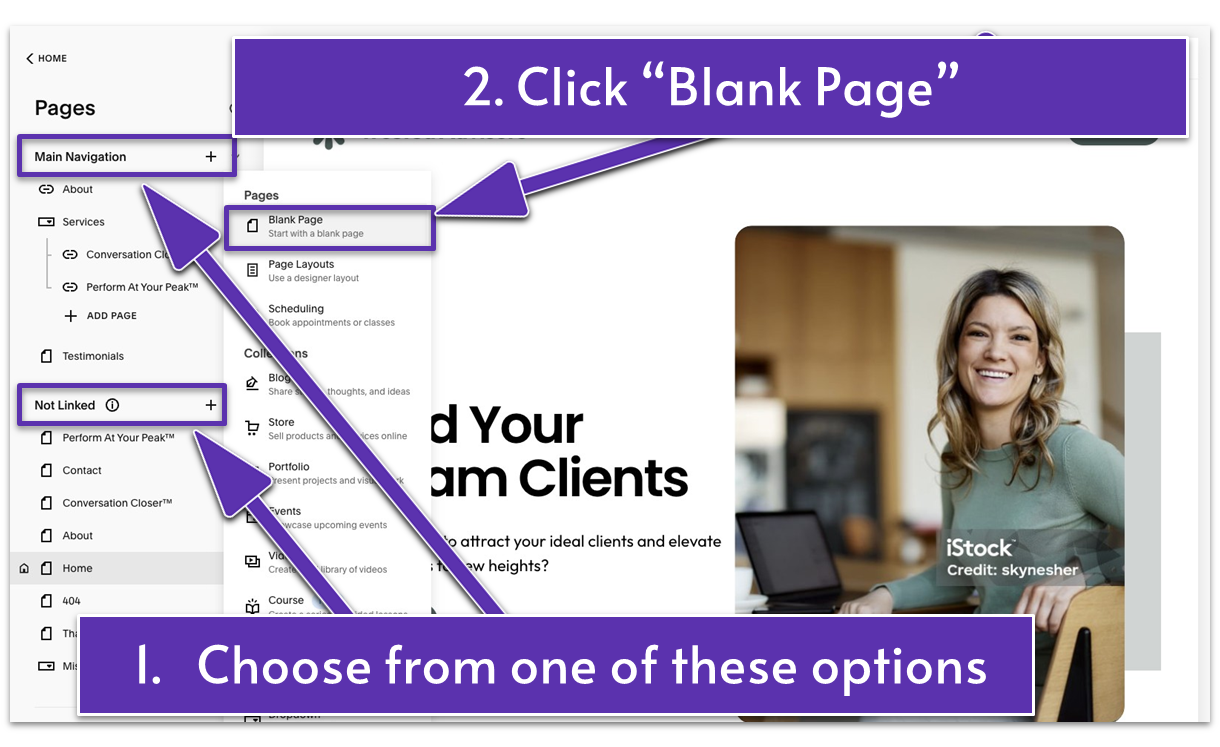
- For this contact page, we’ll select Blank Page from the Not Linked section, meaning the page won’t appear in the website’s main navigation bar. Click on the plus sign next to Not Linked to add a new blank page.
- If you want a page to appear in the main navigation – that’s the top menu on the website – add it from the Main Navigation menu. You can always move your pages around at a later stage.
Step 3: Name your Contact page
- The page you just added will appear as New Page in the Not Linked menu.
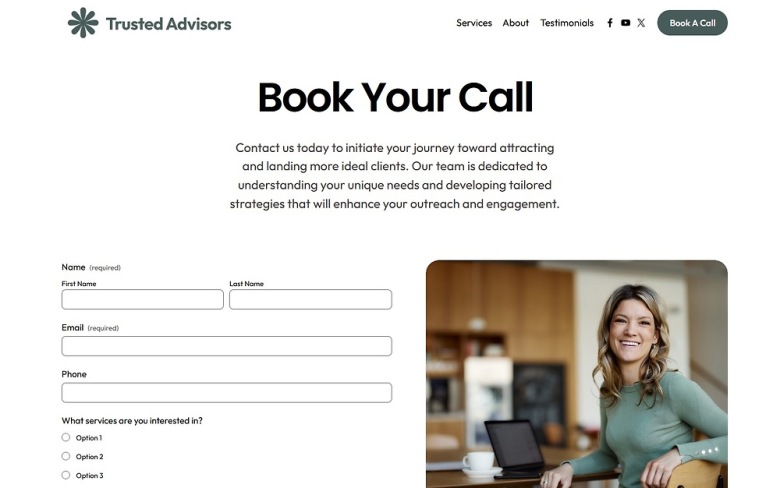
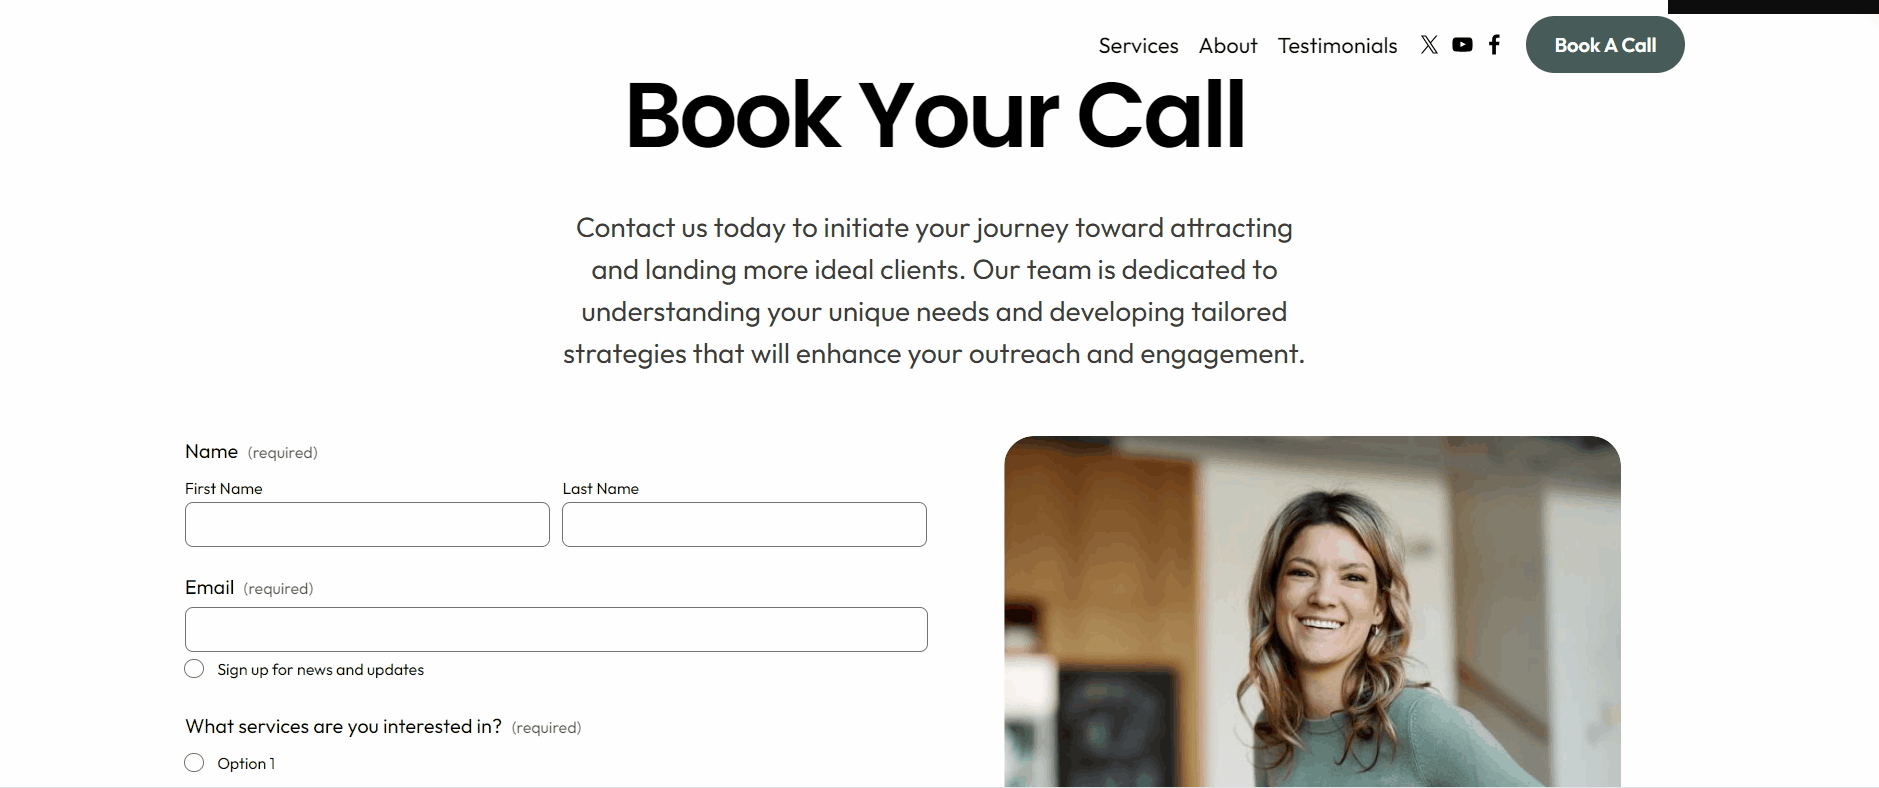
- Double-click on New Page to rename it as desired. For our website, we’ll name the Contact page Book Your Call.

- You’ll be repeating this process for every page you want to add to your website
Now we have the basics sorted, it’s time to make this page truly yours!
2.2 Add Text to the Contact Page
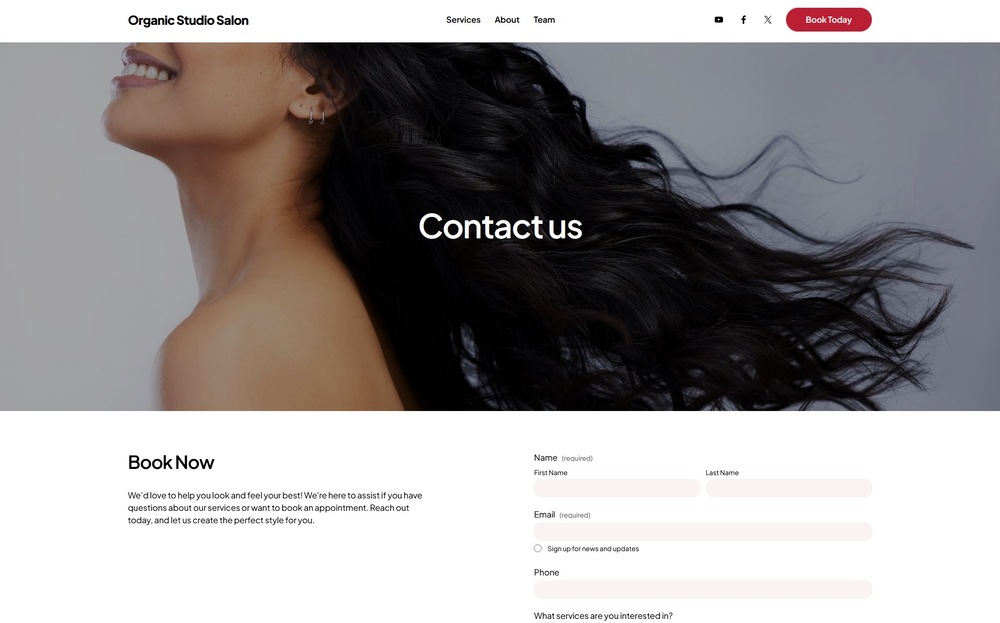
Your contact page needs to include a contact form and preferably multiple ways customers can reach you (e.g., phone, email address, physical location, social media accounts). In addition, you’d want to include a short introduction that highlights your expertise and a compelling call to action – a brief message that encourages your reader to take a desired action (e.g., “contact us,” “book a demo”).
Step 1: Click Edit to start designing your page

- Click on the Book Your Call Contact page under the Not Linked section.
- Then click Edit on the top-left corner of the page preview to open the page editor.
Step 2: Add your first section
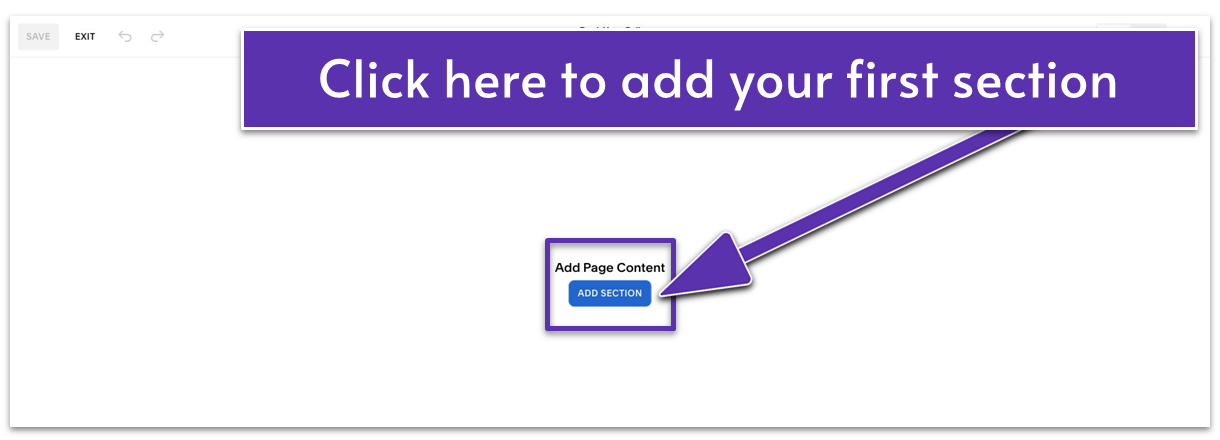
- In the middle of the page where you’ll see Add Page Content, click the Add Section button – a menu with options will pop up.
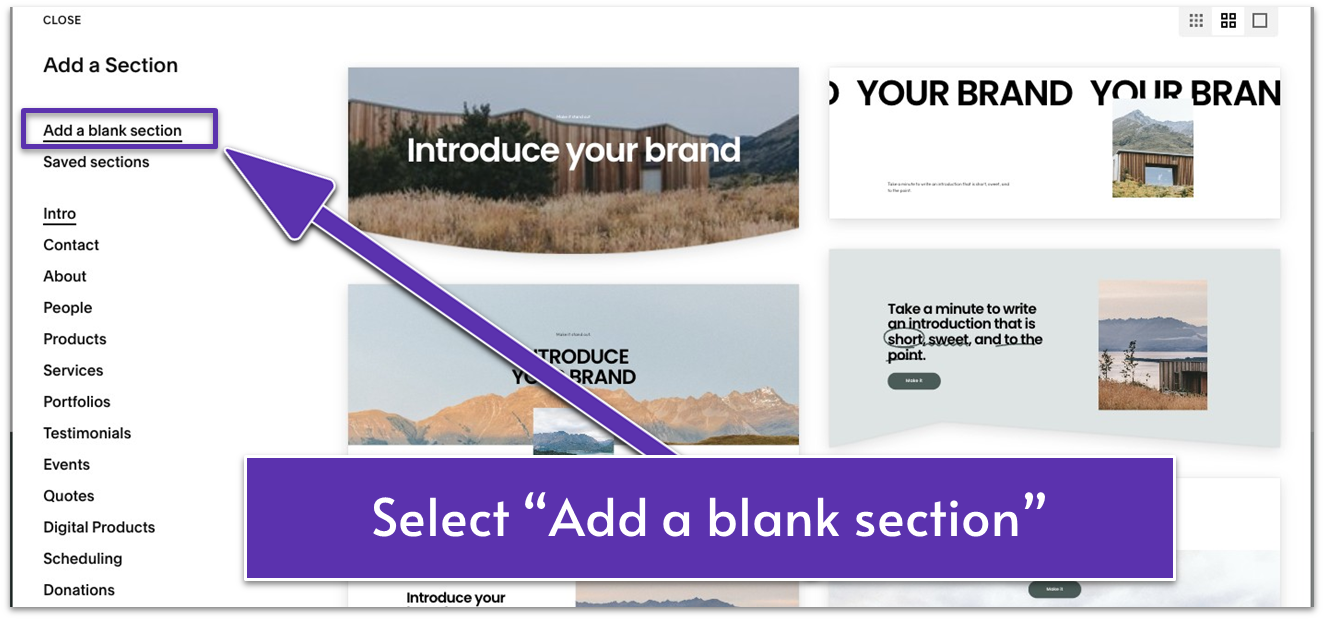
- Select Add a Blank Section from that menu.
Step 3: Add a text block
- Hover over the blank section to reveal editing buttons.
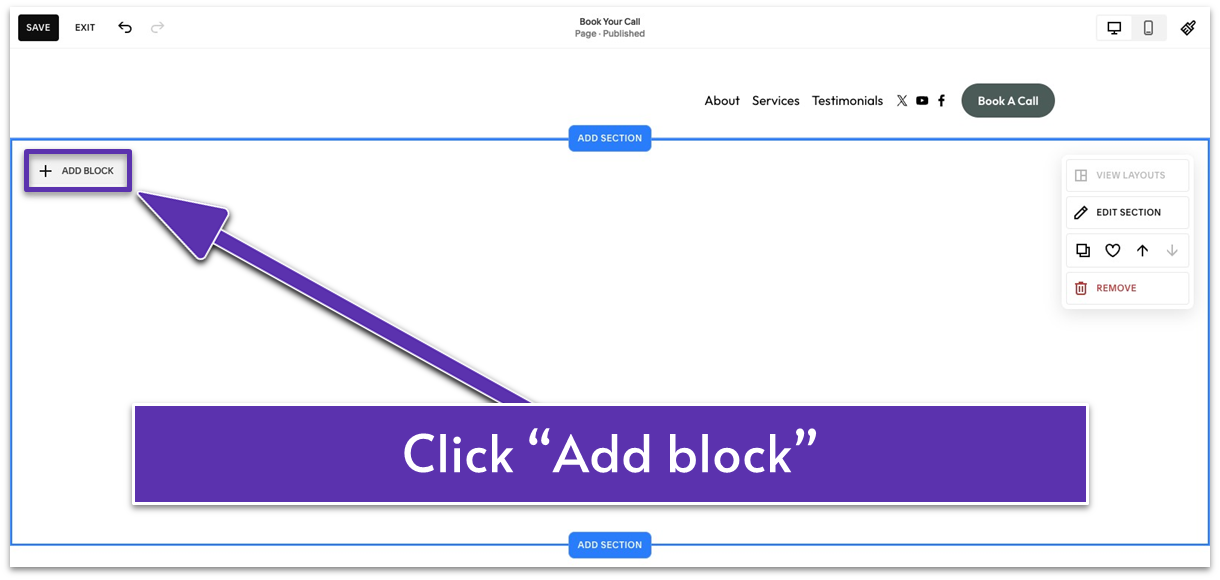
- Click Add Block.
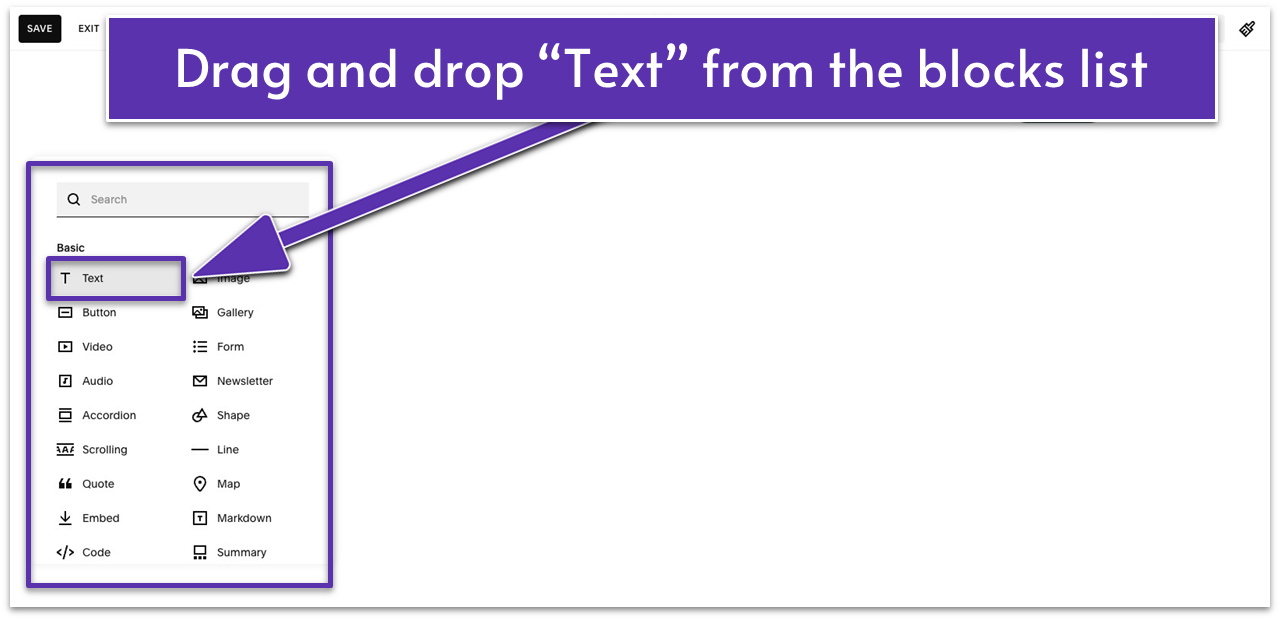
- Drag the Text block and drop it to the middle of the section.
Step 4: Adding a title to the Contact page
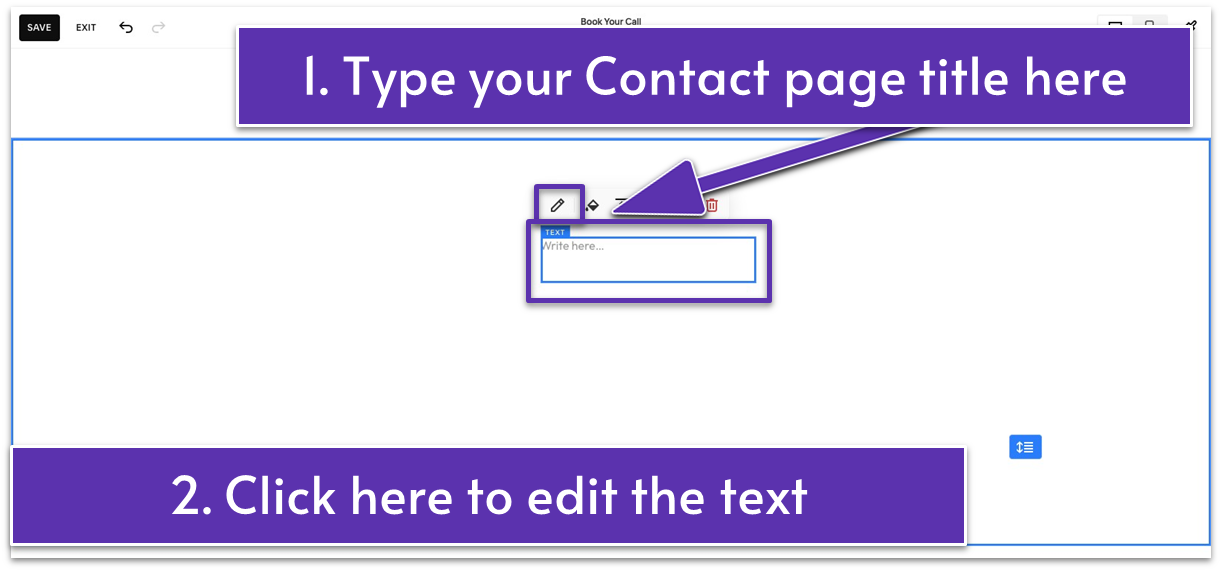
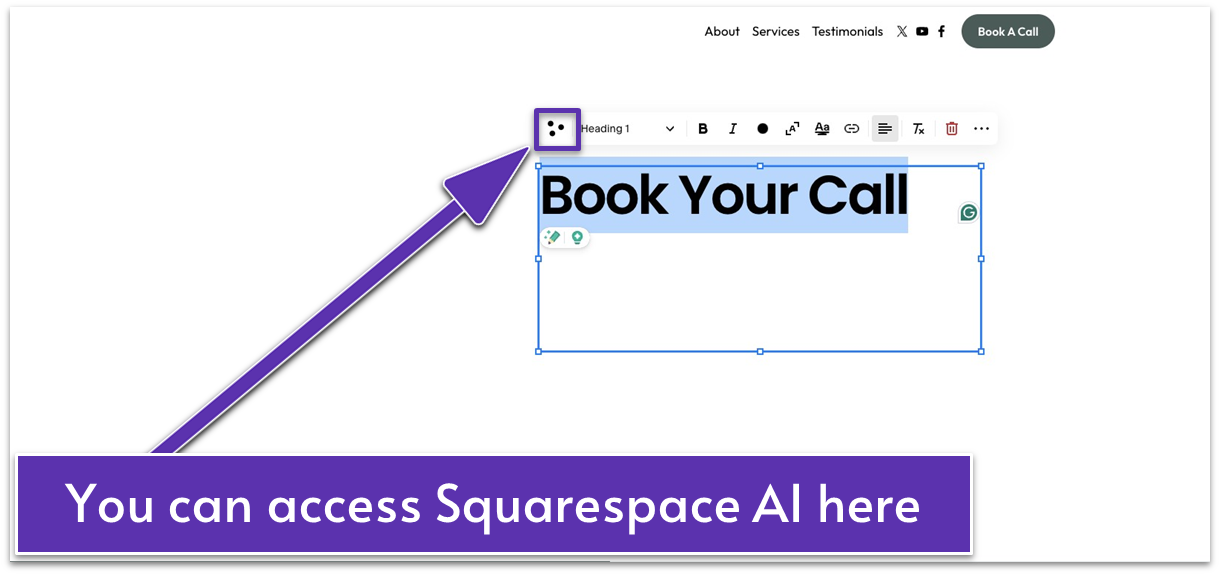
- Write the title of the contact page in the text block – in our case, Book Your Call.
- Click “Edits” (the pencil icon ) to open the text formatting toolbar above the text box. The toolbar includes buttons for heading and paragraph styles, bold, italic, alignment, and more.
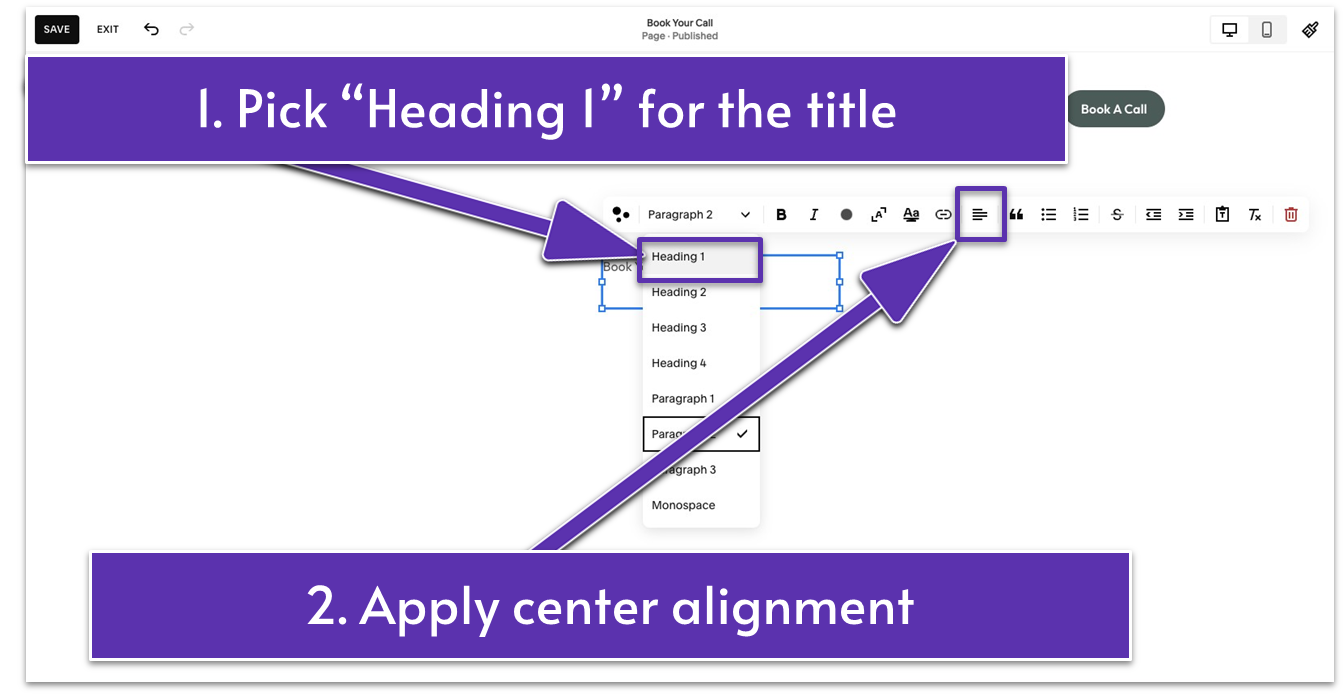
- Click the format drop-down menu and select Heading 1 to turn the text into your page title.
- Drag the text box’s corner points to resize it and make the title fit into one line.
- Go to Text Alignment and pick Center Align.
Step 5: Craft an effective Contact Us pitch
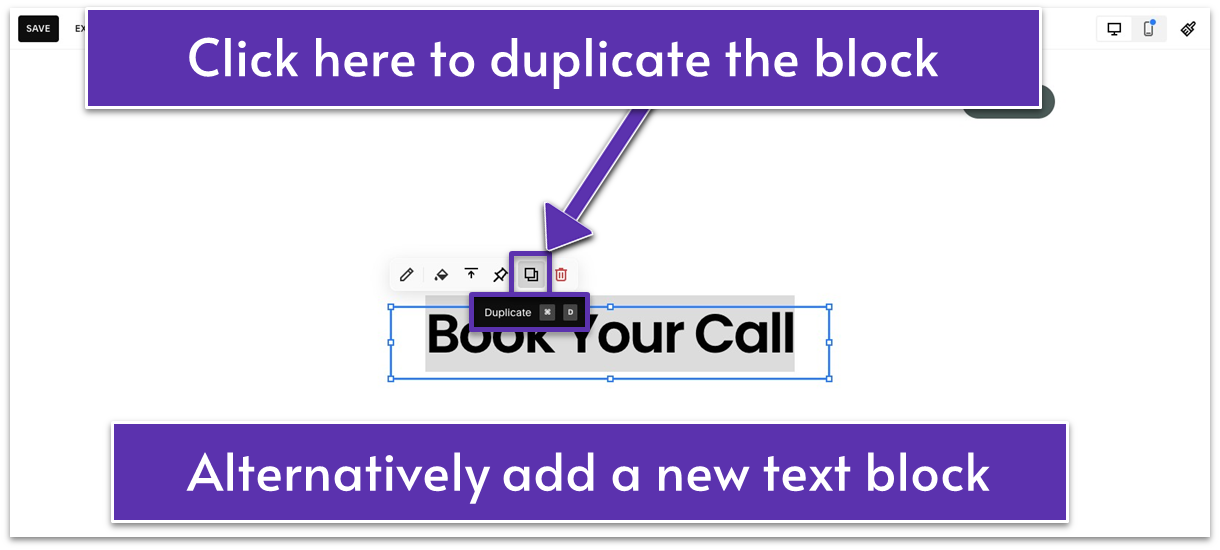
- Add another text block or duplicate the existing one.
- Place the text block below the title. Click the pencil icon and select Paragraph 1 from the format drop-down menu.
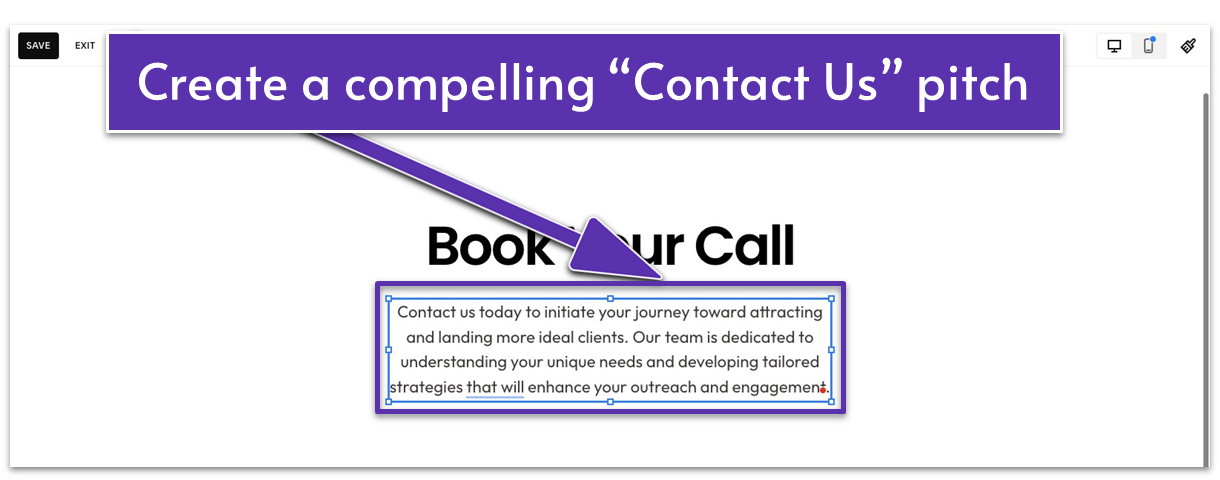
- Populate the new text block with a short pitch for visitors to contact you.
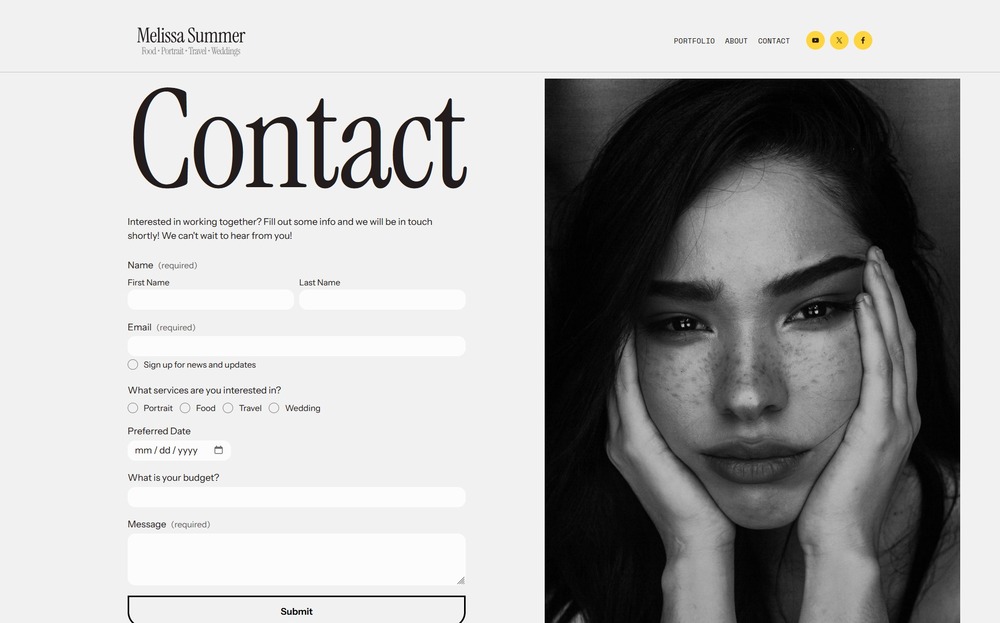
2.3 Add a Contact Form
It’s important that your website visitors can get in touch and ask you questions, especially if they’re thinking about hiring you. Adding a contact form is a quick and easy way to do this. Squarespace offers a contact form template you can add to your website with a click and customize to your needs. You’d want your contact form to be clearly laid out, featuring only essential fields in logical order.
Step 1: Add a form block
- Click Add Block.
- Select Form from the available options. A ready-made contact form will pop up.
Step 2: Customize your contact form
- Click the form to access the editing bar.
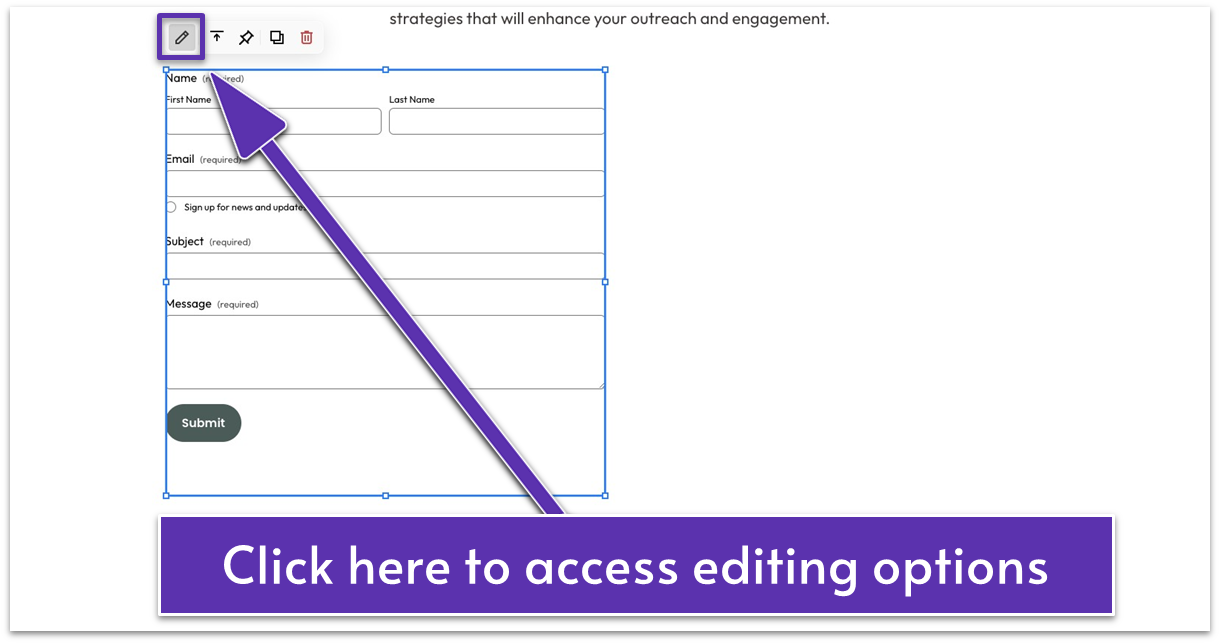
- Click the pencil icon.
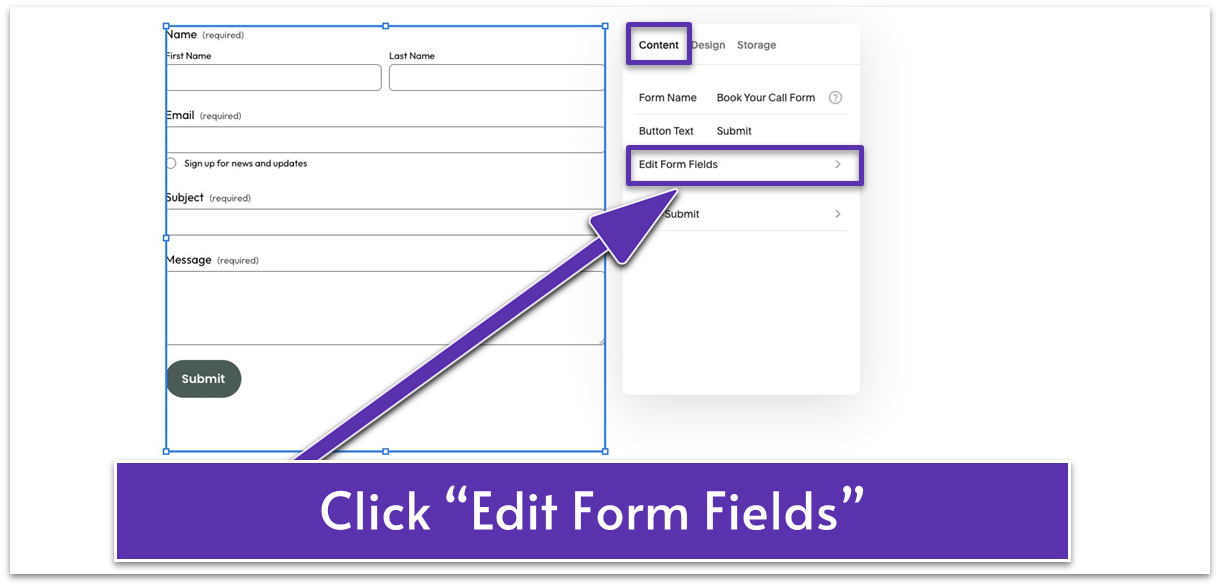
- In the Content tab, select Edit Form Fields to customize your contact form.
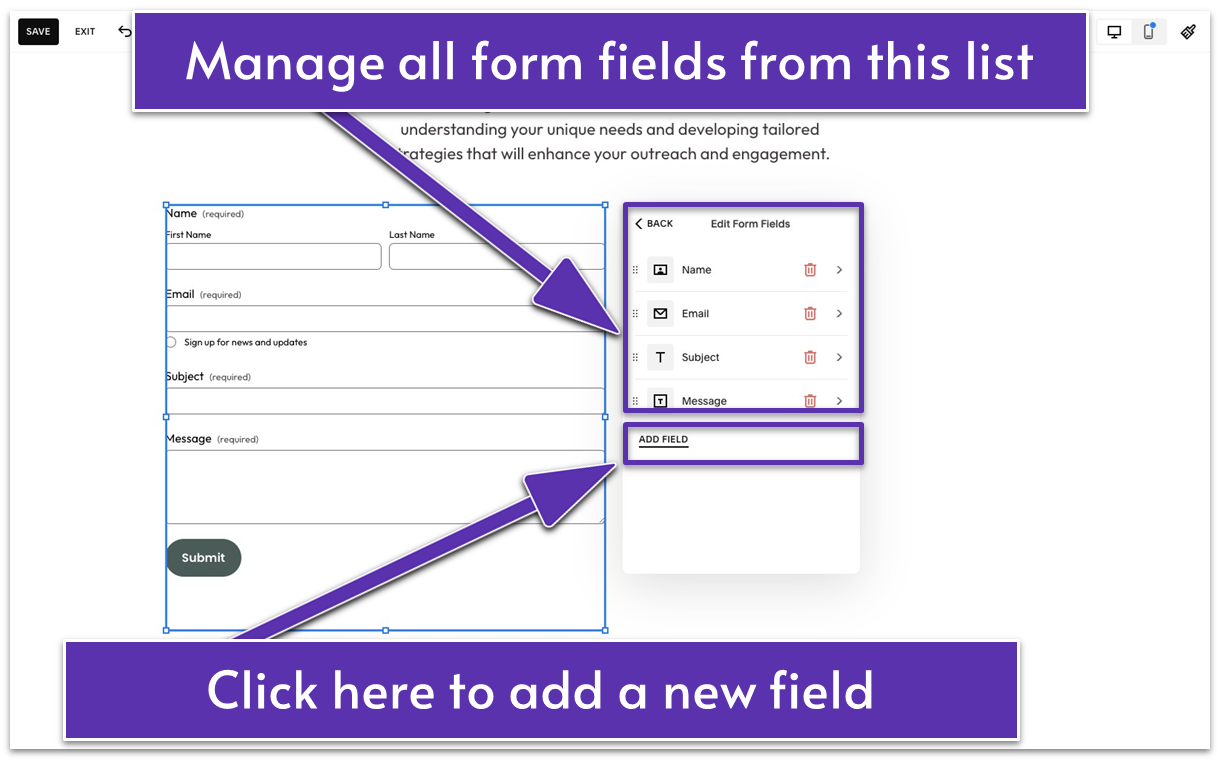
- You can manage your existing fields and add any new fields you might need from the Add Field list.
Step 3: Add and customize a new field
We’ll exemplify how to add and customize a new field with Radio. Here’s what you need to do:
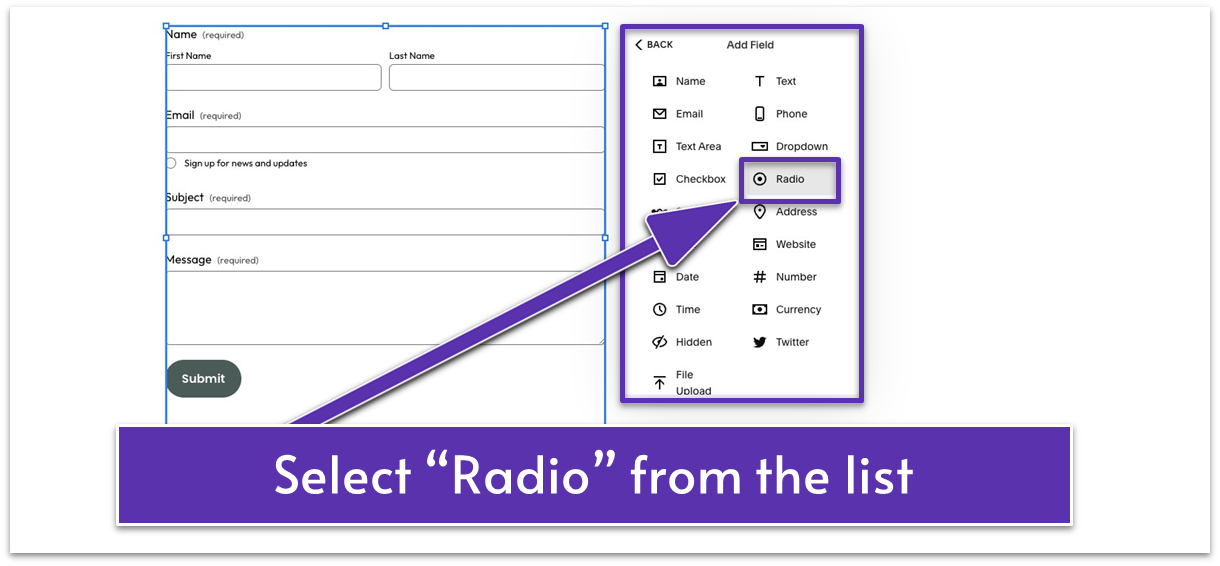
- Select Radio from the available options.
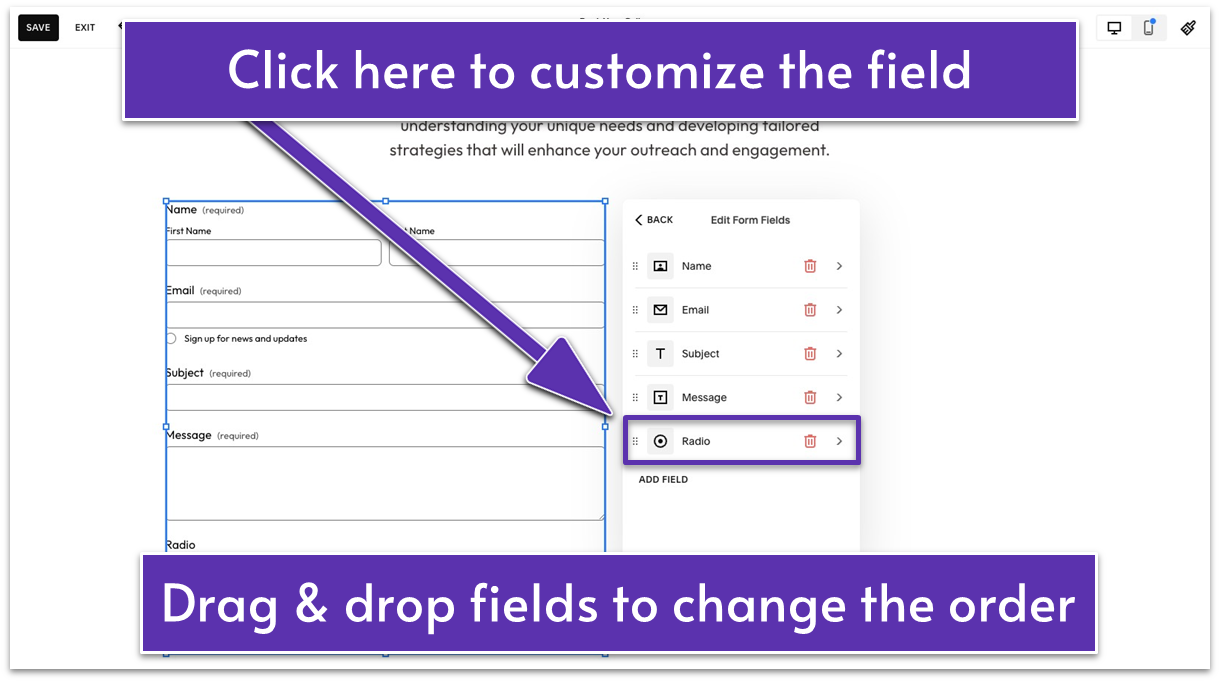
- Once added, click on Radio from the Edit Form Fields menu to customize it.
- You can change the order in which the fields appear on your form directly from Edit Form Fields menu. Simply drag and drop the fields in the desired order.
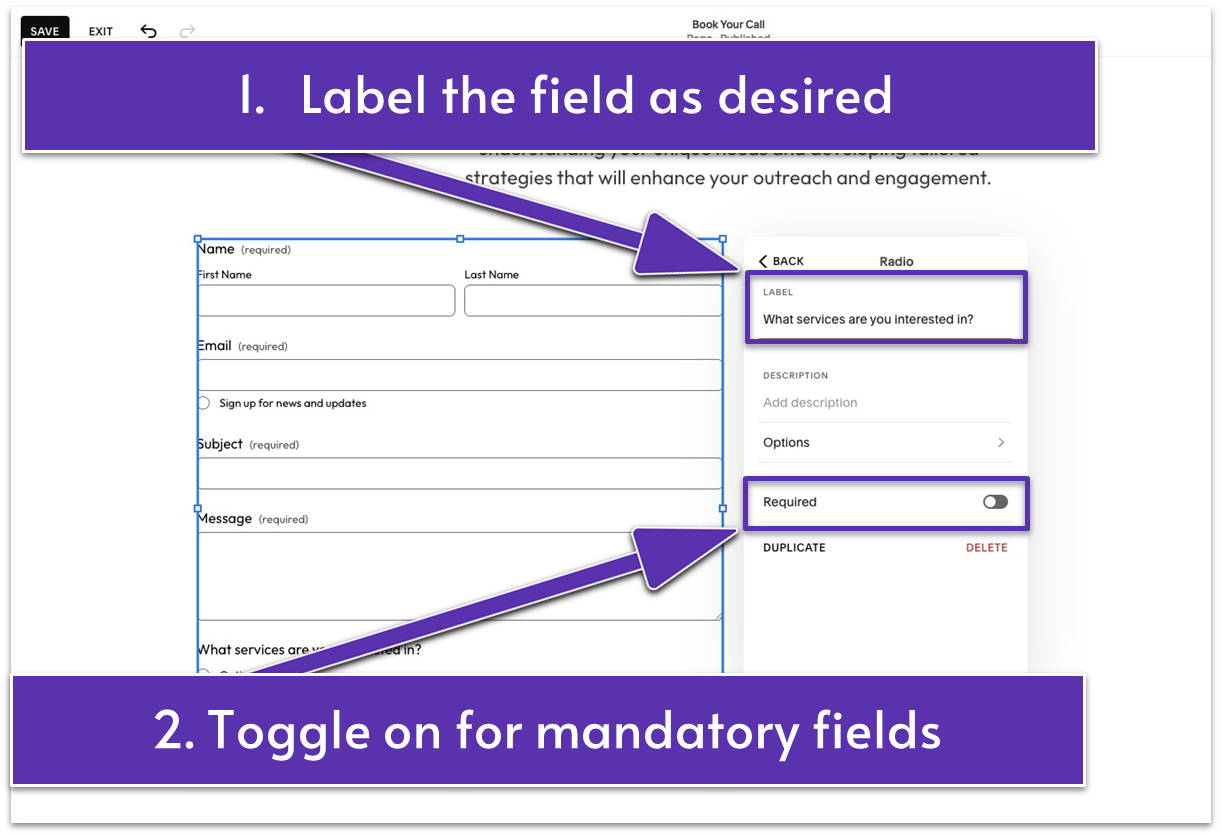
- Label it accordingly. For our website, we’ll label it What Services Are You Interested In?
- Toggle on the Required switch if you wish to make it a mandatory field that visitors can’t skip. Do this for every new field you want to make mandatory. This is on by default for the premade fields in the form template, so you’ll need to toggle it off if you wish to make any of these optional.
- Add a description if needed.
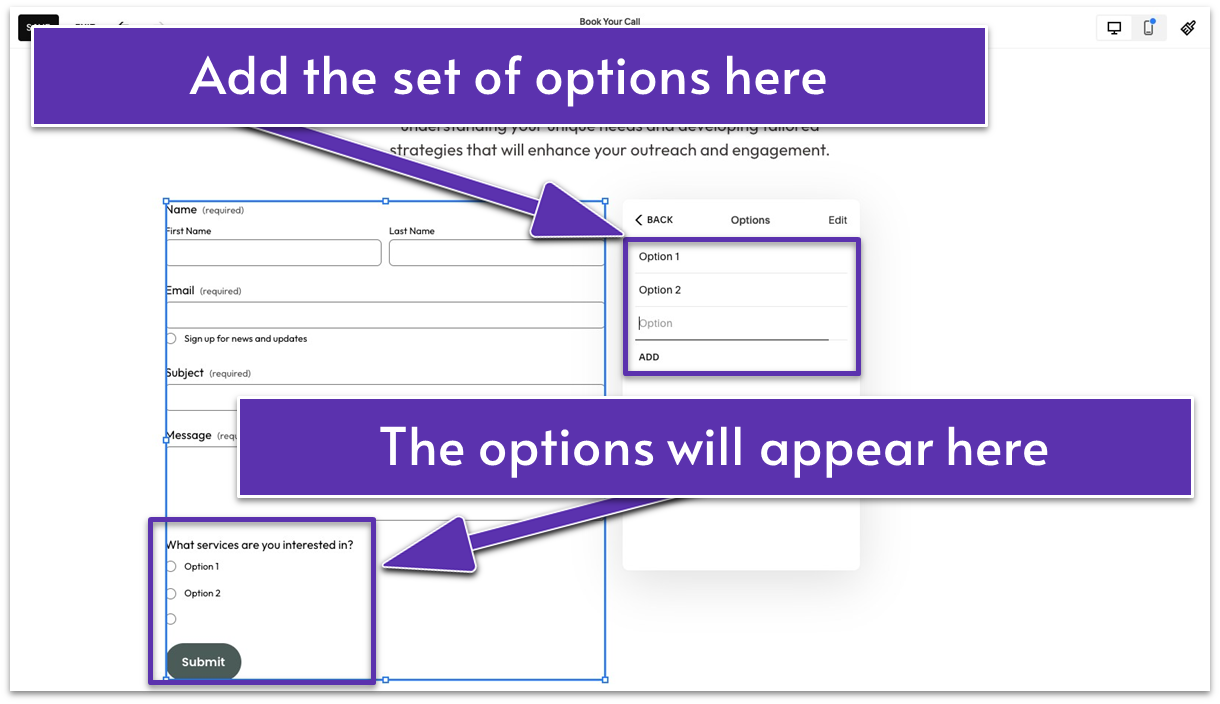
- Click Options to list the services you offer. Maybe you offer an Initial Consultation and a Free 1-to-1 Call. You can add as many as you need.
2.4 Connect an Email to Receive Website Submissions
An email with your business domain helps you establish a professional appearance when interacting with clients. It also ensures that communications are organized and easy to track.
Once you get your business email sorted out, here’s how to connect it with your Contact page:
- Double-click your form and go to Storage.
- Type the business email where you want to receive the website visitor inquiries in the Email Notification field.
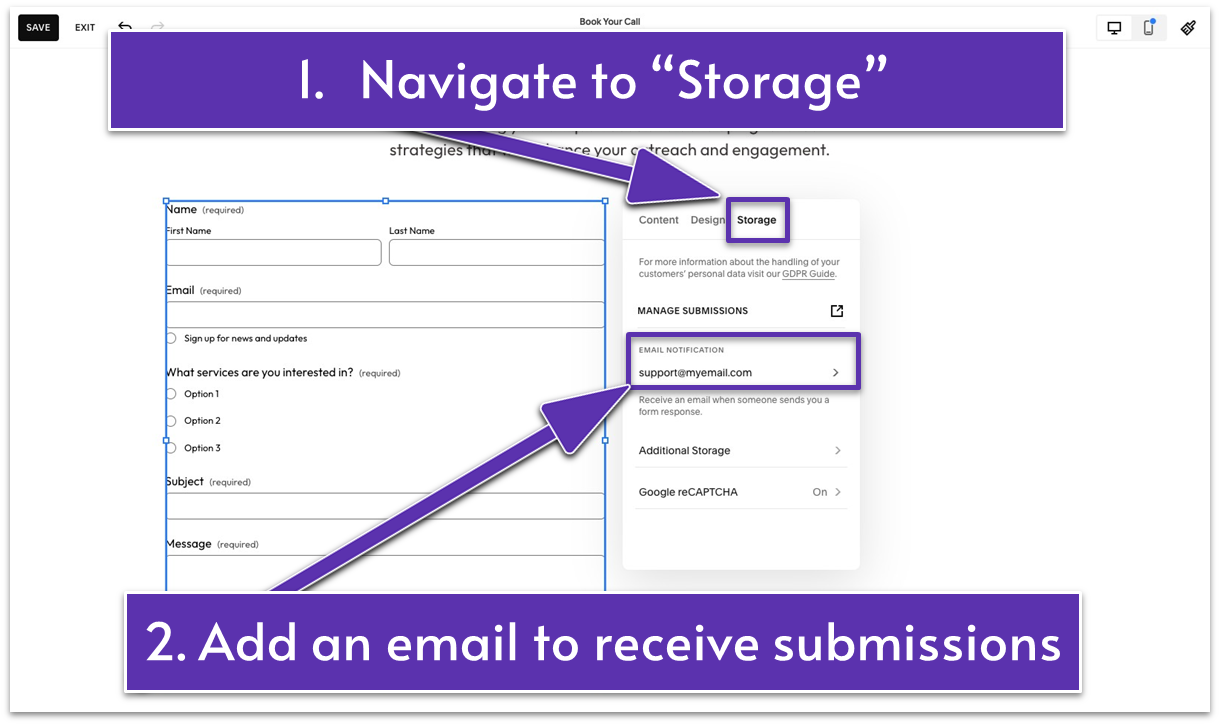
Now that you’ve built the form that aligns with your business needs and connected it with your business email, let’s make it stunning!
2.5 Add an Image to the Contact Form
Adding an image to your contact form can make your page more engaging and inviting. For a consultant website, suitable images include a professional headshot, your office space, or a branded graphic that reflects your services. These visuals help build trust, provide a personal touch, and make it easier for potential clients to connect with you.
Step 1: Add an image block
- Click Add Block.
- Select Image from the list of options.
- Drag that image over to the position you wish to appear.
Step 2: Upload an image
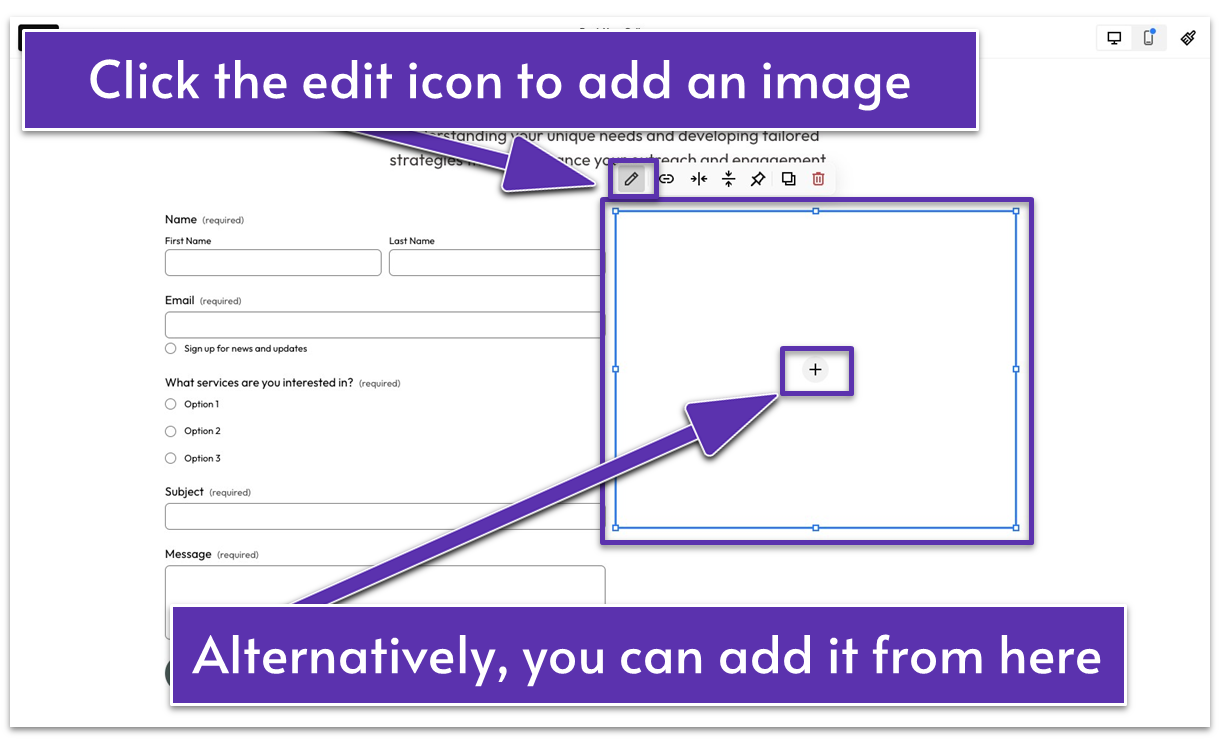
- Click the empty image block. A menu with options will pop up above the block.
- Click Edit (the pencil icon).
- In the Content tab, click Add an Image. Alternatively, you can click the + sign in the middle of the image block. From here, you’ll see the Upload File option.
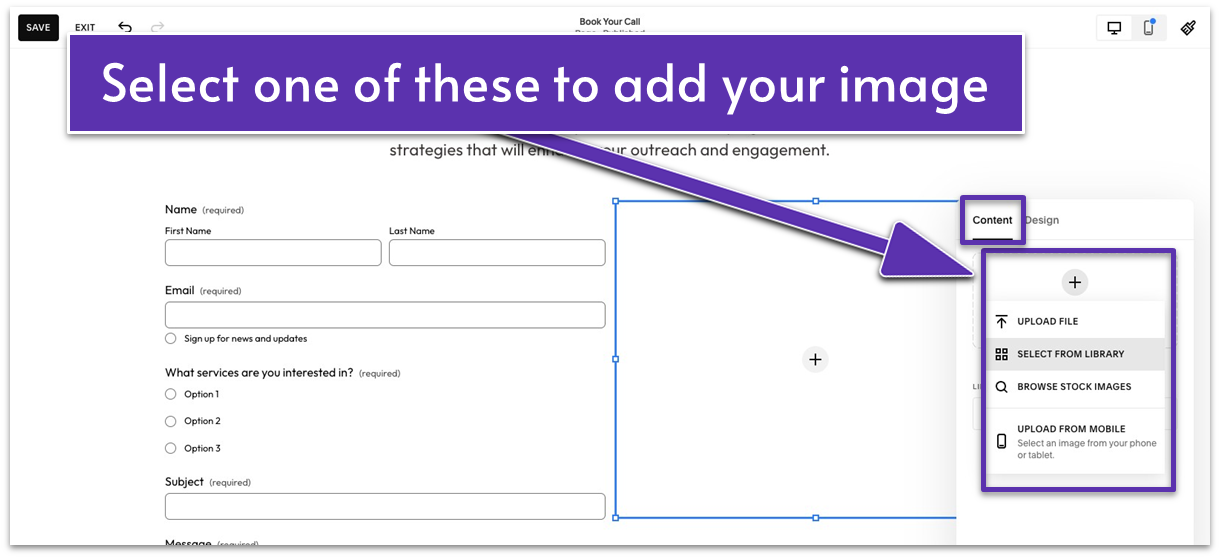
- Choose Upload File if you don’t have the image in your website library and need to upload it from your device.
- If you already have the image on Squarespace, go with the Select from Library option.
- If you don’t have an image of your own, browse Squarespace’s stock of free and premium images, or source your image from elsewhere.
I suggest you find your contact form image now or use any from Squarespace’s free stock to continue the page design process. You can change the image later.
Step 3: Edit the image
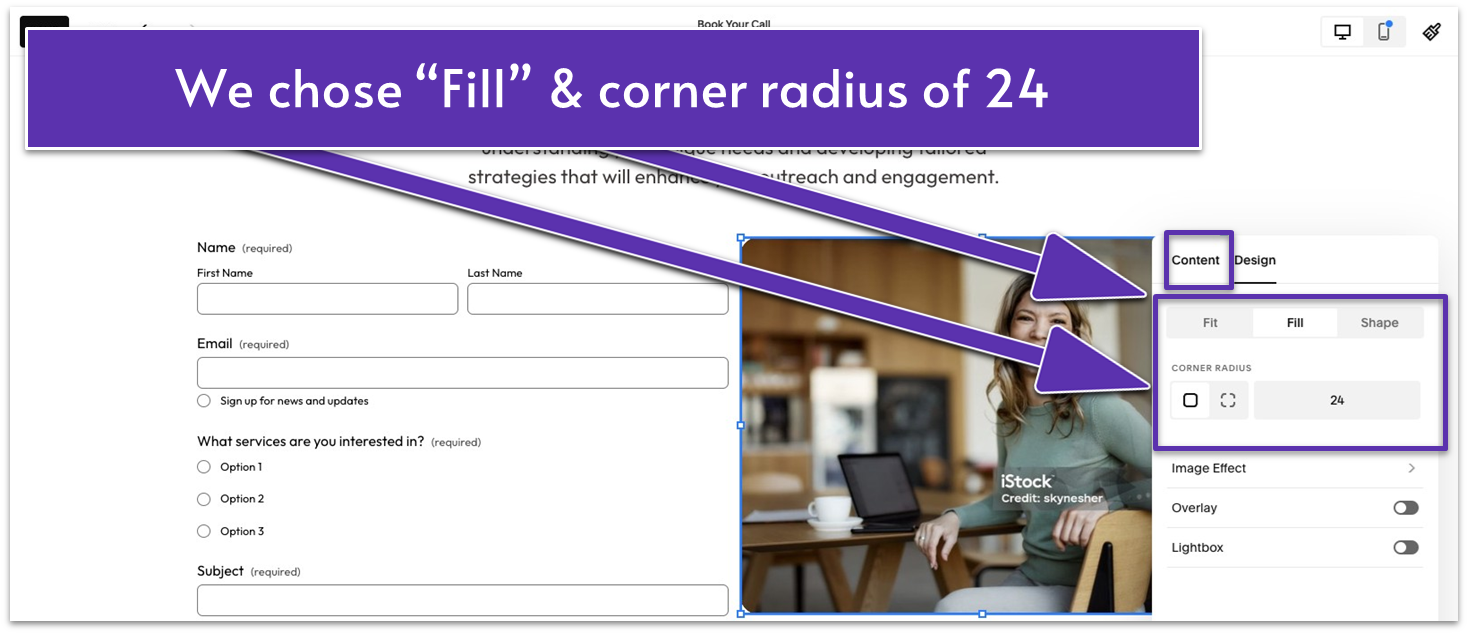
- Double-click the uploaded image and head to the Design tab. For our particular image, we went with Fill and a corner radius of 24 to get slightly rounded corners.
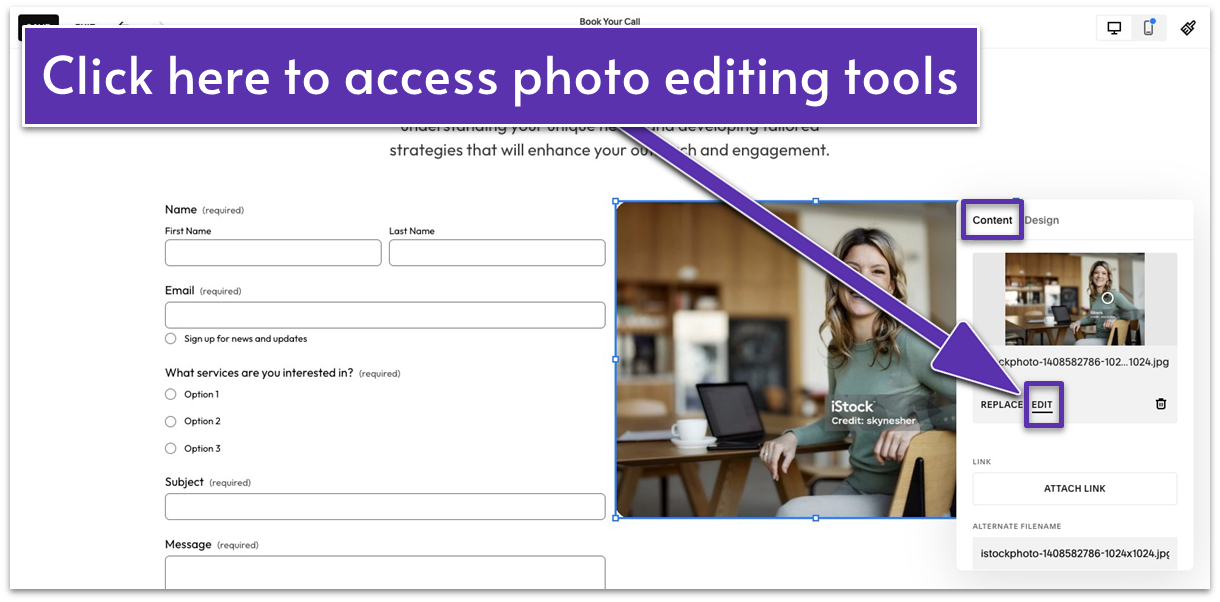
- If you want to alter the actual image, navigate back to Content.
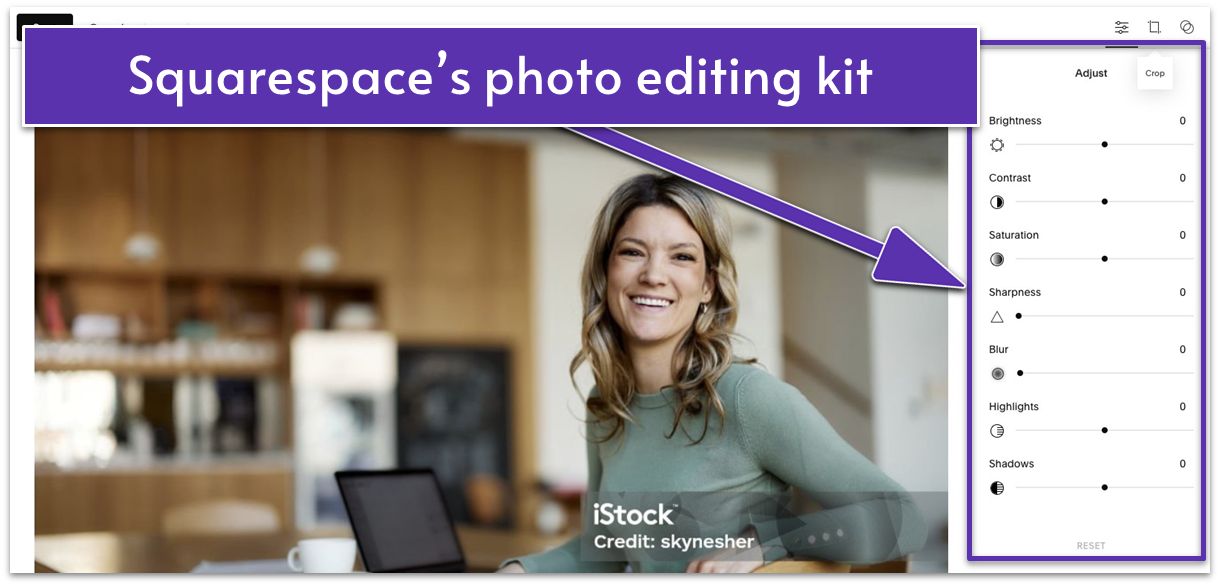
- Select the Edit option below the image. From here, you can adjust the brightness, contrast, saturation, and other parameters.
2.6 Align the Page Elements
Proper alignment of page elements is key to creating a professional and visually appealing website. Well-aligned elements help guide users’ eyes naturally through the content, improving readability and usability.
Here’s how to align page elements effectively to ensure a balanced and user-friendly design:
Step 1: Use the grid to align the elements
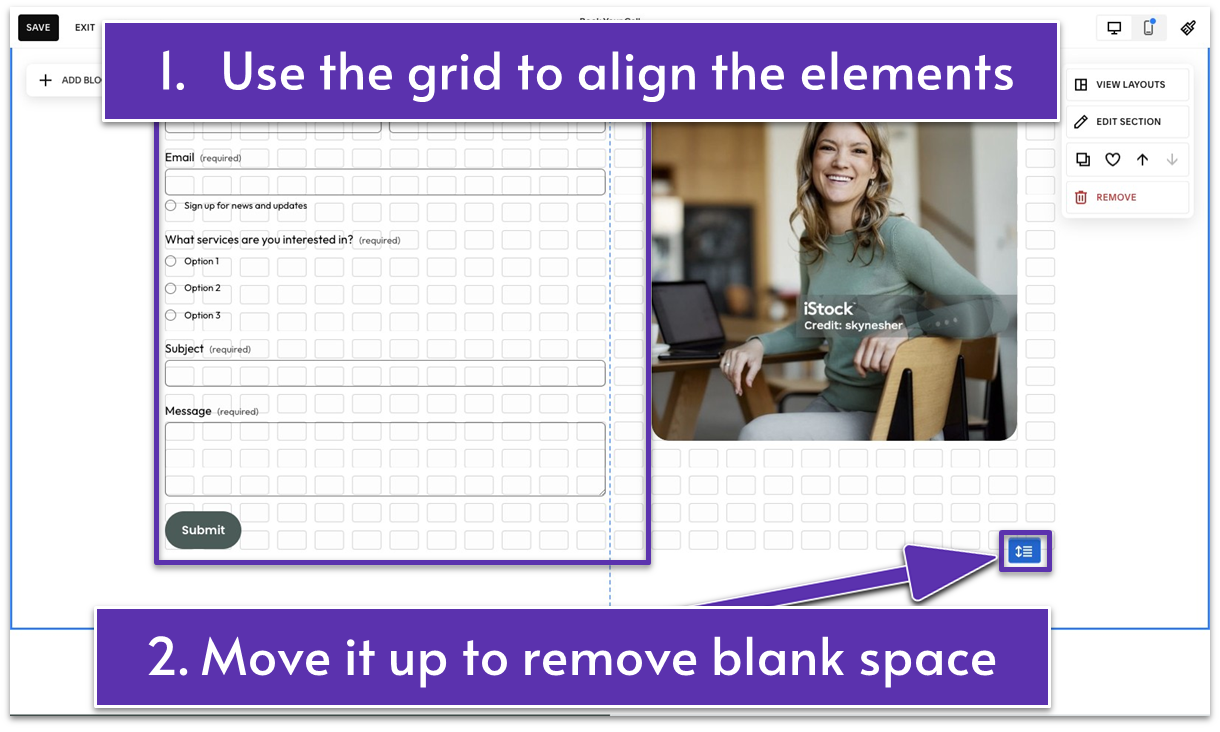
- Simply drag and drop the elements until you achieve a balanced, visually coherent look. Nothing is set in stone here, simply play around and see what looks good.
- Tightly align the elements to ensure you don’t have any unnecessary blank space below your form and image. Repeat this for every section on your website.
Do you see how easy this was? You can totally stop here – your Contact page is ready to receive client submissions.
However, I suggest using this space to the maximum. The internet has too many boring websites, but yours doesn’t have to be given how easy it is to build something unique and beautiful with Squarespace.
Ready to take your contact page to the next level? Let’s do it!
2.7 Add an Instagram Feed Section
Featuring an Instagram feed on your Contact page adds dynamic and showcases your brand’s personality in real time. It provides visitors with a glimpse into your latest activities, projects, and behind-the-scenes content, which can help build trust and make your brand feel more approachable. Additionally, integrating your social presence encourages visitors to follow you, creating further opportunities for interaction.
Step 1: Add a section with a dark color theme
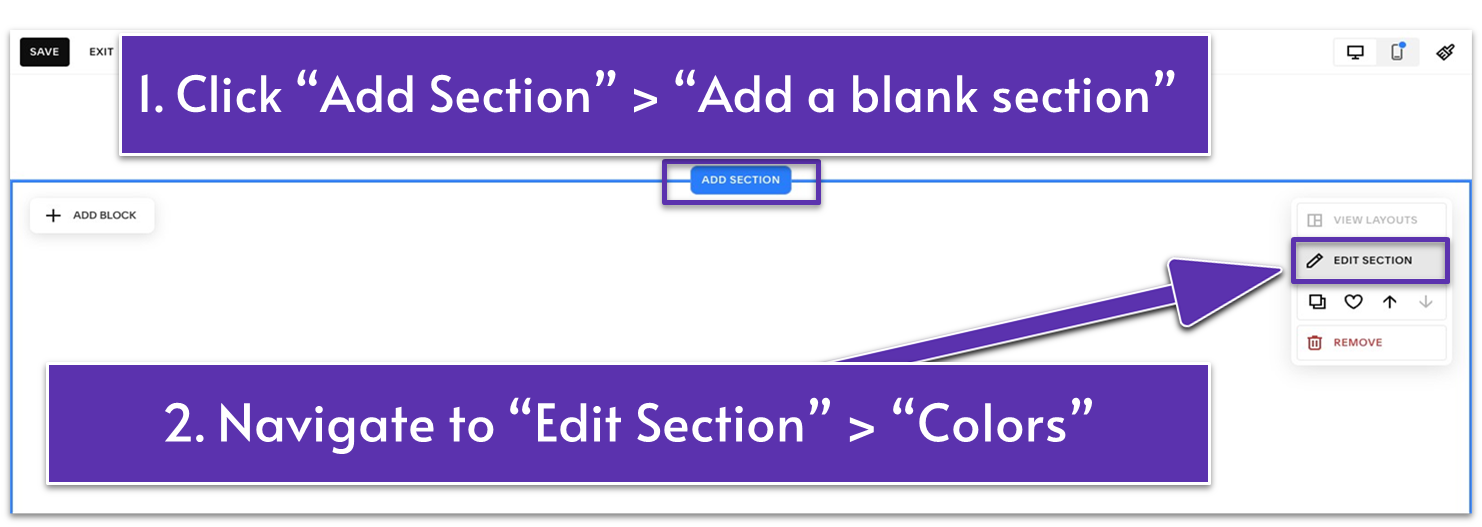
- Below the section you’ve built, click the Add Section button.
- Select Add Blank Section.
- Click Edit Section.
- Navigate to the Colors tab.

- Select one of the dark color themes to contrast the previous section and add a dynamic to your Contact page. In our case, we went with Dark 1, but you can choose any of your color themes.
Step 2: Title the new section
- Click Add Block.
- Select Text.
- Write your section’s title. We’ll name this text block Follow the Journey.
Step 3: Edit the title

- Change the title’s format to Heading 2.
- Resize the text box to fit the text into one line.
- Center-align the title.
- Position the title in the upper central part of the section.
Step 4: Add an Instagram block
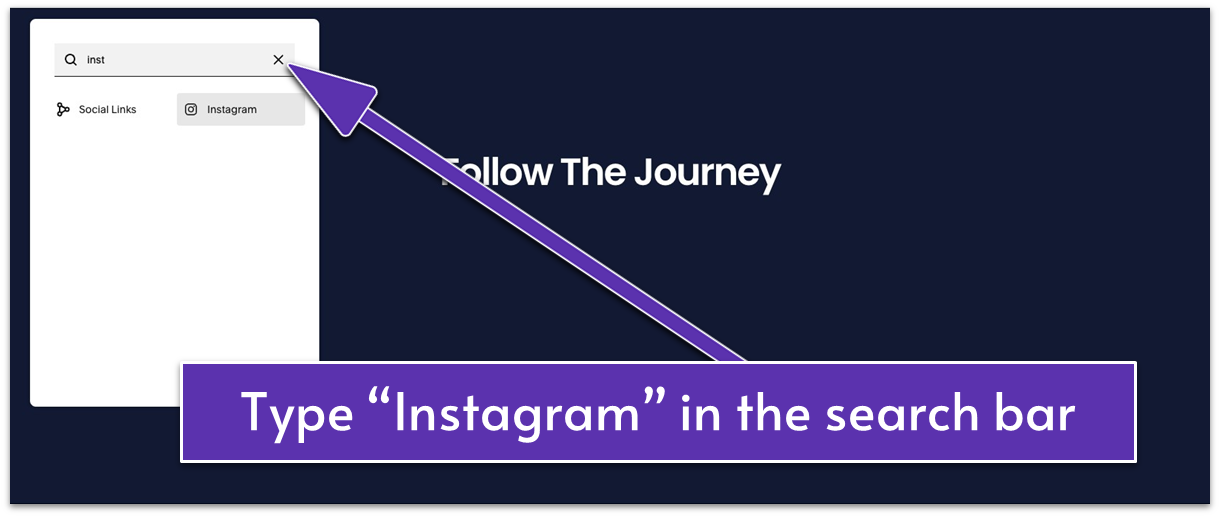
- Navigate to Add Block.
- Type Instagram in the search bar. Instagram doesn’t appear among the first options on the list, so it’s quicker to find it this way.
- Select Instagram.
Step 5: Connect an Instagram account
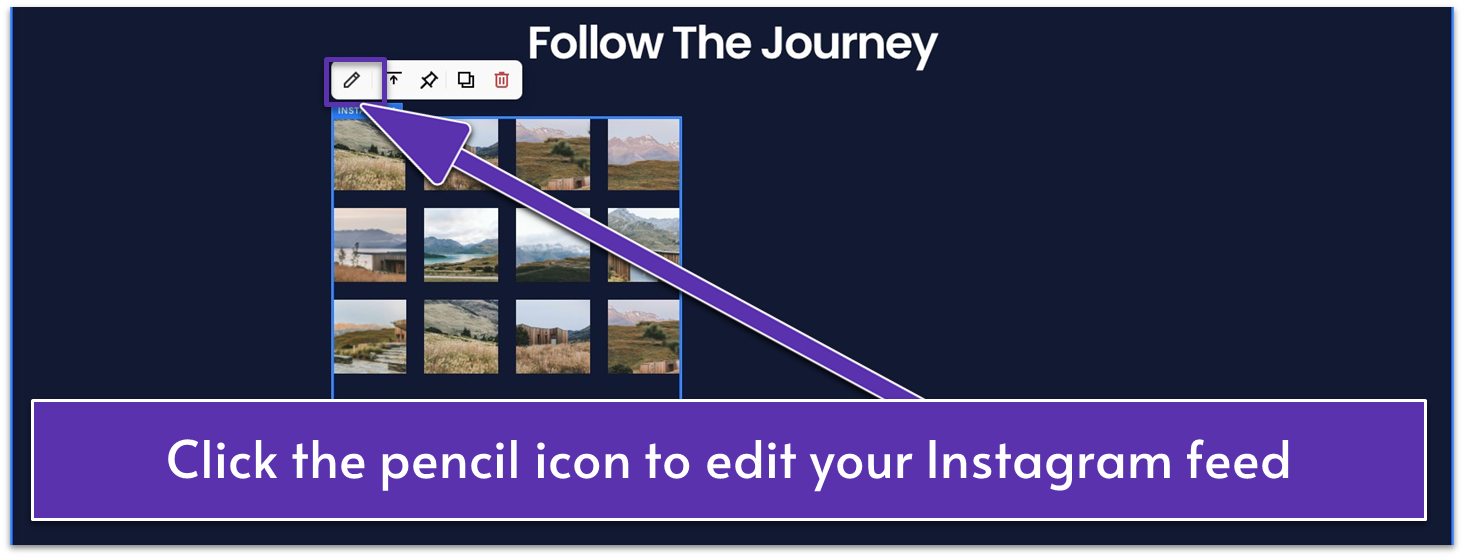
- Click Edit (the pencil icon). In the Account tab, you can connect your Instagram account to your website and customize your feed.
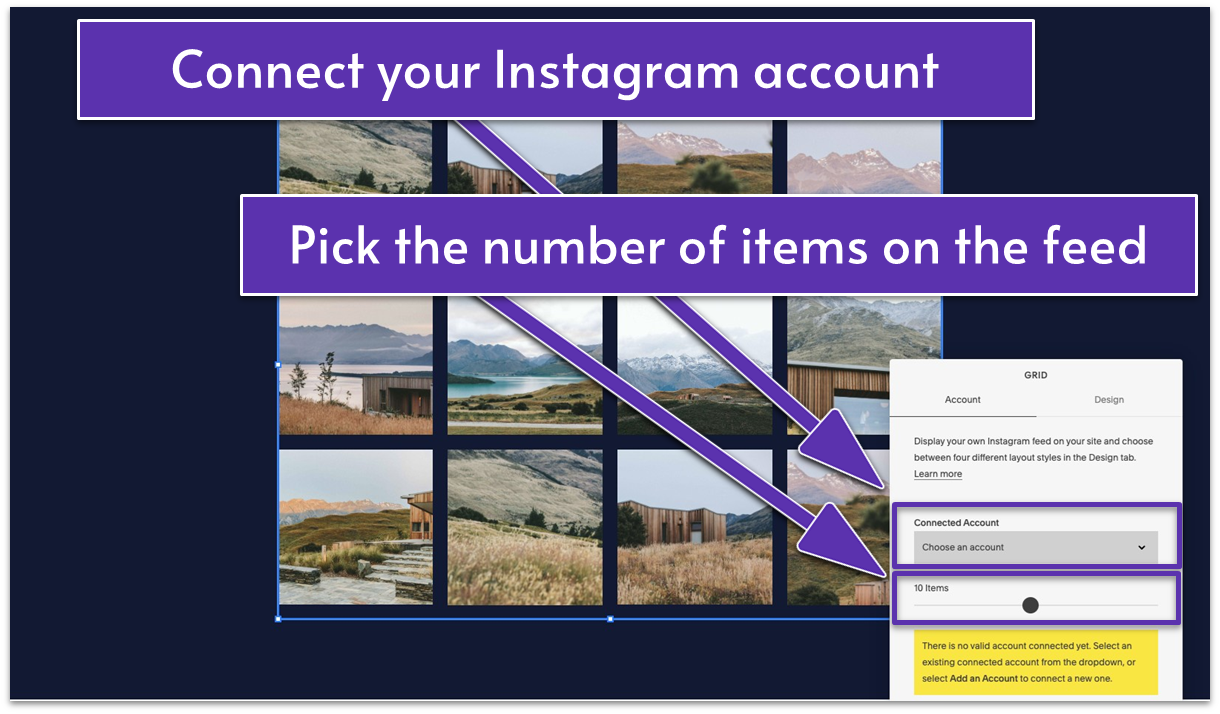
- Pick how many items you’d like your Instagram feed to show in this section.
- Resize the Instagram feed to the desired size.
Step 6: Design the Instagram feed

- In the Design tab, you can choose from different layouts like slideshow, carousel, and grid. We’ll go with a grid layout.
- Adjust the aspect ratio and padding. We’ll keep the 1:1 Square aspect ratio, but adjust the padding to 10.
- Choose how many thumbnails to show per row. We’ll stick with the default 4.
Congrats! You just built your first website page from scratch! Now, let’s optimize it for mobile devices.
2.8 Optimize for Mobile
Some elements might be off in the mobile preview. Making adjustments in mobile view is no different than building your site for desktop screens. Simply evaluate what needs to be fixed and make the tweaks.
If you followed everything we did so far, you’ll only have to adjust these few things for mobile:
Step 1: Go to Mobile View
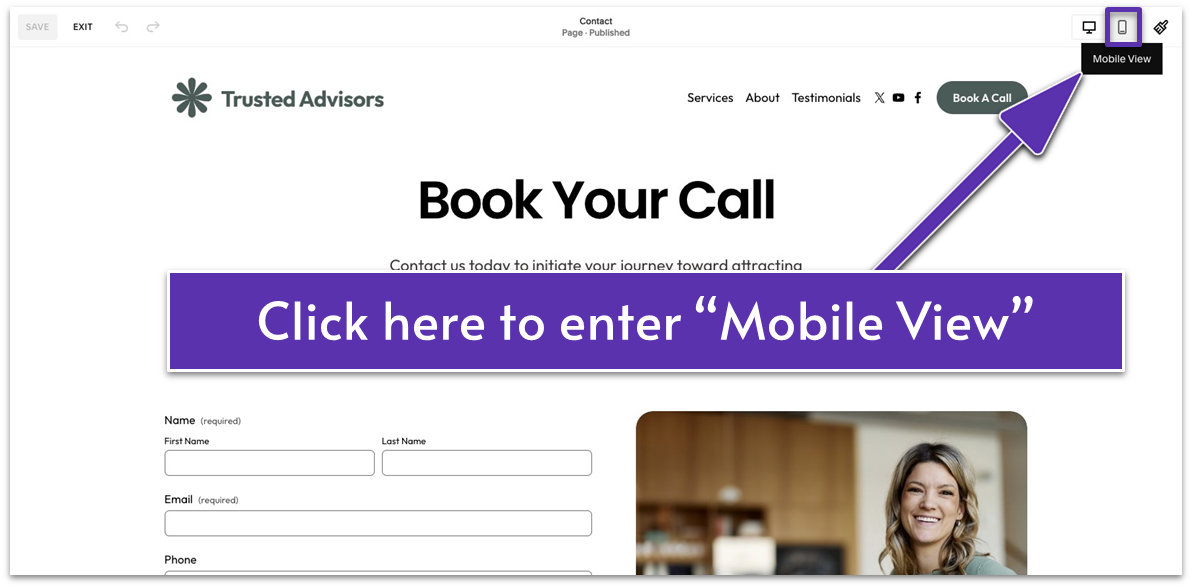
- Navigate to the top right corner of the editor and click the icon that looks like a mobile device .
Step 2: Make the tweaks
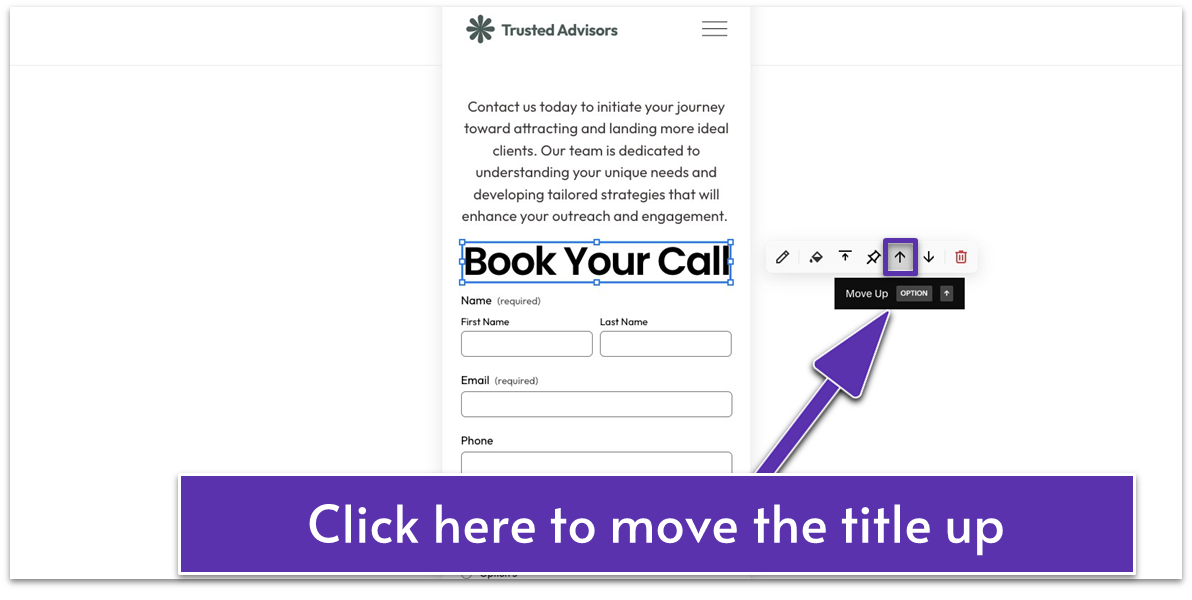
- Click the “Move Up” icon ( ) to move the title to the top of the page.
- Drag the corners of the image to make it bigger.
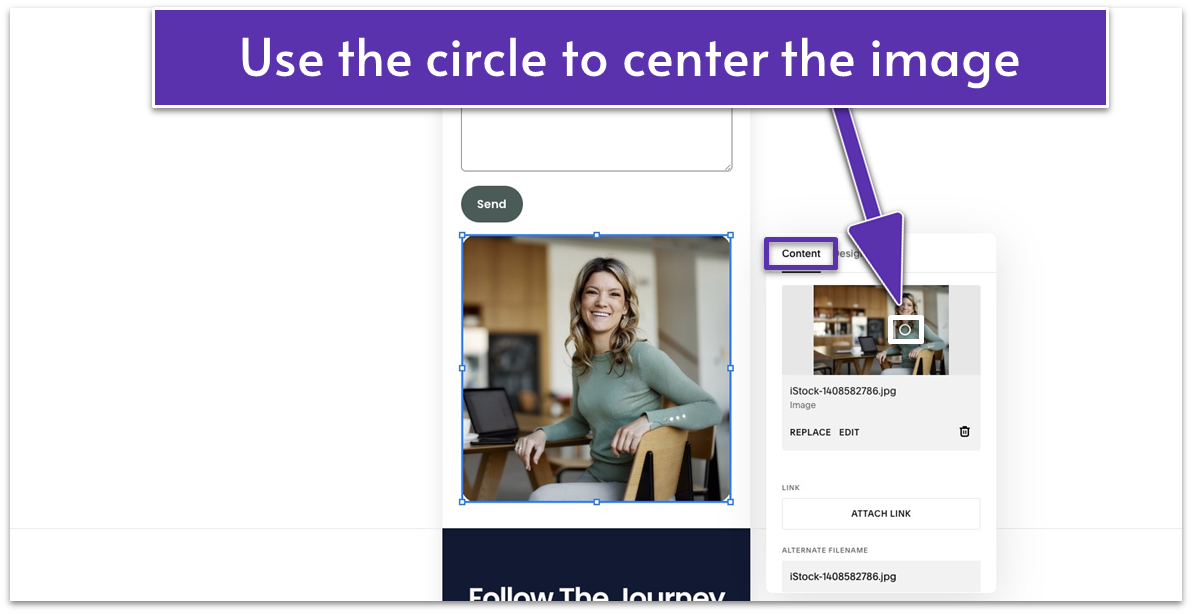
- Depending on your image, you might need to center it differently once you stretch it bigger. If you need to do this, click the “Edit” icon and go to “Content.” You can center the image by moving the small circle from here.
2.9 Save a Section
By saving a section in Squarespace, you can reuse it across different pages without needing to recreate it each time, saving you time and ensuring a consistent look throughout your site. This is especially useful for repeated sections like contact forms, promotional banners, or testimonials.
It also saves time when updating, as changes made to the saved section will automatically reflect wherever it’s used. For this reason, you’ll want to do this step after finalizing everything including optimizing for mobile.
Step 1: Save the section to reuse in the future

- Navigate back to the contact form section.
- Hit the heart icon to save this section.
This section will now appear within your Saved Sections, and you can reuse it as many times as you wish. Repeat this action for every section you anticipate using more than once.
2.10 Save Your Contact Page
Save your progress to ensure all your hard work is preserved and ready to go live. Just one last step, and you’ll have everything securely in place, ready to connect with your audience.
Step 1: Save your Contact page
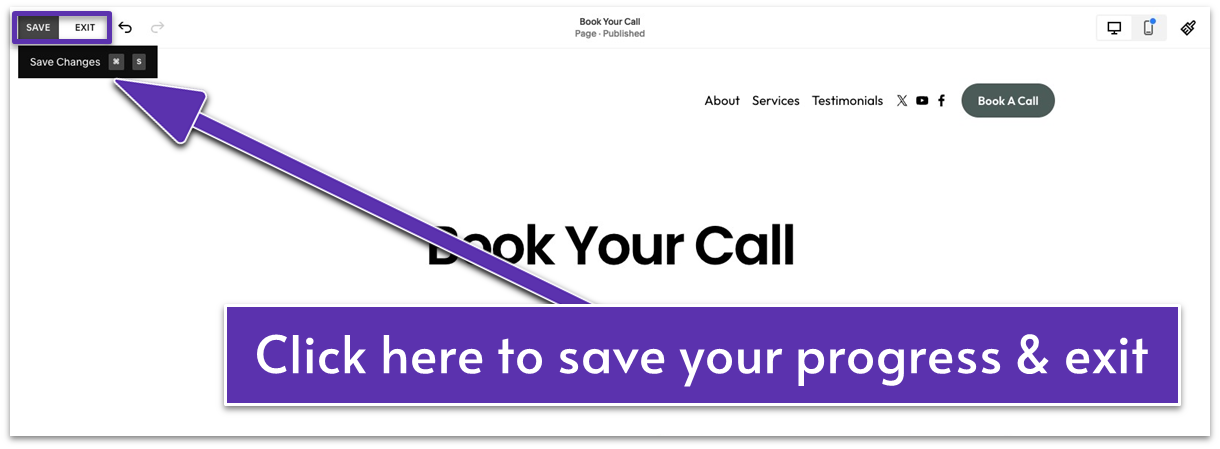
- Click the “Save” button in the upper right corner.
- Click “Exit” to leave the page.
That’s it – your beautiful Contact page is ready! Before we continue, take a moment to admire your work. After all, appreciation is an application for more.
Now that we’ve laid the basics of website building in Squarespace, creating your About page will be even easier. Ready? Let’s go!
