

The most exciting part of building a website is when you add your images and copy and see the whole thing come together. If you’re anything like me, you’re probably already dreaming of that moment. But before we get there, there’s some groundwork we need to cover.
In this first module, you will:
- Identify your website’s primary purpose.
- Create a visual identity.
- Sign up and open a blank template in Squarespace.
Nothing is set in stone at this stage – you can always revisit and adjust things later – but building a solid foundation now will make everything easier later. A website’s success depends largely on how harmonious its design is. Even the most popular websites don’t necessarily prioritize creativity, but they’re clean and easy to use.
Personally, I like my websites pretty and functional, and Squarespace can help with both. With that in mind, let’s get started.
Identify the Main Purpose of Your Website
Defining the purpose of your site helps you decide which features and pages to add. For example, if you want your website to help you find clients, it’s essential to include a visible CTA above the fold on your homepage – and prompt visitors to contact you.
You’ll also prioritize copy that helps visitors understand how you can help them rather than copy about yourself or your business.
This guide will cover many Squarespace tools and features, but not all will be relevant to your needs. To get started quickly, take the quiz below and get a sense of where to place your focus.
It’ll help you define your site’s main purpose, determine which pages you should include from the start, structure your copy, and more. I recommend that you take a snapshot of the results and check them again at any time.

Now that you’re clear on your site’s main purpose and target audience take note of the list below, which includes all the elements you need in order to get started. These are the items we’re leading you through on this page, so don’t worry if there’s nothing to tick off yet:
- Define the main purpose of your site.
- Narrow down your target audience.
- Decide which main action you want visitors to take when they land on your site.
- Structure.
- Logo.
- Color palette.
- Fonts.
- Starter copy.
- Starter images.
By following the steps below, you can get everything ready in about 1 to 3 hours — depending on how closely you want to stick to one of the sample sites we’ve built for this guide.
Remember: the most important thing is to keep progressing through the different items on the list. You can always come back and refine specific elements once your starter site is up and running, but if you put too much pressure on yourself to get everything perfect from the get-go, you’ll make it difficult to progress and might end up abandoning the project altogether. Keep at it!
Decide on the Structure of Your Website
You have two options here, depending on how creative you want to get with the sample sites we’ve built for you.
If one of the sample sites is a perfect fit for your needs as is, you don’t need to worry about the site structure. Simply follow this guide step-by-step, use your own images and copy, and you’ll be able to hit “Publish” as soon as you’ve completed the guide.
If, on the other hand, you want to customize your site beyond elements like images and copy – for example, if you want to mix and match pages or sections from multiple sample sites included in this guide – now is a good time to make these decisions.
First, consider which pages you want to include on your website. If you took the quiz above, you should already know which pages are a must-have. If not, I recommend doing that now!
Then, think about the structure of each page. You may even want to sketch each page on a piece of paper to make sure the different sections fit together well and to help guide your work once you start building. Here’s an example of a homepage sketch, with multiple segments illustrated side-by-side:
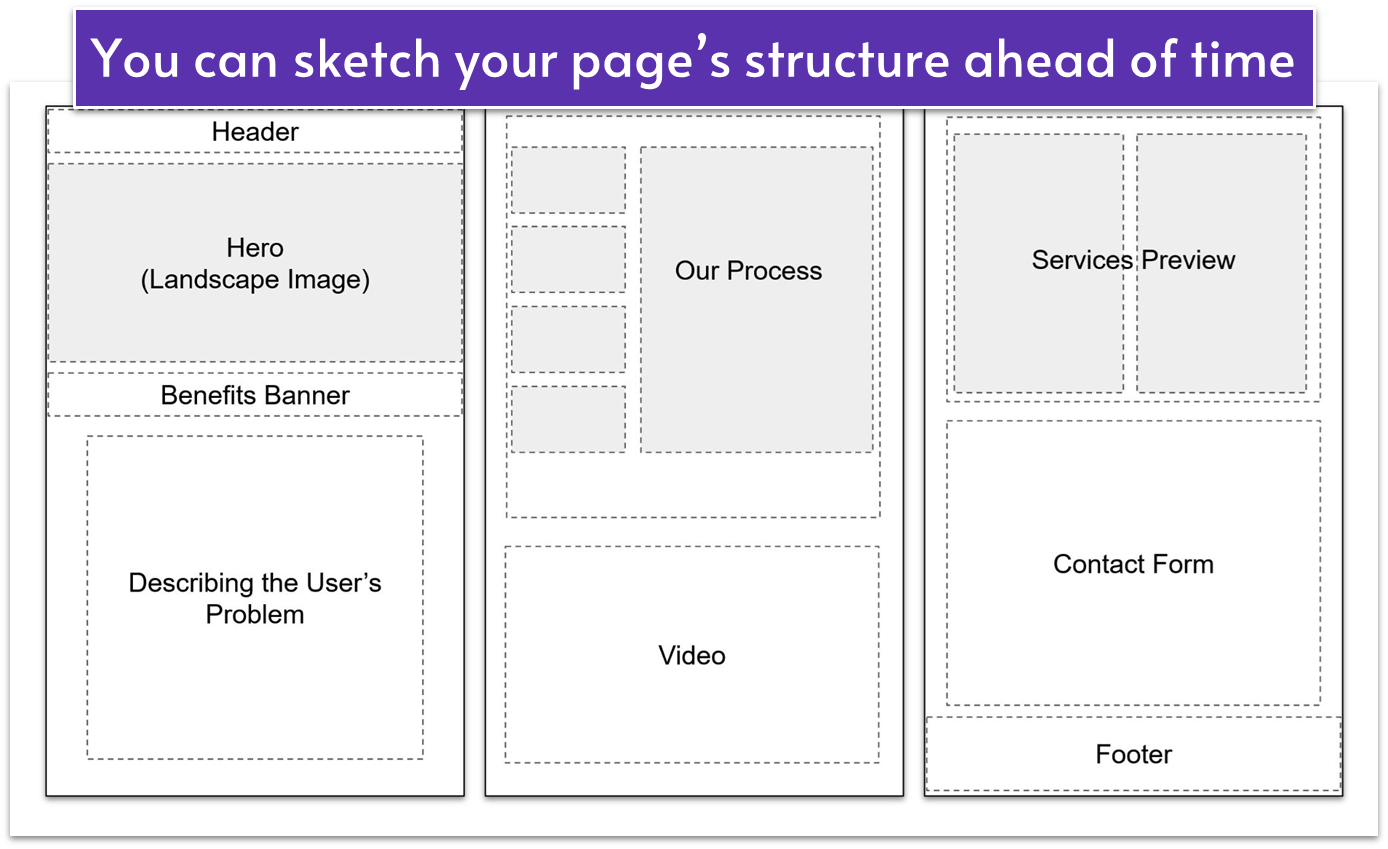
Don’t be afraid to mix and match. This guide includes the most common “building blocks” in Squarespace web design, and these blocks can be rearranged in many ways to create truly unique websites.
For example, maybe you’re building an agency website, but want your homepage hero section to include a stunning landscape image instead of the smaller portrait image and text. You can achieve this by using the step-by-step guide for the Melissa Summer homepage hero instead of Trusted Advisors.
Have a look around the three sample sites and sketch your ideal page structure for each of the pages you want to include on your website. The final design should feel like it represents your brand, but when in doubt, remember to keep things simple for a clean, cohesive look and easy navigation.
Sign Up and Create a Site With Squarespace
We’ll start with a completely blank site, giving you the freedom to create without any pre-existing elements. This approach ensures that every component you add to your website is purposeful and tailored to your needs – and it also helps avoid that “template” look.
Here’s all you need to do for now:
- Go to Squarespace.com and click the Get Started button to begin.
- Answer the 3-step questionnaire about your website category, goals, and whether you prefer templates or AI assistance. For the last step, select Browse templates.
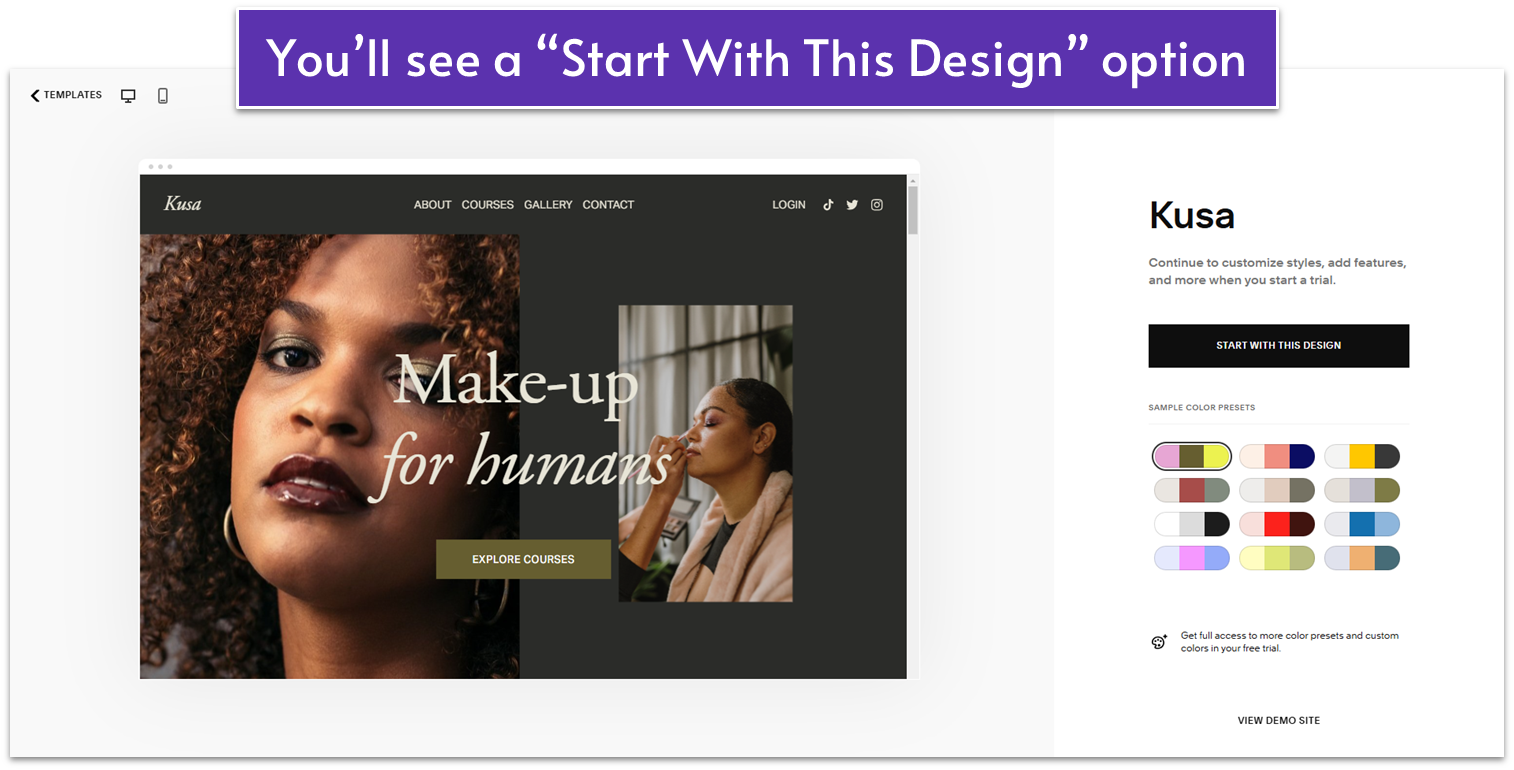

- Squarespace suggests templates based on your site’s category and goals, but for this guide, we’ll skip the premade template selection and go straight to this blank template. Then, click the Start With This Design button.
- Create an account if you haven’t already or log in.
- Once signed in, you’ll see a 4-step setup box asking for your site name and showing an overview of the Edit, Pages, and Site Styles features. Click Get Started on the 4th step.
You now have access to Squarespace’s editor. There are just a few things to tackle before populating the blank template with content and elements.
Create Your Logo
Your logo is the smallest visual cue that lets someone recognize your brand and website instantly.
If you already have a logo – great! You can move on to the next step.
If you don’t have a logo yet, you can create a simple, text-based logo with Squarespace’s logo tool – a drag-and-drop grid where you can customize a design by moving around each part and adjusting fonts, colors, and sizes.
I recommend making your logo now so you can start using it on your new website. The logo maker tool is free, provided you have a Squarespace account.
Creating a Text-Based Logo With Squarespace
- Go to Squarespace’s logo maker.
- Enter your company/brand name into the text field.
- Search for an icon in the search bar (optional).

- Pick an icon from the results (optional).
- Important: These icons are subject to Noun Project’s terms. You can use them royalty-free with a subscription or for free with required attribution.
- Create a tagline (optional).
- Customize your logo.
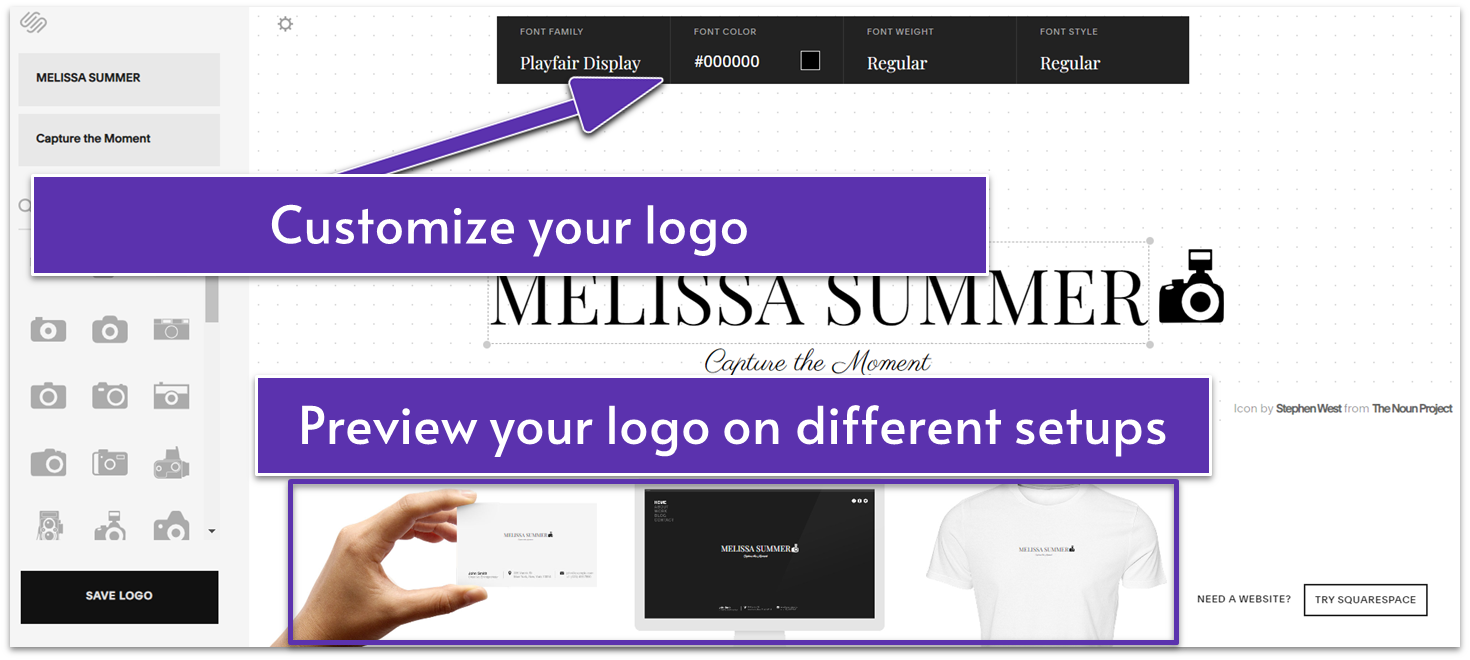
- Select any element (icon, site name, tagline) to customize font, weight, style, and color.
- Hover over the gear icon in the top-left corner of the editor.
- Enable Guides for visible guiding lines that help align elements.
- Enable Snap to Grid to automatically align elements to the grid when moving them.
- Hold the shift key or left-click it, and then select objects in your logo to access the Alignment and Layout settings.
- Play around with the Alignment options to change the placement of your logo name and tagline in relation to each other.
- Use Layout to change the placement of your logo name and tagline in relation to the icon.
- Select colors for the text, icon, and background. You can either use preset colors or input specific HEX color codes.
- Click the preview bar at the bottom of the screen to see what the logo will look like on websites, business cards, and T-shirts.
- Save and download your logo.
- Once you’re happy with your logo, click Save Logo and Download. You can download your logo files in black, white, and color versions as PNG files with transparent backgrounds.
- You can now use the downloaded PNG files on your website, marketing materials, and for other purposes.
Select Fonts for Your Website
When selecting fonts for your website, two key factors should guide your decision:
- Readability. Make sure the text is easy to read and clear across all devices.
- Brand alignment. Choose fonts that align with your brand’s visual identity.
Font types communicate distinct styles or messages and generally fall into three main categories:
- Serif fonts. They are classic and elegant fonts often used in print, giving a sense of formality and sophistication. Examples include Times New Roman, Garamond, and Merriweather.
- Sans-serif fonts. These clean and modern fonts create a contemporary, approachable feel. Common choices are Arial, Helvetica, and Open Sans.
- Display fonts. These fonts are bold and distinctive, ideal for grabbing attention and expressing creativity or playfulness. They work well for headings but aren’t suitable for long paragraphs of text. Playfair Display, Lobster, and Pacifico.
Using a mix of fonts can enhance your site’s design, but it’s important to maintain consistency. For instance, you should stick to the same font for all headings or body text to ensure a cohesive look throughout.
For the next few steps, we’ll show you how to set different style elements in the Squarespace editor. If you want to build one of the sample sites as is, you’ll find the exact specifications (fonts, colors, etc) in the next module – so you don’t need to worry about coming up with unique combinations.
If, on the other hand, you want to build something unique, this is a great time to decide on fonts, colors, buttons, and more.
Choosing Fonts in Squarespace
- Open the Squarespace Editor.
- Log in to your Squarespace account. From your account dashboard, open your site in the Squarespace Editor.
- Access font settings.
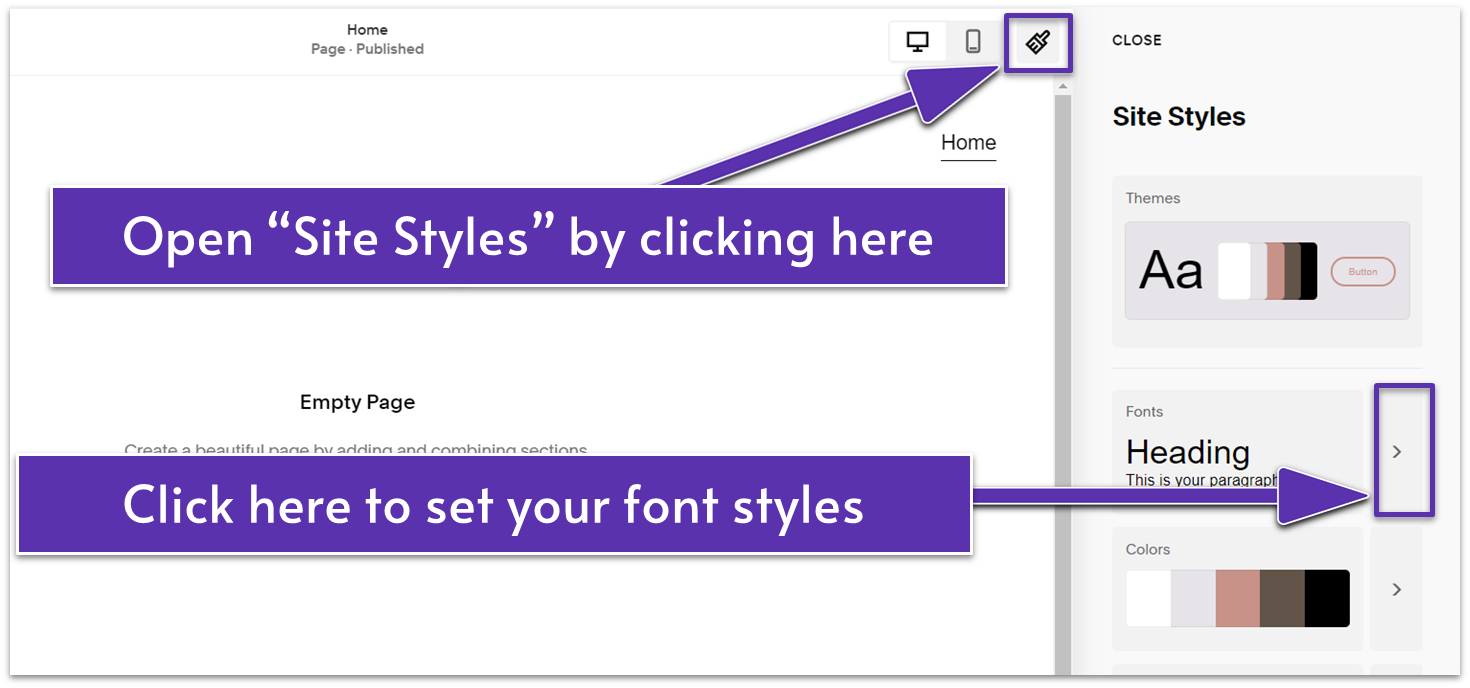
- Click on Site Styles (paintbrush icon) in the upper right corner.
- Click on > next to Fonts to open the fonts settings.
- Choose and customize your site fonts.
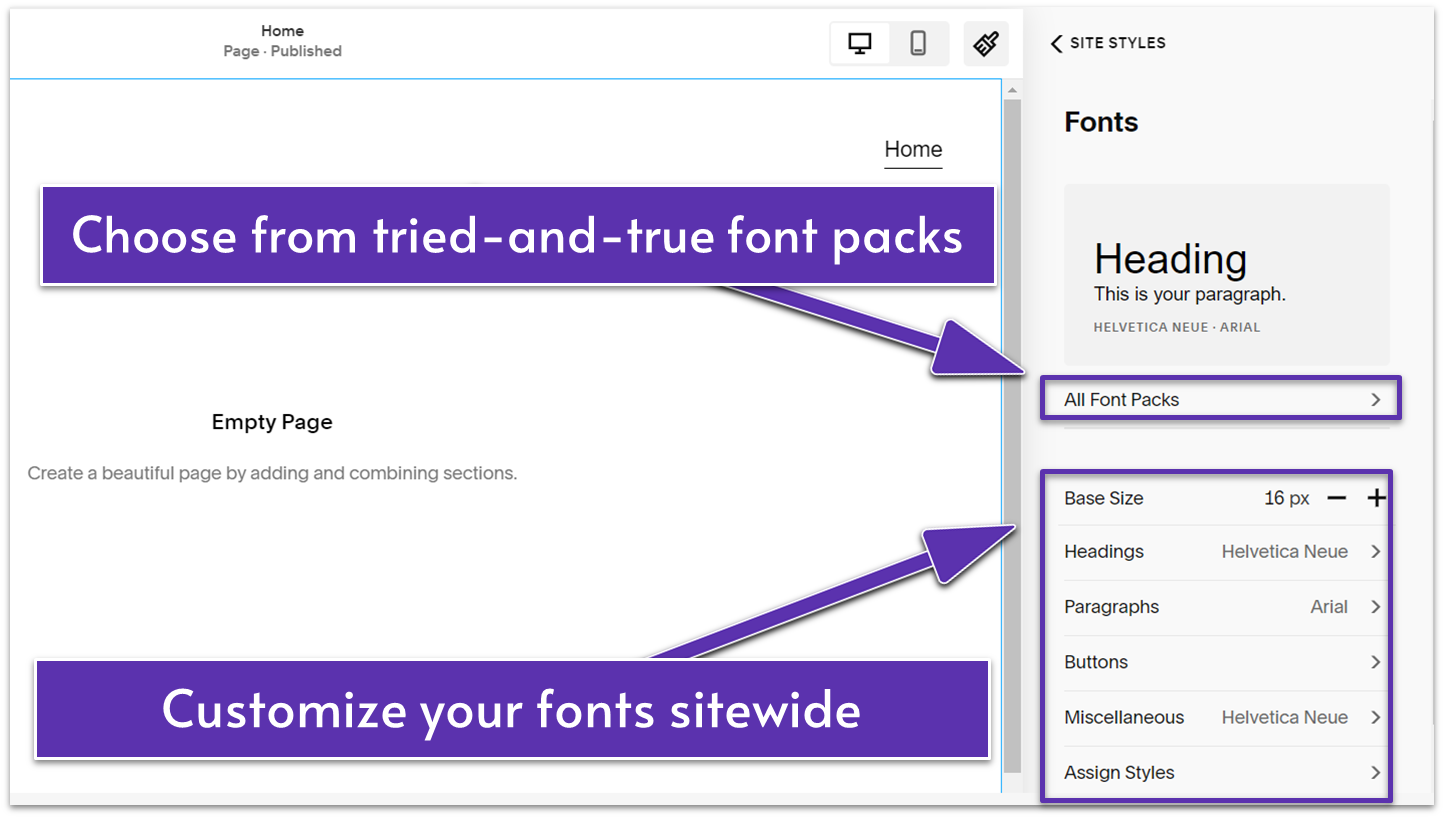
- Click on All Font Packs if you want to play it safe and use some of Squarespace’s tried-and-true font combinations.
- Squarespace has Sans-serif, Serif, and mixed font combos, so there’s something for everyone. Or, you can build your own pack if none of these pre-made bundles strike your fancy.
- Just below All Font Packs, you can manually select fonts for your Headings, Paragraphs, Buttons, and Miscellaneous elements like tags and prices. Click on these options to customize the font size, weight, style, line height, etc.
- As you make the adjustments, a real-time preview of the changes will appear on your left side.
Choose Your Colors
Color is a vital element of your brand’s visual identity. Typically, a site’s color palette will consist of two contrasting colors that stand out and three complementary colors that add balance and depth. Your palette should convey the tone of your brand – whether it’s playful, professional, or modern.
Certain color combinations are often associated with specific tones. For example:
- Bright, vibrant colors evoke energy and enthusiasm.
- Earth tones suggest stability and trustworthiness.
- Neutral tones feel minimalistic and sleek.
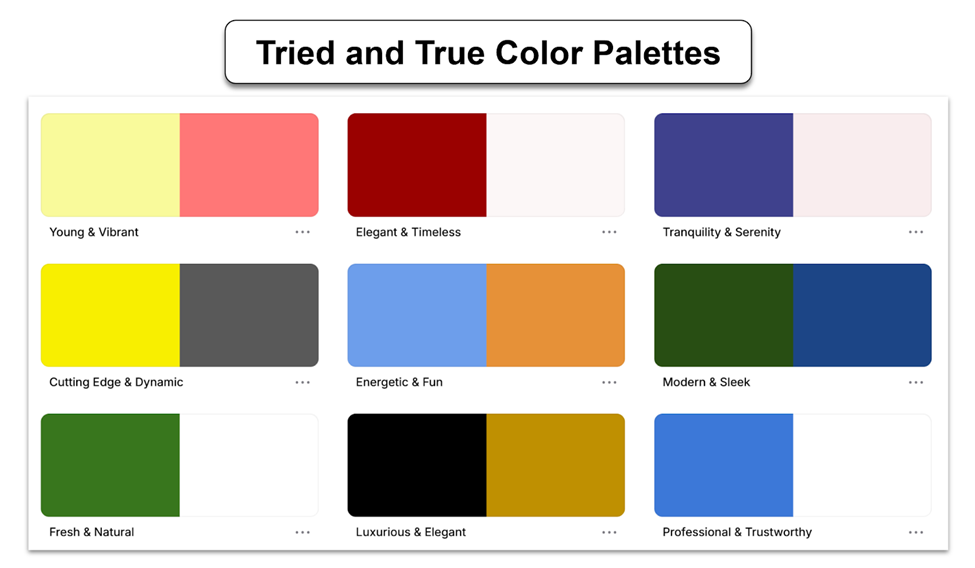
These are a few proven color combinations that you can use, depending on the vibe you’re going for. Think about the message you want your brand to convey, and choose your colors accordingly. If none of the above ready-made color combos are calling your name, there are many free palette tools online – and Squarespace too offers help in this regard.
Color Palette Tools & How to Use Them
Coolors
Coolors makes it easy to generate and refine color palettes. Here’s how to use it:
- Go to coolors.co and click Start the Generator.
- Press the spacebar to generate new color combinations.
- Click the lock icon under each swatch to lock the colors you like.
Paletton
Paletton is another great tool for exploring color harmony. To use it:
- Visit paletton.com and choose a base color.
- Adjust the color wheel to explore monochromatic, complementary, and triadic schemes.
- Use the preview to see how colors work together.
Khroma
Khroma uses AI to help you discover color combinations based on your preferences:
- Visit khroma.co, click Generate, and train the tool by selecting 50 colors.
- Once trained, Khroma will suggest personalized color combinations.
- Filter the generator by type, hue, name, and HEX or RGB values.
- Browse combinations and gradients until you find something you love.
Once you’re happy with the color palette you’ve created, it’s essential to ensure your colors provide enough contrast for readability. Use this free color contrast checker to make sure you have balanced color combinations.
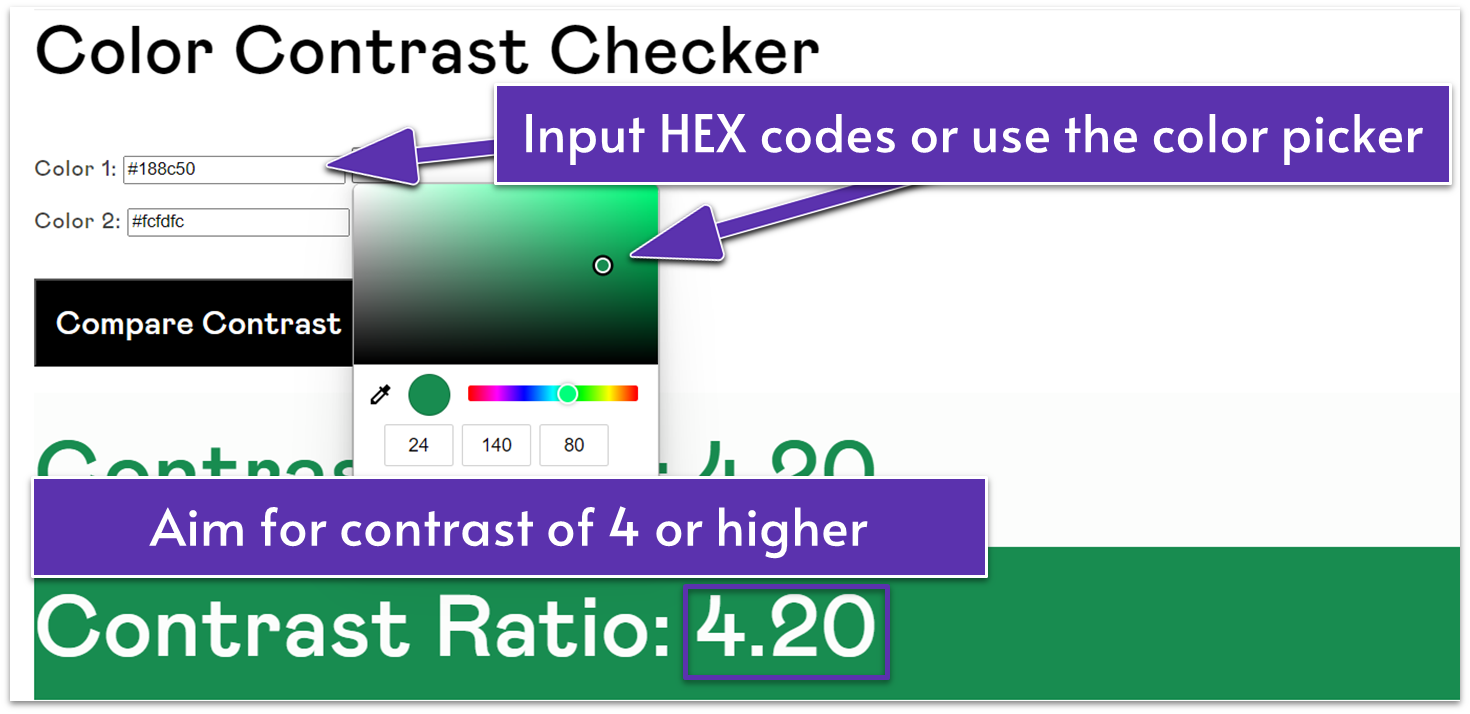
Here’s how it works:
- Enter your colors to check if they combine well as background and text combinations.
- Check the contrast ratio to ensure it’s 4 or higher for readability.
- If the contrast is too low, add a lighter or a darker color or lighten or darken one of the tones.
- Refine your palette until it meets accessibility standards.
Once your palette is ready, applying it in Squarespace is easy – just input the HEX codes directly into your logo or site design.
Choosing Your Colors Directly on Squarespace
Squarespace makes it simple to customize your website’s colors using its pre-made color palettes. These color packs are designed to match different site styles, making it easy for non-designers to achieve great results.
Alternatively, you can build your own palette by playing around with different color combinations directly in Squarespace. Here’s how:
- Open the Squarespace editor.
- Log in to your Squarespace account. From your account dashboard, open your site using the Squarespace editor.
- Access color settings.
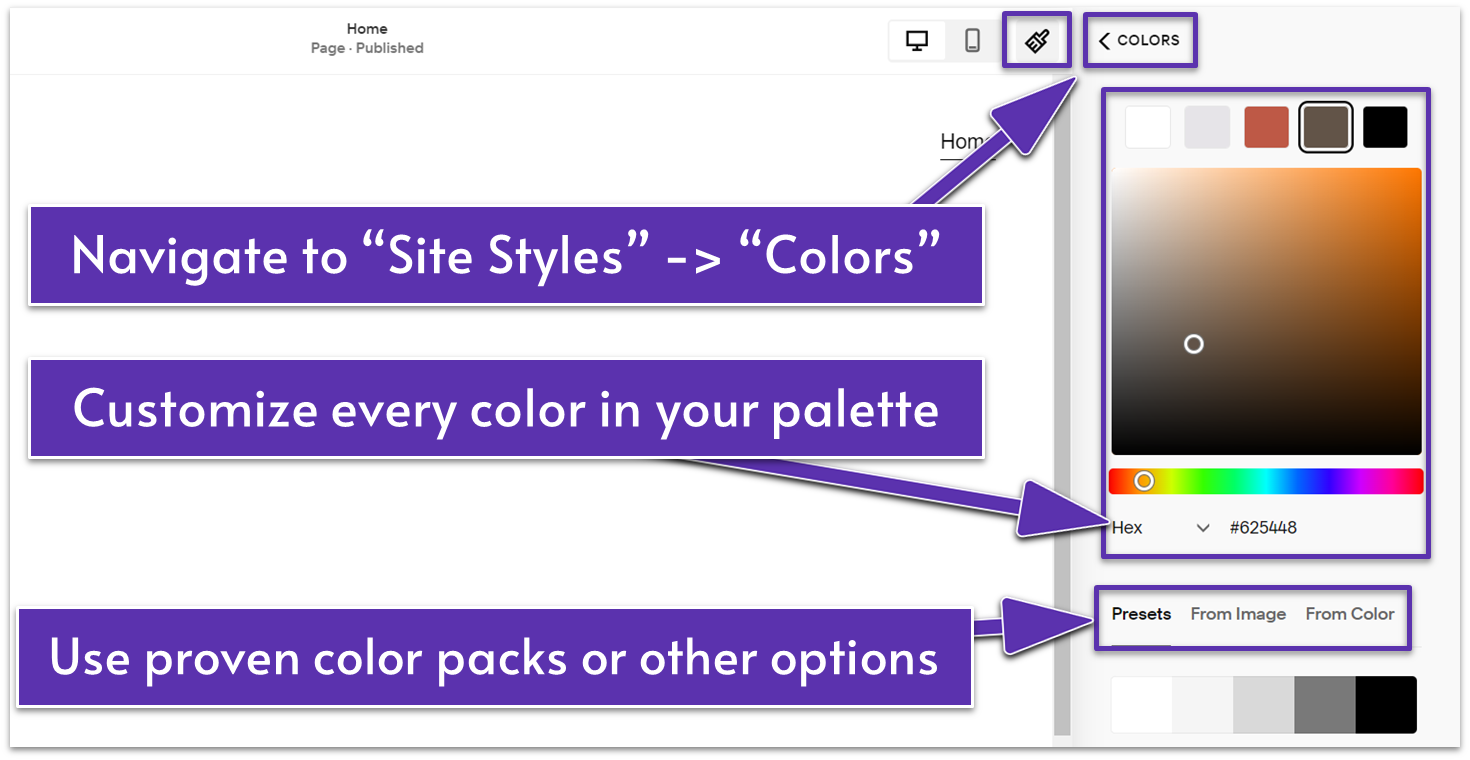
- Click on Site Styles (paintbrush icon). Click on > next to the Colors section.
- Choose your site colors.
- Click on Edit Palette. Here you can build your site palette manually by selecting colors from the color picker or inputting HEX codes.
- Squarespace also offers an array of palette packs that you can select from Presets.
- You can choose colors from an image by clicking From Image and uploading an image file to generate a palette based on its three most dominant colors. Selecting From Color lets you choose a primary color and generate palettes to complement that color.
- You can customize each of the five selected colors in the palette using the palette editor.
- Click Save to save your changes. You can modify your color palette at any time.
- Adjust colors on specific sections.
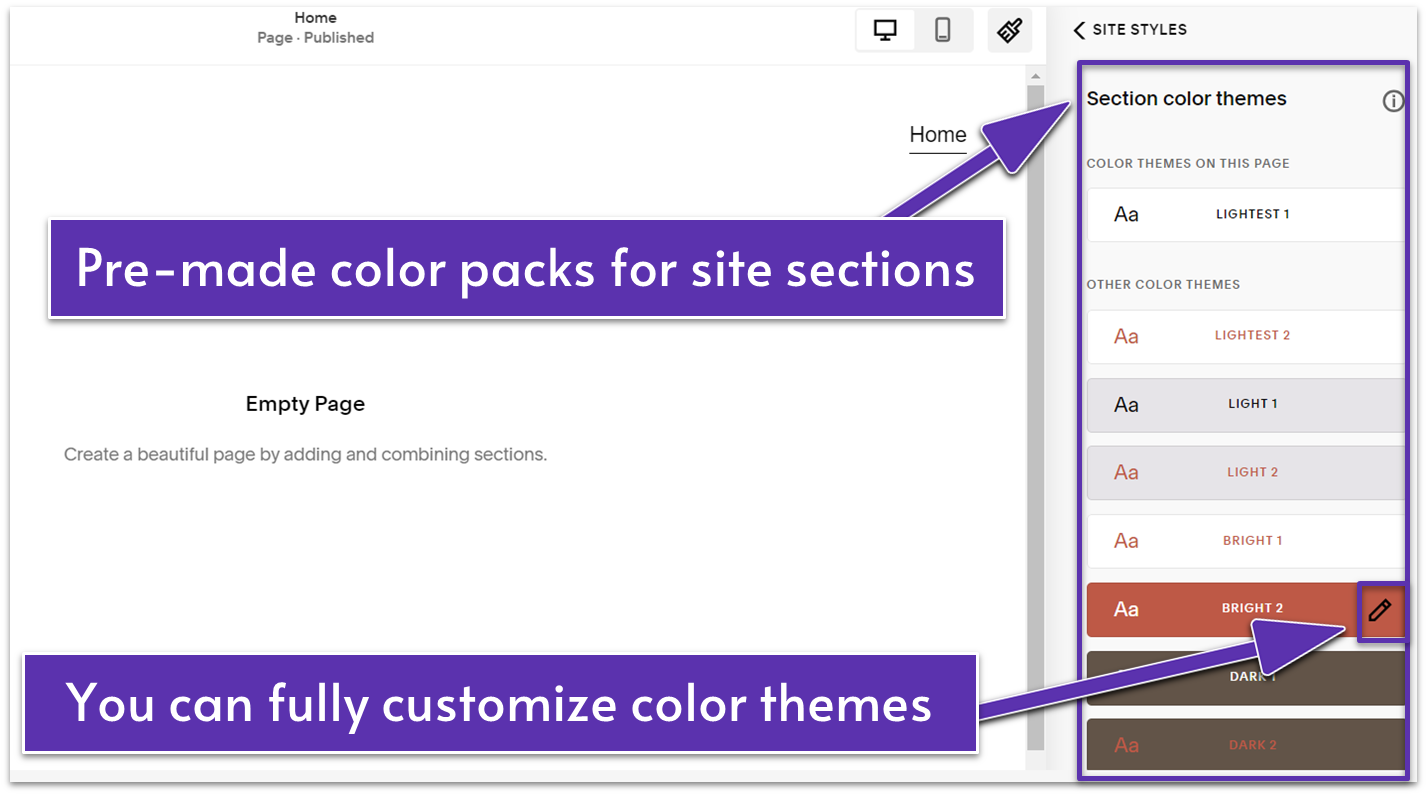
- Once you create your main palette, Squarespace will generate 10 unique color themes based on your palette.
- These Color Themes accessible within the Colors settings act as color packs for different sections of your site. They determine the colors of elements within those sections like site title, background, and navigation links.
- Each palette comes with a predefined range of complementary colors. You can keep the color themes as they are or customize them.
- Click Save to save any changes.
Once you’ve finished editing, your new colors will automatically apply across your site.
Create Button Styles
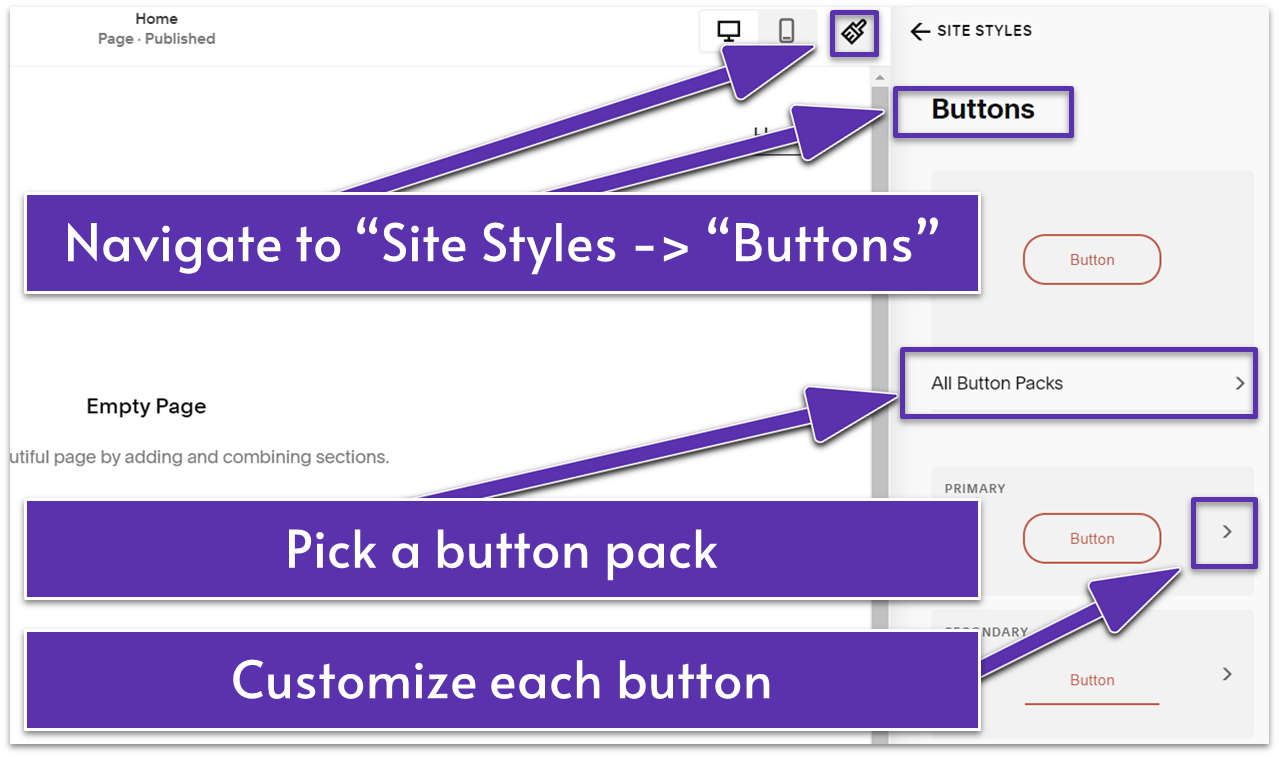
Squarespace offers button packs consisting of primary, secondary, and tertiary button styles. You can find these packs within Site Styles under Buttons. Make sure to choose a button style that matches your site’s theme and branding. Squarespace lets you adjust the button’s size, shape, color, text, outline, and padding.
You want to ensure that your buttons are easy to spot, so consider using colors that are easy to read and clearly guide users through actions like making purchases or navigating the site.
Add and Customize Fields
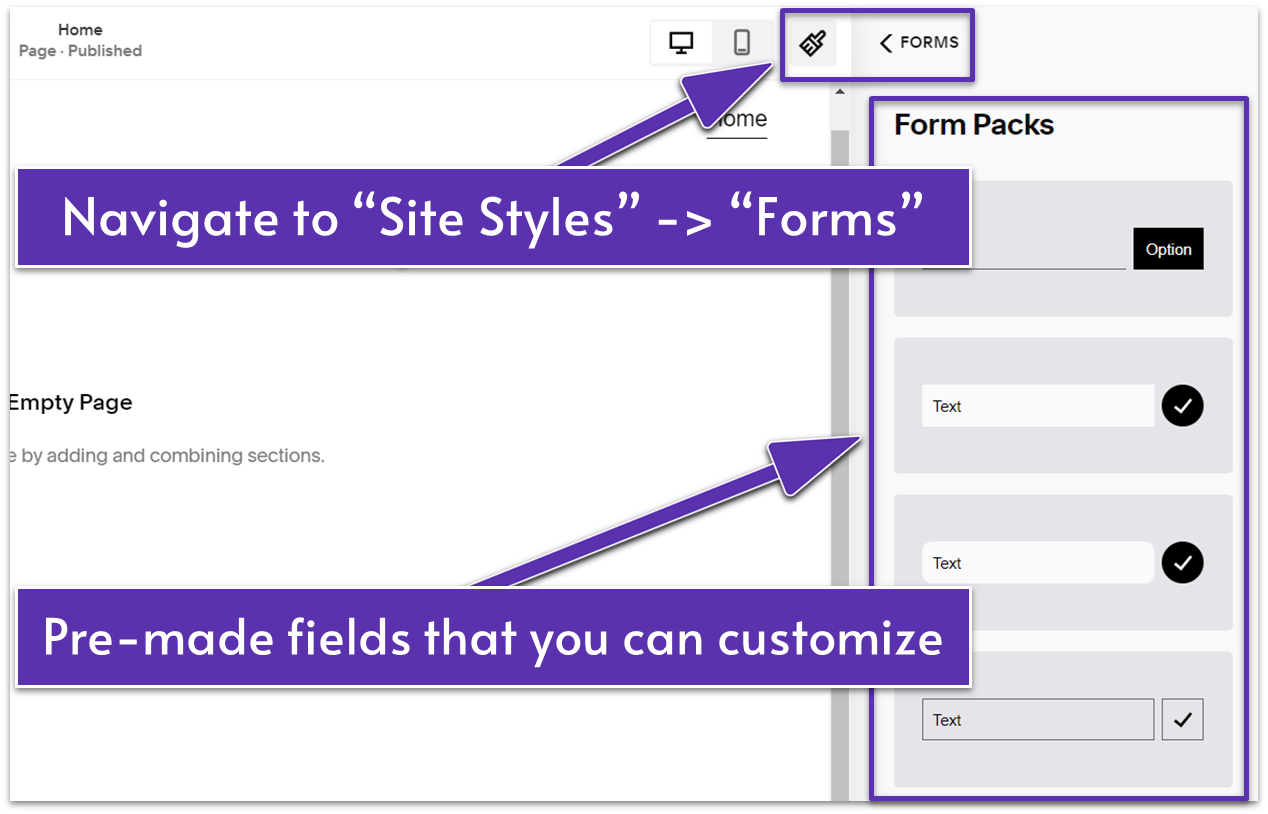
Under Forms within Site Styles, you can control the design of the fields that will appear on your forms. You can customize the fonts, colors, and shapes, apply borders, adjust the padding, add effects, and more. For a consistent look across your site, I suggest matching the design of your fields to your buttons.
Remember that if you want to build one of the sample sites as is, the next module provides the exact specifications for fields, buttons, and more.
Customize Miscellaneous Elements
To perfect your site styles to the last detail, you’ll want to navigate to Miscellaneous. Here, you’ll find Animations, Spacing, and Image Blocks options.
Animations represent the animation styles available to animate site elements as they appear on the page. You can select None or pick from styles like Fade, Scale, and others. I’d personally handle this last. This way, I can preview how the different animation styles work with my website elements.
For spacing, you can keep the default page width of 1200px and default site margin of 4vw. Our Squarespace web designer recommended a width of 1440px and site margins of 3vw for a nicer look on most sites, so try it and see what works best for your site.
For now, you don’t need to do anything regarding Image Blocks. You’ll use this feature when adding images to your website pages.
Finally, I strongly recommend handling most settings within Site Styles in Squarespace first and then proceeding to page design. This will allow you to start with a solid foundation.
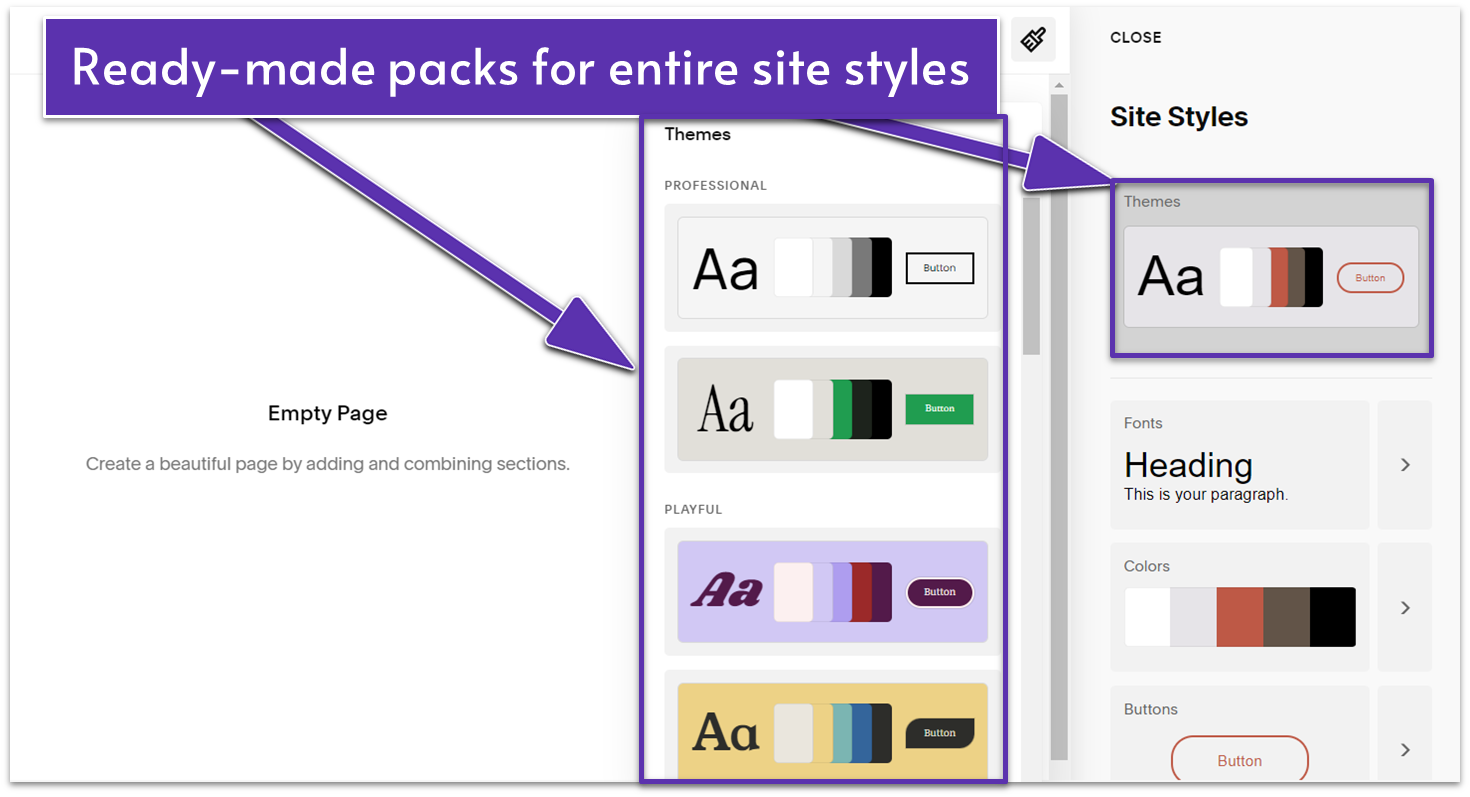
As an alternative, Squarespace makes it easy to handle all site styles in one go with its Themes feature. You can choose from Professional, Playful, Sophisticated, and other themes. These themes contain ready-made packs of fonts, colors, buttons, forms, and miscellaneous elements that you can use as they are or customize.
Gather Content and Images
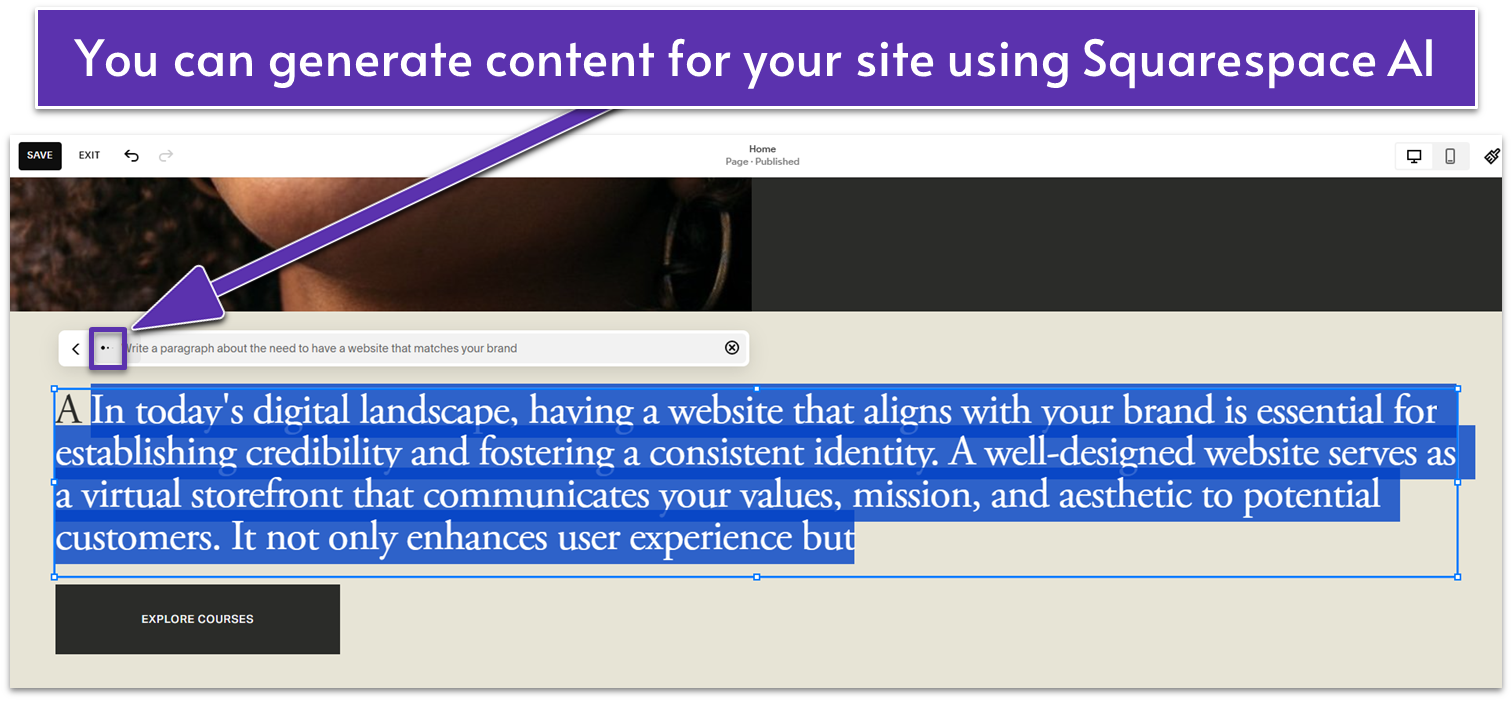
Starting with a blank page can feel overwhelming, but Squarespace provides powerful tools to make the process easier. For content, you can use Squarespace AI to generate most of the copy for your website, including product descriptions and blog posts. From there, you can customize the text to match your brand’s voice and tone and edit it to perfection.
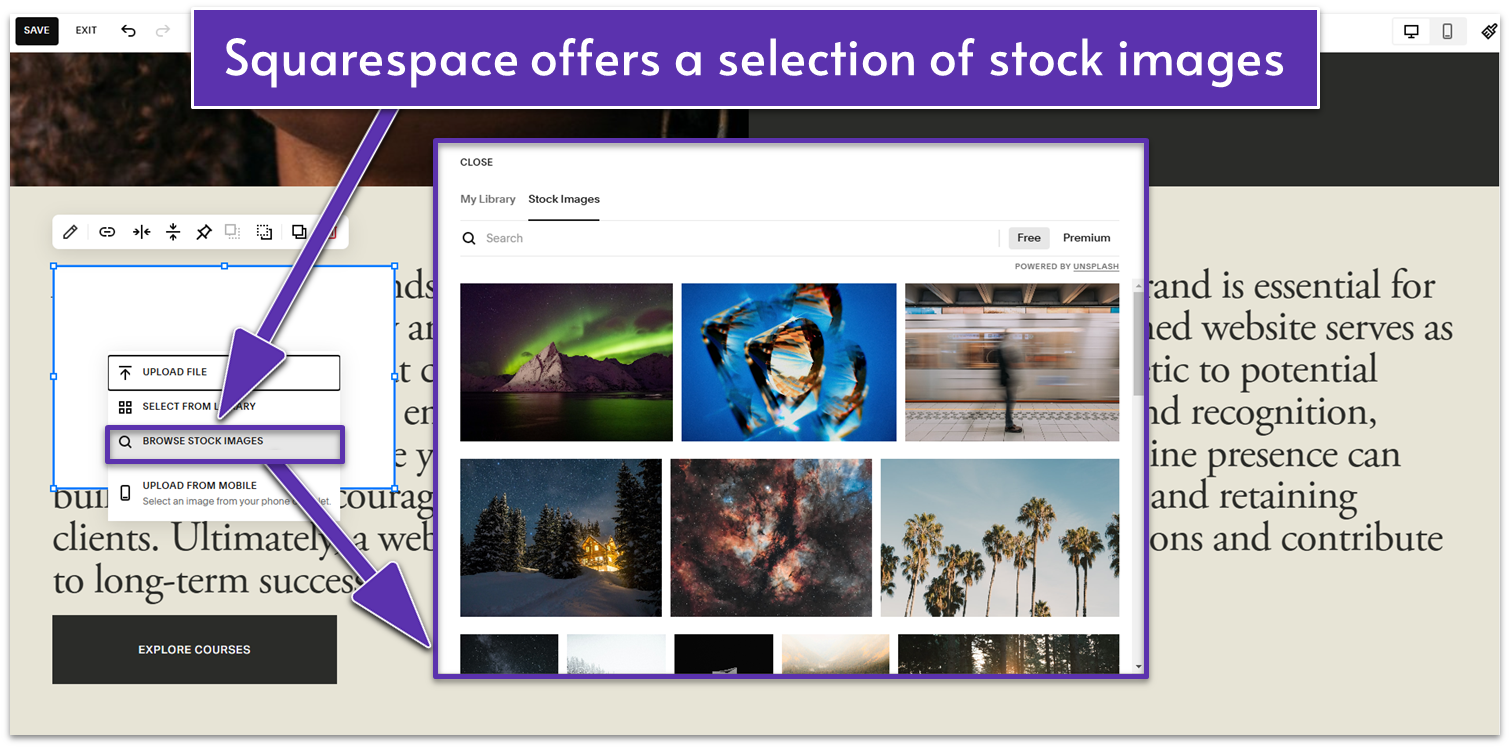
When it comes to images, Squarespace offers a built-in library of free, high-quality stock photos through its integration with Unsplash. This gives you access to thousands of professional-grade images directly within the platform.
If you love one of the sample sites we’ve created for this guide and plan to build something very similar, you already have a fairly good idea of what copy and images you’ll need – so you can source these right away and then pop them into the right pages.
However, if you plan to make more significant design changes, you might want to leave the copy and images for after you’ve finalized the design and use placeholder text and images in the interim.
Once you upload visuals to Squarespace, they will remain available in your Squarespace library and you can reuse them multiple times across your website. Be mindful of video storage which is 30 minutes (unless you pay for more), so you don’t want to upload the same content multiple times. In general, it’s wise to choose content that you can easily reuse.
Additionally, consider the following options:
- Pexels. Free stock photos and videos.
- Pixabay. Free stock photos, illustrations, videos, and music.
- Shutterstock. A premium stock photo collection.
Your content and images don’t need to be perfect right away. You can always come back to refine them as your site evolves. The goal is to get your site live quickly and refine it, so with that in mind, let’s start building.
