Inside this Article
Method 1: Setting Up Your Business Email with Hostinger (hPanel)
Using Hostinger’s proprietary control panel, you can set up your business email for as little as $2.99 per month. No other email hosting service is this cheap. hPanel is also easier to use compared to cPanel and Plesk, which makes it an ideal solution for beginners. What’s more, in our tests, Hostinger scored great for reliability and performance!Step 1 – Choose a Domain Name and Web Hosting Plan
With Hostinger, you have two options to host a business email. You can opt for one of Hostinger’s two email hosting plans, and get email hosting only. Or you can go with a super cheap shared hosting plan, and get email plus website hosting for the same cost. To me, the second option makes more sense. You get more value for your money, and you can host your business email and website in the same place. These are the three available plans: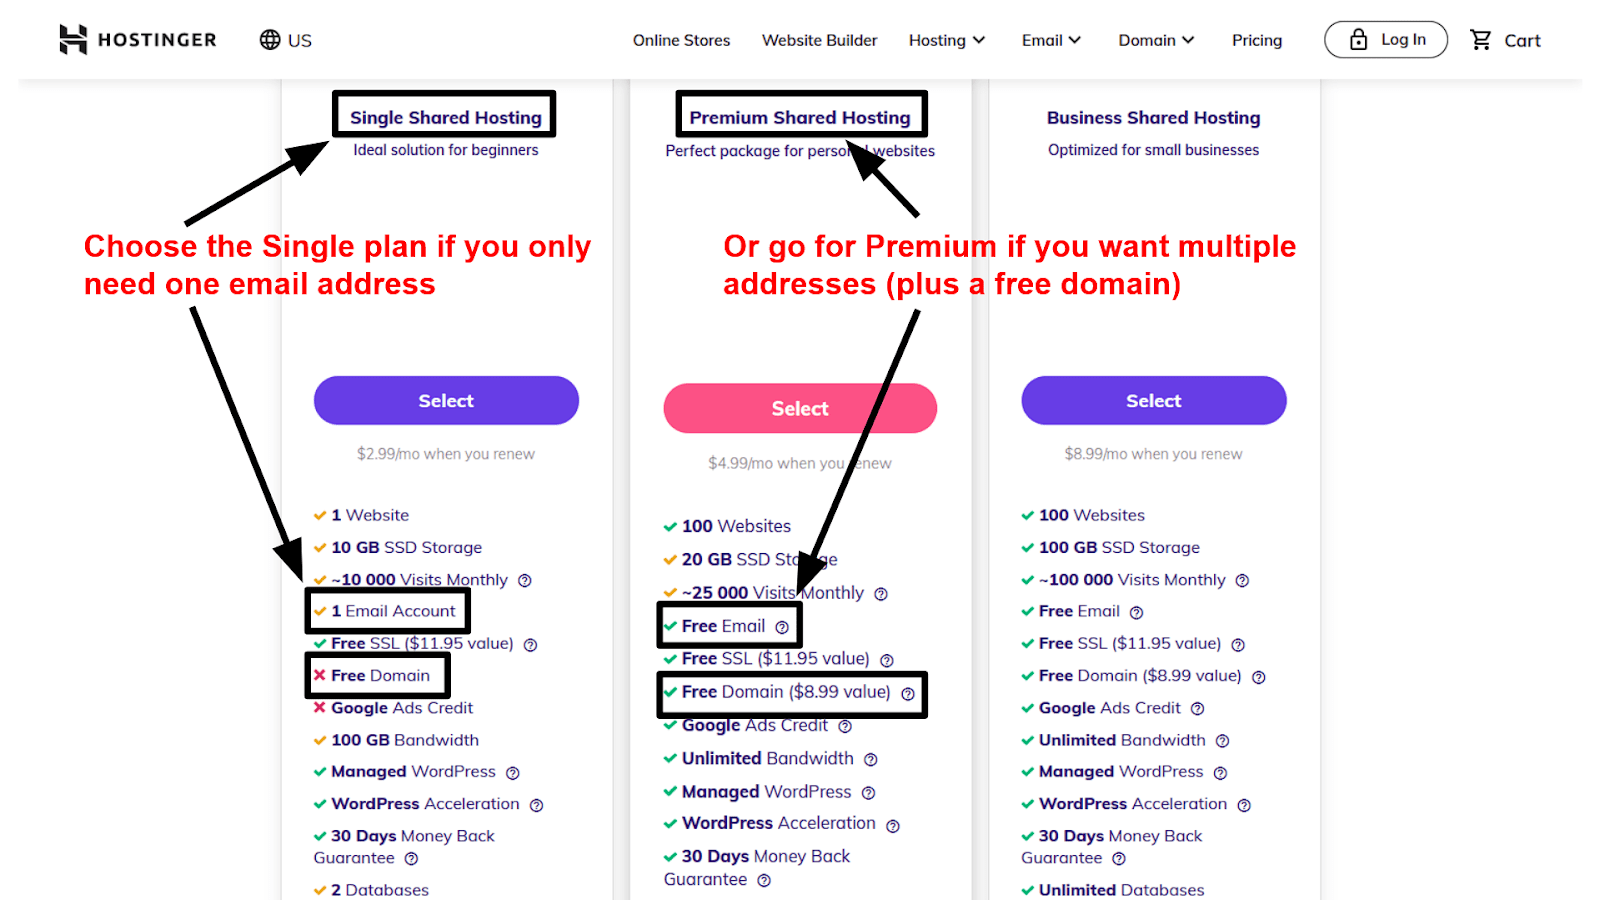 Both the Single and the Premium plans are very affordable, but if you only need one email address, the Single is the cheaper way to go. Even though the domain name isn’t included in the price, you can buy one separately at a low cost.
If you need more than one email address, the Premium plan is a better option. You get up to 100 addresses, more storage space, and a free domain for one year.
Once you’ve selected and paid for a plan, you can add your domain name using hPanel.
Both the Single and the Premium plans are very affordable, but if you only need one email address, the Single is the cheaper way to go. Even though the domain name isn’t included in the price, you can buy one separately at a low cost.
If you need more than one email address, the Premium plan is a better option. You get up to 100 addresses, more storage space, and a free domain for one year.
Once you’ve selected and paid for a plan, you can add your domain name using hPanel.
Step 2 – Log into Your Dashboard and Access hPanel
To access hPanel, hit the “Log In” button on Hostinger’s website, or type this address into your browser: hpanel.hostinger.com. Either way, you should see this screen, where you can fill in the username and password provided by Hostinger: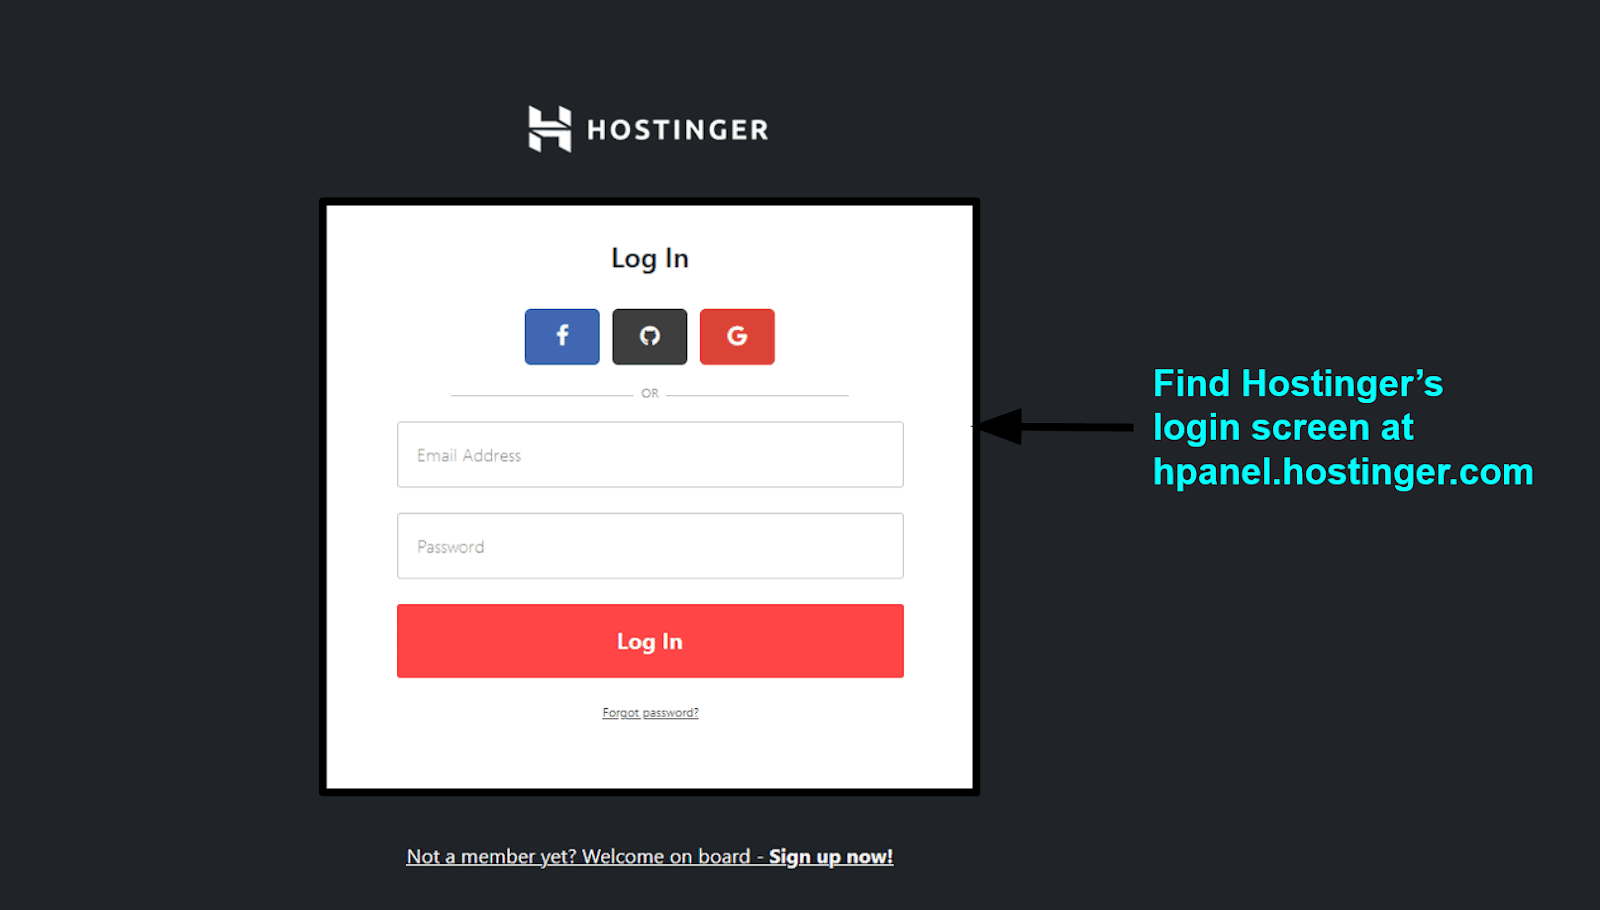 That easy, you’re in.
Step 3 – Create an Email Address
To create and manage your business email, click the “Emails” button at the top of your screen or in the side menu. Either one will do the trick. Then, go to “Email Accounts” using the menu on the left side of your screen.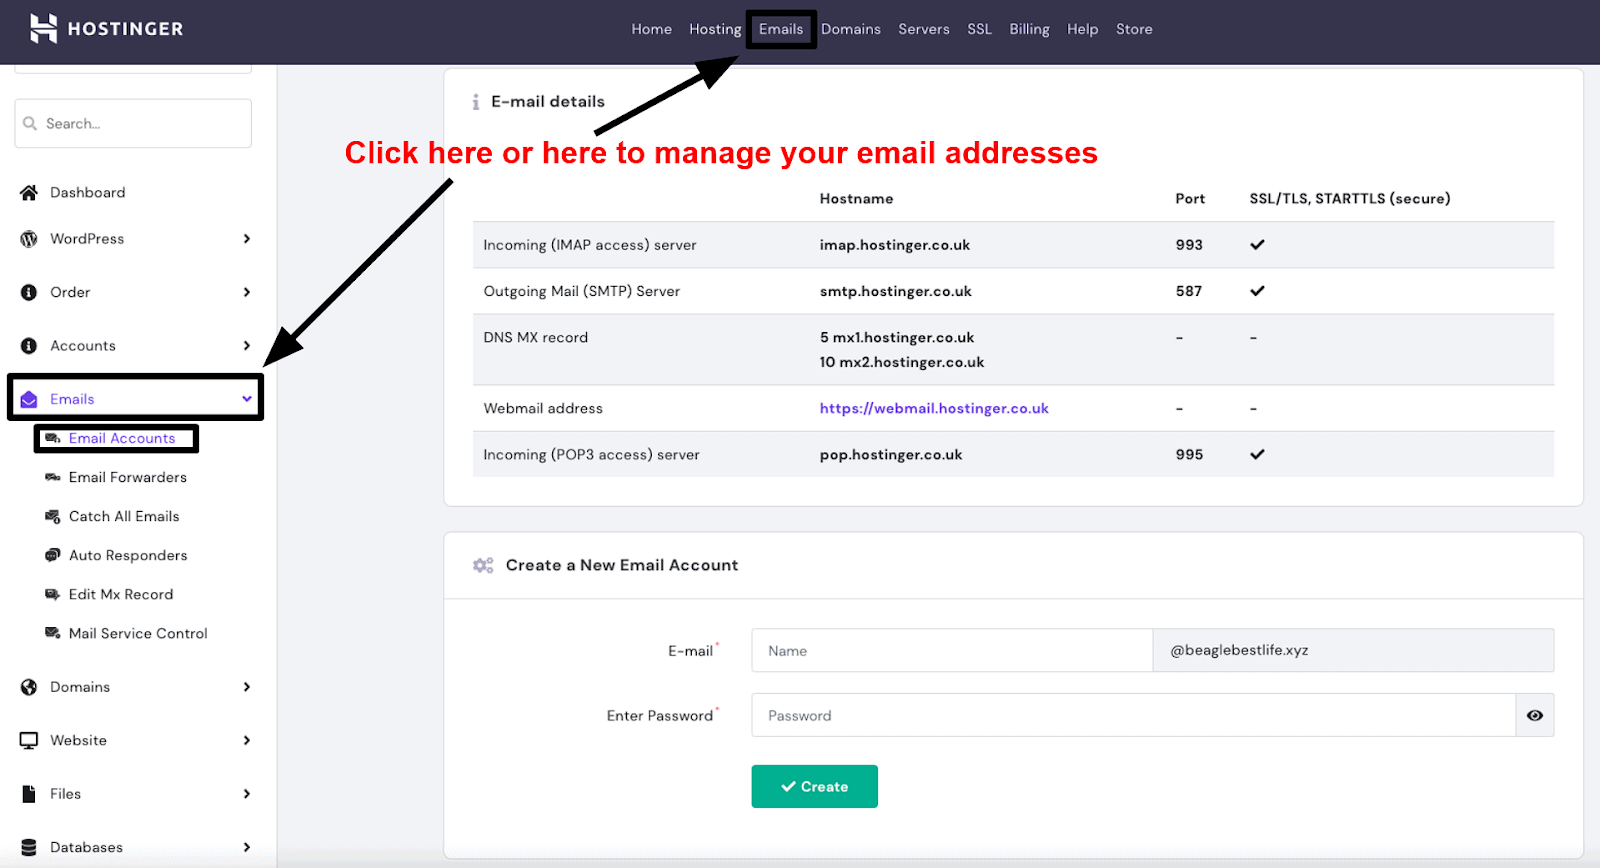 At the bottom of your current screen, you’ll find the form that lets you create a new email address. Type in the address and password, then press “Create”.
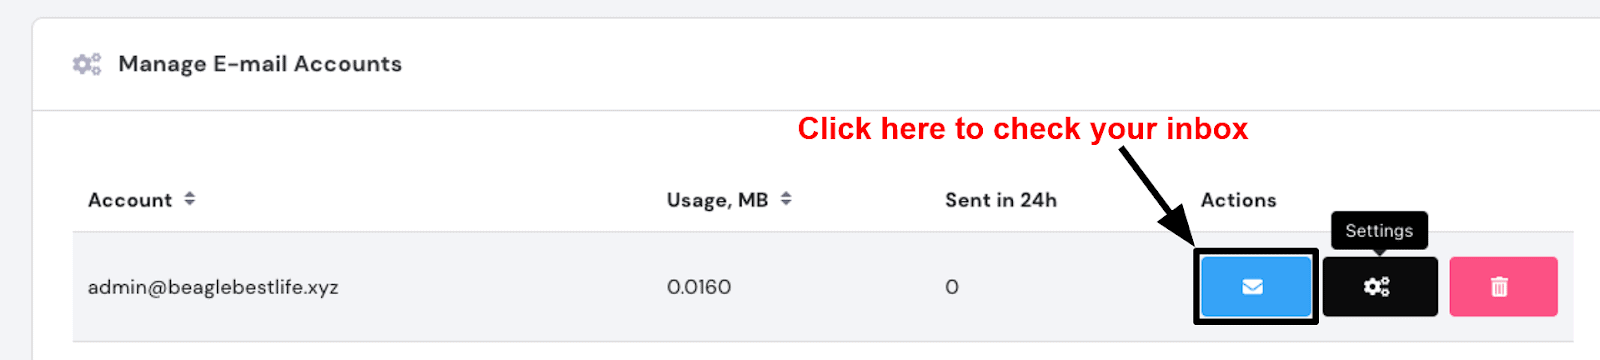
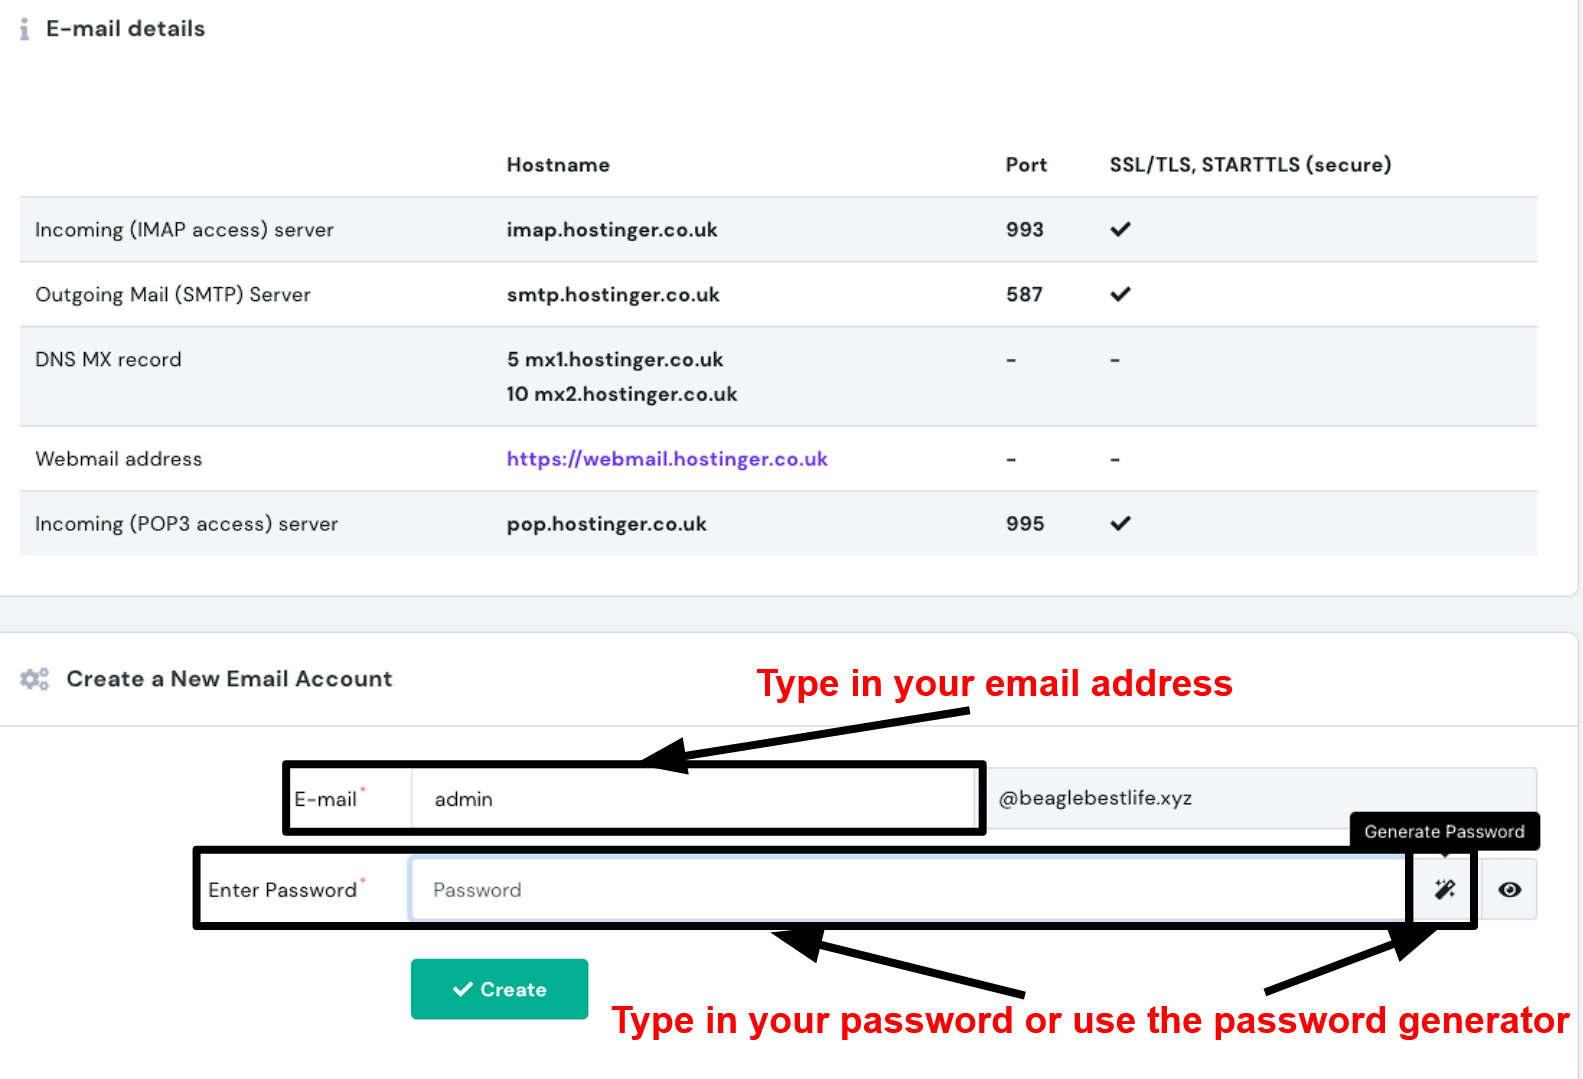 Now you’re all set. You can check your inbox by heading back to the “Email Accounts” screen, and scrolling down to the section titled “Manage Email Accounts”. Next to your address, you’ll see a blue button with an envelope on it. Click it to access the webmail client.
Step 4 – Configure Your New Email Address
From the same section that lets you “Manage Email Accounts”, click the black cogwheels button to configure the selected email address.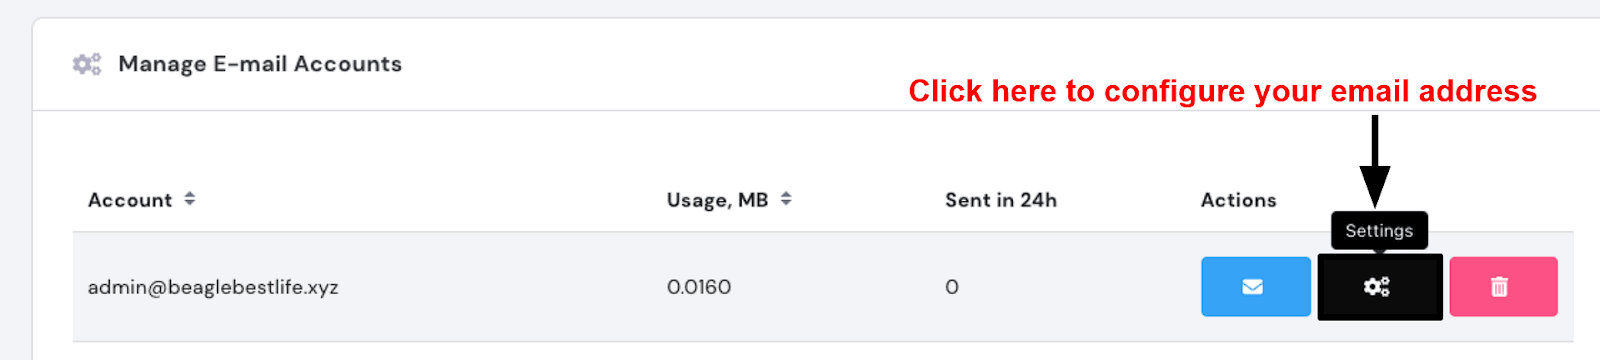 This pop-up screen is where you can change your current password, manage your spam protection/antivirus, and allocate more storage space to your inbox. Everything is neatly packed into one window:
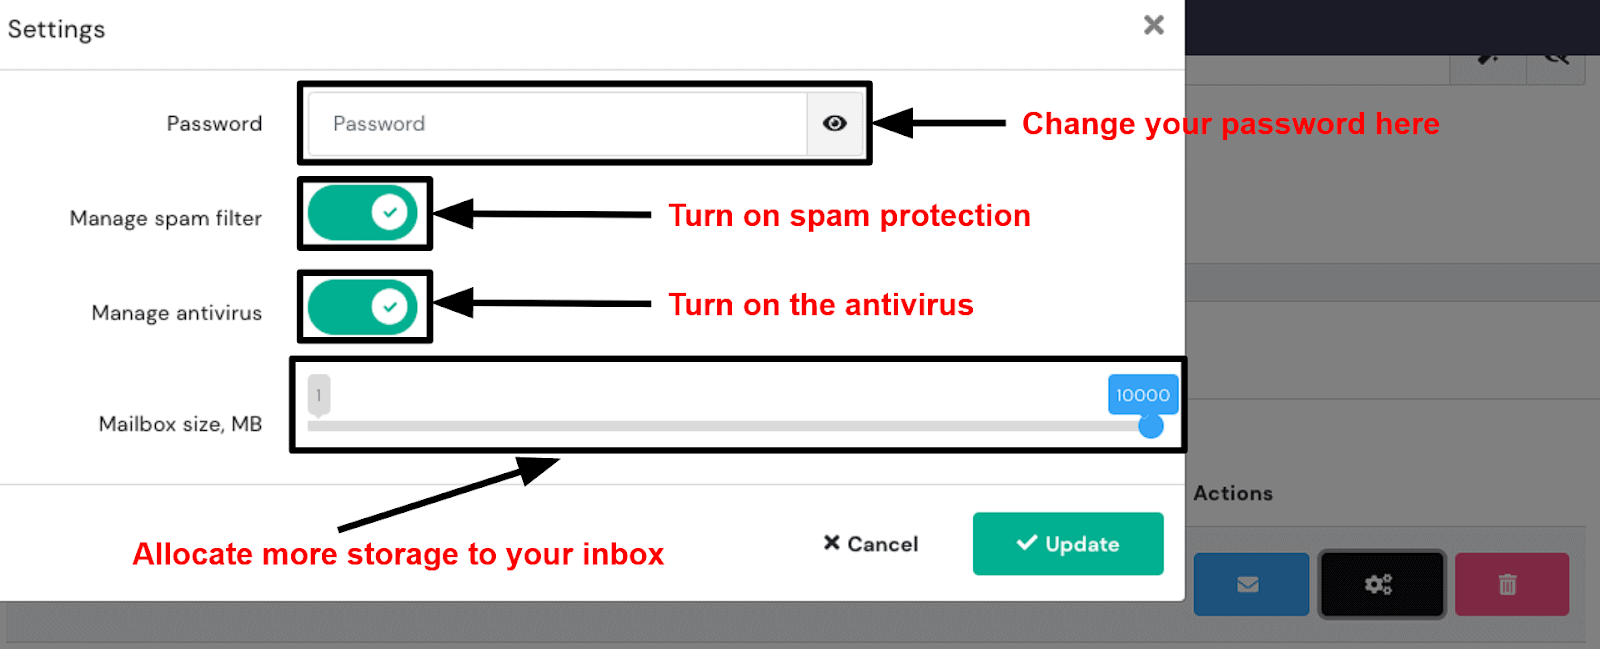 In addition, hPanel has three other configuration tools you can use to keep track of your emails. You’ll find these in the menu on the left-hand side of your screen, under the “Emails” section:
Clicking on “Email Forwarders” takes you to the following screen, where you can type in the email address you want to forward, and the email address you want your correspondence to be forwarded to:
In addition, hPanel has three other configuration tools you can use to keep track of your emails. You’ll find these in the menu on the left-hand side of your screen, under the “Emails” section:
Clicking on “Email Forwarders” takes you to the following screen, where you can type in the email address you want to forward, and the email address you want your correspondence to be forwarded to:
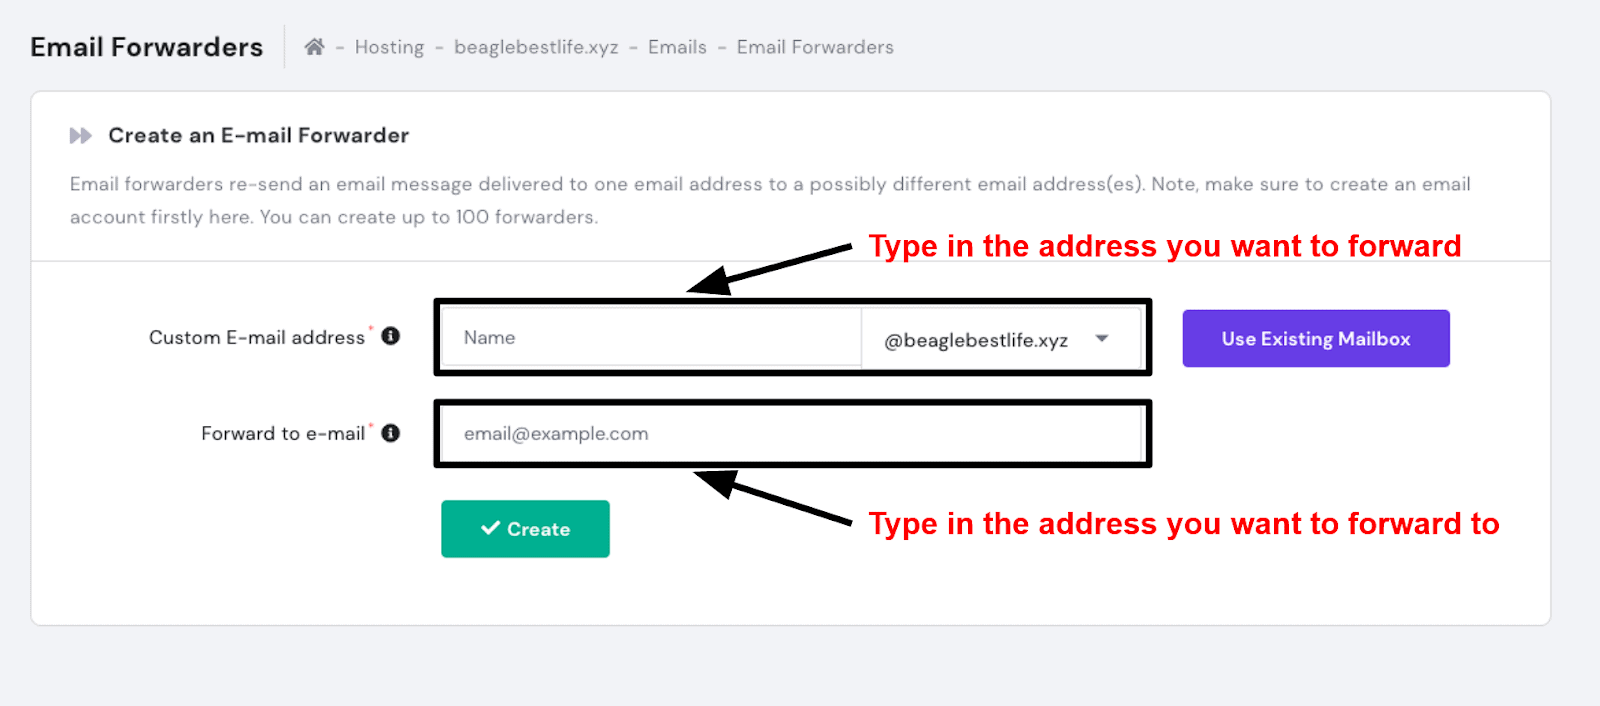 You can use email forwarders to group up all the messages that are sent to different business addresses (for example, to your sales and customer support departments). Or you can forward all your emails to a different client entirely. If you’d rather use Gmail, for instance, you can type a Gmail address in the second field.
One feature that is fairly unique to Hostinger is its “Catch-All Emails” tool. This lets you receive emails that are sent to a misspelled address, and forward them to your correct address. To set it up, you just select your domain from a dropdown list, and choose the address to forward to.
You can use email forwarders to group up all the messages that are sent to different business addresses (for example, to your sales and customer support departments). Or you can forward all your emails to a different client entirely. If you’d rather use Gmail, for instance, you can type a Gmail address in the second field.
One feature that is fairly unique to Hostinger is its “Catch-All Emails” tool. This lets you receive emails that are sent to a misspelled address, and forward them to your correct address. To set it up, you just select your domain from a dropdown list, and choose the address to forward to.
 Finally, you can quickly create autoresponder messages using this form:
 Whenever you’re out of office or on vacation, you can use this tool to notify your clients. In addition, the custom settings at the bottom of the screen let you schedule each autoresponder ahead of time. Create the message, then forget about it.
Overall, Hostinger gives you the same tools that you’d get with cPanel or Plesk, but at a lower cost. Its proprietary control panel is easy to navigate, and you don’t have to click through as many options to configure your email addresses.
Whenever you’re out of office or on vacation, you can use this tool to notify your clients. In addition, the custom settings at the bottom of the screen let you schedule each autoresponder ahead of time. Create the message, then forget about it.
Overall, Hostinger gives you the same tools that you’d get with cPanel or Plesk, but at a lower cost. Its proprietary control panel is easy to navigate, and you don’t have to click through as many options to configure your email addresses.
Method 2: Setting Up Your Business Email in cPanel
Most shared hosting providers use cPanel. It isn’t pretty, but it’s powerful and convenient once you learn your way around.Step 1 – Choose a Domain Name and Web Hosting Plan
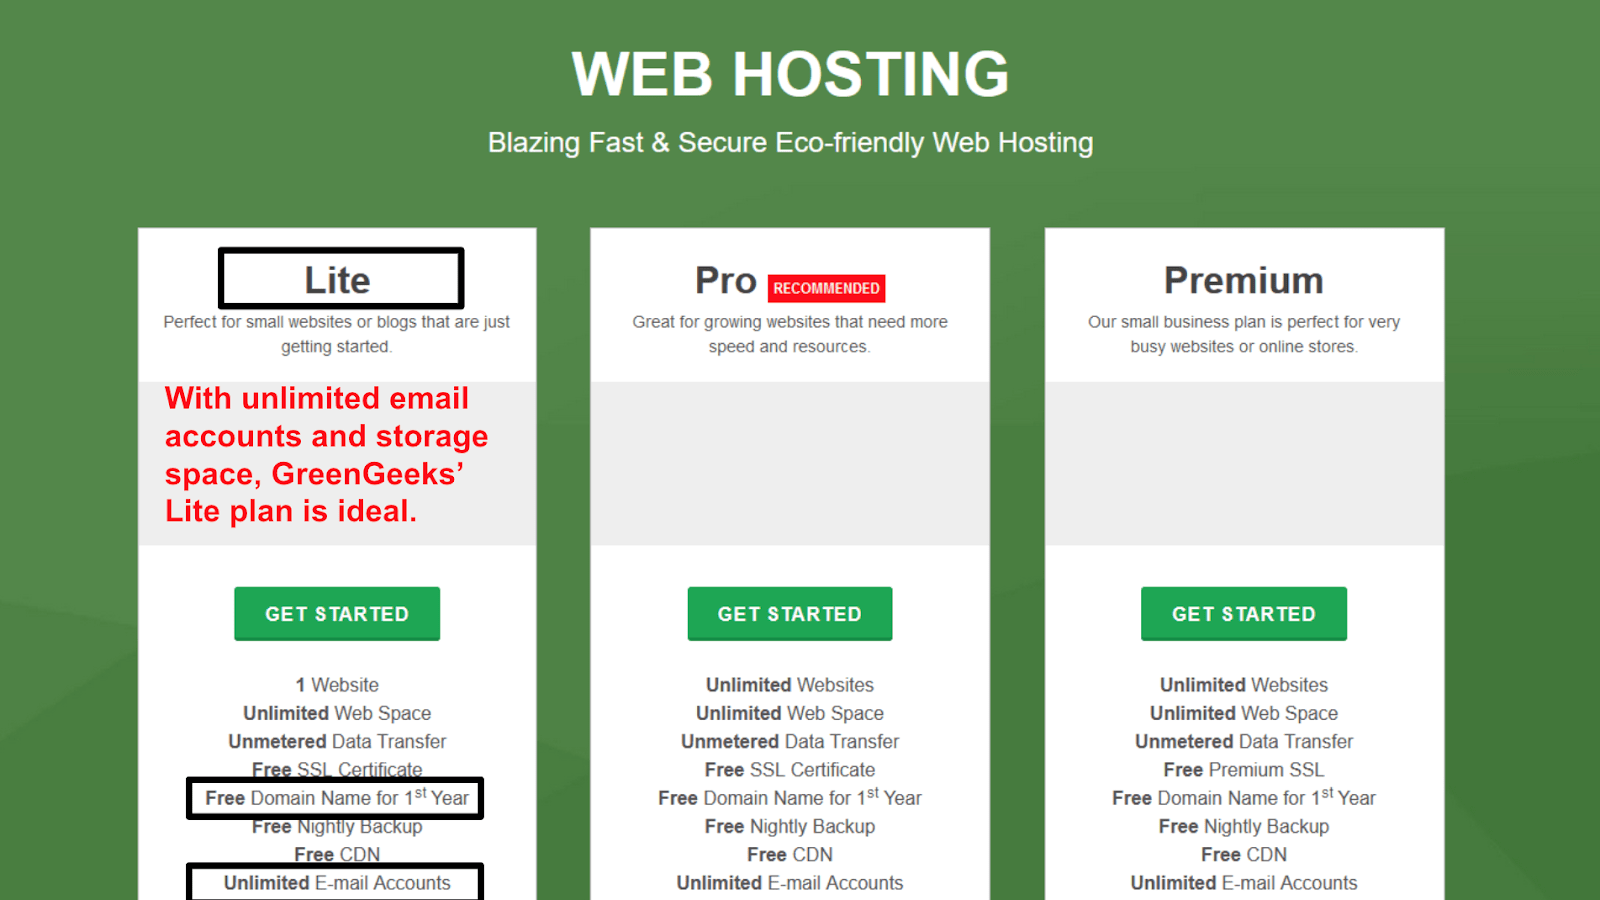
InterServer, GreenGeeks, FastComet, A2 Hosting, and many others offer cPanel hosting. If you already have a cPanel plan, you can skip to the next step. Otherwise, this is the time to select a plan and a domain name for your email. With most hosts, domain registration for the first year is included for free. This isn’t the case with InterServer, but if you opt for the Standard shared hosting plan, domain names are heavily discounted. Plus, you get unlimited storage space and spam protection for your email.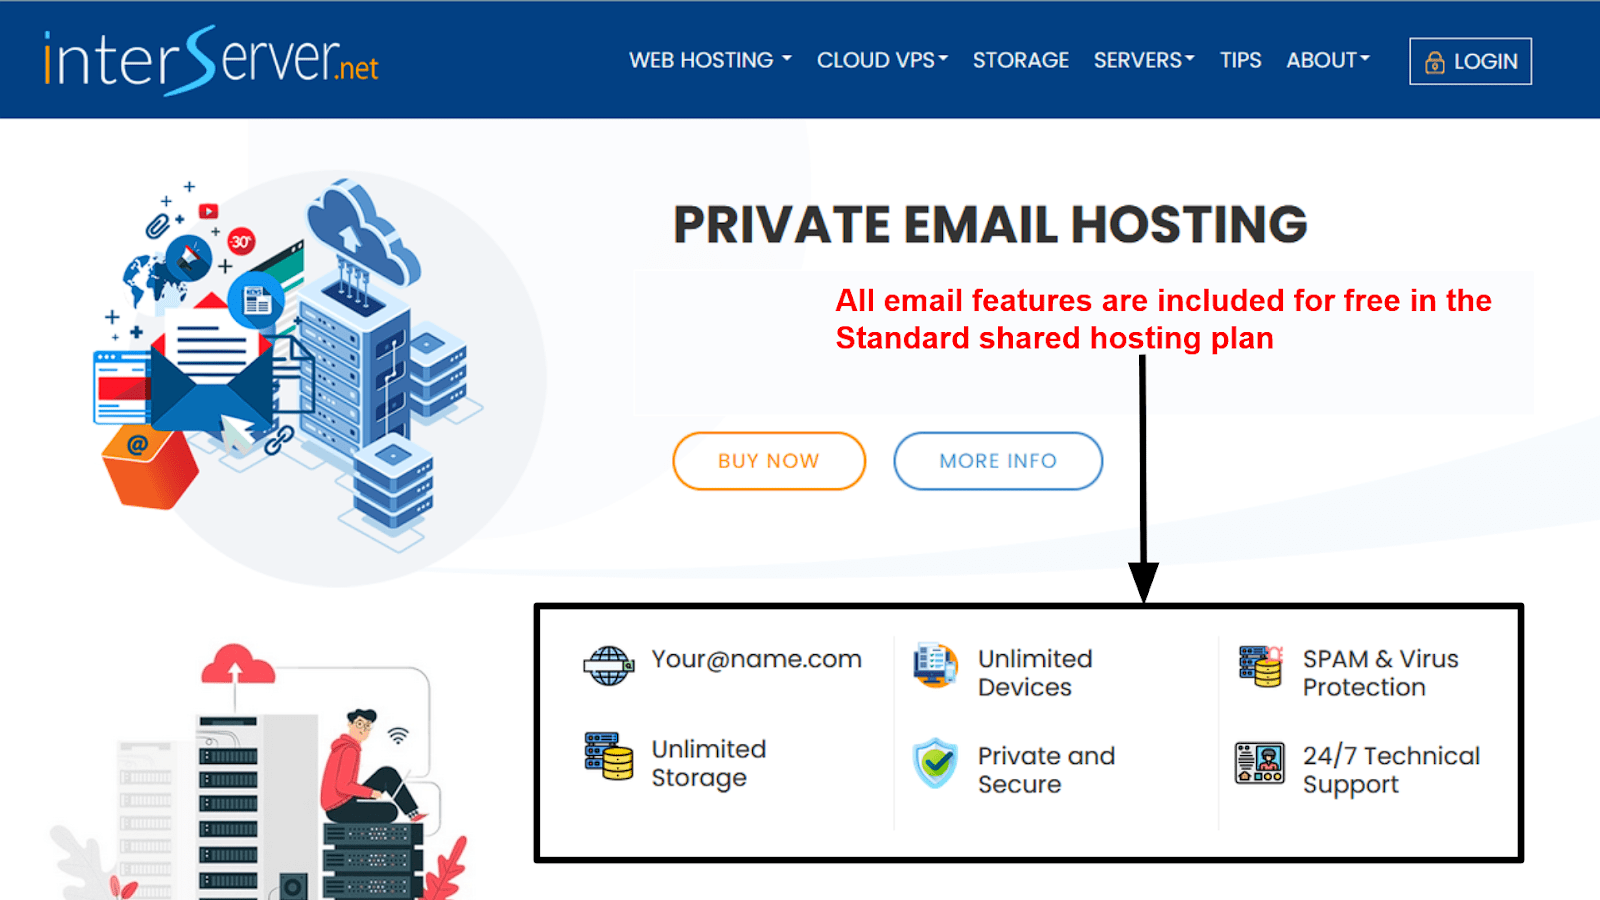 GreenGeeks is slightly more expensive after renewal, but its entry-level plan includes a free domain, unlimited storage, and spam protection: a great set of features for a business email.
 These are just a couple of examples. Generally speaking, an entry-level web hosting plan from any of these top-rated hosting services should be more than enough to host a professional email. Pick your favorite host, sign up, then move on to the second step.
Step 2 – Log into Your Dashboard and Access cPanel
Now that you have a domain and hosting, you can access cPanel to set up your business email. This step might differ depending on the host you use, but as a general rule, you’ll first have to log into your dashboard, and then find the cPanel access button. To give you an example, here’s the login screen for InterServer: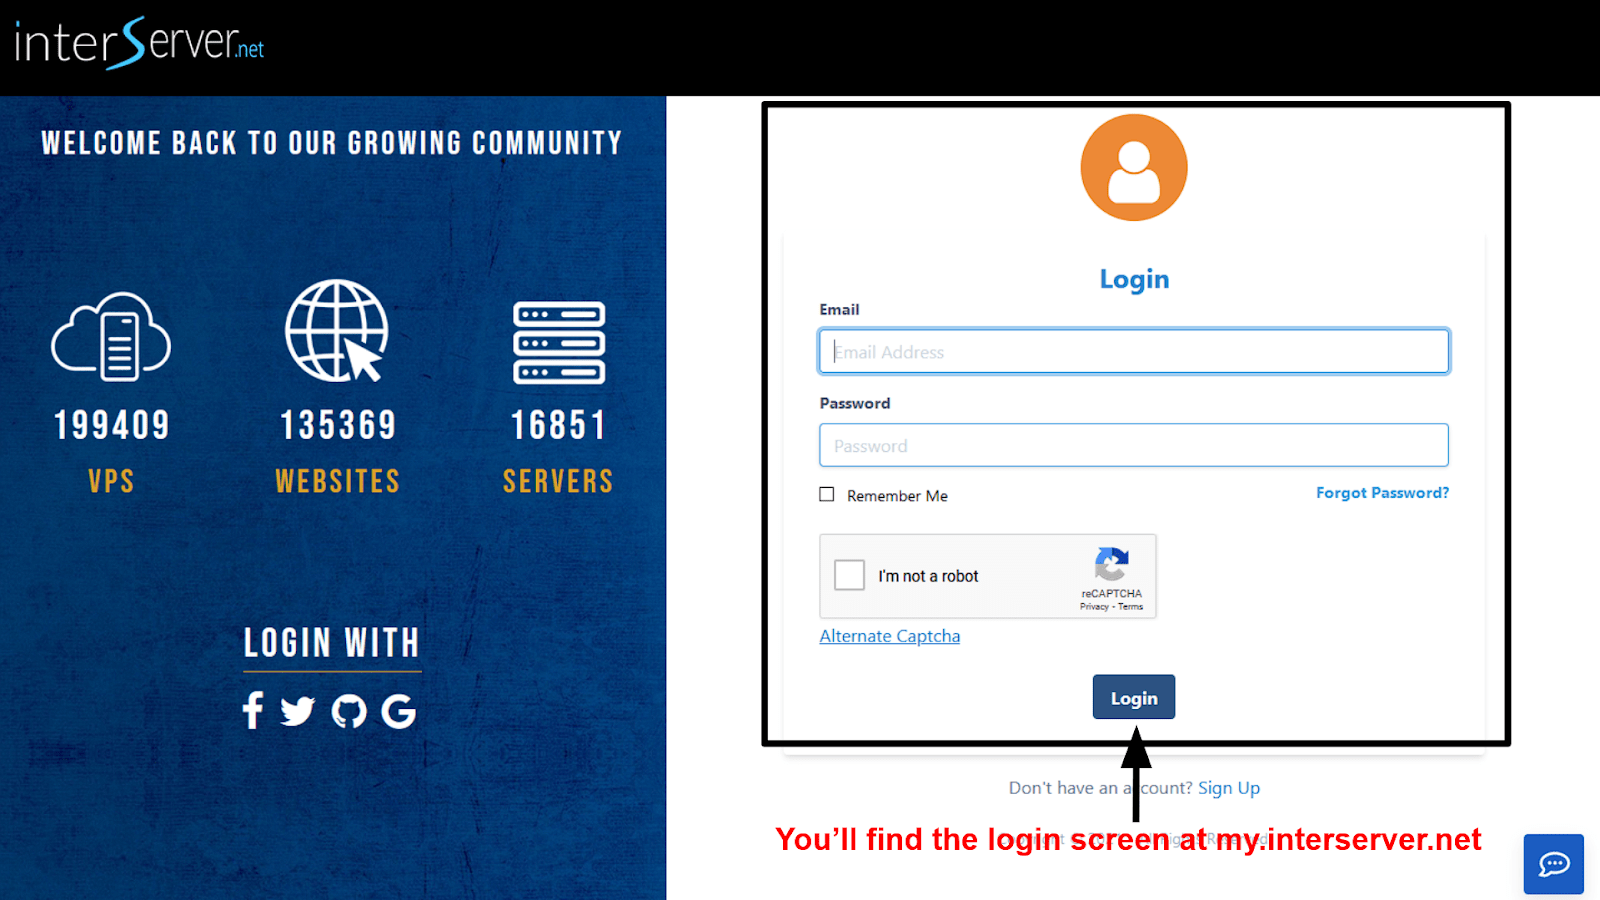 Once you’re logged in, you can scroll down to the bottom of the admin page. Here, you should see the cPanel access button:
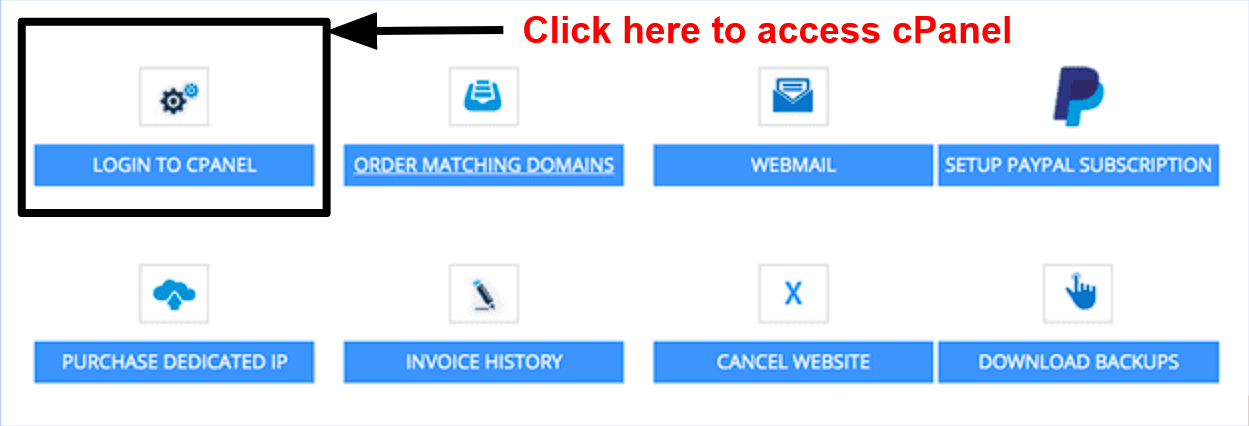 If you’re using a different host and you get lost on the way, don’t panic. Head over to the host’s knowledge base and look up “how to access cPanel” for detailed instructions.
Step 3 – Create an Email Address
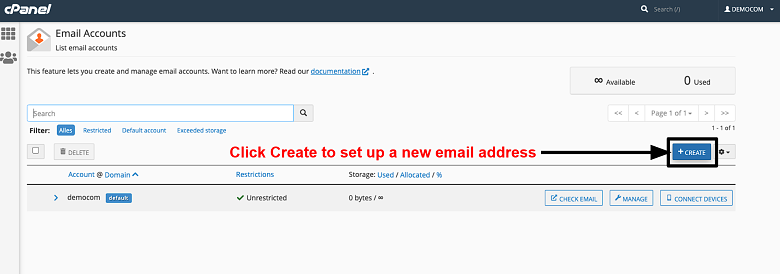
Once you’re logged into cPanel, you should see the following screen. Told you it isn’t pretty, but looks aside, it gets the job done. Click on “Email Accounts” to get started.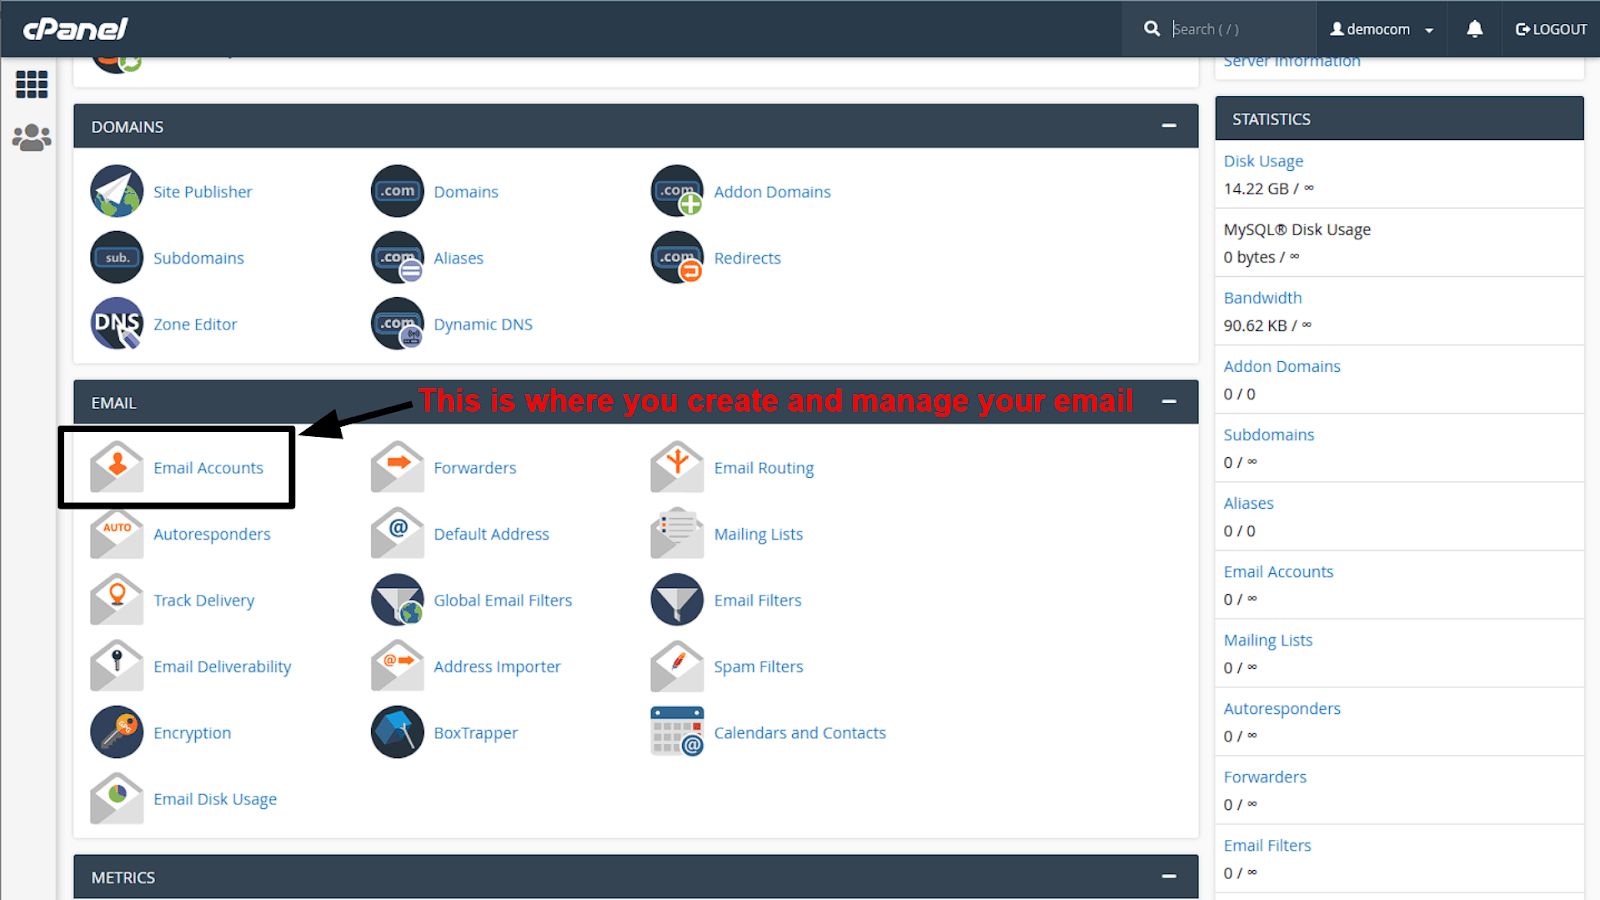 Then, click the “Create” button to set up your first email address.
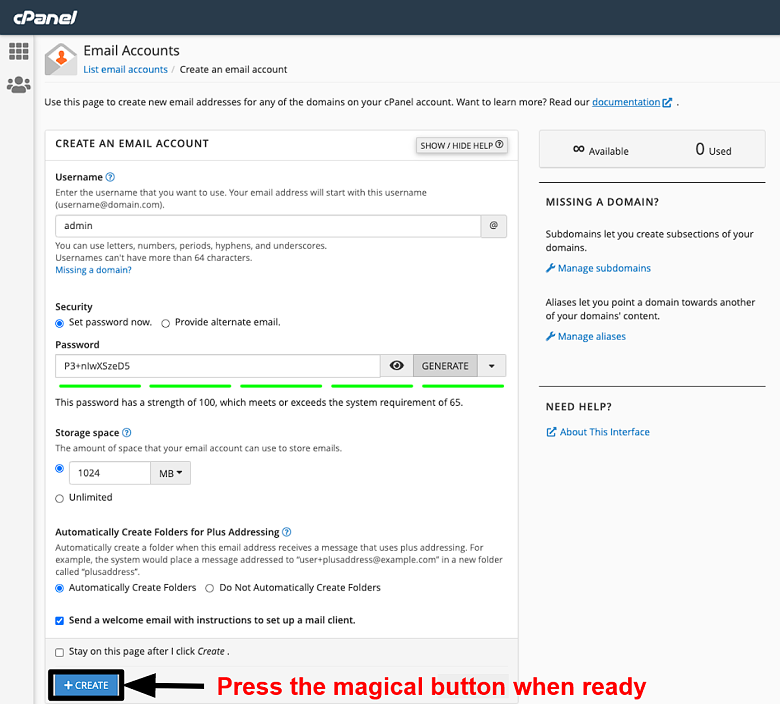
 The next screen is where you type your email username (as in username@yourdomain) and password. You can use the built-in password generator if you’re not feeling particularly inspired.
You’ll also be asked to allocate a certain amount of storage space to your email. Unless you send or receive a lot of media, 1GB (or 1024MB) should be more than enough per mailbox. But if you’re on a plan with unlimited storage, feel free to tick the “Unlimited” box.
At the bottom of the screen, you’ll find the option to receive an email with further instructions for setting up your mail client. You want this ticked.
The next screen is where you type your email username (as in username@yourdomain) and password. You can use the built-in password generator if you’re not feeling particularly inspired.
You’ll also be asked to allocate a certain amount of storage space to your email. Unless you send or receive a lot of media, 1GB (or 1024MB) should be more than enough per mailbox. But if you’re on a plan with unlimited storage, feel free to tick the “Unlimited” box.
At the bottom of the screen, you’ll find the option to receive an email with further instructions for setting up your mail client. You want this ticked.
 This is an example of how everything should look before you press the “Create” button:
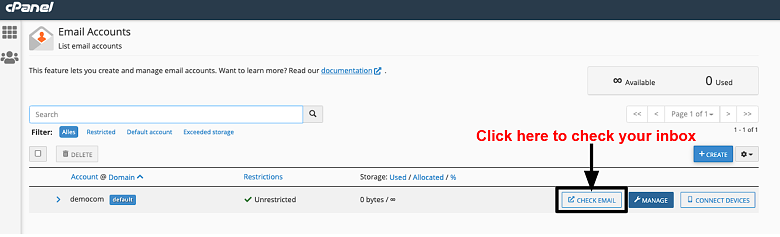
 That’s it! To check your inbox, find the address in the “Email Accounts” screen, and click the “Check email” button:
Step 4 – Configure Your New Email Address
Once you’ve set up your business email, you can click the “Manage” icon to change your password and the amount of storage allocated to each inbox.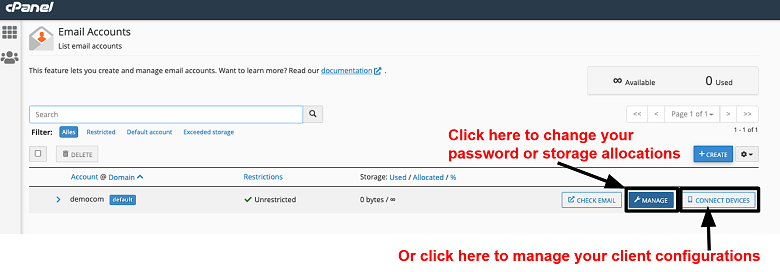 You can also click on “Connect Devices” to change the configuration of your mail client. It’ll bring up this scary-looking screen:
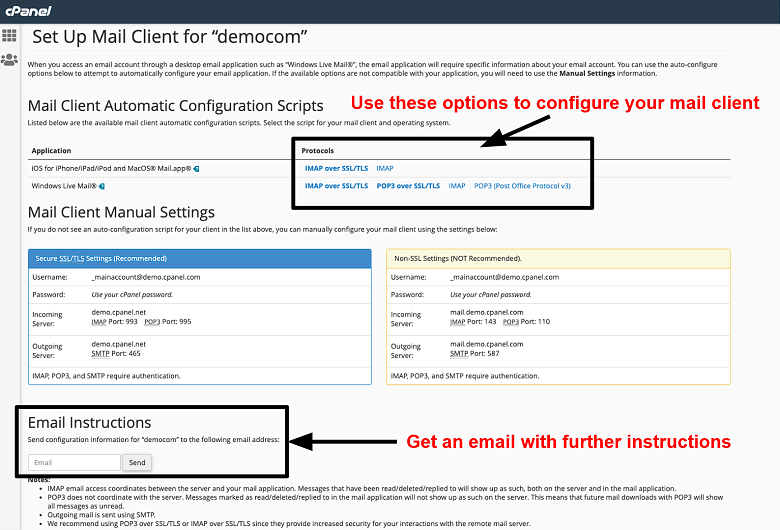 If these options sound like gibberish, that’s alright. All you need to know is:
- The IMAP protocol stores your emails on the server, so you can access them from any device. This is the setting used by most email clients.
- The POP3 protocol downloads your emails to the device you’re using to access them (your desktop or phone, for example). Then, it deletes the emails from the server. You can use this setting to save server space, or if you want to better secure your emails.
- “Over SSL/TLS” is a way to connect to the server that is better secured. If available, you should always use it.
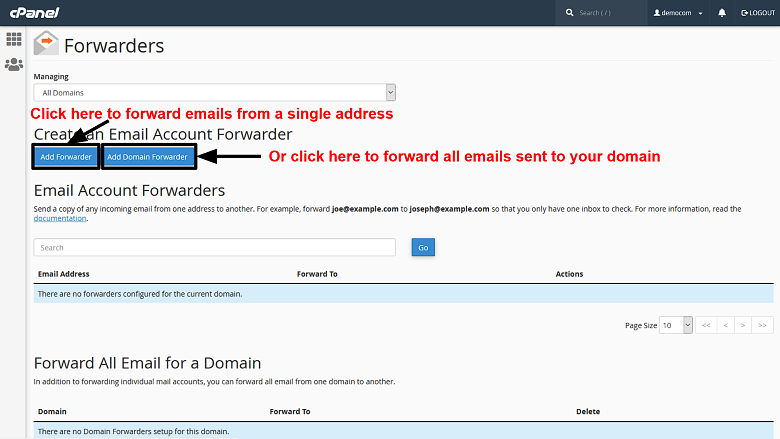
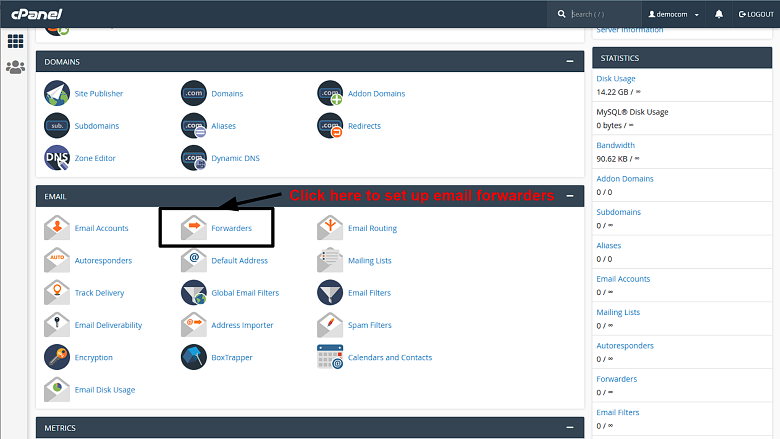 Then, go to “Add Forwarder” to forward emails from a single address, or “Add Domain Forwarder” to forward all emails sent to your domain.
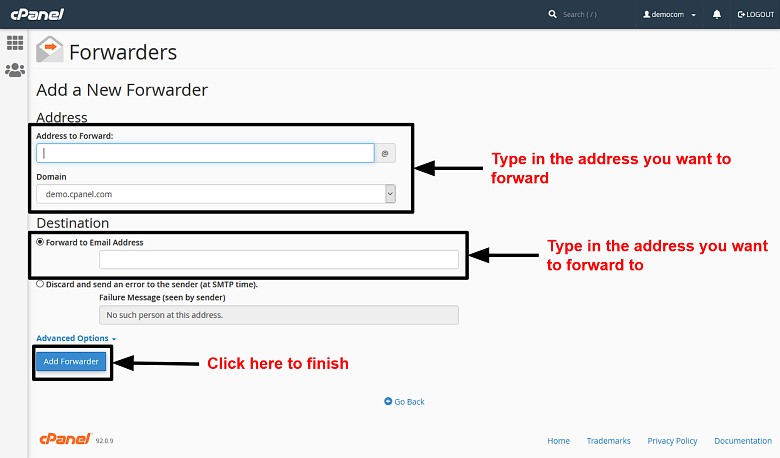
 Once you’re on the correct screen, type in the email address you want to forward, and the address you want everything to be forwarded to. If you prefer to use the Gmail client, for example, type a Gmail address in the second field.
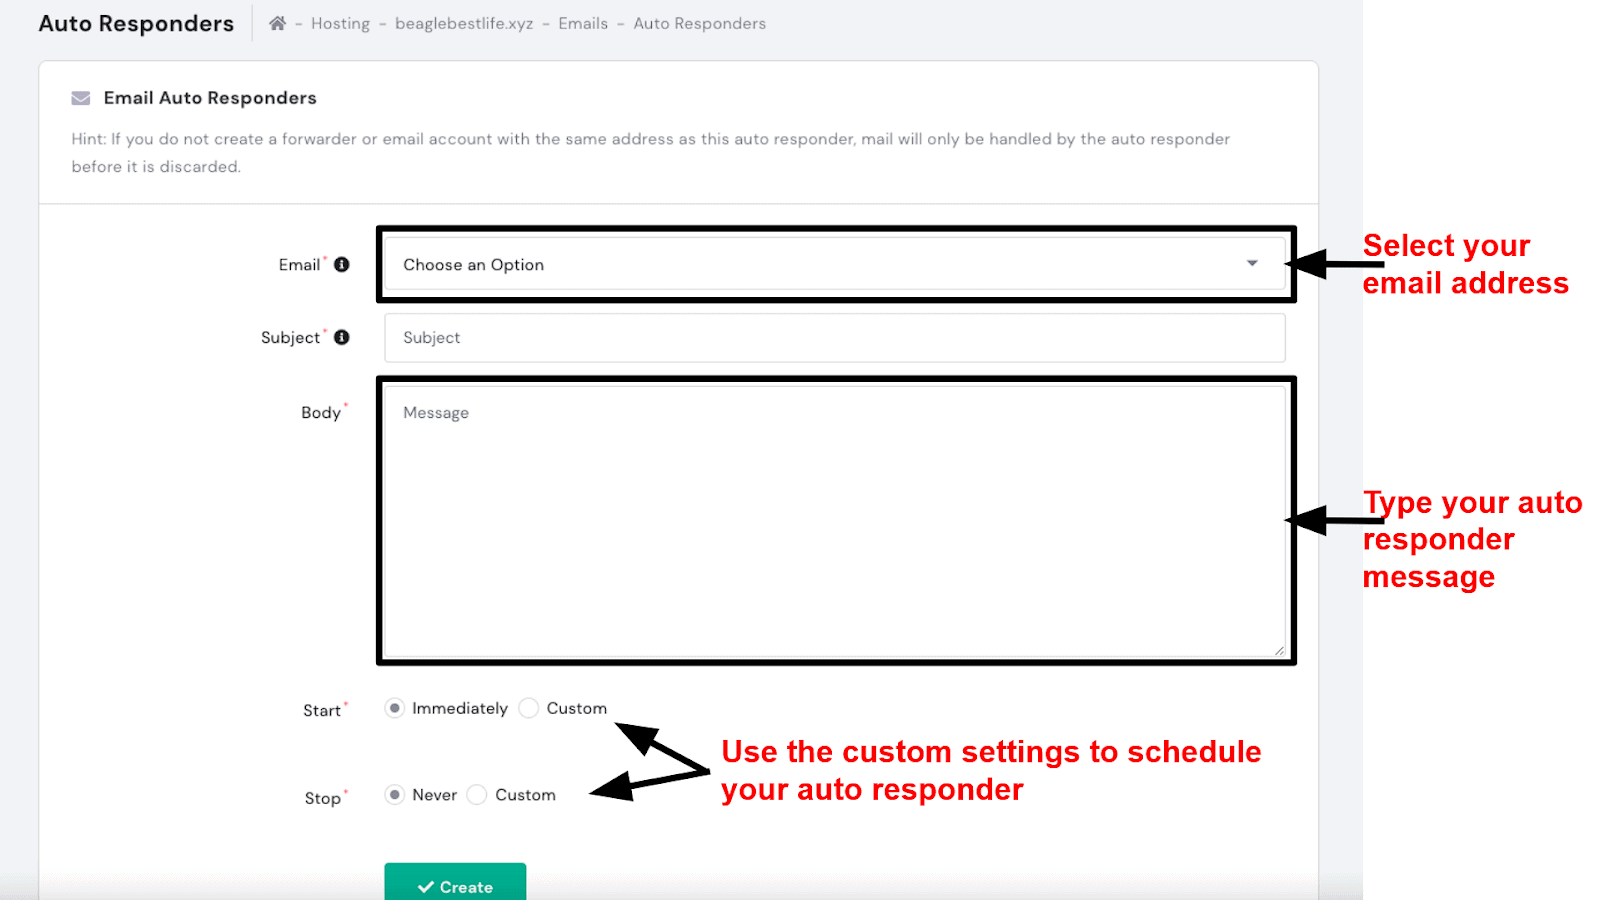
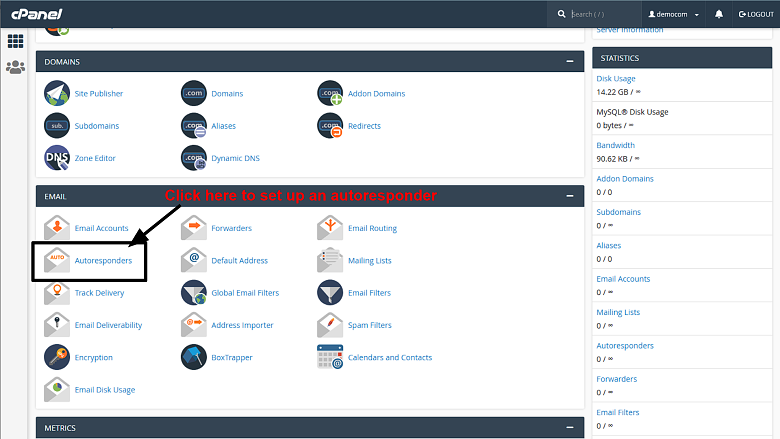
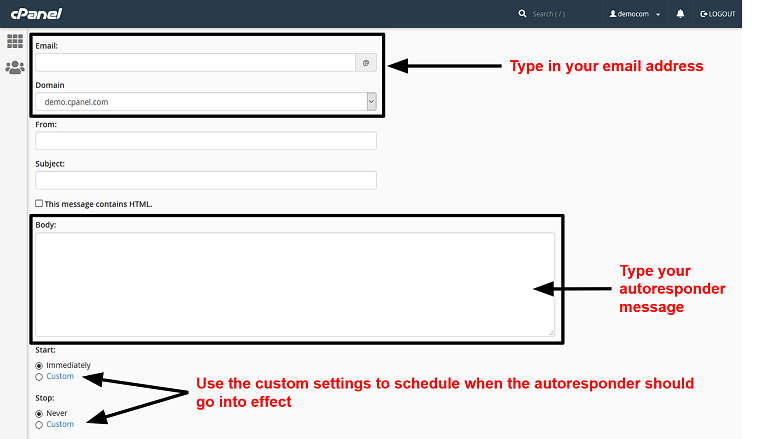
 If you want to set up an autoresponder, head back to the main cPanel screen, and click on “Autoresponders”.
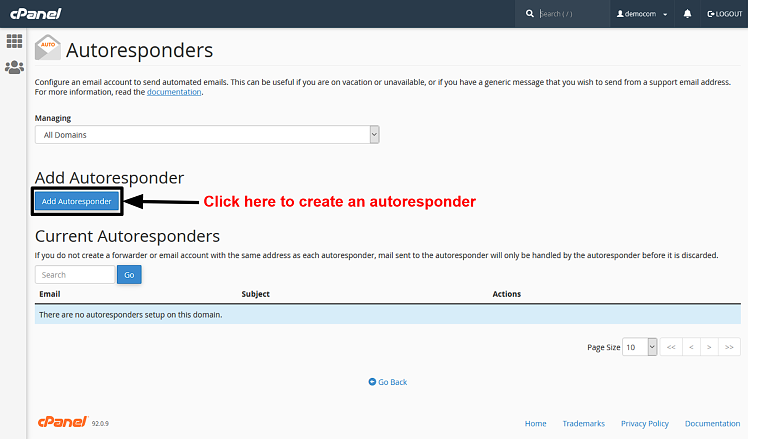
 Click “Add Autoresponder” to create and schedule a new automated message.
 Type in your email address, and create a custom message for your autoresponder. For example, you could say that your office is closed at the moment, but that you’ll return shortly after the holidays (or a specific date). That’s all up to you.
Press the “Create” button to finalize the autoresponder.
Type in your email address, and create a custom message for your autoresponder. For example, you could say that your office is closed at the moment, but that you’ll return shortly after the holidays (or a specific date). That’s all up to you.
Press the “Create” button to finalize the autoresponder.
 Although there are other things you can tweak using cPanel, the email features we’ve looked at so far are the ones you’re most likely to use on a daily basis. Just remember: before you can use this method to set up and configure your business email, you’ll need a web host that uses cPanel.
Method 3: Setting Up Your Business Email in Plesk
Plesk is not as popular as cPanel, but if you ask me, it’s better organized and easier to navigate. Let’s take a closer look.Step 1 – Choose a Domain Name and Web Hosting Plan
To set up your business email with Plesk, you need Plesk-based web hosting. Unfortunately, not many hosts offer this control panel on their cheap shared hosting plans. Instead, Plesk is usually included with Windows (or ASP.NET) hosting, which tends to be more expensive. For example, you can get Plesk with InterServer’s ASP.NET Standard hosting plan, in addition to unlimited email and storage space. The plan isn’t expensive, but it isn’t cheap either, so I don’t recommend it unless you actually need Windows hosting for a custom website.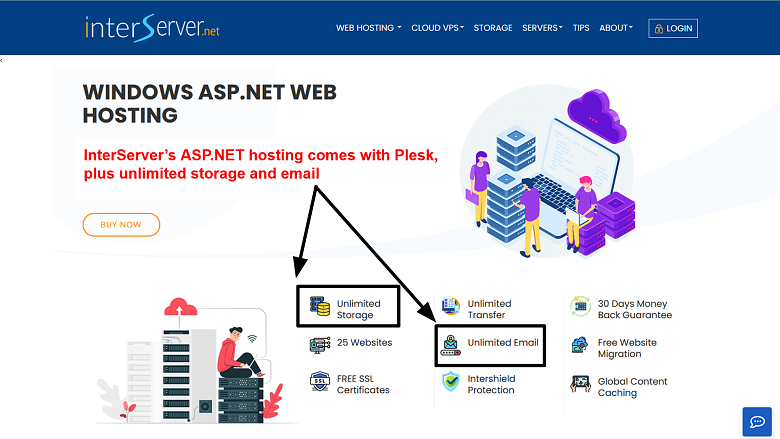 If you’re looking for the cheapest way to host a business email, you might want to skip ahead to my third method. Otherwise, if you already have a Plesk hosting plan (or you intend to buy one), follow me to the next step.
Step 2 – Log into Your Dashboard and Access Plesk
Each host’s dashboard is a little different, but you should be able to find the option to open your control panel from the main screen. If you can’t find this option, head over to your host’s knowledge base and look up “how to access Plesk” for detailed instructions. You can also open Plesk directly by typing the following address into your browser: https://<your domain name or the server IP address>:8443 You should then see this screen, which lets you input the username and password provided by your host (usually in a welcome email):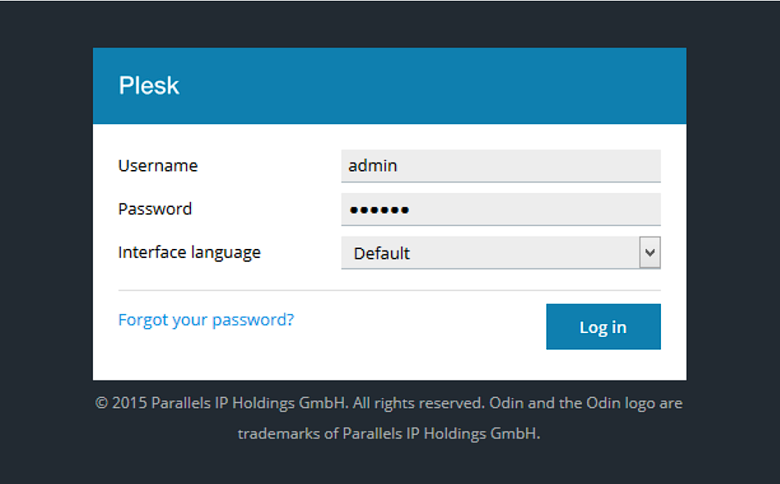
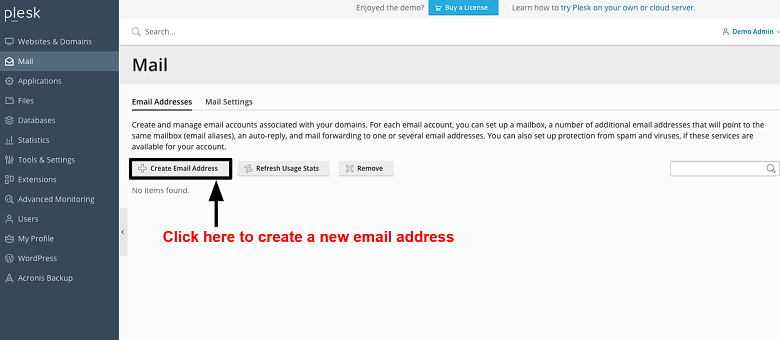
Step 3 – Create an Email Address
Once you’re logged into Plesk, you’ll see a menu on the left side of your screen. Click on “Mail” to proceed.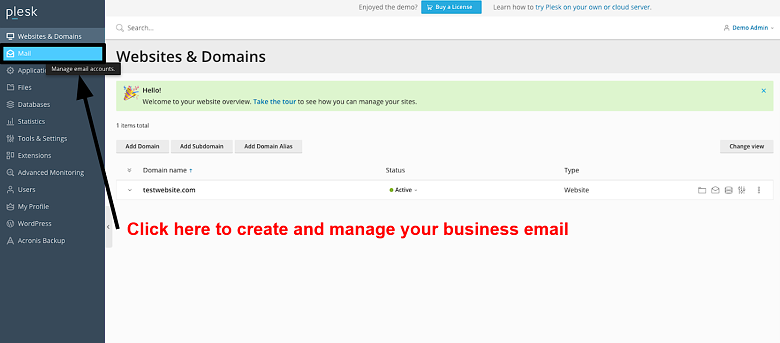 Next up, select “Create Email Address” to set up a new business email.
 Now, you can type in your email address and password, then allocate storage space to your inbox. If you don’t get a lot of media via email, 1GB (or 1024MB) should do the trick. That said, the amount of storage you can use will depend on your specific web hosting plan.
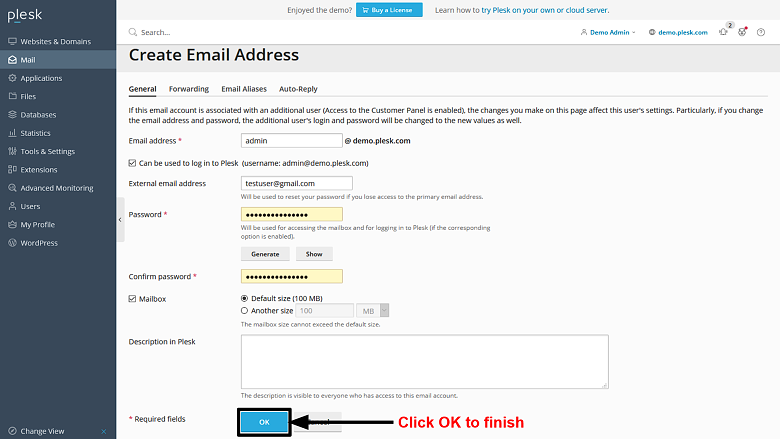
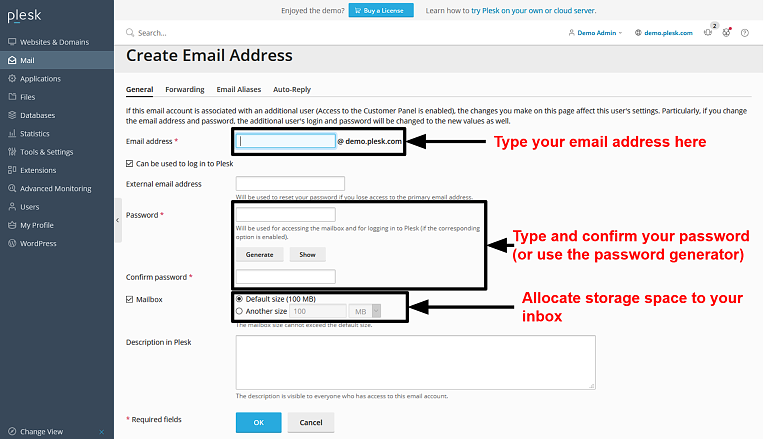 Before you click “OK”, the form should look something like this:
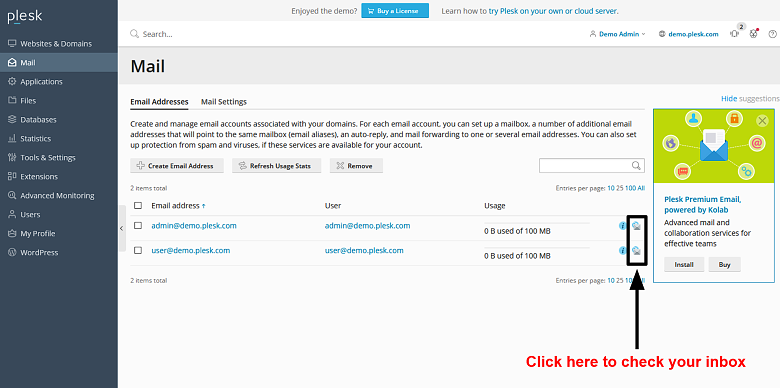
 Once the email is created, you can check your inbox by clicking the envelope icon (on the “Mail” screen). Easy.
Step 4 – Configure Your New Email Address
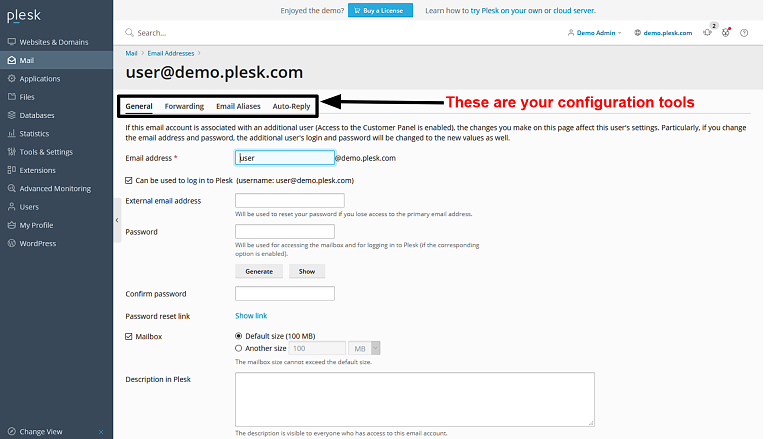
Plesk gives you three handy configuration tools that you can use to make the most of your business email. From the “Mail” screen, click on the address you want to configure.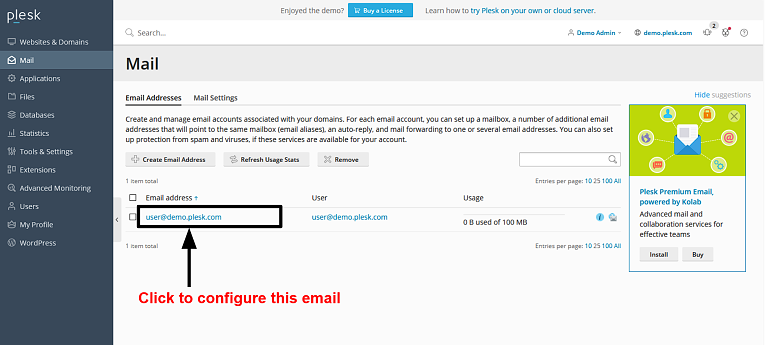 The configuration options appear at the top of the screen:
 The first option is to forward all emails to a different address. If you don’t get along with the webmail client provided by your host, no problem. Switch on mail forwarding, and type in your Gmail or Yahoo address to read your emails there.
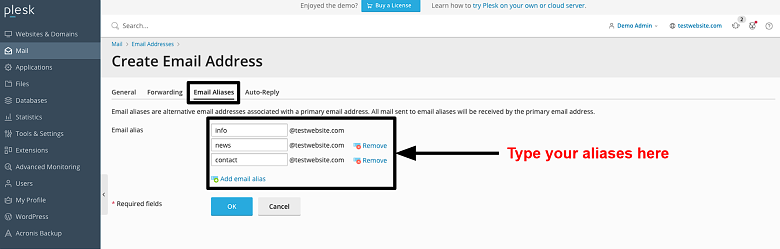
 You can also set up email aliases that’ll forward mail to a primary address. For example, if you want to set up different addresses for your business’ sales and customer support departments (but you intend to answer all of these emails yourself), you can do it here.
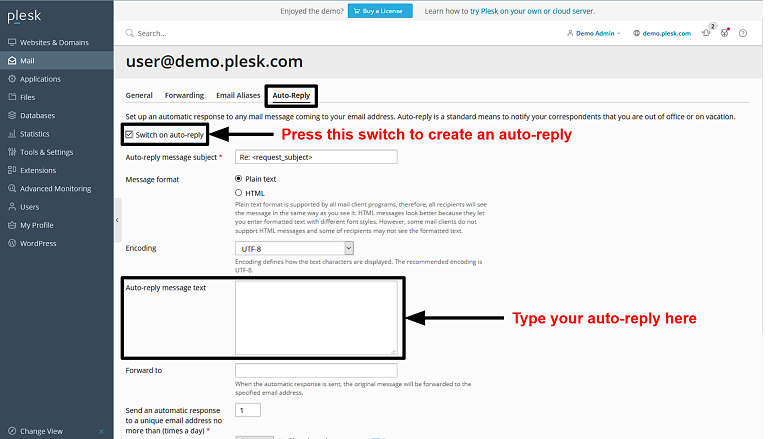
 Finally, you can set up an auto-reply to let clients know that you’re out of office. Simply activate the “auto-reply” feature, enter your message, and click apply. If you wish for the auto-reply to deactivate automatically on a specified date, you can find this option at the bottom of the screen.
 These are the most important email functions that come built into Plesk. That said, your host might give you multiple webmail clients and/or spam protection tools. You can see these features under the “Mail Settings” tab.
For instance, clicking on “Activate/Deactivate Services” lets you toggle spam protection for the selected domain.
These are the most important email functions that come built into Plesk. That said, your host might give you multiple webmail clients and/or spam protection tools. You can see these features under the “Mail Settings” tab.
For instance, clicking on “Activate/Deactivate Services” lets you toggle spam protection for the selected domain.